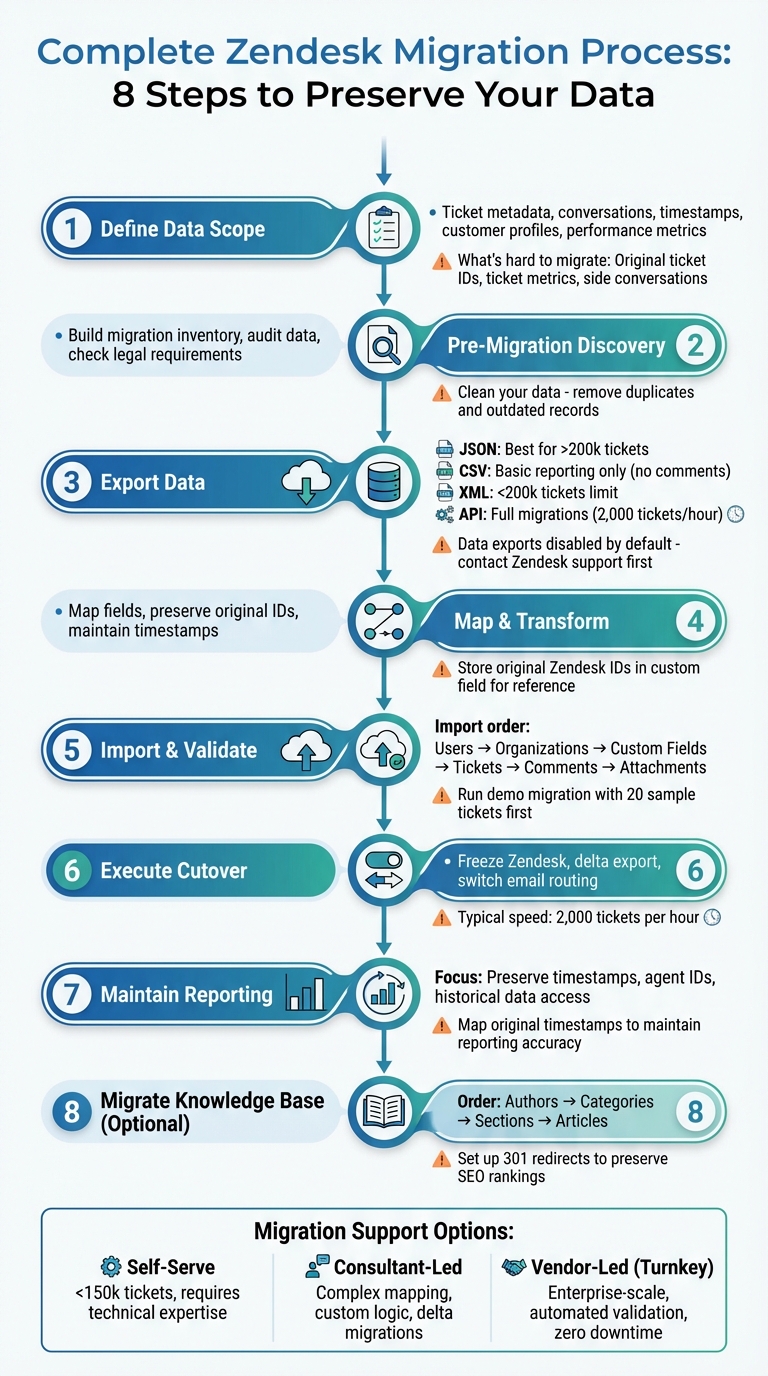
Switching from Zendesk to another platform without losing critical data like ticket history and customer details can seem daunting. But with the right steps, it’s entirely manageable. Here’s a quick overview of how to ensure a smooth migration:
- Identify what to preserve: Ticket metadata, conversations, timestamps, customer profiles, and performance metrics.
- Plan thoroughly: Audit your data, map fields, and clean up outdated records.
- Export data correctly: Use Zendesk’s JSON or API for comprehensive exports, including comments and attachments.
- Handle challenges: Original ticket IDs, metrics, and side conversations may require workarounds.
- Test and validate: Run a small-scale test migration to confirm data integrity before full import.
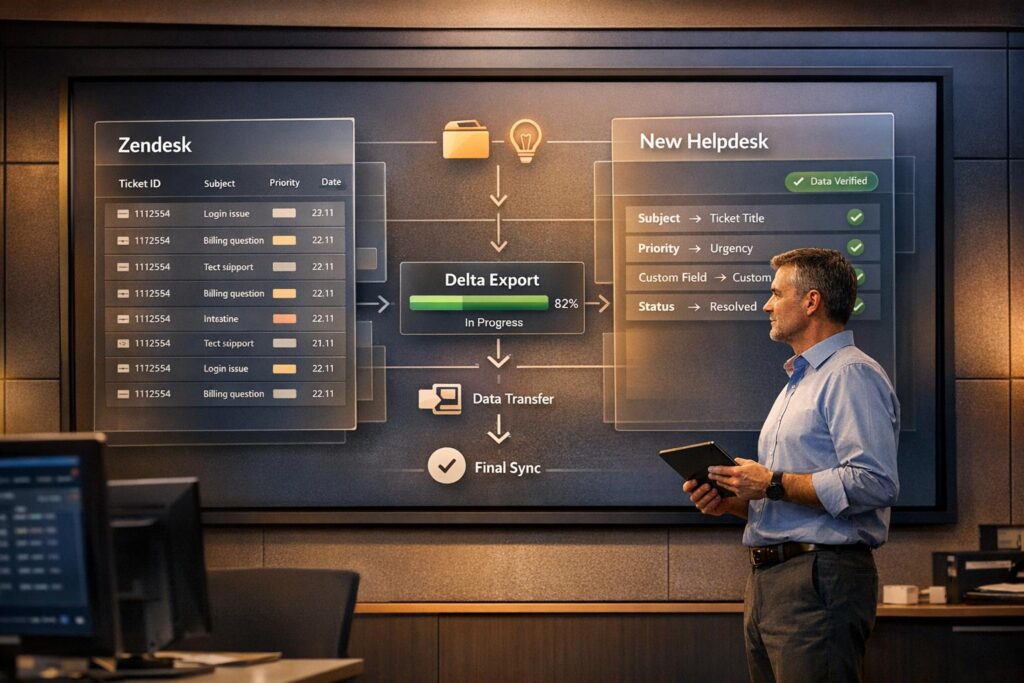
- Cutover carefully: Freeze Zendesk activity, perform a final sync, and update email routing.
- Post-migration checks: Validate records, ensure timestamps and IDs are preserved, and test workflows in the new system.
8-Step Zendesk Migration Process: From Planning to Cutover
Zendesk Import Tutorial: How to Run Zendesk Demo Migration?
Step 1: What ‘Not Losing Ticket History’ Actually Means
Before diving into exporting data, it’s crucial to understand what "ticket history" and "customer data" actually encompass – and what you can realistically preserve during the migration process.
What Data You Need to Preserve
Ticket history is more than just basic information. It includes several key elements:
- Ticket metadata: Details like ticket ID, status, priority, subject, and tags.
- Conversation content: Public comments, private notes, descriptions, and attachments (including inline images).
- Customer details: Information about requesters, submitters, CCs, organizations, and user profiles (names, emails, external IDs).
- Timestamps: Dates and times for creation, updates, assignments, and resolutions.
- Custom fields: Any custom ticket, user, or organization fields you’ve set up.
- Performance metrics: Data such as satisfaction scores, resolution times, reply times, reopens, and assignment history.
If you’re using Zendesk Guide, don’t forget to include knowledge base content – this covers articles, categories, sections, and translations.
What’s Hard to Migrate (and How to Work Around It)
Not everything transfers seamlessly. Here are some common challenges and practical workarounds:
- Original ticket IDs: Zendesk generates new ticket IDs during import. To maintain a reference to the original IDs, create a custom field in your new system and store them there for auditing purposes.
- Ticket metrics: Metrics like "First reply time" and "First resolution time" aren’t imported via standard APIs. Export these metrics from Zendesk and map them to custom fields in your new platform.
"Ticket metrics (First reply time and First resolution time, for example) are not imported for the ticket." – Carl McDowell, Zendesk Customer Care
- Side conversations: These don’t transfer by default. To retain internal context, convert them into private notes.
- Call recordings: These can often be migrated as MP3 attachments, but you may need specific activation or third-party tools for this.
- Audit trails and internal events: These are tricky to move with standard APIs. Archival exports may be required. Additionally, large tickets with extensive comment histories might need multiple API calls to retrieve all data. Keep in mind that standard CSV exports from Zendesk exclude deleted tickets, ticket comments, and descriptions. For a complete export, use JSON or XML formats instead.
Step 2: Pre-Migration Discovery (The Part Everyone Skips)
Skipping the discovery phase is one of the quickest ways to derail a migration project. This step is essential for uncovering hidden dependencies, avoiding surprises, and ensuring every critical data element is accounted for before moving forward. Think of it as laying the groundwork for a smooth migration.
Build Your Migration Inventory
Start by documenting all your Zendesk assets – this includes channels, custom fields, business rules, and integrations. Be thorough, as this inventory will help you capture both the obvious data and any informal workarounds your team might rely on.
Here’s what your inventory should include:
- Channels: Email, chat, web widget, social media, and any other ticket sources.
- Custom Fields: For tickets, users, and organizations – these need to be mapped to the new system’s fields.
- Business Rules: Triggers, automations, macros, SLAs – essential for recreating workflows while avoiding notification overload.
- Agent Roles and Groups: Ensure proper ticket ownership and group assignments.
- Knowledge Base: Categories, sections, articles, and inline images – preserve both public and internal documentation.
- Active Integrations: Tools like CRM systems, Slack, Jira, and others that your team depends on.
- Reporting Metrics: Key performance metrics such as resolution times, CSAT scores, and first reply times.
Important Notes:
- Zendesk data exports are disabled by default, so you’ll need to contact their support team to enable them.
- Temporarily disable required field conditions in ticket forms before migration. This will prevent import errors caused by missing values in older data.
Use this phase to clean your data. Identify and remove duplicates, outdated records, or anything unnecessary to migrate. Remember, Zendesk automatically changes "Solved" tickets to "Closed" after 28 days and archives them after 120 days. Decide whether these archived tickets need to be migrated or can remain behind.
| Inventory Category | Specific Items to Document | Purpose |
|---|---|---|
| Channels | Email, Chat, Web Widget, API, Social Media | Ensure all ticket sources are properly redirected. |
| Custom Fields | Ticket, User, and Organization custom fields | Map data types to the new system. |
| Business Rules | Triggers, Automations, SLAs, Macros | Recreate workflows and avoid workflow disruptions. |
| User Data | Active/Inactive Agents, Groups, Organizations | Retain ticket ownership and requester history. |
| Knowledge Base | Articles, Sections, Categories, Inline Images | Preserve self-service and internal resources. |
| Legal/Compliance | GDPR, HIPAA, Data Retention Policies | Ensure the migration meets legal requirements. |
Check Data Retention and Legal Requirements
Once your inventory is complete, review your organization’s data retention policies and legal obligations. Determine whether your data needs to comply with regulations like GDPR, HIPAA, or CCPA. This will help you decide what to migrate, what to archive, and what should be deleted.
"Data that no longer exists can’t be compromised in a breach, so regular deletion decreases both your compliance risk and your exposure to expensive data incidents." – Drata
Different regulations have varying retention requirements. For example:
- HIPAA: Healthcare records must be kept for at least 6 years from creation or last use.
- SOX: Financial records must be retained for 7 years.
- PCI DSS: Transaction logs must be kept for at least 1 year, with 3 months readily accessible.
Before migrating, utilize Zendesk’s built-in deletion schedules to purge archived tickets that don’t meet compliance standards. Use tools like the Zendesk Ticket Redaction app to remove sensitive information, such as credit card numbers or passwords, from ticket comments. Also, check if your industry or region has specific data residency requirements to determine where your migrated data should be stored.
Step 3: Export Your Data from Zendesk
Once you’ve completed your inventory, the next step is exporting your data. This ensures you have a complete and accurate dataset to work with during the migration process.
Export Methods and Their Capabilities
Zendesk provides three main export formats through its user interface: JSON, CSV, and XML. Each option serves different purposes, so it’s important to choose the one that fits your needs.
JSON Exports
This format is ideal for accounts with over 200,000 tickets. It uses Newline Delimited JSON (NDJSON), which is great for handling large datasets. However, there are a few caveats: if a single ticket exceeds 1 MB, its comments are excluded and flagged in a separate error file. For accounts with more than one million tickets, JSON exports are processed in 31-day increments. Additionally, JSON exports omit data with timestamps within six minutes of the export request to avoid capturing in-progress updates.
CSV Exports
CSV exports are the most basic option. They exclude ticket comments, descriptions, deleted tickets, and custom fields that are multi-line or multi-select. This makes them suitable for simple reporting or user lists but not for migrations where ticket history is critical.
XML Exports
XML exports include ticket comments and account settings, but they’re limited to accounts with fewer than 200,000 tickets. This option is better suited for smaller datasets.
For a complete migration, the Zendesk REST API is the best option. It allows you to export tickets, comments, users, organizations, and attachments with full metadata. The API processes about 2,000 tickets per hour. To speed things up, you can request Zendesk to temporarily increase your API rate limit before starting.
"To protect the data in your Zendesk account, data exports are not enabled by default… The account owner must contact Zendesk Customer Support to enable data exports." – Zendesk Support
| Export Method | Includes Comments? | Includes Attachments? | Best For | Key Limitations |
|---|---|---|---|---|
| JSON (UI) | Yes (unless ticket >1MB) | No | Large datasets (>200k tickets) | 31-day increments for >1M tickets; 6-minute data lag |
| CSV (UI) | No | No | Basic reporting/spreadsheets | No descriptions, deleted tickets, or multi-line fields |
| XML (UI) | Yes | No | Small accounts (<200k tickets) | Hard limit of 200,000 tickets |
| REST API | Yes | Yes (via specific endpoints) | Full migrations with attachments | Requires technical resources; subject to rate limits |
Before initiating your final export, make sure to disable triggers, automations, and mail notifications. This step prevents unwanted notifications from being sent to customers or accidental changes to your data during the cutover.
How to Export Attachments and Help Center Content
After completing your main export, you’ll need to secure attachments and Help Center content to ensure nothing critical is left behind.
For attachments, standard UI exports only provide metadata and links, not the actual files. To retrieve the files themselves, use the API to fetch the content_url for each attachment linked to ticket comments. Some third-party migration tools can automate this process, but be aware of their limitations – some only support up to 10 attachments per ticket.
When it comes to Knowledge Base content, Zendesk does not offer a native export option in the UI. Instead, you’ll need to rely on the Help Center API to extract articles, categories, and sections, or use third-party tools. If your Help Center includes videos or custom HTML, enable the "Display unsafe content" setting in Zendesk Guide before exporting. This ensures that HTML tags aren’t blocked during the export or import process.
"No export feature is available for Knowledge. For alternatives, see How can I export my help center content? [via API]" – Zendesk Support
One last detail to keep in mind: CSV exports follow your account’s default time zone, while JSON exports typically use UTC. This difference can lead to timestamp mismatches during validation. To avoid confusion later, document your time zone settings before exporting.
With your data securely exported, you’re ready to move on to mapping and transforming it in the next phase.
Step 4: Map and Transform Your Data
Once your data is exported, the next step is to align it with the structure of your new system. This process, known as data mapping, ensures that all tickets, user records, custom fields, and tags are correctly transferred without errors or missing information.
Map Zendesk Fields to Your New System
Data mapping involves matching Zendesk fields – like tickets, users, statuses, and custom fields – to equivalent fields in your new platform. Start by creating a mapping document that outlines each field in Zendesk and its corresponding field in the target system. This document should also include any rules for transforming the data during the migration.
Standard fields, such as "Ticket Subject", "Requester Email", and "Assignee", usually map directly to similar fields like "Subject", "Customer Email", and "Agent." The tricky part often lies with custom fields, which may require extra care. For example, Zendesk custom fields like drop-downs, multi-selects, and checkboxes often generate tags for reporting or workflows. These tags can persist even if the field is removed. To avoid issues, ensure data types are aligned – like converting Zendesk "Numeric" fields to "Integer" in the new system.
"Data mapping is the process of matching data fields within a system to specific fields in another system." – Taras Velychko, Help Desk Migration
In Zendesk, custom field data is stored in a custom_fields array, with each entry containing a unique identifier and value. When using APIs for migration, rely on the unique field ID rather than the display name, especially if multiple fields have similar names.
| Zendesk Field Type | Target Field Type | Notes |
|---|---|---|
| Drop-down | Single Select | Maps titles to options and tags to properties |
| Multi-select | Multiple Select | Allows multiple options to be selected |
| Text | Text (Single Line) | 65,536 character limit in Zendesk |
| Checkbox | Checkbox (Boolean) | Captures Yes/No values, often linked to tags |
| Numeric | Integer | No length restriction for ticket fields |
| Date | Date / Date Time | Zendesk saves dates in YYYY-MM-DD format |
If your new system doesn’t have direct equivalents for some fields, consider creating custom fields to replicate Zendesk’s data types (e.g., text, dropdown, checkbox). For more complex data that doesn’t fit cleanly, use private notes to store it. Before importing, disable any "required" field settings or validation rules (like regex checks) to prevent errors during migration.
Run a small-scale test migration to confirm that fields, tags, and custom statuses are mapped correctly. This step allows you to catch and fix any issues early. After completing your mapping document, test it thoroughly before proceeding with the full migration.
Preserve Original IDs and Timestamps
Most target systems generate new unique IDs during import, but you’ll want to retain the original Zendesk ticket IDs for historical reference. Add a dedicated custom field in the new system, such as "Legacy Zendesk ID", to store these IDs. This makes it easier to cross-reference old tickets or locate them when customers mention their original ticket numbers.
"Help Desk Migration doesn’t migrate source ticket IDs, as Zendesk sets ticket IDs and cannot be overwritten. You can add custom fields to source tickets with ID’s." – Help Desk Migration
To maintain historical accuracy, map Zendesk timestamps like "Created At", "Updated At", and "Solved At" to custom date fields in the new system. Many platforms replace these dates with the migration date, so preserving original timestamps is essential for reports like average resolution time or monthly ticket volume.
Time zone consistency is another key consideration. Zendesk JSON exports default to UTC, while CSV exports use your account’s time zone. Document your time zone settings before exporting and apply consistent conversion rules to ensure accurate data.
| Zendesk Field | Target System Mapping | Purpose |
|---|---|---|
| Ticket ID | Custom Field (e.g., "Legacy Zendesk ID") | Allows historical lookup and cross-referencing |
| Created At | Target "Created Date" Field | Keeps reporting data accurate |
| Updated At | Target "Last Modified" Field | Maintains audit trails |
| Requester ID | Target User/Contact ID | Links tickets to the correct users |
| Organization | Target Account/Company Field | Preserves B2B support relationships |
| Tags | Target Tags/Labels | Maintains categorization and filtering |
During your test migration, confirm that metadata like timestamps and user IDs remain intact. This step ensures that your mapping rules are functioning correctly before moving forward with the full data import. Once your mapping is validated and your metadata preserved, you’ll be ready to proceed to the import stage.
Step 5: Import Data and Validate Everything
Now that you’ve completed your data mapping, it’s time to move forward with the actual transfer. This step ensures that all critical data makes it to the new system intact. Import the data carefully and verify its accuracy along the way.
Import Order and Rate Limits
The sequence of your imports is crucial. Start with users and organizations, as these are the foundation for maintaining relational links – tickets can’t exist without their associated contacts, organizations, and agents in place. Once these are imported, move on to custom fields for tickets, users, and organizations. Afterward, import the tickets themselves, followed by their comments, attachments, and CSAT data.
Before starting, disable active automations, triggers, and email notifications, and set required field conditions to "Never." Zendesk migrations typically process around 2,000 tickets per hour. To avoid bottlenecks, contact both vendors to request a temporary increase in API rate limits. Breaking the import into smaller batches can also help minimize errors and make troubleshooting more manageable.
Run a demo migration first, using a small sample – 20 random tickets and articles will suffice. This test will help uncover any mapping errors or missing data, ensuring the relationships between records remain intact. If issues arise during this demo, they’ll likely show up in the full migration as well.
"Validation is your safety net – it confirms that everything moved as expected and continues to function correctly in the new system."
– Eric Klimuk, Founder and CTO, Supportbench
Once the data is imported, shift your attention to validating the results to catch any discrepancies early.
Validation Checklist
After the import, review everything to confirm the data’s accuracy. Start with the migration report, which will show how many records were successfully migrated, failed, or skipped. Compare the total number of tickets in Zendesk to the count in the new system to ensure nothing is missing.
Check sample tickets to verify that comments are attributed to the correct users, not default admin accounts, and that they appear in the proper chronological order. Look at custom fields – dropdowns, checkboxes, and text fields – to make sure they transferred correctly. Also, manually download and open attachments to confirm inline images and files are accessible and uncorrupted.
Ensure tickets are assigned to the right agents, linked to the correct organizations, and that original IDs, tags, and labels are present in the new system. Validate timestamps as well, keeping in mind that Zendesk uses UTC time, so you’ll need to check them against this standard.
| Validation Category | Verification Method |
|---|---|
| Record Integrity | Compare the counts of migrated, failed, and skipped records in your migration reports. |
| Conversation Flow | Sample tickets to confirm comments are in the correct chronological order. |
| Metadata | Ensure original IDs, tags, and labels are preserved in the target system. |
| User Mapping | Verify tickets are assigned to the correct agents and linked to the right organizations. |
| Attachment Check | Confirm inline images and file attachments are accessible and intact. |
Finally, test sample tickets with support agents to ensure everything works as expected. If you ran a demo migration earlier, delete those test records to avoid duplicates before the final cutover.
With everything validated, you’re ready to move on to the cutover plan with confidence.
sbb-itb-e60d259
Step 6: Execute Your Cutover Plan
Now that your import has been validated, it’s time to execute the final transition from Zendesk. This stage is all about timing – getting it right minimizes downtime, avoids data loss, and keeps your support operations running smoothly.
Final Data Freeze and Delta Export
To ensure a clean transition, halt all activity in Zendesk during the final export window. This means no new tickets, no edits, and no updates. Send a reminder to your team 24 hours in advance via email or calendar notifications.
"Consider temporarily freezing changes to the original system during migration. This prevents mismatches caused by last-minute edits or live data updates and ensures a consistent data set is being moved."
– Eric Klimuk, Founder and CTO, Supportbench
Once Zendesk is frozen, perform a delta export to capture any updates made since the initial migration. Before importing this final batch, disable automations and notifications in the new system to avoid any unintended actions.
If possible, request a temporary API rate limit increase to accelerate the delta export process. Typically, migrations handle around 2,000 tickets per hour, so a higher rate limit can significantly shorten the transition time. After the delta import is complete, run through your validation checklist to confirm everything is in place.
Once validated, proceed to update your routing settings.
Switch Email Routing and Notify Teams
Redirect your email routing by updating DNS settings or email forwarding rules to ensure all new customer requests go straight to your new system. Test a few sample tickets immediately to confirm they are being received, assigned, and responded to correctly.
For your internal teams, hold a quick morning check-in during the cutover week to address any immediate concerns. Additionally, set up a dedicated feedback channel, such as a Slack group, where agents can report issues like broken links or missing attachments.
For your customers, consider sending a notification in advance if you anticipate any delays or changes in your support channels. Update your "Contact Us" page or automated responses to reflect revised response times, if necessary. To lighten the load on your team during the cutover, promote your knowledge base as a self-service option for common questions.
| Cutover Step | Action Required | Purpose |
|---|---|---|
| Data Freeze | Stop all edits in the source Zendesk instance. | Ensures data consistency for the final export. |
| Delta Export | Run a final sync of records created/updated during migration. | Captures the gap data between the initial export and cutover. |
| Routing Switch | Update DNS/email forwarding to the new system. | Directs all new customer inquiries to the new platform. |
| Validation | Run test tickets and check agent assignments. | Confirms the new environment is fully operational. |
With the cutover complete and email routing updated, your support operations are ready to move forward seamlessly into the next phase, ensuring continuity in reporting and customer service.
Step 7: Maintain Reporting and Historical Data Access
Once your data import is complete, the next step is ensuring you can maintain reporting continuity. This is crucial for tracking long-term trends, evaluating agent performance over time, and answering questions about past customer interactions. Without a solid plan, these insights could be lost during migration.
How to Keep Reporting Continuity
To preserve reporting continuity, make sure you accurately map original timestamps, agent IDs, and ticket IDs during the migration. For added reliability, store the original ticket IDs in a custom field. This step is essential for keeping your data auditable and maintaining consistent reporting after the migration.
"Metadata (timestamps, user IDs) is accurate and unchanged." – Eric Klimuk, Founder and CTO of Supportbench
Keep in mind that CSV exports rely on your account’s default time zone, while JSON exports use UTC. Standardizing these time zones during the data transformation process is critical to avoid any inconsistencies. Ensure that key timestamp fields remain untouched throughout the migration. Similarly, map the original agent IDs to their corresponding profiles in the new system to retain historical ticket ownership. These steps are non-negotiable if you want to ensure accurate historical reporting in your updated support platform.
Additionally, archive your existing reports to create an audit baseline. It’s also a good idea to have your support agents review the historical data in the new system to confirm its accuracy. This hands-on validation can catch errors that automated checks might overlook, giving your team confidence in using the new system for both current and historical reporting needs.
Step 8: Migrate Your Knowledge Base (Optional)
If your migration plan includes a Knowledge Base, ensure the transition is smooth and well-organized. Unlike ticket migration, moving a Knowledge Base involves reworking the content structure and URLs. This step demands careful attention to formatting, images, and links to maintain content quality and protect your SEO rankings.
Export and Import Knowledge Base Articles
Once your tickets and data are migrated, it’s time to focus on your Knowledge Base. Since Help Center content typically needs to be extracted using APIs or third-party tools, plan this step in advance. To maintain the proper hierarchy, import the content in this order: Authors (as agents in your new system), Categories, Sections, and finally, Articles.
Preserve the formatting of your articles by transferring their HTML content through the API. Inline images must also be re-uploaded to the new platform to ensure they display correctly.
"Planning is critical. You’ll need to map the structure of your legacy content to your help center’s three-layer structure." – Skip Moore, Zendesk Employee
To safeguard your SEO rankings, set up 301 redirects from old article URLs to their new counterparts. Create a mapping document that pairs legacy URLs with the new URLs and collaborate with your IT team to implement these redirects at the DNS or web server level. This step prevents broken links and ensures that search engines transfer ranking authority to your updated Help Center. Retaining internal links and SEO during this process is just as important as preserving ticket history.
Before diving into a full migration, run a pilot test with a small batch of articles. This allows you to check for issues like character encoding, formatting errors, or broken internal links. Once these tests confirm everything is functioning as expected, you can proceed with the complete migration.
With your Knowledge Base successfully migrated and redirects in place, you’re ready to explore support options for the next phase.
Migration Help from Vendors
When planning your migration, it’s important to consider the support options available. The right choice depends on the size of your dataset and your team’s technical expertise. Each option comes with different levels of cost, control, and complexity.
Self-serve migrations work best for datasets with fewer than 150,000 tickets and for teams with technical know-how. Automated tools can efficiently transfer standard data, but they often miss elements like side conversations, call recordings, and tags. Your team will need to manage mapping errors, troubleshoot API issues, and ensure the results are accurate.
Consultant-led migrations involve hiring third-party experts, such as Helpando or Help Desk Migration. These professionals handle more complex tasks like advanced mapping, filtering, and custom logic that automated tools can’t manage. They may also offer "Delta Migrations", which capture records created after the initial transfer, ensuring no data is lost during the final cutover.
Vendor-led (turnkey) migrations are managed entirely by your new platform provider. This approach includes automated checks, validation workflows, and custom transformation rules from the start. For instance, Supportbench offers turnkey migrations at no cost when you switch to their platform. This option is ideal for enterprise-scale migrations or for teams that can’t spare resources from their daily responsibilities, as it reduces downtime and mitigates risks.
"Data migration is more than just copying files from one system to another – it’s a delicate, high-stakes process that can affect everything from day-to-day operations to long-term compliance." – Eric Klimuk, Founder and CTO, Supportbench
Before settling on an approach, it’s critical to run preliminary tests. Make sure custom fields, attachments, and agent assignments map correctly. Always audit your data beforehand – there’s no need to migrate spam or decade-old resolved tickets unless compliance requires it. With these migration support options in mind, you’ll be well-prepared to move forward with your plan.
Frequently Asked Questions
Here are answers to some common questions about Zendesk migrations, covering what to expect during and after the process.
Can I migrate all attachments and ensure they remain linked to the correct tickets?
Attachments aren’t included in CSV exports and may be excluded from JSON exports if ticket files exceed 1MB. To ensure all attachments are transferred and correctly linked, use the Zendesk API or a specialized migration tool to capture binary files. After migration, verify a sample of attachments to confirm everything is intact.
"Pay special attention to relational data. Ensure that links between records (such as tickets and users) remain intact after the transfer. Mismatched relationships are one of the most common sources of integrity issues in poorly executed migrations." – Eric Klimuk, Founder and CTO of Supportbench
Can I keep the same ticket IDs in my new system?
Most platforms will assign new ticket IDs during the import process. However, some vendor-led migration solutions allow you to save the original Zendesk IDs in a custom field, making cross-referencing possible.
How long does a typical migration take?
On average, migrations process about 2,000 tickets per hour. Depending on the amount of data and its complexity, the entire migration can take several days to a few weeks. A significant portion of this time is spent on planning and preparation.
What happens to SLAs and automations during migration?
SLAs and automations won’t activate for imported tickets. To avoid issues, disable these features in the target system before the migration begins. Tag imported tickets (e.g., migrated_from_zendesk) to ensure they are excluded from automation rules .
Can I migrate chat transcripts and side conversations?
Chat transcripts can usually be migrated if they are stored as ticket comments or attachments. Side conversations, however, may require additional steps, so it’s best to confirm this with your migration vendor. Call recordings can be converted into MP3 attachments during the process. Always test a sample of these records to ensure accuracy.
What’s the safest cutover method to avoid downtime?
A phased approach is recommended. First, freeze Zendesk activity and perform a delta export. Then, forward new emails to the new system and switch DNS once validation is complete. Running both systems in parallel during this phase helps reduce risks .
Will customers still have access to their old tickets in a portal?
Yes, as long as user accounts and ticket histories are migrated and requester relationships are properly mapped. Customers should be able to log in to the new portal and view their past tickets. Test this functionality with several customer accounts before finalizing the cutover.
How do I handle GDPR and data retention requirements?
Before migration, audit your data. There’s usually no need to migrate spam or very old resolved tickets unless required for compliance . Check your legal retention policies to identify which records must be kept. If you need to delete or anonymize certain data, complete that cleanup in Zendesk before exporting. Be sure to securely archive the original Zendesk export for compliance purposes.
What if I need to capture new tickets created during the migration?
Perform a delta migration to capture tickets created late in the process. Freezing Zendesk activity during the final migration phase ensures data consistency and prevents mismatches.
Do I need to increase API limits before starting?
Yes, it’s a good idea. Request a temporary increase to Zendesk’s API rate limits to handle high-volume migrations. This will speed up the transfer of large datasets and attachments, minimizing the risk of delays caused by hitting rate limits.
FAQs
What challenges should I expect when migrating ticket history from Zendesk?
Migrating ticket history from Zendesk can feel like a daunting task, especially when it comes to preserving ticket metadata like timestamps, agent assignments, statuses, and requesters. These details are crucial for keeping historical context intact and ensuring accurate reporting. However, many export tools struggle to fully capture workflows such as automations, triggers, and internal notes, which can result in functionality gaps during the migration.
Another tricky aspect is handling attachments and linked tickets. Attachments often need to be retrieved separately to maintain their integrity and original timestamps. Meanwhile, linked or parent-child ticket relationships can get disrupted due to ID changes during the import process. On top of that, mapping custom fields, tags, and other customer data accurately is essential to avoid errors and ensure a seamless transition.
To tackle these challenges, consider leveraging APIs for comprehensive data extraction. Validate the data thoroughly and plan for additional exports or manual documentation to address limitations, such as missing audit logs or intricate automations. A well-thought-out approach can make all the difference.
How can I ensure compliance with privacy laws and data security during migration?
When planning your migration, safeguarding sensitive data and adhering to compliance standards should be top priorities. Start with a thorough pre-migration review to pinpoint sensitive information, understand legal retention obligations, and outline access permissions. This step is crucial to avoid unauthorized access or accidental exposure of customer data.
For secure data transfer, rely on API-based exports over encrypted channels to protect information while it’s in transit. Restrict access to migration tools and exported files strictly to authorized personnel, and maintain detailed audit logs to monitor all activities. This approach not only enhances security but also aligns with privacy regulations like GDPR, which stress the importance of secure data handling and meticulous documentation.
Once the migration is complete, double-check that all data has been transferred correctly. Archive the original exports for record-keeping and compliance purposes. Taking these measures ensures you maintain strong governance practices and minimize the risks of data breaches or regulatory violations.
How can I ensure my data migration was successful?
To confirm your data migration went smoothly, start by checking the total number of tickets, users, and organizations that were transferred. Break this down by time periods, statuses, and other key attributes to ensure nothing has been overlooked.
After that, conduct spot checks on a selection of random tickets to verify conversation integrity. This means making sure all comments, internal notes, timestamps, and attachments have been preserved accurately. It’s also wise to focus on data from top customers or high-priority cases, ensuring key details like tags, custom fields, and SLAs are intact.
Lastly, review attachments and metadata, such as original ticket IDs and agent assignments, to confirm everything matches your expectations. While automated tools can speed up this process, manual validation is crucial for ensuring accuracy and catching any potential issues.