

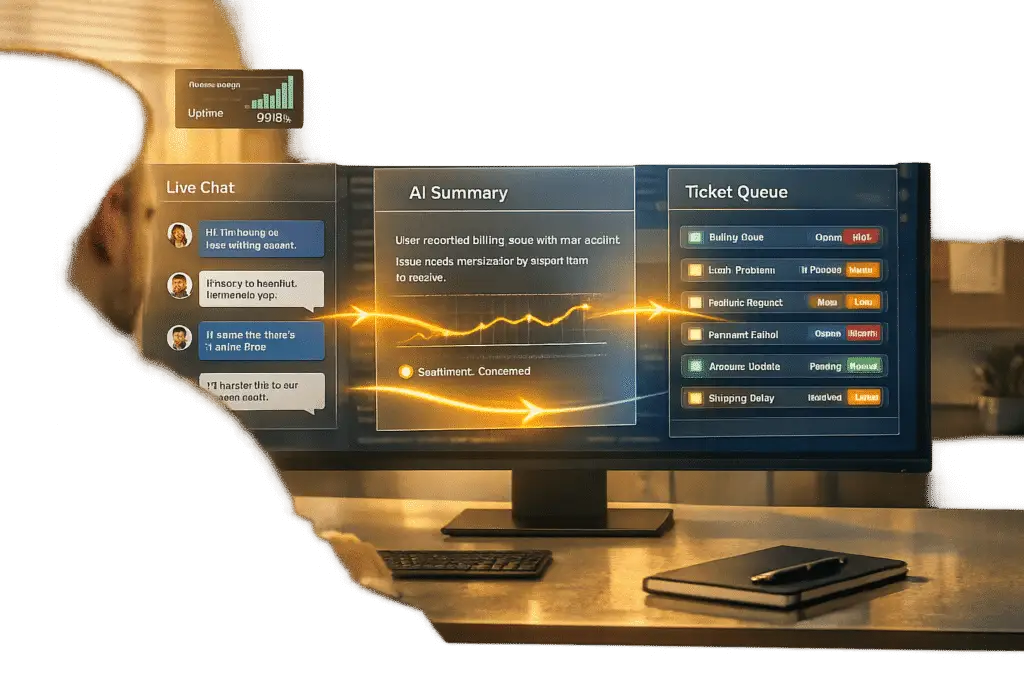
When using Intercom for live chat but managing tickets in a separate system, the key is creating a smooth workflow that avoids data silos, manual work, and fragmented customer experiences. Here’s how you can achieve this:
- Why separate systems? Intercom excels at real-time chat, while ticketing platforms handle complex, asynchronous workflows better. This split allows Tier 1 agents to handle quick queries in Intercom and escalate complex issues to Tier 2 or Tier 3 using a ticketing system.
- Challenges without integration: Without a proper connection, agents may face context fragmentation, manual data entry, and reporting gaps, leading to inefficiencies and customer dissatisfaction.
- Steps to streamline:
- Evaluate your current setup to identify inefficiencies and optimize your support workflows.
- Choose a ticketing system with strong integration features and AI-driven automation.
- Set up seamless integration using Intercom’s Data Connectors, mapping data fields, and enabling two-way sync.
- Leverage AI for tasks like summarizing conversations, routing tickets, and automating repetitive actions.
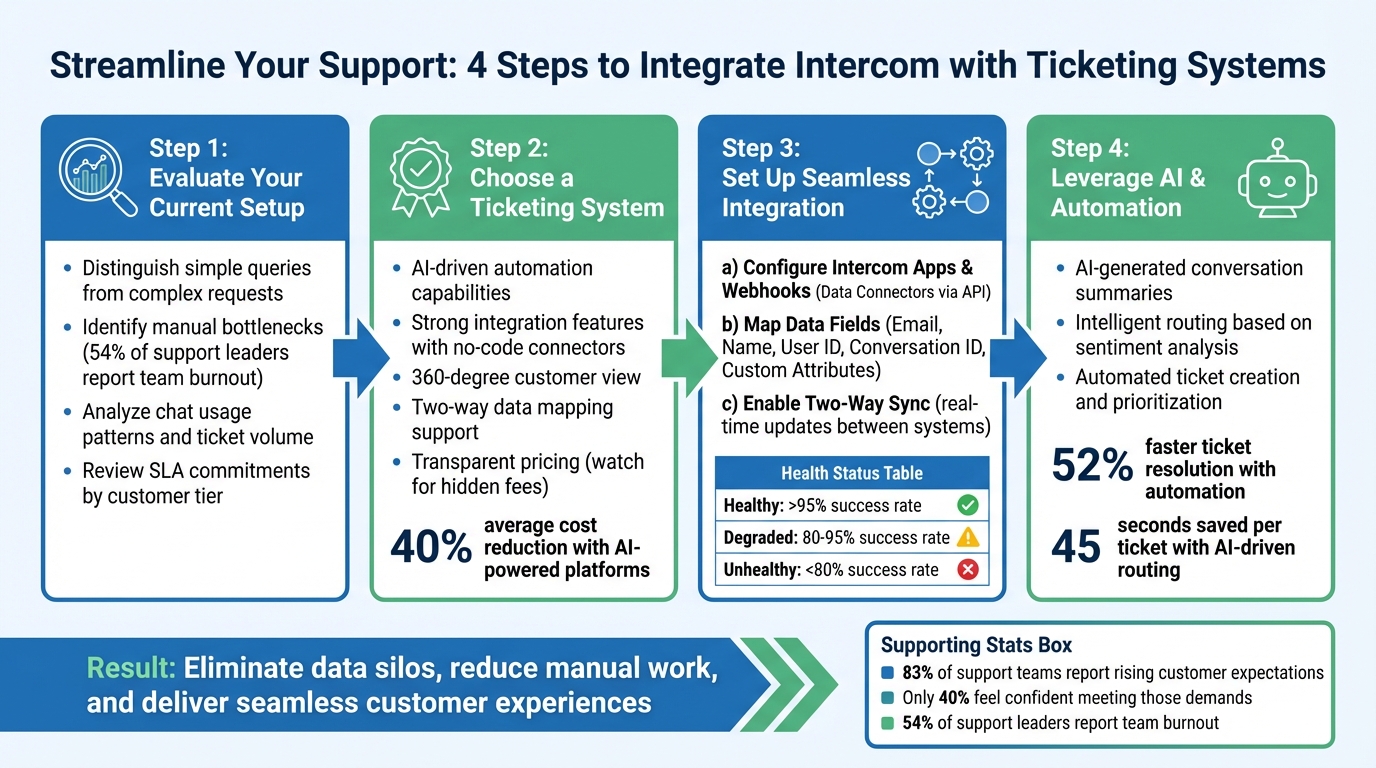
4-Step Workflow Integration Process: Connecting Intercom Chat to External Ticketing Systems
Evaluating Your Current Setup and Choosing a Ticketing System
Start by taking a close look at your current support operations. Review the types of issues your team handles, the volume of requests, and how much time agents spend on each task. This analysis helps uncover inefficiencies, especially in areas where smooth handoffs are lacking. One key step is distinguishing between simple queries and complex requests. For example, simple queries like "What’s my order status?" or "How do I reset my password?" can usually be resolved quickly through chat or automation. On the other hand, complex requests often require deeper investigation and collaboration across teams. If agents are spending too much time in tools like Intercom on cases that should be formal tickets, you’ve identified a major gap.
"A support ticket is employed for managing customer requests, as opposed to mere queries." – Intercom
Another critical step is identifying manual bottlenecks. Look for areas where agents are manually transferring data or searching across scattered information sources. These inefficiencies not only slow down resolutions but also contribute to burnout – something 54% of support leaders say their teams are already experiencing. Map out where your data resides and pinpoint where agents are losing time hunting for it.
Analyze Chat Usage and Ticket Volume
Dive into your Intercom data to spot patterns and triggers that indicate when a chat should escalate into a ticket. Common signals include unresolved issues after multiple back-and-forth messages, keywords like "outage" or "bug", or conversations that have stalled for several days. Also, examine customer segments like enterprise accounts or high-value users to see if they frequently require escalation to specialized teams.
Make sure to review your SLA commitments as well. If different customer tiers have varying response time requirements, your workflow should automatically prioritize these during handoffs. Without proper prioritization, an urgent issue from a Premier customer could end up delayed in the same queue as routine queries, potentially breaching your service agreements.
Once you’ve identified these patterns and requirements, you’ll be better equipped to choose a ticketing system that can handle these complexities seamlessly.
Choosing a Ticketing System
When selecting a ticketing system, focus on platforms that automate customer support workflows using AI-driven automation and strong integration capabilities. Look for systems with no-code connectors that bring live external data directly into the agent’s view. This eliminates the need for agents to jump between tools mid-conversation, saving time and reducing errors.
A modern ticketing platform should provide a 360-degree view of the customer. This means showing the entire history of interactions, products purchased, renewal dates, and performance metrics in one centralized dashboard. It should also support two-way data mapping, syncing Intercom conversation IDs, user details, and company attributes with corresponding fields in the ticketing system.
One standout option is Supportbench, designed specifically for cost-efficient, AI-powered B2B support. It uses intelligent routing based on sentiment analysis – not just basic keyword rules – ensuring that frustrated customers are escalated automatically. On average, Supportbench cuts operational costs by 40%. Unlike older systems that add AI as an afterthought, Supportbench integrates automation into every step, from ticket creation to resolution tracking.
When comparing platforms, don’t just look at upfront costs – consider hidden fees as well. Some systems may advertise low per-agent pricing but charge extra for critical features like advanced reporting, SLA management, or API access. Supportbench includes these features in its core package, making it a more transparent and predictable investment for growing teams. Choose a solution that supports cost-effective, AI-powered workflows tailored to modern B2B needs.
sbb-itb-e60d259
Setting Up the Integration Between Intercom and Your Ticketing System
Once you’ve chosen your ticketing platform, it’s time to connect it with Intercom. This integration ensures that chat conversations are seamlessly converted into tickets, eliminating the need for manual copying and pasting. The process involves three key steps: configuring the connection, mapping data fields, and enabling real-time updates between the two systems.
Configure Intercom Apps and Webhooks
Intercom’s Data Connectors make integration simple by sending live data to external systems and triggering actions like ticket creation. To begin, head to Settings > Integrations > Data connectors in Intercom. Enter the HTTPS URL of your ticketing system’s API endpoint and select the POST method to send data for creating new tickets.
For secure communication, include an authentication token in the HTTP Headers (e.g., Authorization: Bearer YOUR_TOKEN).
Next, use Workflows to control when and how Data Connectors are triggered. In the Workflow builder, add a "Collect data" step to gather necessary information from the conversation. Follow this with a "Data connector (using API)" step to automate the ticket creation process. For manual escalation, agents can use CMD + K (Mac) or Ctrl + K (Windows).
It’s essential to set up a fail path in your Workflows. If ticket creation fails – due to a timeout or API error – the fail path will notify agents or customers, ensuring no conversation is overlooked. Keep an eye on the Health column to monitor performance: "Healthy" means a success rate above 95%, while anything below 80% indicates serious issues that need attention.
| Health Status | Success Rate | What It Means |
|---|---|---|
| Healthy | > 95% | Operating optimally |
| Degraded | 80% – 95% | Experiencing issues; partially functional |
| Unhealthy | < 80% | Critical problems requiring immediate action |
Map Data Fields and Define Handoff Triggers
Accurate field mapping ensures that key information from Intercom is correctly displayed in your ticketing system. Start by mapping contact identity fields like Email, Name, and User ID to match Intercom users with existing records in your ticketing platform. Transfer the full chat transcript by mapping the Message.body attribute to the ticket’s "Comment" or "Description" field.
To maintain a link between the chat and the ticket, map the Intercom Conversation ID to an External ID field in your ticketing system. If your business uses Custom Data Attributes such as "Order ID", "Price Plan", or "Subscription End Date", map these to corresponding fields in your ticketing platform. This additional context helps agents resolve issues more effectively.
For handoff triggers, consider both automated and manual options. Automated triggers can include keywords like "urgent" or "escalate", unresolved conversations, or specific customer segments like enterprise accounts. Before activating a handoff trigger, ensure all required Conversation Data Attributes are collected using Intercom’s "Collect Data" blocks. This prevents incomplete tickets from being created.
To avoid duplicate profiles, match data types between systems. Use unique identifiers like User ID or Email when calling the ticketing system’s API.
Enable Two-Way Sync
Two-way synchronization ensures both systems stay updated in real time, so agents always have the latest information, no matter which platform they’re using. This reduces manual effort and improves efficiency, which is especially important for modern, AI-driven support operations. Intercom’s Data Connectors support GET, POST, PUT, PATCH, and DELETE operations, enabling tasks like reading ticket statuses, updating records, or creating new entries.
Set up webhooks and ticket-specific triggers to ensure updates flow smoothly between systems. For instance, when an agent updates a ticket in the ticketing system, a webhook can push that change back to Intercom, automatically updating the conversation’s status. Use the Data Connector Execution Webhook to monitor real-time events and maintain dashboards.
To avoid duplicate records, map the external system’s ID to Intercom’s external_id and test with a GET request. Keep in mind that Data Connectors have a 15-second timeout limit. If your API is slow, consider optimizing or splitting the request. Execution logs are stored for 7 days, which can be useful for troubleshooting.
Before launching the integration, use the "Used by" view in Intercom to check which Workflows, Macros, or Custom Answers depend on a specific Data Connector. This review step helps avoid breaking dependencies when making changes. With everything set up and monitored, your integration will handle thousands of handoffs effortlessly, allowing your team to focus on resolving customer issues instead of managing data transfers. The real-time sync ensures a smooth transition from chat to tickets, keeping your support workflow efficient and reliable.
Improving Workflows with AI and Automation
Now that your integration is in place, it’s time to let AI do the heavy lifting. By automating repetitive tasks, AI frees up your team to focus on solving more challenging customer issues, boosting both efficiency and productivity.
Use AI for Case Summaries and Routing
One of the most practical uses of AI is in summarizing conversations. Instead of having agents sift through entire chat histories, tools like Intercom Workflows can automatically create concise conversation summaries using the "Add summary note" action. These summaries are posted as internal notes, giving agents in your ticketing system instant context. Keep in mind, there are limits to how many summaries can be generated, so it’s important to set thresholds that align with your needs.
To implement this, head over to Fin AI Agent > Workflows and create a new workflow. Start by adding the "Add summary note" action, then follow it with a "Data connector (using API)" step. This will push the AI-generated summary – along with other key details – into your ticketing system. The result? When a chat escalates, the receiving agent gets a quick, AI-generated recap instead of a lengthy transcript.
AI can also transform how tickets are routed. By analyzing intent, sentiment, and customer data, AI ensures that tickets land with the right team immediately. Unlike rigid keyword-based rules, AI’s natural language processing capabilities can interpret customer needs more accurately. For instance, if a message shows signs of frustration or mentions a high-value account, AI can prioritize the ticket and send it to a senior specialist – even without the customer explicitly using words like "urgent." Studies show that companies using automation resolve tickets 52% faster than those relying on manual processes. Additionally, AI-driven ticket routing saves support teams an average of 45 seconds per ticket compared to traditional triage methods.
To set up routing triggers in Intercom Workflows, use a "Collect data" step to gather details like email, issue type, or account tier. Then, trigger a Data Connector to take action. For example, if a conversation is tagged with "Feature Request", you can configure a workflow to automatically create a Jira issue, ensuring that product feedback reaches the right team without manual intervention.
Lastly, make sure the AI-generated insights are synced across platforms like Salesforce to maintain consistent, real-time visibility.
Sync AI-Generated Data Between Systems
Two-way synchronization is key to ensuring that AI-generated insights – such as summaries, sentiment scores, or routing decisions – are shared seamlessly between Intercom and your ticketing system. This prevents data silos and ensures that agents on both platforms have access to the same up-to-date information. Intercom’s Data Connectors make real-time syncing easy.
For more complex scenarios, like reformatting AI insights before sending them to your ticketing platform, you can use Python code blocks within Intercom’s Data Connectors to customize data structures as needed.
Testing, Monitoring, and Troubleshooting Your Workflow
Once your integration is live, it’s crucial to ensure it functions as intended and remains reliable. Testing helps catch issues early, while continuous monitoring lets you address problems before they impact your customers.
Run End-to-End Testing
Before fully rolling out your integration, test the entire workflow – from the initial chat to ticket resolution. Intercom’s "Test response" feature can validate your API connection during the Data Connector setup, ensuring data is correctly mapped to your ticketing system. Start with GET requests whenever possible to safely read data without risking unintended changes or deletions in your external system during testing.
Once the API passes initial tests, simulate real customer interactions. Send test messages through Intercom that align with your workflow triggers, and track how the data flows into your ticketing system. Be sure all necessary conversation attributes are captured before the Data Connector activates, as auto-created tickets may leave required fields empty. Use the "Troubleshoot Workflows" tool to review a chronological timeline of trigger events for specific conversations. This feature highlights which conditions were met or failed, making it easier to pinpoint issues. Keep in mind that troubleshooting logs are retained for 30 days, so document any problems promptly.
Once your tests confirm everything is working as expected, shift focus to monitoring performance metrics to ensure long-term success.
Track Key Metrics
Keeping an eye on key metrics can reveal whether your workflow is running smoothly or needs fine-tuning. Intercom categorizes Data Connectors based on success rates and latency thresholds, making it easier to evaluate performance.
Focus on both external and internal latency to catch issues early. The default timeout for external APIs is 15 seconds – if your API is slow, you’ll need to optimize it. Monitor HTTP status codes to identify recurring errors; repeated 500 errors or timeouts indicate underlying problems that require immediate attention. Data Connector logs are available for 7 days, giving you a limited window to investigate failures.
For real-time monitoring, set up the Data Connector Execution Webhook to feed data into external dashboards. This allows you to proactively track SLAs and receive alerts before minor issues escalate into larger problems.
If you notice anomalies in these metrics, use the troubleshooting steps below to resolve them effectively.
Fix Common Problems
When your metrics point to an issue, here are some common problems and their solutions to get your workflow back on track:
| Common Problem | Impact | Solution |
|---|---|---|
| Sync Delays / Latency | Slow ticket creation; poor customer experience | Check "External Latency" metrics and confirm the external API isn’t hitting rate limits. |
| Duplicate Records | Messy data in the ticketing system | Verify the ID is mapped to the external_id field as outlined during the integration setup. |
| Unassigned Tickets | Tickets remain in "Unassigned" folder; missed SLAs | Add explicit "Assign to team" actions and check for "Away" status in Round Robin settings. |
| Workflow Conflicts | Reassignments or double-triggering | Use tags (e.g., "Tag is not X") to prevent multiple workflows from triggering on the same event. |
| Audience Mismatch | Workflow fails for specific users | Ensure the workflow audience includes both "Users" and "Leads" if applicable. |
| Data Connector Timeout | API integration fails to complete | Optimize the external API response time to stay within the 15-second limit. |
If workflows aren’t triggering as they should, double-check the priority list – only the highest-priority workflow will run for customer-facing scenarios. Additionally, outdated Inbox rules can interfere with newer automations, so disable or migrate them to avoid unexpected behavior. Finally, always configure a "fail path" in your workflows. This ensures users receive context or alternative options when an API call fails.
Conclusion
Managing chat and tickets across separate platforms doesn’t have to be overwhelming. By keeping Intercom for live chat and using a dedicated system for ticket management, you can harness the strengths of both: quick, conversational support for straightforward issues and organized, long-term tracking for more complex cases that require teamwork.
To make this work smoothly, seamless handoffs are essential. Automating processes with tools like Data Connectors and Workflows can simplify ticket creation, link conversation IDs to external ticket IDs, and ensure agents always have the context they need when an issue escalates. This not only spares customers from repeating themselves but also helps your team avoid juggling disconnected tools.
With customer expectations on the rise – 83% of support teams report this – and only 40% feeling confident in meeting those demands, automation becomes a game-changer. Features like AI-powered routing, AI case summaries, and two-way system syncing allow you to scale support effectively without compromising quality or adding more staff.
Once your integration is live, keep a close eye on success rates, address latency issues, and resolve problems like duplicate records or unassigned tickets before they grow into bigger challenges. This guide provides a step-by-step approach to help you move from setup to optimization, ensuring faster resolutions and improved customer experiences – all while maintaining your existing support tools.
Start small with a single workflow, test it thoroughly, and then expand. When done right, integrating these systems transforms them into a unified, efficient operation.
FAQs
What should trigger a chat-to-ticket handoff?
When a chat-to-ticket handoff is necessary, it typically happens when the AI or support agent determines that the issue requires human involvement or can’t be resolved automatically. This ensures that situations beyond the AI’s capabilities are directed to the right channel, guaranteeing the customer gets the support they need.
How do I prevent duplicate users and tickets across systems?
To prevent duplicate users and tickets during an Intercom integration with another system, rely on unique identifiers such as email addresses or user IDs to sync user profiles accurately. Ensure the integration is configured to verify if a user already exists before creating a new one.
For tickets, use shared identifiers like ticket IDs to link systems effectively. Additionally, set up automation rules to detect and merge duplicates by analyzing criteria such as matching subjects or overlapping customer details. This approach keeps your data clean and organized.
What’s the minimum data a ticket needs from Intercom?
To ensure smooth ticket identification and processing, an Intercom ticket must include key attributes such as the ticket type and other relevant fields. These attributes are set up through the Data Connector, which makes fields like ticket type mandatory for seamless handling and integration.