
Switching to Help Scout can feel daunting, but a structured plan can make the process smoother. The key is to focus on preventing downtime, avoiding missed messages, and ensuring your team is prepared. Here’s how to approach it:
- Audit your current system: Identify all support channels, email aliases, and workflows to ensure nothing is overlooked.
- Plan your data migration: Map old system elements (e.g., "Tickets" become "Conversations") and prepare for manual updates like recreating workflows.
- Test before going live: Use a staging environment to run small-scale imports and troubleshoot issues.
- Coordinate the cutover: Switch email forwarding and other ticket sources to Help Scout before the final data import.
- Monitor post-migration: Verify data accuracy, train agents on Help Scout, and track performance metrics to optimize operations.
A well-executed migration ensures a smooth transition for your team and uninterrupted support for your customers.
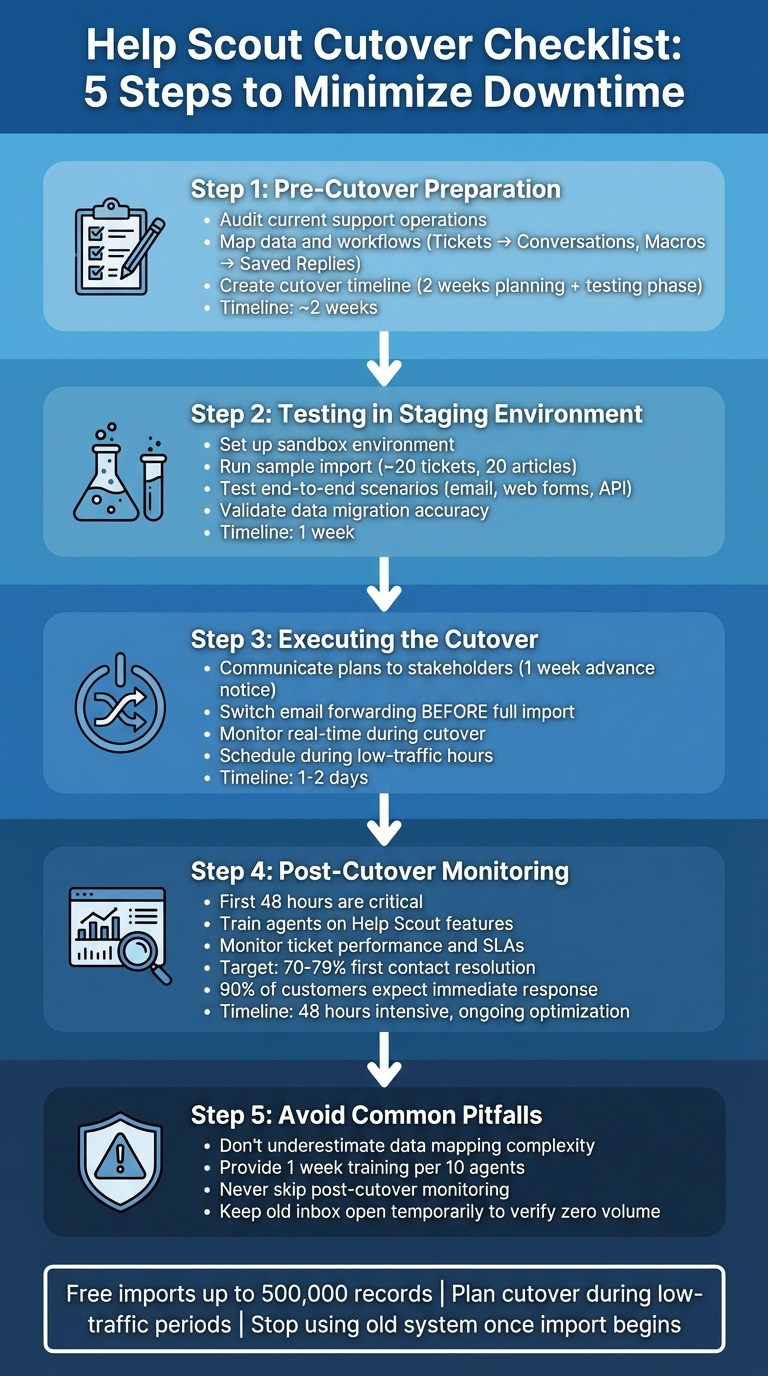
Help Scout Migration Checklist: 5-Step Cutover Process
Step 1: Pre-Cutover Preparation
Before starting your migration, make sure to document every support channel you currently use. This includes your main support inbox, email aliases, website contact forms, social media accounts, and phone systems that generate tickets. Even one missed entry point could result in lost customer messages.
Audit Your Current Support Operations
Take stock of everything in your system that won’t transfer automatically. Items like macros, triggers, and workflows need to be manually recreated in Help Scout as Saved Replies and Workflows. It’s also a great opportunity to clean up outdated content. As Aprill Allen from Knowledge Bird points out:
"Often you’ll end up with stale content, or content that’s been written from the perspective of a technical person and not from a customer."
Review and update your tags, fix typos, and ensure your saved replies and knowledge base articles are accurate. Pay attention to internal links and article dates, as these may need manual adjustments after the migration. Another key step: verify that agent email addresses match between systems. If they don’t, historical tickets might not assign correctly. Also, avoid deactivating end-users in your current system before migration – this could lead to case transfer failures.
Once your support operations are documented and cleaned, you’re ready to map your data and workflows.
Map Out Data and Workflow Migration
Start by aligning your current platform’s elements with Help Scout’s structure. For example, "Tickets" in your old system become "Conversations" in Help Scout, and "Macros" transform into "Saved Replies." Ticket statuses are simplified into three categories: Active, Pending, and Closed. Create a mapping table early to avoid confusion. For instance, if your current system uses both "Solved" and "Resolved" statuses, both will need to map to "Closed" in Help Scout.
Custom fields require special attention. Help Scout doesn’t handle ticket types or custom statuses in the same way as other platforms. You’ll need to decide whether to use Custom Fields, Tags, or Folders instead. If you’re migrating contact-level custom fields, they might need to be added to Contact Notes as a workaround. Be cautious with tickets containing over 100 comments – some migration tools may split these into multiple conversations. Before importing your data, manually set up all Users and Inboxes in Help Scout to ensure everything lands in the right place.
Once your mapping is complete, it’s time to outline a clear cutover schedule.
Create a Cutover Timeline
Plan your migration in phases, assigning specific dates to each step. Without a timeline, you risk delays or even data loss. Typically, you’ll need about two weeks for planning and auditing. During this time, your team can also familiarize themselves with Help Scout by experimenting with its features. Next comes testing and QA, where your best support agents validate workflows and check data accuracy.
Schedule the full data import during low-traffic hours, such as early mornings or weekends. Coordinate the switch for email forwarding and other ticket sources to Help Scout right before the import begins. This prevents tickets from getting stuck in your old system. Once the import is underway, your team should stop using the legacy platform and work exclusively in Help Scout. Build in some buffer time for each phase. As ClonePartner wisely notes, "A flexible timeline is a realistic timeline". If you’re importing more than 500,000 records, remember to account for the additional cost of $500 for every extra 500,000 records beyond the free tier.
sbb-itb-e60d259
Step 2: Testing in a Staging Environment
After laying the groundwork with data mapping and a pre-cutover timeline, the next step is rigorous testing in a controlled staging environment. This phase helps catch potential issues before they impact your customers. A staging environment provides the perfect space to identify data errors, broken workflows, and integration problems. Essentially, it acts as a bridge between your pre-cutover planning and the live migration. Start by adding team members at Manage > Users so they can familiarize themselves with the interface and experiment with features before real data is introduced.
Set Up a Sandbox Environment
In the sandbox environment, begin by manually creating Users and Inboxes to ensure your test data maps correctly to agents and mailboxes. Use the Import2 tool to perform a "Sample Import", which brings over a small, manageable subset of data – typically around 20 tickets and 20 articles. Before initiating the import, tag these tickets in your current system with a unique identifier like imported so you can easily locate them in Help Scout. To avoid accidental notifications during testing, disable all agent and customer email alerts in the staging environment.
Run End-to-End Test Scenarios
Simulate real-world scenarios by sending test tickets through email, web forms, and API to verify proper routing and agent notifications. Test key features like collision detection by having two agents open the same conversation simultaneously to ensure the warning displays correctly. Confirm that @mentions trigger notifications and that status changes – such as Active, Pending, or Closed – move conversations into the appropriate folders. Additionally, recreate and test saved replies and workflow automations to ensure they work as intended. These tests are critical for ensuring you’re ready for the live migration.
Validate Data Migration Accuracy
After completing the sample import, download migration reports to check the success of your data transfer. Involve your support agents in this process – they’re familiar with customer histories and can quickly spot missing conversations or incorrect assignments. Pay close attention to details like comment authors, timestamps, attachments, and custom fields to ensure everything has been accurately preserved. Look out for broken internal links in knowledge base articles, as these often require manual corrections. If your system includes complex tickets with numerous replies or extensive notes, consider running a "Custom Demo Migration" to test those specific cases. Once you’re confident in the data’s accuracy, delete the test data and get ready for the actual cutover.
Step 3: Executing the Cutover
This is the moment where everything comes together. The cutover phase is where timing and coordination make all the difference – either you transition smoothly, or you risk missed tickets and confusion. The key? Switch every incoming ticket source to Help Scout before starting your full data import. This ensures new conversations flow directly into the system, bridging your testing phase with live operations.
Communicate Cutover Plans to Stakeholders
Keep your support team in the loop well ahead of time. Share the exact cutover date and time at least a week in advance, and follow up with a reminder 24 hours before the migration starts. Assign specific roles to team members: one to monitor email forwarding, another to oversee the migration dashboard, and someone to handle urgent customer requests. To make the transition smoother, provide a cheat sheet that translates terminology from your old system to Help Scout’s. Clear communication like this is critical for avoiding downtime and ensuring accurate ticket routing.
Consider a Phased Rollout (Optional)
For teams managing multiple departments, a phased rollout can be a safer option. By migrating one mailbox at a time, you reduce the risk of widespread issues. If something goes wrong during the first migration, you’ll have time to fix it before moving on to other teams. Schedule your cutover for a low-volume support day, like a weekend or holiday, to ease the pressure on your team. Before starting, double-check that all agent profiles are set up in Help Scout. This ensures tickets are assigned correctly from the start.
Whether you opt for a phased approach or a full cutover, real-time monitoring remains essential.
Monitor in Real-Time During Cutover
Once the full import begins, your team needs to stop using the old system immediately. Help Scout emphasizes this point:
"Your team should stop working from the previous email or help desk when you start the full import – they should only be working from Help Scout once you start."
Before launching the full import, disable agent notifications and switch all ticket sources to Help Scout. Use the live migration dashboard to keep track of progress. If possible, hold off on handling new tickets until the import is complete so your agents have access to complete customer histories. Real-time monitoring during this phase helps you avoid downtime and missed messages, keeping your migration on track.
Step 4: Post-Cutover Monitoring and Optimization
Once the cutover is complete, the next 48 hours are crucial. This is when potential issues can be identified and resolved before they escalate into customer complaints or SLA violations. Start by auditing all incoming sources – this includes old email aliases, forum-linked addresses, and API integrations – to ensure everything is correctly flowing into the Help Scout Inbox. Check for misassigned conversations, missing tags, or broken links in your knowledge base. Once the data is verified, shift your focus to preparing your team to work efficiently within the new system.
Train Agents on Help Scout Features
Training your agents on Help Scout’s features is essential to ensure a smooth transition. Focus on introducing the new terminology and workflows, such as adding notes, assigning conversations, and managing statuses using keyboard shortcuts. To make this process more effective:
- Set up a dedicated Slack channel for real-time Q&A during the transition.
- Use a test environment where agents can practice tasks like adding notes, assigning conversations, changing statuses (e.g., Pending or Closed), and navigating via keyboard shortcuts.
- Record screenshares that demonstrate how incoming support is organized into various views or folders.
As Aprill Allen from Knowledge Bird notes:
"Often you’ll end up with stale content, or content that’s been written from the perspective of a technical person and not from a customer."
This highlights the importance of ensuring your team is trained to approach tasks from the customer’s perspective.
Monitor Ticket Performance and SLAs
Help Scout’s reporting tools are invaluable for keeping tabs on ticket performance and SLA compliance. Use these tools to track response times, resolution metrics, and SLA adherence. Features like Views and Workflows can help flag conversations that are at risk of missing deadlines. Here’s how you can leverage Help Scout’s reports:
- All Channels Report: Analyze overall conversation volume and identify peak activity times.
- Email Report: Monitor reply and resolution rates to gauge team efficiency.
- Happiness Report: Track customer satisfaction ratings to uncover potential friction points in the customer experience.
Set up workflows to automatically escalate conversations that remain unaddressed within a specific timeframe. Additionally, create folders using "waiting since" criteria to highlight conversations nearing their deadlines.
Collect Feedback for Continuous Improvement
Gathering feedback is key to refining your processes. Simplify CSAT surveys to make it easier for customers to respond. For example, one team used a single-question survey that triggered immediate supervisor reviews for negative scores. Configure your feedback tool to automatically create tasks for supervisors whenever neutral or negative feedback is received.
Track "Was this article helpful?" ratings on Docs pages to identify outdated instructions or gaps in your self-service content. Regularly review saved replies and schedule cleanups to keep information relevant. Tim Jordan emphasizes:
"The difference between teams that simply collect feedback and those that use feedback well comes down to three things: asking the right questions at the right time, distinguishing signal from noise, and building systems that turn insights into action."
Use support trends – like recurring contact reasons, volume spikes after updates, and tag usage – to uncover hidden friction points that may not show up in surveys. Incorporate specific customer comments into one-on-one sessions to better understand the underlying reasons for improvement, rather than relying on generic advice.
Step 5: Common Pitfalls to Avoid During Migration
Even with careful preparation, migrations can derail quickly. The difference between a seamless transition and a chaotic one often comes down to steering clear of three key mistakes that can overwhelm support teams.
Underestimating Data Mapping Complexity
Data mapping is often where migrations face their first major challenge. Different platforms use entirely unique terminologies – what one system calls "Open" might be "Active" in Help Scout, and "Resolved" could translate to "Closed." The real hurdle, though, lies in field compatibility. For example, Help Scout doesn’t offer native ticket types or custom statuses like some other platforms. You’ll need to replicate these using Tags, Folders, or Custom Fields.
Another consideration is Help Scout’s 100-comment limit per ticket, which might require splitting long conversations. Additionally, importing knowledge base articles may need specialized tools that reset creation dates. Adopting knowledge-centric solutions during this phase can help maintain documentation accuracy. To avoid surprises, run a demo migration with about 20 tickets to ensure fields, attachments, and relationships are mapped correctly. If you’re migrating custom contact-level data that Help Scout doesn’t support natively, transfer that information into Contact Notes instead. Be sure to disable outgoing notifications during the process – you don’t want customers receiving a flood of alerts for old tickets.
Taking these technical steps early can help you avoid headaches later, as detailed in subsequent training and implementation strategies.
As Anh Kato, Senior Support Engineer at Oliver Wight, shares:
"Help Desk Migration is a time saver! I would do it again if I ever needed to migrate from one help desk tool to another… It’s worth every penny as it saved me lots of time."
Neglecting Agent Training
Technical obstacles are only part of the equation – human factors can be just as critical. Skipping proper training risks lowering your team’s efficiency and morale. Without a clear understanding of features like Collision Detection or AI drafting, agents might send duplicate responses or reduce the quality of customer interactions.
Even though Help Scout is known for its ease of use (earning a 4.4/5 rating on G2), transitioning from enterprise platforms like Zendesk often demands at least one week of training for every 10 agents on your team.
Before the cutover, give your team hands-on time with Help Scout. Set up a test environment where they can practice @mentions, collision detection, and status changes. Assign real-world scenarios, such as creating saved replies or starting new conversations. To help agents get up to speed faster, enroll them in Help Scout’s live or pre-recorded training sessions. Heidi Harris, Head of Learning and Development at Help Scout, highlights the importance of ongoing learning:
"When team members are learning and continually improving, then they’re equipped to contribute even more impact to help us succeed."
Skipping Post-Cutover Monitoring
Even after a smooth migration, failing to monitor post-cutover activity can undermine your progress. Active monitoring is crucial to avoid stranded tickets, which occur when new conversations are still routed to your old help desk due to overlooked API integrations or outdated email aliases. Without this step, errors like misassigned conversations or incorrect tags can linger unnoticed.
Keep your old inbox open temporarily to confirm ticket volume has dropped to zero. If new tickets appear, it’s likely due to a missed source – perhaps a forum link or web form still tied to the old system. Double-check your Outgoing Email Settings in Help Scout to ensure customer replies are being sent correctly. Additionally, verify that knowledge base links, conversation threads, and custom field mappings are functioning as expected.
Make sure your entire team transitions to Help Scout as soon as the full import begins. Help Scout’s documentation offers this critical reminder:
"Switch over your email forwarding… so that new conversations are going to Help Scout before you start the full import to avoid tickets being stranded in your old help desk."
Conclusion: Ensuring a Smooth Transition to Help Scout
To wrap up your Help Scout migration effectively, focus on three core actions: thorough preparation, rigorous testing, and active post-cutover monitoring. One critical step in the process is redirecting your email forwarding just before the full import. This minimizes the risk of leaving tickets behind. Before reaching this phase, ensure you’ve audited every support channel – including overlooked elements like forum aliases and third-party integrations – and confirmed that agent profiles and data mappings are fully set up.
Testing is non-negotiable. As Aprill Allen from Knowledge Bird aptly states:
"Failure to test… [is] the most common overarching cause of problems."
Keep in mind that workflows, saved replies, and knowledge base articles typically don’t migrate automatically. You’ll need to recreate these manually or leverage the API to ensure nothing essential is left behind.
When the full import begins, make sure your team stops working in the old help desk entirely. This avoids fragmented ticket histories and ensures all new inquiries are routed directly into Help Scout.
The post-cutover phase is where you can fine-tune your operations for long-term success. Monitor key metrics like first contact resolution rates (targeting 70%–79%) and response times. Research shows that 90% of customers expect an immediate response, with 60% seeing a 10-minute turnaround as acceptable. Additionally, nearly 90% of buyers now value customer experience as much as the product itself. Use this transition as an opportunity to refine and improve your workflows rather than simply replicating old systems. Tools like real-time monitoring and built-in AI insights can help you optimize performance further.
To ensure a smooth process, plan your cutover during low-traffic periods, disable agent notifications during the import, and use the migration as a chance to simplify and streamline your digital processes. Help Scout offers free imports for up to 500,000 records, taking much of the technical burden off your plate. This allows you to concentrate on the human side of the transition – ensuring your team is set up for success in the new environment.
FAQs
How long should a Help Scout cutover take?
When transitioning to Help Scout, the cutover process can span anywhere from several days to a few weeks. The timeline largely depends on how complex the setup is and the amount of data being transferred. Key steps in this process include pre-migration planning, testing the system, and implementing changes in phases. This phased approach helps reduce downtime and ensures everything runs smoothly. Careful preparation and active monitoring are essential to avoid issues like missed replies during the transition.
What should we do with custom fields and ticket types?
When moving to Help Scout, it’s crucial to organize custom fields and ticket types to keep your data consistent. Start by auditing and standardizing your custom fields to avoid any confusion later. During the migration, carefully map these fields to ensure everything aligns properly. Custom fields can serve as a substitute for ticket types by helping you categorize, prioritize, or diagnose conversations effectively.
Make sure to validate all data transfers to preserve reporting accuracy and reduce any potential hiccups. Using automation tools can simplify the process, especially if you’re importing data from a different platform.
How do we prevent missed emails during the import?
To make sure no emails slip through the cracks when importing data into Help Scout, it’s important to follow a clear and organized process. Start by creating a backup of all your data – this ensures you have a safety net in case something goes wrong. Next, run a test import with a small sample to confirm that emails and tickets are mapped correctly. Keep a close eye on the process in real-time so any issues can be dealt with immediately.
For added peace of mind, consider testing the migration in a staging environment before committing to the full transition. This extra step helps catch potential problems early and ensures a smoother move without missing important emails.