
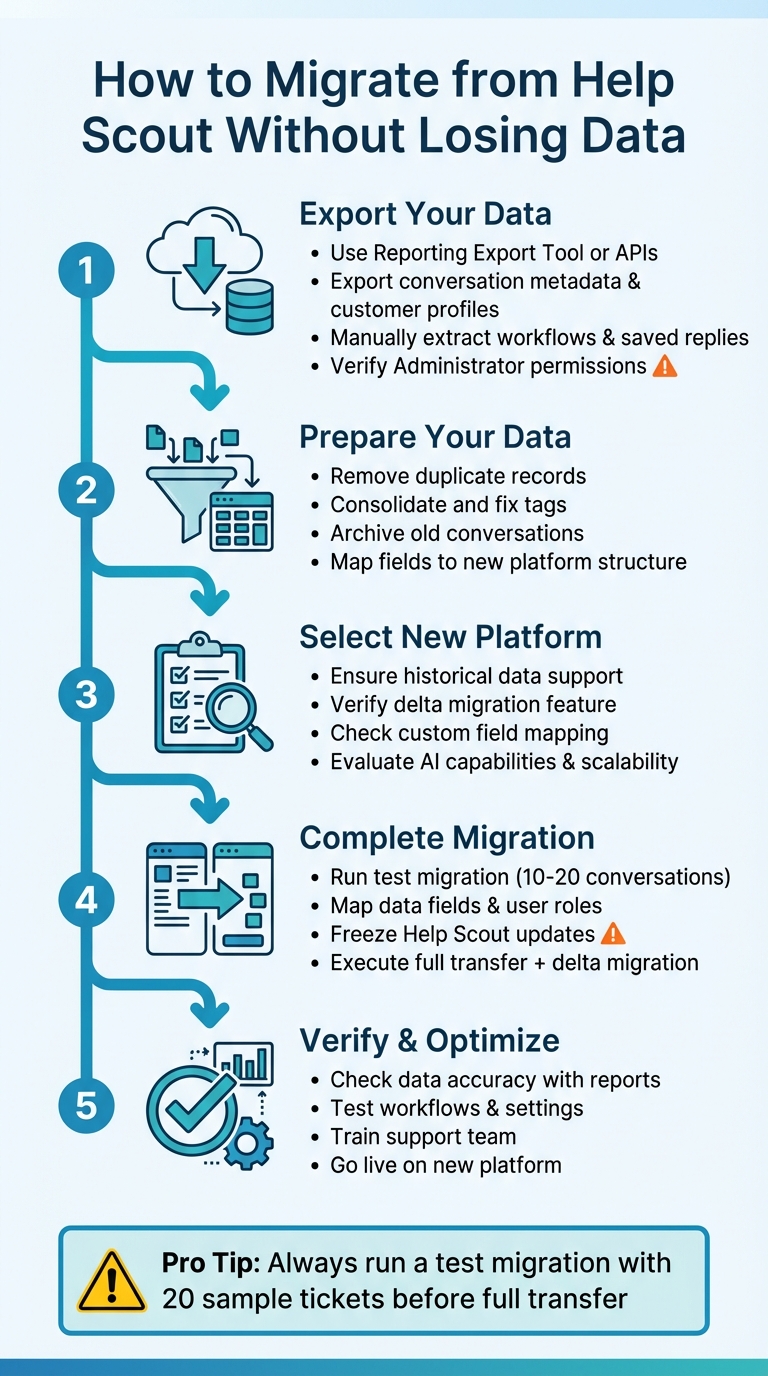
Migrating from Help Scout can feel overwhelming, especially when you’re concerned about preserving years of customer conversations and history. Here’s how you can ensure a smooth transition while keeping your data intact:
- Export Your Data: Use Help Scout’s export tools (like the Reporting Export Tool or APIs) to download conversation metadata, historical records, and customer profiles. Note that workflows, saved replies, and knowledge base articles often require manual recreation or API-level extraction.
- Prepare Your Data: Clean up duplicates, consolidate tags, and archive outdated conversations. Organize your data to match the structure of your new platform.
- Test the Migration: Start with a small sample (10–20 conversations) to catch errors early, such as broken attachments, incorrect field mapping, or missing details.
- Choose the Right Platform: Pick a system that can handle your historical data, supports custom fields, and offers features like delta migration to capture updates during the transition.
- Complete the Transfer: Freeze updates in Help Scout, update email forwarding settings, and run a full migration followed by a delta migration to ensure no data is missed.
- Verify and Optimize: Review migrated data for accuracy, test workflows, and train your team on the new platform.
Switching platforms doesn’t mean losing your history. With careful planning, testing, and execution, you can preserve your data and set up a better system for your growing support needs.
5-Step Help Scout Migration Process: From Export to Optimization
Step 1: Export Your Data from Help Scout
Check Help Scout’s Export Tools
Help Scout offers several methods for exporting your data, each with specific limitations. The Reporting Export Tool lets you download conversation metadata, such as conversation IDs, statuses, assignees, tags, custom fields, and customer information. However, it does not include the actual conversation threads, satisfaction comments, or open conversations. You can save these exports in CSV or XLSX formats.
For a more complete data extraction, you’ll need to use the Inbox API and Docs API. The Inbox API allows you to pull raw conversation data and reporting metrics, but users on the Standard plan won’t have access to the reporting endpoints. If you need to export Knowledge Base articles, you’ll need the Docs API, as these articles are not included in the standard conversation exports.
Help Scout also partners with tools like Import2, which can transfer conversations, customers, and tags from your account. However, workflows, saved replies, and inbox settings require separate handling, as they aren’t automatically included in the migration process. To avoid migration issues, ensure you have "Account Owner" or "Administrator" permissions and full access to all mailboxes. Missing permissions for even one mailbox can lead to migration failures.
Decide What Data to Export
Before exporting, assess what data is actually necessary for your migration. By typing "All" in the Help Scout search bar, you can quickly see the total number of conversations, customers, and Docs in your account. This helps you gauge your data volume and make informed decisions.
Focus on exporting active conversations, historical records, and customer profiles that are essential for providing context in ongoing support. This is also a good time to clean up your data. As Mathew Patterson from Help Scout explains:
"Switching help desks is your chance to rid yourself of the digital equivalent of those boxes [of junk], such as: Old notifications, alerts, and other non-customer conversations; Tags and labels that are duplicates, typos, or no longer needed".
By carefully selecting what to export, you can streamline the migration process and avoid unnecessary clutter. Keep in mind that workflows, saved replies (macros), custom mailbox settings, and knowledge base articles require either API-level extraction or manual re-creation. Plan your export based on the features your team actively uses.
Back Up and Check Your Exported Data
Before committing to a full migration, test the process with a small sample – export and migrate 20 tickets to see how well the data transfers. This allows you to confirm that attachments, labels, and timestamps are preserved correctly and to catch any field mapping issues early.
Once the export is complete, review the migration reports. These will show which records were "migrated", "failed", or "skipped". Ensure that authors are properly attributed in comments and that attachments are intact and downloadable. Pay extra attention to conversations with over 100 comments, as Help Scout may split these into multiple records during the migration.
Finally, create a secure backup of all exported files before moving forward. Note that XLSX exports use UTC time, while CSV exports follow your account’s configured timezone. Document the format you’re using to avoid confusion when verifying timestamps later. A secure backup ensures you have a fallback in case of errors during the migration.
With your data backed up and verified, you’re ready to move on to preparing it for migration in Step 2.
Step 2: Prepare Your Data for Migration
Review and Remove Duplicate Records
Once your data is exported, the next step is to identify and eliminate duplicates. Check conversation IDs, ticket numbers, and customer emails to spot any repeated entries. This is particularly important if you’ve been managing multiple mailboxes or have combined historical data from merged accounts.
Take a closer look at your tagging system. Merge tags that overlap, fix any typos, and delete outdated labels that no longer serve a purpose. Before migration, pre-create agent accounts in the new platform using the same email addresses as in Help Scout. This prevents the system from generating duplicate or "ghost" agent profiles during the transfer. If you’re combining multiple agent accounts, you can map several source agents to a single active admin in the new system.
For tickets created during the migration process, use a Delta Migration to bring in only the records that were created or updated after your initial transfer. Some tools also offer a "re-migration" feature, which removes previously migrated data before starting fresh, reducing the risk of duplicate entries.
Archive Old Conversations
Before moving your data, separate important customer history from unnecessary clutter like old notifications, automated alerts, and non-customer conversations. These records don’t need to take up space in your active support system and can be archived separately.
To ensure you retain full access to conversation content, extract complete data using the Help Scout API. In-app reporting exports typically include only metadata, not the actual conversation threads. For long-term storage of data that won’t be migrated, consider tools like Fivetran to transfer Help Scout data into a data warehouse or business intelligence platform.
Tag conversations with labels such as historical_archive or imported before migration. This makes it easier to filter and identify archived records in your new system for reporting purposes.
Organize Data for Import
Clean and organized data simplifies the migration process and makes ongoing management easier. Remove outdated notifications, system alerts, and redundant tags before organizing your records. Review saved replies and knowledge base articles to ensure they focus on customer needs. As Aprill Allen from Knowledge Bird explains:
"Often you’ll end up with stale content, or content that’s been written from the perspective of a technical person and not from a customer".
Map your data fields to align with the structure of your new platform. Status, priority, type, and custom fields should match the target system. If an exact match isn’t available, consider migrating the data as tags or internal notes. For knowledge base articles, update internal cross-links to align with the URL structure of your new platform. Conduct a ticket audit to identify all sources of incoming support – like old email addresses, API integrations, or forum links – to ensure nothing is missed during the transition.
| Data Entity | Recommended Action for Compatibility |
|---|---|
| Tags | Consolidate duplicates; fix typos; add a "legacy" identifier |
| Custom Fields | Map to equivalent fields or convert to tags/notes |
| Agents | Pre-create accounts in the target platform to maintain assignments |
| Attachments | Decide whether to migrate or skip to save storage and time |
| Knowledge Base | Update internal URLs to match the new platform’s structure |
| Closed Tickets | Archive or migrate as historical records for continuity |
With your data cleaned and properly mapped, you’re ready to move on to selecting your new AI-native support platform in Step 3.
Step 3: Select an AI-Native B2B Support Platform
Features to Prioritize
When migrating to a new platform, it’s critical to ensure your historical data remains intact. The platform you choose must safeguard the integrity of tickets, contacts, organizations, and custom fields. Without this, your agents lose valuable context, making it harder to maintain strong customer relationships.
A delta migration feature is a must-have for a seamless transition. This function captures any new or updated records created during the migration process. It ensures no conversations are lost while the full migration is underway. Be sure the platform supports importing your entire history, including closed tickets, internal notes, and side conversations, to provide a complete view of customer interactions.
For B2B operations, custom field and object mapping is crucial. Your platform needs to handle legacy custom fields – like strings, booleans, dates, and multi-select options – as well as specialized data such as asset tracking or warranty details. Losing this structure can disrupt workflows and critical business insights.
AI capabilities should be integrated directly into the platform rather than added as separate modules. Look for tools that offer AI-powered ticket summaries, resolution suggestions based on past cases, and automatic knowledge base article creation from resolved conversations. These features enhance productivity without driving up costs with per-agent AI fees.
Lastly, make sure the platform can accommodate your data needs and budget as your business grows.
Evaluate Scalability and Pricing
Migration is also a great opportunity to evaluate whether the platform can scale with your business. Take a close look at the API documentation and rate limits. A well-documented API with high limits signals the platform can handle custom integrations and won’t slow down during peak data sync periods.
Pricing transparency is key. Some platforms offer free migrations for smaller datasets (up to 500,000 records) and charge $500 for every additional 500,000 records. Others use volume-based pricing that reduces the cost per record as your data scales. Avoid platforms that hide essential features behind costly add-ons or charge separately for AI tools that should be standard.
Conduct a ticket audit before committing to a platform. Identify all sources of incoming support – such as old email addresses, API integrations, and forum links – and confirm the platform can consolidate these channels without needing extra tools. Use this as an opportunity to clean up outdated content and unnecessary technical jargon in saved replies. This avoids migrating clutter that could slow down your team.
Confirm Data Compatibility
Before finalizing your decision, verify that the platform supports full data compatibility. Start with a demo migration using a small dataset (20 to 100 conversations) to test field mappings, attachments, and formatting.
Prepare your new environment by manually setting up mailboxes, teams, and agent profiles with the same email addresses as your current system (e.g., Help Scout). This prevents "ghost agent" profiles, where tickets get assigned to non-existent users. For former employees, map their tickets to an "Archive Agent" to preserve history without incurring extra seat costs.
Ensure the platform can support inline images and attachments without breaking conversation threads. Some systems require converting inline images to standard attachments if they don’t support older HTML formats. Also, confirm that knowledge base articles migrate with updated internal cross-links that match the new platform’s URL structure.
Matt Brayley, Field Service Manager at Primetals Technologies, highlighted the importance of retaining historical data:
"We considered starting fresh with a new help desk – and losing years of history. [Migration allowed us] to retain our data".
Finally, map Help Scout’s original record IDs to the new platform’s "external_id" field. This ensures idempotent imports and safe delta migrations.
Step 4: Complete the Migration
Run a Test Migration First
Before diving into the full migration of your Help Scout history, it’s smart to start with a test migration. Use a small dataset – around 10 to 20 conversations – to simulate the entire process. This step helps identify potential issues early, saving you from costly errors later on [3, 16].
Make sure the user handling the migration has Administrator or Owner permissions and access to all Help Scout mailboxes. Lack of proper permissions is a common reason for migration failures.
Once the test migration is complete, review the summary table to check for migrated, failed, or skipped records. Go a step further and manually inspect specific tickets to ensure they include the correct details, such as Type, Source, Status, Priority, Custom Fields, Requester, Agent, and Tags. If you’re transferring knowledge base articles, confirm that their status, location, and category are preserved.
Mathew Patterson from Help Scout highlights the importance of this step:
"Before committing to the full migration, run smaller migrations of smaller data sets, and have multiple people check the end result for accuracy."
To reduce errors, use separate browser sessions or incognito mode when authorizing multiple accounts. Most professional tools will also automatically delete test data before the full migration to avoid duplicate records.
With your test migration confirmed, move on to mapping your data fields and user roles.
Map Data Fields and User Roles
After a successful test migration, the next step is aligning your data fields and reassigning roles to ensure everything integrates smoothly. Map default fields like subject, tags, and status, along with any custom fields. If any tickets are assigned to inactive or deleted agents, reassign them to an active administrator to avoid orphaned records [16, 7]. If the new platform doesn’t support certain Help Scout custom fields, consider mapping that data to "Tags" or "Notes" to retain it.
If you’re using the same agent email addresses in both systems, temporarily adjust the emails in Help Scout (e.g., change admin@domain.com to admin+1@domain.com). This frees up the primary emails for account setup in the new platform.
Ashley Milne, a Data Migration Specialist at Import2, offers this advice:
"You don’t have to put your help desk data back in the same place!"
This is also a great time to reorganize your mailboxes, streamline tags, and decide how to map tickets based on their original source or status.
Execute the Full Data Transfer
Once your field mappings and role assignments are finalized, it’s time for the full migration. Freeze updates in Help Scout right before starting the transfer to avoid data mismatches [4, 5].
Update your email forwarding settings and other ticket sources (like integrations, Beacons, and forms) to point to the new platform. Tag all conversations in Help Scout with something like imported or legacy_history to make them easier to identify in the new system [4, 2, 5].
Schedule the migration during a low-traffic period, such as a weekend, to minimize the impact on your team. Depending on the size of your data and API limits, the migration may take a few hours to a couple of days.
After the full migration is complete, run a Delta Migration to capture any new conversations or updates that occurred during the transfer window. Finally, use the migration summary reports to verify accuracy by comparing source IDs with target IDs.
| Migration Step | Key Action | Verification Metric |
|---|---|---|
| Preparation | Create Agents in Target | Ensure all active Help Scout users exist in the new tool. |
| Mapping | Match Custom Fields | Confirm Help Scout tags and custom fields have a clear destination. |
| Test Run | Execute Test Migration | Check a sample of 10–20 tickets for complete thread history. |
| Validation | Review "View Records" | Compare Source IDs with Target IDs for accuracy. |
| Cleanup | Delete Demo Data | Ensure the target is clean before the full transfer to avoid duplicates. |
sbb-itb-e60d259
Step 5: Verify and Optimize After Migration
Check Data Accuracy
Once the migration wraps up, it’s time to double-check that everything transferred correctly. Start by verifying that all conversations and historical data were moved over without issues. Use summary reports to compare entity IDs and identify any "failed" or "skipped" records that need addressing before you fully retire Help Scout.
Manually inspect a sample of records to confirm that field mapping is accurate. Pay close attention to attachments, thread details, and any knowledge base articles you migrated. Make sure articles are in the right folders, categories, and statuses.
Timezone discrepancies can also crop up during migration. Help Scout’s XLSX exports typically default to UTC, while CSV exports use the administrator-defined timezone. Adjust timestamps if needed. Also, check that users have the "Reports: Export reporting data" permission to access these exports.
Here’s a quick checklist to guide your review:
| Data Entity | Verification Checklist |
|---|---|
| Conversations | Check ID, status, subject, created/closed dates, and thread count |
| Customers | Verify name, email, phone number, and profile URL |
| Knowledge Base | Ensure article status, collection/category location, and internal links are correct |
| Team Data | Confirm assignee (owner), rated users, and permission levels |
| Custom Data | Check that all custom field values are visible and correctly populated in the new UI |
Test Workflows and Settings
After confirming data accuracy, shift your focus to workflows and settings. Use the test migration as a foundation to validate that everything aligns with the new platform’s structure. Recreate workflows, macros, and saved replies manually, then run a delta migration to capture any updates made during the transition.
Map Help Scout statuses to the corresponding ones in the new system. Audit all incoming support channels and merge duplicate tags to streamline operations. Before going live, have your support team test the new platform by practicing tasks like adding notes, assigning conversations, and using @mentions. This hands-on testing will help uncover potential issues, such as broken knowledge base links, missing attachments, or misassigned conversations. Running a final delta migration ensures that your workflows are intact and ready.
Train Your Support Team
Getting your team comfortable with the new platform is crucial. Use a sandbox environment to train them on essential tasks like adding notes, adjusting custom fields, and leveraging AI tools. Since automation rules and canned responses won’t transfer automatically, provide clear instructions for manually rebuilding these assets.
This is also a great time to revisit your tagging strategy and refresh outdated content. Aprill Allen from Knowledge Bird highlights the importance of this step:
"Often you’ll end up with stale content, or content that’s been written from the perspective of a technical person and not from a customer."
Make the most of live or pre-recorded training sessions offered by your new platform. Ensure all agent accounts are set up before the migration to avoid delays or confusion. Finally, establish a clear cut-over protocol: once the full migration begins, your team should stop using Help Scout and fully transition to the new system.
With thorough training and preparation, your team will be ready to hit the ground running on day one.
Common Migration Mistakes to Avoid
Missing Field Mappings and Lost Data
One of the biggest pitfalls during migration is improperly mapping fields, which can result in lost data. For example, Help Scout doesn’t natively support custom fields for contacts. To avoid losing this information, you can map custom fields into contact notes or tags instead. Another common issue arises with CC user data – migration tools often fail to import this automatically, typically redirecting these email addresses into a custom field instead.
Status mapping can also cause headaches. Help Scout uses statuses like "Active", "Pending", and "Closed", but your previous platform might use terms such as "Solved" or "Resolved." Without proper mapping, you risk misclassifying tickets – active tickets could end up archived, or closed tickets might appear as open. To prevent these problems, run a demo migration with at least 20 random tickets. Use this test to confirm that comments, authors, custom fields, and attachments are transferred correctly before proceeding with the full migration.
Field mapping errors can create a domino effect, leading to larger issues down the line.
Email and Workflow Problems
Timing is everything when it comes to email forwarding. Switch your email forwarding to the new platform just before the full migration begins. This ensures new conversations don’t get stuck in the old system. Also, review all incoming support channels – forums, API integrations, and alias emails – to make sure nothing is overlooked.
Keep in mind that automated migration tools won’t transfer your rules, macros, or saved replies. You’ll need to manually recreate these workflows in the new system. To minimize disruption, plan the migration during a period of low email traffic.
Technical preparations are important, but don’t underestimate the role of clear communication during this process.
Poor Team Coordination
A smooth migration isn’t just about technology – it’s also about teamwork. One common mistake is failing to communicate effectively with your team. If agents continue updating records in the old system during the migration, those changes won’t carry over, leaving you with incomplete data. To avoid this, enforce a strict "stop work" policy as soon as the migration begins.
Before migration day, create agent accounts in the new platform to prevent access issues. Have multiple team members review the test migration to catch potential problems like broken links, missing tags, or misassigned conversations. Also, make sure the individuals managing the migration have the necessary permissions, such as "Reports: Export reporting data" or "Manage saved replies", to avoid last-minute delays.
Set a clear cut-off date for switching systems, and communicate this to both your team and customers. This ensures everyone knows when to stop using the old platform and helps maintain a smooth transition.
How to Export Data from Help Scout Using the Migration Wizard
Conclusion
Switching from Help Scout ensures your conversation history and customer data stay intact, but the process requires thoughtful preparation, testing, and timing. Start by exporting your data and cleaning up duplicates. Then, conduct a trial migration with a small set of tickets to confirm that field mappings, statuses, and attachments transfer correctly. This step helps identify any areas needing manual adjustments.
Some elements – like workflows, saved replies, and knowledge base articles – won’t migrate automatically and will need to be recreated manually. While this might seem tedious, it’s also a great chance to reorganize and streamline your support processes. Think of it as an opportunity to leave outdated practices behind.
Beyond the migration itself, this is a perfect time to reevaluate your support tools. For B2B teams handling complex accounts or long-term cases, migrating can pave the way for upgrading to a platform better suited to modern needs. Legacy systems often lack features like custom statuses, advanced automation, and AI-driven tools that enhance efficiency. Moving to an AI-native platform like Supportbench not only preserves your data but also equips your team with tools to work smarter and manage costs effectively.
FAQs
What data can’t be exported from Help Scout without using the API?
When using Help Scout, certain data cannot be exported without accessing the API. For instance, conversation thread contents are not available through the in-app export tools and require API access to retrieve. Additionally, user account details and inbox settings cannot be exported automatically. These must be manually recreated when transitioning to a new platform.
How can we keep receiving new emails while migrating without losing tickets?
To ensure tickets aren’t lost during migration, adopt a phased approach. Start by exporting and migrating your existing data. Next, implement a delta migration or real-time sync to handle any new emails or tickets that come in during the process. Before fully switching email routing to the new platform, perform one final sync. Keep email forwarding enabled throughout the process to maintain uninterrupted ticket flow.
How do we preserve agent ownership and timestamps during the import?
To keep agent ownership and timestamps intact during the import process, make sure the export captures all relevant conversation metadata, including timestamps and agent details. Use import tools that correctly map this metadata to the new system. Before proceeding with the full migration, run tests with sample imports to verify everything transfers accurately. This approach reduces the risk of data loss or errors and helps maintain the integrity of historical records.
Related Blog Posts
- How do you migrate away from Freshdesk without losing tickets, contacts, or history?
- How do you migrate away from HappyFox without losing ticket history or attachments?
- How do you migrate from Intercom to a true helpdesk without losing conversation history?
- How do you migrate away from Jira Service Management without losing ticket history?