


Migrating from Intercom to a helpdesk system can feel overwhelming, but it’s manageable with the right approach. The key is to ensure your conversation history, customer data, and workflows transfer smoothly without losing context. Here’s a quick breakdown:
- Why migrate? Intercom’s chat-focused structure can become unmanageable for scaling teams. A dedicated helpdesk offers structured ticketing, better lifecycle management, and more robust reporting.
- What to prioritize? Focus on recent conversations, open tickets, and essential data like attachments and custom fields. Archive older, irrelevant data separately to avoid clutter.
- How to do it? Use a migration tool that handles conversation threads, attachments, and timestamps. Test the migration first, then schedule the full transfer during off-peak hours to minimize disruptions.
- Post-migration steps: Verify data accuracy, set up workflows, and train your team on the new system.
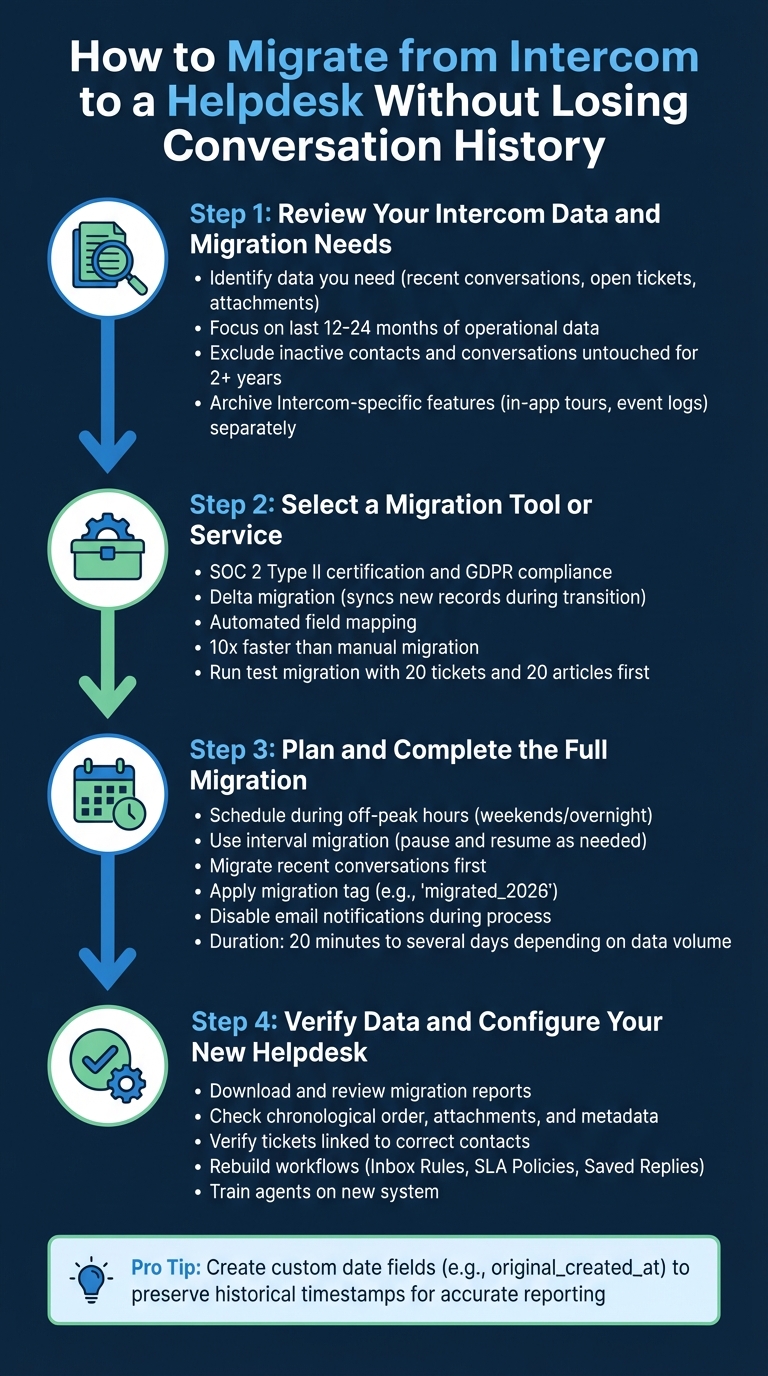
4-Step Process to Migrate from Intercom to a Helpdesk Without Losing Data
Step 1: Review Your Intercom Data and Migration Needs
Start by identifying the data you truly need and understanding its purpose. For instance, if you’re focused on regulatory compliance, a basic database archive may be all you require. But if you need historical records to solve customer issues, preserving entire conversation threads – complete with timestamps and attachments – is essential. This review is a critical first step in selecting the right tools and planning your migration effectively.
"The first question to ask yourself is ‘why do I need this data?’ The answer will impact the structure and style of your migration." – Intercom Help Center
Not all Intercom data seamlessly integrates into a new helpdesk system. Focus on key elements like support history (Conversations and Tickets) and relationship data through a modern support CRM (Contacts and Companies). Features unique to Intercom, such as in-app tours, event logs, and automated campaigns, can be archived separately as JSON or CSV files for future reference. Tags and Custom Data Attributes are also helpful for organizing and categorizing your information.
Identify Which Data to Keep
When migrating, prioritize operational data, such as open conversations and recent tickets from the last 12–24 months. Include all details, like attachments and private notes. For older, closed tickets, you can simplify the process by consolidating their history into a single transcript note. This approach minimizes API load and speeds up the migration.
Exclude unnecessary data, such as contacts without ticket history, inactive or suspended users, and conversations untouched for over two years. If historical data is still relevant, consider mapping these entries to a placeholder like "Inactive Contact" to avoid cluttering your new system with outdated accounts. Leads, which Intercom treats separately from active users, should also be reviewed. Tag these records as "lead" during migration to maintain their distinction.
For a smoother migration, disable phone number validation in your new helpdesk system. This prevents errors caused by legacy data formats.
List Your New Helpdesk Requirements
Once you’ve analyzed your data, outline what you need in your new helpdesk. The platform should address the reasons for moving away from Intercom. Look for features like structured ticket lifecycle management (e.g., Open, Pending, Resolved, Closed) with clear ownership and assignment tracking. Automation tools powered by AI can streamline routine tasks like tagging, routing, and follow-ups. SLA management tools are also essential for ensuring timely responses and tracking performance metrics.
If you’re migrating a knowledge base, ensure the new platform supports a three-level hierarchy (Collection > Section > Article) to replicate Intercom’s structure. Without this, articles may default to a disorganized "Default Folder". Additionally, confirm that the platform supports custom field mapping to retain all your Intercom data attributes. Look for delta migration capabilities, which allow you to sync new records created during the transition without causing downtime.
Lastly, prioritize security. Your new helpdesk should meet SOC 2 Type II compliance and GDPR requirements, with strong encryption for data both in transit and at rest.
sbb-itb-e60d259
Step 2: Select a Migration Tool or Service
Now that you’ve outlined your data requirements, it’s time to choose a migration tool that aligns with those needs.
The right tool should ensure conversation history transfers seamlessly. It’s crucial that data relationships – like tickets linked to their original contacts, organizations, and custom fields – remain intact. This way, your support team can access complete customer histories without missing details. Look for tools with SOC 2 Type II certification and encryption that complies with GDPR standards.
Delta migration is another feature to prioritize. It syncs new or updated records during the process, allowing your team to keep working uninterrupted without having to juggle two platforms. Automated field mapping is also a must-have. Using dropdown menus, you can match ticket priorities, statuses, and tags effortlessly. These features are key to maintaining the integrity of your data throughout the migration.
Preserving context is equally important. For instance, inline images should be converted into attachments, and side conversations migrated as private notes. If you’re moving a knowledge base, the tool should automatically update internal cross-links between articles and handle multilingual content without breaking translations.
Compare Migration Tools for Accuracy and Reliability
Professional migration tools can transfer data up to 10 times faster than manual methods. Take Help Desk Migration as an example – it boasts a 5.0/5 rating for customer support and 4.8/5 for ease of use on Capterra. When evaluating tools, ensure they can handle Intercom’s OAuth authorization and correctly distinguish between "Users" and "Leads", preserving this distinction in the new system.
Most tools use a record-based pricing model, meaning you only pay for the number of tickets, contacts, and articles you migrate. Service packages typically range from "Standard" (self-service) to "Signature" (fully managed migration), with custom pricing available for large-scale projects that may involve API development or advanced CSV preprocessing.
"I had to migrate my knowledge bases from Intercom to Zoho Desk. Help Desk Migration is the fastest, easiest, and cheapest solution to get the job done." – Marcos Custodio, CMO at Webpeak
Run a Test Migration First
Before diving into the full migration, perform a test run with 20 tickets and 20 articles. This step lets you verify attachments, formatting, and custom fields. Since migration tools process data the same way in both test and full runs, any issues identified during testing will likely resurface during the actual migration.
Be strategic with your test cases. Include edge cases like large attachments or complex HTML formatting to ensure the tool handles them properly. Temporarily disable email alerts, ticket triggers, and automations on both platforms during the test to avoid duplicate notifications being sent to customers. After the test, use the migration wizard’s detailed reports to review which records transferred successfully, which were skipped, and which failed. The report will also provide record IDs to help you locate any problematic entries.
Make sure your articles retain their three-level hierarchy during the test to avoid them being automatically assigned to default folders.
"The most useful custom feature for us was being able to migrate only associated customers with the tickets we migrated. With this customisation, we could migrate tickets in batches, saving money." – Anthony Kendrew, IT Solutions Developer at The Salvation Army
Once the test migration runs smoothly, you’re ready to move forward with the full migration plan.
Step 3: Plan and Complete the Full Migration
Once your test migration is successful, it’s time to tackle the full data transfer. To minimize disruptions, schedule this process during periods of low activity.
Schedule Migration During Off-Peak Hours
Timing is everything when it comes to a smooth migration. Using interval migration, you can pause and resume data imports to align with your business’s operational needs. For example, schedule the migration to run over weekends or overnight, pausing it during business hours to keep your system accessible for agents.
During the full migration, you can rely on delta migration to sync any new or updated records while your team continues working in Intercom. A final delta sync ensures no records are left behind. This approach helps avoid downtime and keeps your agents available to assist customers.
To speed up the process, consider temporarily increasing your API limits. Additionally, disable automated email notifications to prevent customers and agents from receiving alerts about historical tickets. Before starting, confirm that team structures are fully configured in your new helpdesk to ensure proper ticket assignment.
"The migration was without any hiccups, which allowed us to switch much faster than anticipated." – Damiaan Peeters, Umbarco & .Net Developer, Umbrace
Once you’ve scheduled the migration and adjusted system settings, focus on transitioning the most recent conversations first.
Migrate Recent Conversations First
Start by prioritizing recent conversations. This ensures that agents can address current customer issues immediately, while older records transfer in the background. Using a "newest records first" feature, data can be migrated in reverse chronological order, allowing your support team to hit the ground running on the new platform.
For a more efficient migration, consider data thinning. For example, you might skip attachments from tickets older than 12–24 months if they’re not critical. This streamlines the process without losing the essential history your team relies on. To keep things organized, apply a tag like "migrated_2026" to all imported tickets, making it easy for agents to distinguish between legacy data and new requests.
The duration of your migration will depend on the volume of data being transferred. It can range from 20 minutes to several days. Automated tools can make this process up to 10 times faster than manual methods, but even with automation, large datasets require careful monitoring and patience.
Step 4: Verify Data and Configure Your New Helpdesk
Once your data migration is complete, the next step is to ensure that everything transferred correctly and to configure your helpdesk for smooth operations. It’s crucial to preserve conversation history while setting up a system that runs efficiently. Start by reviewing migration outcomes – download the migration reports from your tool for a detailed analysis of the process.
Check Migrated Data for Accuracy
Manually review the data to confirm that everything is in order. Check that conversations are properly arranged in chronological order and that replies are linked correctly. Attachments and inline images should now reside on the servers of your new helpdesk platform.
"If some records didn’t migrate or/and transfer incorrectly during the Demo Migration, they won’t move during the Full Data Migration." – Help Desk Migration
Ensure tickets are connected to the correct contacts and organizations. Take a closer look at metadata like custom fields, tags, and ticket statuses to confirm they’ve been mapped accurately. Since many platforms don’t allow backdating ticket creation times, verify that your migration tool created custom date fields (e.g., original_created_at) to retain historical timestamps from Intercom for accurate reporting.
Set Up Workflows and Automations
Once you’re confident in the accuracy of your migrated data, it’s time to rebuild the key workflows that keep your support team running efficiently. Recreate logic-based features such as Intercom’s Inbox Rules, Segments, and SLA Policies. These elements can’t be migrated via API and will need manual setup on your new platform. Also, rebuild critical tools like Saved Replies using your helpdesk’s features, and ensure Side Conversations are preserved as private notes.
To keep things organized, apply a migration tag (e.g., "migrated_intercom") to all imported tickets. This will help distinguish legacy data from new conversations in reports and prevent automation rules from accidentally triggering on old records. Before re-enabling triggers, define your business hours and SLA policies to ensure ticket statuses calculate accurately. Finally, train your agents on the updated automation rules and reporting dashboards so they’re ready to hit the ground running on day one.
Common Migration Problems and How to Avoid Them
Even with careful planning, migrations can hit unexpected hurdles. One common issue is timestamp discrepancies. Many helpdesks don’t allow backdating the "Created At" field, meaning migrated conversations may show the migration date instead of the original interaction date. A simple workaround? Create a custom date field (like original_created_at) to store the original timestamps for accurate reporting.
Another frequent problem involves visual content, particularly embedded images. Copying HTML alone won’t cut it – image URLs often link back to Intercom’s servers. Once your Intercom account is closed, those images become inaccessible. To avoid this, download all embedded images from Intercom, upload them to your new helpdesk’s media gallery, and update the HTML src URLs to point to the new location.
Agent and team setup is another critical step to get right before migrating. If you don’t map Intercom’s assignee.id to your new helpdesk’s agent IDs, all conversations might appear as if they were handled by a single API user instead of your actual support team. Proper mapping ensures accurate reassignment of conversations.
This ties into the importance of author attribution, as emphasized by ClonePartner:
"To make the history look real, you must explicitly map the author_id or create the comment ‘on behalf of’ the original user. If you miss this, your entire support history will look like it was written by one robot." – ClonePartner
Another issue to watch for is custom field failures. Dropdown options and field schemas need to be pre-configured in your new helpdesk to match Intercom’s setup. Without this, dropdowns won’t function properly. It’s also a good idea to temporarily disable phone number validation to prevent "invalid format" errors during contact imports.
Lastly, don’t forget to pause active Intercom outbound campaigns before migration. This frees up API capacity and avoids delays caused by excessive API calls during the transfer. By addressing these potential problems ahead of time, you can ensure a smoother migration while maintaining the integrity of your support history.
Conclusion: Completing Your Migration Successfully
Switching from Intercom to a dedicated helpdesk can be straightforward if handled with care and a clear plan. The secret? Treat it like a well-structured project. Start by auditing your data to clean up duplicates, map each field carefully, and test with real data to catch any errors early. Schedule the full migration during off-peak hours, and follow a logical sequence: Companies → Contacts → Ticket Schema → Conversations. Don’t forget to use custom fields to preserve historical timestamps. These steps align with the detailed process outlined earlier.
As Eric Klimuk, Founder and CTO of Supportbench, wisely notes:
"Done right, migration isn’t just a one-time task. It’s a chance to improve how your data is structured, accessed, and supported for years to come."
Protecting your support history is critical. Assign unique external IDs to every record, re-upload embedded images to ensure they remain accessible after your Intercom account is closed, and accurately map agent IDs to maintain author attribution. These measures safeguard the integrity and usability of your data.
Once the migration is complete, focus on optimizing your helpdesk. Features like built-in audit logs, configurable dashboards, and sandbox environments for testing workflows can transform your operations. You’ll gain real-time SLA tracking, automated compliance monitoring, and predictive insights such as CSAT, CES, and NPS scoring – all seamlessly integrated into the platform.
Take inspiration from Rossi Residencial, a major construction company in Brazil. In July 2025, they completed a seamless migration of four SAP environments to Google Cloud without any downtime. By conducting a thorough pre-migration assessment, rolling out changes in phases, and using mirrored architecture, they cut infrastructure costs by 50% and eliminated outages entirely. This shift allowed their IT team to move from constant troubleshooting to focusing on strategic goals. Your migration can achieve similar outcomes, offering reduced costs, enhanced visibility, and a solid foundation for future growth.
FAQs
How do I keep conversation timestamps accurate after migration?
To keep conversation timestamps accurate after migration, make sure the original timestamp data remains intact during both the export and import processes. Double-check that these timestamps are properly mapped and displayed in the new helpdesk system. Use migration guides that prioritize data accuracy and include steps for post-migration validation. This approach helps prevent errors and ensures the transition goes smoothly.
How do I prevent old tickets from triggering automations and emails?
Before starting your migration, make sure to disable or pause any workflows or automations tied to old tickets. This prevents outdated triggers from sending emails or activating automations during the transfer. Once everything is migrated, you can re-enable or adjust these workflows to keep processes running smoothly without unnecessary notifications.
How can I migrate embedded images so they don’t break later?
To keep embedded images intact during migration, export each conversation one at a time. Save them as PDFs or text files, as these formats retain the embedded images within the exported data. This method ensures your images stay preserved and accessible after the migration process.
Related Blog Posts
- How do you migrate from Salesforce Service Cloud to a helpdesk without losing case history?
- How do you migrate away from Freshdesk without losing tickets, contacts, or history?
- How do you migrate away from HappyFox without losing ticket history or attachments?
- How do you preserve email threading when migrating from HappyFox?