


Switching from Freshdesk to another platform can be complex, but you can avoid losing tickets, contacts, or history by following a structured migration plan. Here’s a quick breakdown:
- Review Your Data: Clean up outdated or duplicate records and ensure all necessary fields are accurate and complete.
- Export Data: Use Freshdesk’s export tools or APIs to download tickets, contacts, and knowledge base content. Ensure you include all relevant details like attachments and conversation history.
- Map Data Fields: Create a clear mapping document to match Freshdesk fields with the new system. Test with a small data set to avoid errors.
- Disable Automations: Turn off workflows and notifications during migration to prevent disruptions.
- Run Full Migration: Transfer data in sequence (companies, contacts, tickets) while maintaining relationships between records.
- Verify and Configure: Check data accuracy, test workflows, and re-enable automations in the new system.
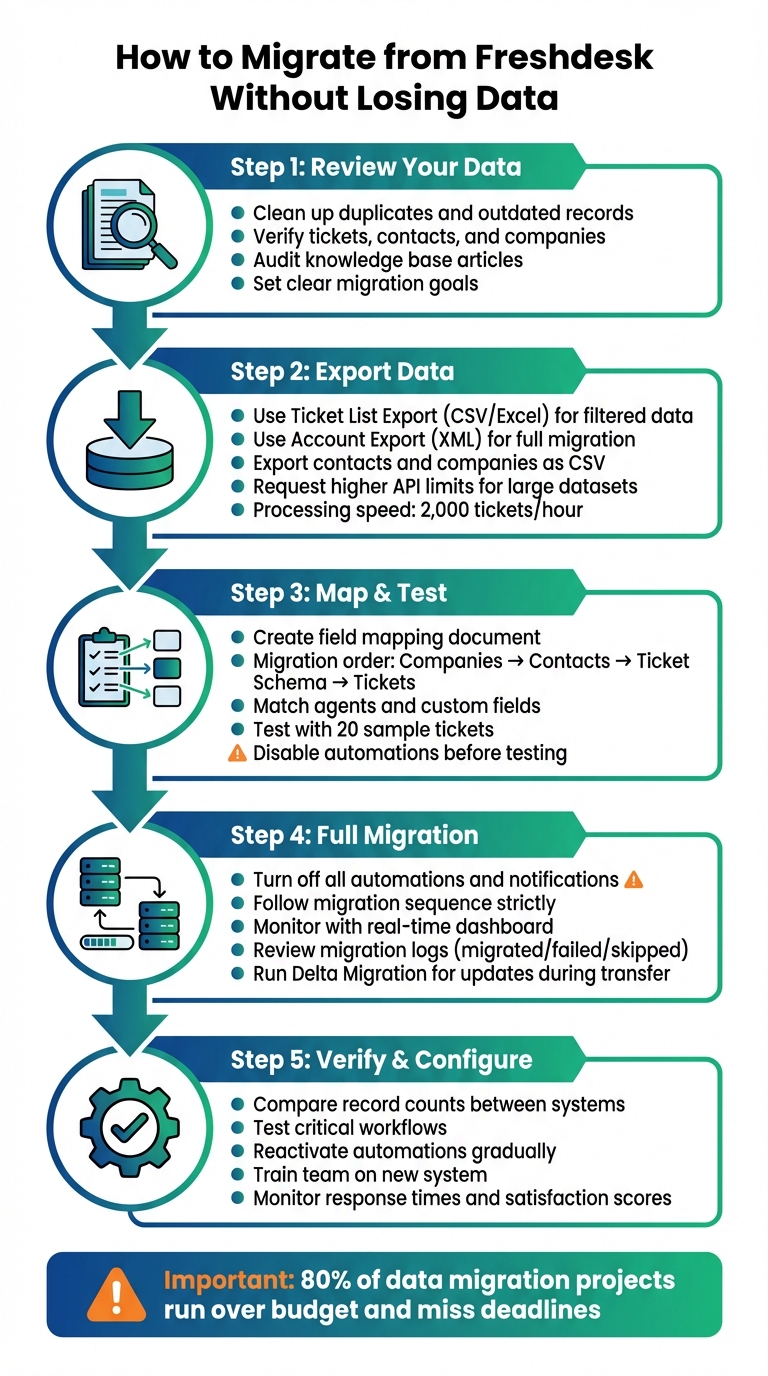
5-Step Freshdesk Migration Process Without Data Loss
Step 1: Review Your Freshdesk Data and Set Migration Goals
Taking a close look at your Freshdesk account is essential to avoid common pitfalls like migrating outdated or duplicate data, which can lead to errors during the process.
Check Freshdesk Data for Accuracy and Completeness
Start by thoroughly reviewing all your help desk records. This includes tickets (such as their subject, description, status, priority, and type), contacts (names, emails, phone numbers), and companies (names and domains). Don’t forget to examine metadata like custom fields, tags, and attachments. Pay extra attention to conversation history, carefully distinguishing between public replies and private notes – these provide critical context for future support interactions.
Your knowledge base is another area that requires detailed scrutiny. Audit articles, categories, and folders to confirm your help center is active. Inactive knowledge bases can lead to migration failures. Additionally, look out for special ticket states, such as archived tickets or parent-child ticket relationships, as these may need specific handling that standard migration tools might not support.
Data quality is crucial. Clean up duplicate, outdated, or spam-flagged records. Ensure every contact has a name and either an email address or phone number to prevent import errors.
Once you’ve assessed the state of your data, you’ll be ready to set clear migration goals.
Define Your Migration Objectives
"Unclear goals can still result in failure – like missing fields, broken workflows, or mismatched expectations." – Eric Klimuk, Founder and CTO of Supportbench
Setting specific goals is key to ensuring your migration achieves both technical and business success. For instance, while data might transfer correctly, broken workflows or unmet expectations can still result in failure. Decide whether your goal is to retire a system, cut costs, or enable AI-driven workflows, and make sure your migration strategy aligns with that objective. Success metrics, such as better reporting, quicker data access, or the ability to implement modern automation, can help measure your progress.
Also, determine what data you don’t need to migrate. Carrying over records that are rarely used can add unnecessary complexity and cost. Being selective ensures your project stays compliant with regulations and service-level agreements (SLAs) while avoiding wasted resources on irrelevant data.
sbb-itb-e60d259
Step 2: Export Data from Freshdesk Using APIs and Export Tools
Once you’ve outlined your goals, the next step is to export your Freshdesk data. Depending on your needs – whether it’s quick reporting or a full system migration – you can choose between APIs and export tools.
Export Tickets, Contacts, and Knowledge Base Content
Freshdesk offers two main options for exporting data. The Ticket List Export lets you download filtered ticket data in CSV or Excel formats. This includes ticket properties like subject, status, and custom fields. However, it doesn’t cover full conversation threads or archived tickets. For a more comprehensive export, the Account Export is your go-to. Accessible under Admin > Account > Account Details > Export data, this option provides an XML file containing tickets, conversations, solution articles, forums, and customer lists.
Keep in mind that only users with Account Administrator privileges can perform a full account export. If you’re using API tools, you’ll find your API key under Profile icon > Profile Settings. For manual ticket exports, selecting "Show multiline text fields" ensures detailed ticket descriptions and custom fields are included. To export contacts and companies, head to the Contacts or Companies tabs and click Export to generate CSV files with all default and custom fields.
| Export Method | Data Included | Format | Best Use Case |
|---|---|---|---|
| Ticket List Export | Filtered tickets, metadata, custom fields | CSV, Excel | Quick reports, specific ticket sets |
| Account Export | Full history, conversations, articles, attachments | XML | Full system migration, backups |
| Contact/Company Export | Customer details, secondary emails, custom fields | CSV | CRM updates, contact migration |
After exporting, plan for large datasets to ensure efficient processing.
Manage Large Data Volumes Efficiently
Handling large datasets requires careful preparation to avoid system slowdowns or data loss. Freshdesk processes migrations at a rate of about 2,000 tickets per hour, so batch processing is essential for larger accounts.
Before exporting significant data volumes, reach out to Freshdesk support to request higher API limits, which can help speed up the transfer. Use filters such as date range, ticket status, agent, or brand to focus on the most relevant records and minimize processing time. For example, set "Created time" to "Any time" on the list page, then refine it further within the Export window to ensure you capture the right timeframe.
To avoid disruptions, disable all ticket creation and time-triggered automations before starting your export. This prevents notifications or triggers from being applied to historical data. If you’re using Parent-Child ticketing, temporarily deactivate it under Admin > Advanced Ticketing to avoid errors with task-type tickets during the migration.
Step 3: Map Data Fields and Run a Test Migration
Once you’ve exported your data, the next step is to carefully map how each data element transitions into the new system. This step is crucial to avoid broken links between tickets, agents, and customers, ensuring that important support context remains intact. With the data exported and reviewed, the focus now shifts to detailed mapping and thorough testing.
Create a Field Mapping Document
Start by identifying what needs to be migrated and what configurations must be recreated. Data such as tickets, contacts, and knowledge base articles can transfer directly. However, configurations like SLAs, triggers, and automations will need to be manually rebuilt in the new system. Follow a specific migration order: begin with companies, then contacts, followed by the ticket schema, and finally the tickets themselves, including their conversation history. This sequence maintains the relationships between records.
Make sure all necessary custom fields are set up in the target system. You can do this manually or use a migration wizard. For agents and groups, match each Freshdesk user to their counterpart in the new system to retain ticket ownership. If an agent is no longer active, reassign their tickets to a default active agent to prevent migration errors.
To ensure smooth data transfer, create a manual mapping table (often called a crosswalk) to align Freshdesk’s ticket statuses – like Open, Pending, and Resolved – with equivalent statuses in the new platform. For mandatory fields in the target system that lack corresponding data, assign fixed default values. This step prevents errors and ensures every ticket is successfully created. Additionally, retain the original ID in an external_id field in the new system. This allows for safe reruns if needed and helps maintain data integrity.
"Losing these [custom] fields during migration can mean losing critical context." – Help Desk Migration
Test the Migration with Sample Data
Once your mapping document is ready, validate it with a controlled test migration. Instead of processing random records, select sample tickets and knowledge base articles with complex data – such as those containing large attachments, inline images, or call recordings – for a more accurate test. This approach ensures that mapped fields properly recreate the intended data relationships.
Before running the test, disable any ticket-creation or time-triggered automations in the target system to avoid sending accidental notifications to customers. After the test migration, download the migration reports and carefully review any records flagged as "failed" or "skipped" to identify missing mandatory data or inactive agents. Have your support team verify that the data’s usability and context remain intact.
If some tickets end up in the Spam folder, it’s likely because they are linked to soft-deleted or inactive contacts in Freshdesk. To fix this, reactivate those contacts before running another test. Once you’re confident that everything looks correct, use a rollback tool to remove the test data, keeping your new environment clean and ready for the full migration.
Step 4: Complete the Full Migration and Track Results
Now it’s time to execute the full data transfer. This step demands careful planning to minimize disruptions and close monitoring to address any issues before they snowball. The objective? Move everything – tickets, contacts, attachments, and conversation history – while keeping data relationships intact.
Turn Off Automations and Notifications During Migration
Before starting the migration, disable all ticket automations, parent-child ticketing, and priority settings in both systems through the Admin interface. If left active, these rules can trigger on imported tickets, leading to duplicate notifications or incorrect statuses.
If your platform doesn’t allow you to fully disable automations, there’s a workaround: apply a unique tag like migrated_ticket to all imported records. Then, update your automation rules to exclude tickets with that tag. This ensures that automated workflows won’t interfere with your historical data.
Once automations are turned off or adjusted, you can proceed with transferring data in the planned sequence.
Transfer All Data While Maintaining Connections
Follow this migration sequence: companies, contacts, ticket schema, and finally, tickets with their full conversation history. Sticking to this order ensures that foreign key relationships between records remain intact, so every ticket stays linked to the correct customer and company.
Automated migration tools typically handle around 2,000 tickets per hour. If you’re dealing with a large data set, consider reaching out to both Freshdesk and your new platform’s support teams to request a temporary increase in API limits. This can help speed things up. While the migration is running, use a real-time dashboard to track progress and spot any anomalies that could indicate mapping or connection issues.
Don’t overlook inline images – migrate them as attachments. This ensures that important visual context, like troubleshooting screenshots, is preserved even after your Freshdesk account is deactivated.
Once the transfer is complete, move on to reviewing the migration logs.
Review Migration Logs and Fix Errors
After the migration, download detailed logs that categorize records as migrated, failed, or skipped. Pay special attention to the "skipped" report, which often highlights issues like missing mandatory fields, inactive agents, or invalid email formats.
"The Migration Wizard processes Demo and Full Migrations the same way. If any ticket data is missing or incorrect during the Demo, the same issue will likely occur in the Full Migration." – Help Desk Migration Knowledge Base
Carefully review the logs to confirm that ticket ownership, timestamps, and attachments transferred correctly. Double-check that comments and notes are attributed to the right agents. For example, in Freshdesk, an agent’s initial comment might incorrectly appear as coming from the customer if certain settings weren’t configured properly. Fix any errors immediately.
If your team continued working in Freshdesk during the migration, run a Delta Migration to capture any new or updated records created after the full transfer started. This ensures your new system is fully up-to-date.
Step 5: Confirm Data Accuracy and Configure the New System
Your migration isn’t truly complete until you’ve verified that all data has transferred correctly and your team can operate smoothly. This step ensures that your new platform is ready for daily use and helps identify any issues before they affect your customers.
Check Data Accuracy and Completeness
Start by comparing the record counts for tickets, contacts, and companies in both the old and new systems. If the numbers don’t align, dig into the migration logs to find out which records were skipped or failed to transfer.
Next, verify relational integrity by reviewing sample customer profiles and their associated tickets. Pay close attention to timestamps, custom field values, and character encodings, especially if your business supports multiple languages.
"Validation is your safety net – it confirms that everything moved as expected and continues to function correctly in the new system." – Eric Klimuk, Founder and CTO, Supportbench
Test critical workflows by creating, updating, assigning, and closing tickets. This hands-on approach ensures that private notes, attachments, and other contextual details have transferred successfully. Manually review a sample of tickets to confirm that inline images, screenshots, and Knowledge Base articles are intact, properly organized, and have working internal links.
Reactivate Automations and Train Your Team
Once you’ve confirmed data accuracy, shift your focus to restoring operational workflows. Begin by reactivating ticket creation rules and time-triggered automations. Monitor the system closely for duplicate tickets or missed communications – these could signal routing issues between the old and new platforms.
Before going live, train your team on the new system’s features, especially if it includes AI-driven tools. Gradually re-enable workflows and set up a feedback loop so team members can report issues immediately. Track key metrics like response times, resolution times, and customer satisfaction scores from day one to identify and address any performance gaps early.
Address Post-Migration Problems
Even after workflows are live, some migration issues may linger. Use migration reports to identify failed or skipped records and resolve them quickly. Common issues like missing mandatory fields, inactive agents, or invalid email formats can often be fixed by re-mapping data or updating records manually. If needed, run a Delta Migration to capture updates made after the initial transfer.
For Knowledge Base content, re-upload any Base64-encoded images manually to avoid losing them once your old account expires. Double-check that security settings are in place to protect sensitive data, ensuring it’s only accessible to authorized personnel. Set up dynamic SLAs and real-time alerts for overdue tickets to maintain service quality during the transition.
Research shows that 80% of data migration projects run over budget and miss deadlines. Addressing issues quickly and monitoring the system closely will help you avoid further delays and ensure a smooth shift to daily operations.
Conclusion: How to Successfully Migrate from Freshdesk
Making the switch from Freshdesk requires more than just moving data – it’s about ensuring every piece of your system works smoothly in the new environment. The key lies in careful planning, thorough testing, and meticulous verification. Start by reviewing your data, mapping fields accurately, and testing the process with a small sample of around 20 tickets to catch any potential issues early. Don’t forget to disable automations during the migration and run a Delta Migration to keep everything aligned and up-to-date.
"Data migration is more than just copying files from one system to another – it’s a delicate, high-stakes process that can affect everything from day-to-day operations to long-term compliance." – Eric Klimuk, Founder and CTO, Supportbench
Modern platforms are making this process easier by incorporating AI into migrations. Supportbench, for example, simplifies the workflow by embedding AI tools directly into the process. Features like AI Co-Pilot, auto-summarization, and automated knowledge base creation reduce the need for manual effort. With pricing starting at $32 per agent per month, it offers enterprise-level functionality without the hefty price tag often associated with older systems.
The platform also provides sandbox environments and built-in validation tools, allowing you to test workflows and spot errors before going live. From the first day, AI-driven automation takes over tasks like ticket prioritization and tagging, ensuring your operations run smoothly. These advanced tools not only simplify the technical aspects of migration but also enhance the structured approach outlined above, setting you up for success.
FAQs
What should I watch out for when migrating from Freshdesk to another platform?
Migrating away from Freshdesk can feel like a daunting task, especially without a solid plan in place. Some of the most common challenges include losing important data, breaking ticket relationships, and dealing with outdated or duplicate records. To steer clear of these issues, start by thoroughly auditing and cleaning your data. This ensures that only accurate and relevant information makes it to the new system.
Another misstep many make is skipping pilot migrations. Running a small-scale test transfer allows you to catch potential problems early, making the full migration process much smoother. On top of that, failing to plan for minimal downtime or not keeping your team informed can throw a wrench into your customer support operations.
The key to a smooth migration lies in careful preparation, methodical execution, and rigorous testing. This approach ensures that all tickets, customer contacts, and historical data are transferred seamlessly, keeping your support operations intact.
How can I keep my data accurate during and after migrating from Freshdesk?
To keep your data accurate during and after a migration from Freshdesk, start by auditing and cleaning your database. This step ensures that only relevant and correct information makes it to the new platform. Next, prepare a thorough data mapping plan to align fields, tickets, and contacts between the two systems. Use dependable export methods to capture everything you need, such as ticket histories, customer profiles, and any attachments.
Once the migration is done, validate the transferred data by comparing it to the original source. Make sure ticket IDs, timestamps, customer information, and the relationships between data objects are intact. Running test migrations ahead of the full transfer is a smart way to catch and resolve any issues early. After the migration, test workflows, generate reports, and verify that all critical data is accurate and easy to access in the new system. Taking these steps helps maintain data integrity and reduces the risk of errors.
What should I do if some data doesn’t transfer correctly during migration?
If you find that some data didn’t transfer correctly during migration, begin by conducting a small-scale test migration. This helps identify potential problems before tackling the full process. Once the test is complete, carefully review the transferred data to ensure all critical information is intact. If you spot any gaps, consider using manual methods or alternative tools to recover and re-import the missing data. Always double-check the accuracy and completeness of the data before finalizing the migration to avoid unnecessary disruptions.
Related Blog Posts
- Help Desk Migration Checklist: How to Switch Platforms Without Downtime
- How do you run a successful help desk migration project (timeline, roles, and cutover plan)?
- How do you migrate from a US helpdesk to a non-US platform without losing history or data?
- How do you migrate from Salesforce Service Cloud to a helpdesk without losing case history?