Migrating your help desk system can save costs, improve team efficiency, and reduce agent burnout – if done correctly. However, 83% of data migration projects fail or exceed budgets and timelines. Here’s how to avoid common pitfalls and ensure a smooth transition:
- Plan thoroughly: Set clear goals, audit your current system, and define key metrics like uptime, response times, and data accuracy.
- Assemble the right team: Include a project manager, support lead, IT specialist, power users, and stakeholders to cover all aspects of the migration.
- Prepare data and train your team: Clean and validate data, map fields accurately, and involve agents in testing the new platform.
- Choose the right migration approach: Decide between a "Big Bang" or phased migration based on your system’s complexity and risk tolerance.
- Test post-migration: Check data integrity, validate workflows, and gather feedback to fix issues quickly.
A detailed cutover plan, backups, and AI tools for automation can reduce errors and ensure success. Proper execution and testing are non-negotiable for a seamless transition.
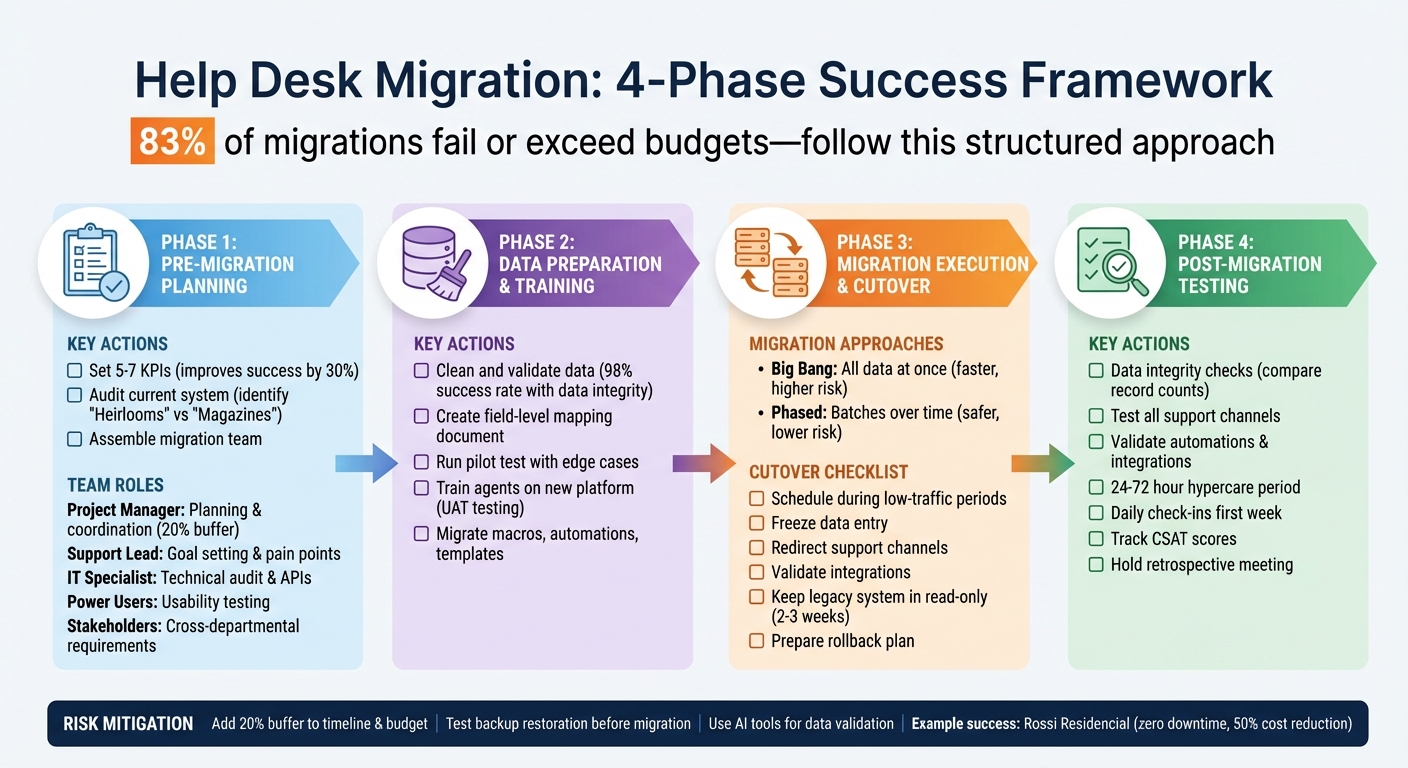
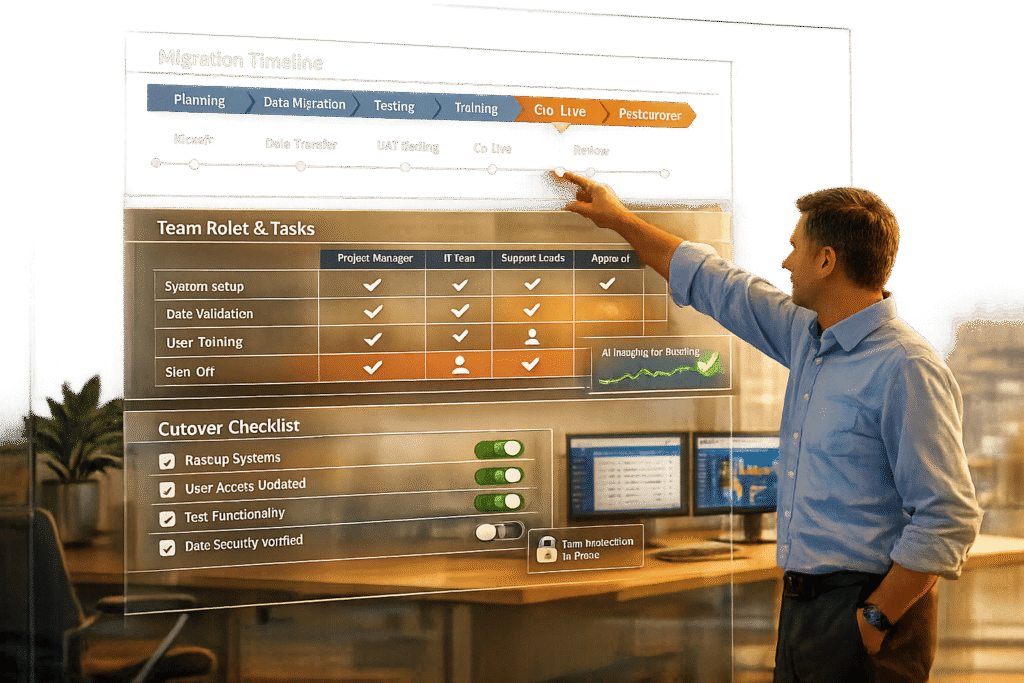
4-Phase Help Desk Migration Process: Timeline, Roles, and Key Actions
Phase 1: Pre-Migration Planning
Pre-migration planning is the backbone of a successful migration. Without it, projects often stumble – 83% of them, to be exact. This phase is all about laying the groundwork to avoid costly missteps. It involves setting clear goals, understanding the limitations of your current system, and assigning responsibilities to the right people.
Set Clear Success Metrics
Focusing on 5–7 key performance indicators (KPIs) can improve your chances of success by 30%. Start by evaluating your current performance metrics – things like system uptime, average response times, and other benchmarks that will help measure post-migration progress.
Choose metrics that align with your business objectives. For example:
- Financial metrics like Total Cost of Ownership (TCO) can show if migration is saving money.
- Technical metrics like migration velocity (records transferred per week) help track progress.
- User metrics like adoption rates and CSAT scores indicate how well users are adapting.
- Data integrity metrics, such as mapping accuracy, ensure critical relationships between customer records and tickets remain intact.
"You don’t have to put your help desk data back in the same place!" – Ashley Milne, Data Migration Specialist, Import2
Set baseline measurements for your chosen metrics and define alert thresholds. For instance, a 10% reduction in downtime could save $150,000 annually. These baselines and thresholds will help you act quickly if something goes off track.
Once your metrics are defined, take a deep dive into your current system to figure out what matters most.
Audit Your Current System
A comprehensive audit is essential to determine what data is worth transferring and what’s best left behind. Start by creating a data inventory: count tickets, customer records, and attachments. Identify duplicates, incomplete fields, and outdated information that could clutter your new system. Eliminating irrelevant data will make the migration smoother.
"There’s no benefit to moving junk. A clean dataset saves time, reduces risk, and improves results in the new system." – Eric Klimuk, Founder and CTO of Supportbench
Consult your frontline agents to uncover any workaround processes they’ve developed. Review your vendor contracts early – look for automatic renewal clauses or cancellation fees that could affect your timeline. Compare the listed price of your current system with actual costs, including hidden fees for things like API calls or premium features.
Also, evaluate your system’s compliance with regulations like GDPR or HIPAA. If there are gaps, document them as must-haves for the new platform. Companies that prioritize data integrity see a 98% success rate in their migrations. Organize your data into two categories:
- "Heirlooms": Critical customer history that must transfer perfectly.
- "Magazines": Outdated or irrelevant information that can be archived or discarded.
Assign Migration Team Roles
A successful migration requires a team effort – it’s not just an IT project. Here’s how to structure your team:
- Project Manager: Oversees the entire process, setting realistic timelines with a 20% buffer for unexpected issues. They align all departments and manage the budget.
- Support Lead: Focuses on frontline operations, identifying pain points like agents struggling to find customer history and setting improvement targets.
- IT/Technical Specialist: Handles the technical side, from evaluating API documentation to developing a data mapping strategy.
- Power Users: Your most experienced agents test workflows in sandbox environments, ensuring tasks remain intuitive. They also act as internal advocates for the migration.
- Cross-Functional Stakeholders: Representatives from Finance, Sales, or Engineering ensure that integrations with systems like CRM or billing platforms are accurately mapped.
| Role | Primary Responsibility | Key Contribution |
|---|---|---|
| Project Manager | Planning & Coordination | Defines scope, timeline, and includes budget buffers |
| Support Lead | Goal Setting | Identifies operational pain points and key metrics |
| IT Specialist | Technical Audit | Evaluates APIs, security, and data structure |
| Power User | Usability Testing | Validates workflows in sandbox environments |
| Stakeholders | Requirements Gathering | Ensures cross-departmental integrations are mapped |
Each role plays a critical part in keeping the migration aligned with your business goals. Involve team members early, especially during the audit phase. Additionally, assign someone to document current system settings – like automation rules and notification triggers – since these often need to be manually recreated in the new system.
Phase 2: Data Preparation and Team Training
With your team and objectives established, it’s time to tackle data preparation and get your agents ready for the transition. This phase builds on your earlier planning and focuses on ensuring your data is clean and your team is equipped to handle the new platform. Why does this matter? Because poor data quality and untrained staff are the leading causes of migration failures.
Clean and Validate Your Data
Start by auditing your data to weed out duplicates, outdated records, incomplete fields, and inconsistent formats. Only migrate what’s necessary – like active tickets from the last 12 months – and archive anything irrelevant. Bringing over years-old, unused data will only clutter the new system and slow things down.
Create a field-level mapping document to align your old system’s fields with the new one. For instance, if your current platform uses "Customer Name" and the new one uses "Contact Name", make sure to document that mapping. Pay close attention to tricky fields like date formats, currency codes, and user IDs, as these can easily lead to errors if not handled properly.
Run a pilot test with a small subset of data. Include edge cases to ensure your mapping works correctly and catch any issues early. Afterward, compare record counts between the old and new systems and double-check complex tickets to confirm that timestamps, custom fields, and inline images transferred correctly.
Before the final migration, perform a test restore in a separate environment to confirm the integrity of your backups. Consider freezing changes to your legacy system during the final cutover to avoid mismatches caused by last-minute edits.
Once your data is in order, shift your focus to preparing your team.
Train Agents on the New Platform
Even the best platform won’t deliver results if your team doesn’t know how to use it effectively. Get your top agents involved early in the process – during platform selection and testing. This not only builds buy-in but also helps uncover workflow gaps. Have them conduct User Acceptance Testing (UAT) by working through their most common ticket types in a sandbox environment. They’ll spot confusing features or missing functionality that others might miss.
"The real game-changer was involving our top support agents in the testing (QA) phase. They caught three critical workflow issues we would have missed." – ClonePartner Customer
Don’t forget to migrate existing macros, automations, and templates to maintain productivity. Tailor training materials to specific roles and record all sessions so your team can revisit them as needed during the first few weeks.
During the rollout, hold daily check-ins or pulse surveys to quickly identify and address any UI or navigation challenges. Offer live chat support or "office hours" for agents during the transition. Highlight how the platform’s AI-powered tools – like automated data validation or smart ticket routing – will simplify their workload and make their tasks more efficient.
Phase 3: Migration Execution and Cutover Plan
You’ve prepped your data and trained your team – now it’s time to carry out the migration. Data migrations are inherently risky, so the goal is to implement the new system while keeping disruptions to your support operations as minimal as possible.
Choose Your Migration Approach
When it comes to migration, there are two main paths: Big Bang or Phased.
- Big Bang Migration: All data is transferred at once during a scheduled cutover window. This method is quicker and often less expensive upfront. However, it carries higher risk – if something goes wrong, your options for recovery are limited.
- Phased Migration: Data is transferred in smaller, more manageable batches over time. This allows for testing and troubleshooting while both the old and new systems run in parallel. While this approach takes longer and may cost more due to dual-system maintenance, it significantly lowers the risk of major disruptions.
For complex, customer-facing systems, a Phased migration is typically the safer choice. On the other hand, internal systems with lower stakes may benefit from a Big Bang approach, provided you’ve conducted thorough testing beforehand. A great example comes from Rossi Residencial, a Brazilian construction company. In 2025, they successfully migrated four SAP environments with zero downtime by combining detailed pre-migration assessments and phased rollouts. Impressively, they also managed to reduce infrastructure costs by 50%.
Once you’ve chosen your approach, you’ll need to focus on executing a well-structured cutover plan.
Execute the Cutover Plan
Here’s how to handle the cutover phase effectively:
- Timing Is Everything: Schedule the cutover during low-traffic periods – weekends, holidays, or off-peak hours – to minimize disruptions for your users.
- Freeze Data Entry: Before starting, pause new ticket creation or reroute incoming conversations in your old system. This avoids data inconsistencies during the transition.
- Redirect Support Channels: On the go-live day, ensure all support channels – email aliases, contact forms, embedded chat widgets, and any other entry points – redirect to the new platform.
- Validate Integrations: Double-check that all integrations, like your CRM, analytics tools, and notification systems, are functioning as expected. Confirm SLA rules and alerts are active.
- Legacy System Access: Keep the old system in read-only mode for two to three weeks after migration. If you’re using a Phased approach, adjust data freeze and rollback protocols accordingly.
Having a rollback plan is critical. Test your backup restoration process beforehand, and prepare scripts to reactivate legacy email routing in case something goes wrong. Set up a dedicated “war room” communication channel for your team to coordinate in real time during the cutover. As Justin Rochell, Support Leader at Pocket, wisely advises:
"Don’t rush it".
Finally, add a 20% buffer to your timeline and budget to account for any unexpected technical hiccups.
Once the cutover is complete, move on to testing and optimization to finalize the transition.
Phase 4: Post-Migration Testing and Optimization
The cutover is done, but the journey isn’t over yet. Rushing through post-migration testing can lead to costly mistakes or even project failure. This phase acts as your safety net, ensuring everything works as it should before you declare the migration a success.
Test System Performance and Data Accuracy
Now that the new system is live, it’s time to ensure every piece of data and functionality is in place. Start with data integrity checks. Compare the total number of records in the old and new systems for tickets, contacts, and organizations. Randomly audit tickets from different time periods to confirm that custom fields, attachments, timestamps, and comments have migrated correctly. Ensure contacts are still linked to their respective organizations, and verify that knowledge base articles are properly formatted, with working internal links.
Next, test system functionality across all support channels. Create test tickets via email, your web portal, social media, and API endpoints to confirm they populate accurately. Double-check agent roles and permissions to prevent unauthorized access, and test the workflows for the five most common ticket types to ensure they operate smoothly.
Don’t stop there – validate automations, integrations, and business rules. Confirm that tickets are routed to the right teams and that automated notifications trigger as intended. Check data flows for key third-party integrations, like Salesforce, Jira, or Slack, to ensure everything syncs properly. Run reports (e.g., first response time, ticket volume) and compare them with historical data to verify accuracy.
Finally, assess real-world performance. Measure response times for tasks like opening tickets or running searches during peak hours. Have agents complete their daily tasks in the system and note any interface lags. Review the customer portal from a user’s perspective to ensure it’s intuitive for self-service and ticket submission. As ClonePartner aptly puts it:
"Skipping the QA phase is one of the most disastrous Common Help Desk Migration Mistakes you can make. It’s like building a new house and not checking if the plumbing or electricity works before moving in".
Thorough testing now ensures smooth operations later.
Collect Feedback and Adjust Processes
Once testing is complete, focus on gathering feedback to address any lingering issues. The first 24–72 hours after go-live – known as the hypercare period – are critical. Set up a dedicated Slack or Microsoft Teams channel where agents can report bugs, data inconsistencies, or workflow challenges in real time. Use a shared document or project board to track these issues, assign owners, and monitor their resolution.
During the first week, conduct daily check-ins or pulse surveys to identify usability problems early. Monitor external feedback by tracking Customer Satisfaction (CSAT) scores immediately after go-live, and compare metrics like first response time and resolution rate against pre-migration data. If you notice any dips, investigate and resolve them quickly.
Once the hypercare period wraps up, hold a retrospective meeting with project leads, technical teams, and users. Use this session to pinpoint what caused issues and what went smoothly. Document these findings – along with any workarounds or process improvements – in a centralized knowledge base. This will make future migrations or updates far more manageable.
sbb-itb-e60d259
Best Practices for Risk Mitigation
Migrations typically stumble over avoidable errors, not technical barriers. With thorough planning and execution as your foundation, these practices can help further reduce risks. By concentrating on two key areas – data protection and team alignment – you can significantly lower the chances of migration issues.
Prevent Data Loss and Corruption
Losing data during migration can throw operations into chaos. Start by auditing and cleaning your data before transferring it. Eliminate duplicates, outdated entries, and inconsistent formats – bringing unclean data into a new system only carries over old problems. Create a detailed field-mapping document that connects every source field to its target location. Include transformation rules for elements like date formats, currency codes, and naming conventions. Also, ensure relational data integrity by preserving links between related records during the move.
While backups are essential, they’re only as good as your ability to restore them. As ClonePartner aptly states:
"A backup is useless if you can’t restore it."
Test your backups in a separate environment to confirm they work as intended. This includes verifying attachments, inline images, and timestamps. For added safety, keep your old help desk in read-only mode for 2–3 weeks post-migration, providing a fallback reference in case something goes wrong.
Prepare for worst-case scenarios by developing and testing rollback scripts. Have a backup email routing method in place, like reactivating legacy access, in case the new system fails to process tickets. During the cutover, freeze source data temporarily to avoid mismatches from last-minute edits. Use live dashboards and audit logs to spot and address anomalies early. Finally, build a 20% buffer into both your timeline and budget to handle unexpected technical issues.
While protecting your data is crucial, keeping your team aligned is just as important for a seamless migration.
Keep Your Team Informed and Aligned
Smooth migrations depend on people as much as technology. Clear communication and proactive management can prevent team-related issues from derailing the process. As mentioned earlier, assemble a cross-functional team that includes a support lead, a top agent, IT staff, and a project manager. These individuals will act as champions throughout the migration. Define a clear "North Star" by documenting the migration’s purpose – whether it’s improving reporting or speeding up onboarding – so the team stays focused when challenges arise.
Keep all departments, such as engineering, finance, and operations, informed about the migration schedule, potential impacts, and any new workflows. Notify your customers ahead of time about the upgrade and be transparent about possible slower response times during the transition. Equip your support team with pre-written communication templates to ensure consistent and reassuring messages to clients.
Involve frontline agents early by giving them sandbox access to simulate tasks and provide feedback before the full rollout. Record training sessions on the new platform so these resources remain accessible for current and future team members. Set up a dedicated feedback channel – like a Slack workspace or shared document – immediately after launch to quickly address agent-reported issues. Also, create a support contact list for rapid internal responses during the initial weeks post-migration. Finally, plan your cutover during quieter periods, such as weekends or low-activity times, to minimize customer disruptions and allow your team to focus on resolving any issues.
How AI Simplifies Migration
Integrating AI into your migration process not only cuts down on manual errors but also speeds up the entire operation. Manual migrations often lead to bottlenecks and mistakes, with many projects running over budget and past deadlines. AI-powered tools tackle these challenges by automating much of the technical work – such as data validation and post-migration tasks – so your team can focus on strategic decisions rather than repetitive processes.
AI-Powered Data Validation and Transfer
AI simplifies data migration by automating processes that used to require extensive manual effort. For example, automated ETL (Extract, Transform, Load) processes handle data extraction, apply transformation rules to standardize formats, and load everything into the new platform. This approach not only ensures accuracy but also generates detailed audit trails for accountability. Tasks like standardizing date formats, currency codes, and naming conventions are handled seamlessly.
These modern AI tools are designed to be user-friendly, often requiring no coding or deep technical expertise. They can identify duplicates, flag outdated records, and fix formatting inconsistencies while maintaining the integrity of relational data.
To minimize disruptions, schedule migration jobs during off-peak hours. Before fully switching over, AI tools can migrate a small sample of actual data – including edge cases like inactive users or legacy formats – to ensure the mapping logic works correctly. Real-time dashboards keep you informed during the transfer, flagging any anomalies immediately.
Boost Agent Productivity with AI
AI doesn’t just streamline data migration – it also enhances daily support operations. Rule-based automation takes care of ticket routing, tagging, and SLA enforcement, ensuring requests are sent to the right agents or departments without any manual intervention.
AI co-pilots further boost productivity by analyzing historical cases and knowledge bases in real time. This reduces the time agents spend searching for solutions. Features like automated ticket categorization and predictive analytics – such as AI-driven CSAT (Customer Satisfaction) and CES (Customer Effort Score) predictions – help managers identify and address potential issues before they escalate.
Conclusion
Successfully migrating a help desk system isn’t just a technical task – it’s a careful, business-critical process that demands thorough preparation, clear communication, and the right tools. As Eric Klimuk, Founder and CTO of Supportbench, explains:
"Data migration is more than just copying files from one system to another – it’s a delicate, high-stakes process that can affect everything from day-to-day operations to long-term compliance".
With 83% of migrations either failing or exceeding budgets and timelines, a structured approach is the best way to minimize risks. Each phase – planning, execution, and testing – plays a vital role in ensuring a smooth transition.
Start with a clear goal for your migration, whether that’s improving onboarding efficiency, cutting infrastructure costs, or enhancing reporting capabilities. Audit your data thoroughly to remove unnecessary information, and involve frontline agents in User Acceptance Testing. Their hands-on experience often helps uncover workflow issues that technical teams might overlook. Plan for contingencies by including a 20% buffer in both your timeline and budget to handle unexpected challenges.
Testing is non-negotiable. Run pilot migrations with real-world data, including tricky cases like legacy formats or inactive users, before committing to the full migration. Post-migration, keep your legacy system available in read-only mode for 2–3 weeks as a fallback option.
AI can play a powerful role in this process. Automating tasks like data validation, format standardization, and integrity checks not only speeds up the migration but also improves daily operations with features like intelligent ticket routing. These automation tools complement the careful planning and testing phases, creating a more seamless transition.
Finally, post-migration health checks, ongoing metric tracking, and feedback loops are essential to ensure the system is performing as expected and to address any lingering issues. By adopting a systematic approach and leveraging modern tools, you’ll reduce risks, stay on budget, and set your support team up for success in the long run.
FAQs
What are the biggest risks of a help desk migration, and how can you avoid them?
The most common risks in a help desk migration include data loss, system downtime, broken workflows, and compliance issues. Data loss can happen if tickets, workflows, or other information aren’t properly cleaned, mapped, or transferred. System downtime may disrupt day-to-day operations, while broken workflows can impact team efficiency if critical data relationships aren’t preserved. Compliance risks are another concern, especially if sensitive customer data isn’t securely managed during the process.
To reduce these risks, start with careful planning. This means cleaning and organizing your data, setting clear goals, and using specialized tools for help desk migrations. Running pilot tests is a great way to catch potential problems early. You can also use strategies like delta migrations, which transfer only new or updated data during the final cutover, helping to minimize downtime. Once the migration is complete, validate the results by testing workflows and ensuring data accuracy. Finally, make sure your team is trained on the new system to keep everything running smoothly and maintain productivity.
Why is it important to involve frontline agents during a help desk migration?
Involving frontline agents in the migration process plays a key role in ensuring a smooth and efficient transition. When these team members are actively included, it reduces resistance to change because they feel like an integral part of the process. This sense of inclusion not only builds their investment in the project but also helps them adapt to new workflows early on, which can significantly cut down on disruptions after the migration is complete.
Frontline agents also bring a wealth of knowledge from their daily experiences. Their firsthand insights can help pinpoint potential challenges, offer practical suggestions for improvement, and provide feedback that strengthens the migration plan. Engaging them fosters a sense of collaboration, paving the way for greater adoption and long-term success.
How does AI make help desk migration easier and more efficient?
AI takes the hassle out of help desk migration by handling tedious tasks, ensuring data accuracy, and improving workflow efficiency. It automates processes like data transfer, cleaning, and validation, which not only saves time but also ensures data integrity. Plus, it preserves critical ticket relationships, making the transition as smooth as possible.
AI-powered tools also keep an eye on the migration process in real time, spotting and addressing issues quickly to reduce downtime. Features like predictive analytics and automated workflows help teams anticipate and tackle potential problems before they escalate. This makes the migration process quicker, more dependable, and cost-efficient. By using AI, businesses can cut risks and boost efficiency throughout the migration journey.