
Switching help desk platforms can be risky – data loss, downtime, and disrupted workflows are common pitfalls. With 83% of data migration projects failing or exceeding budgets and timelines, a structured approach is critical. Here’s how to ensure a smooth transition:
- Set Goals: Define measurable objectives like reducing costs or improving ticket resolution times.
- Clean Data: Audit and standardize records to eliminate duplicates and outdated information.
- Build a Team: Assign roles like project manager, IT specialist, and data owner to oversee tasks.
- Back Up Data: Securely store all tickets, customer records, and settings before migration.
- Test Thoroughly: Use a small data sample to validate field mapping and system configurations.
- Monitor Progress: Track migration in real-time to catch and fix issues early.
- Go Live in Phases: Start with a pilot group and keep the old system in read-only mode as a fallback.
- Collect Feedback: Engage agents to identify and resolve usability issues post-migration.
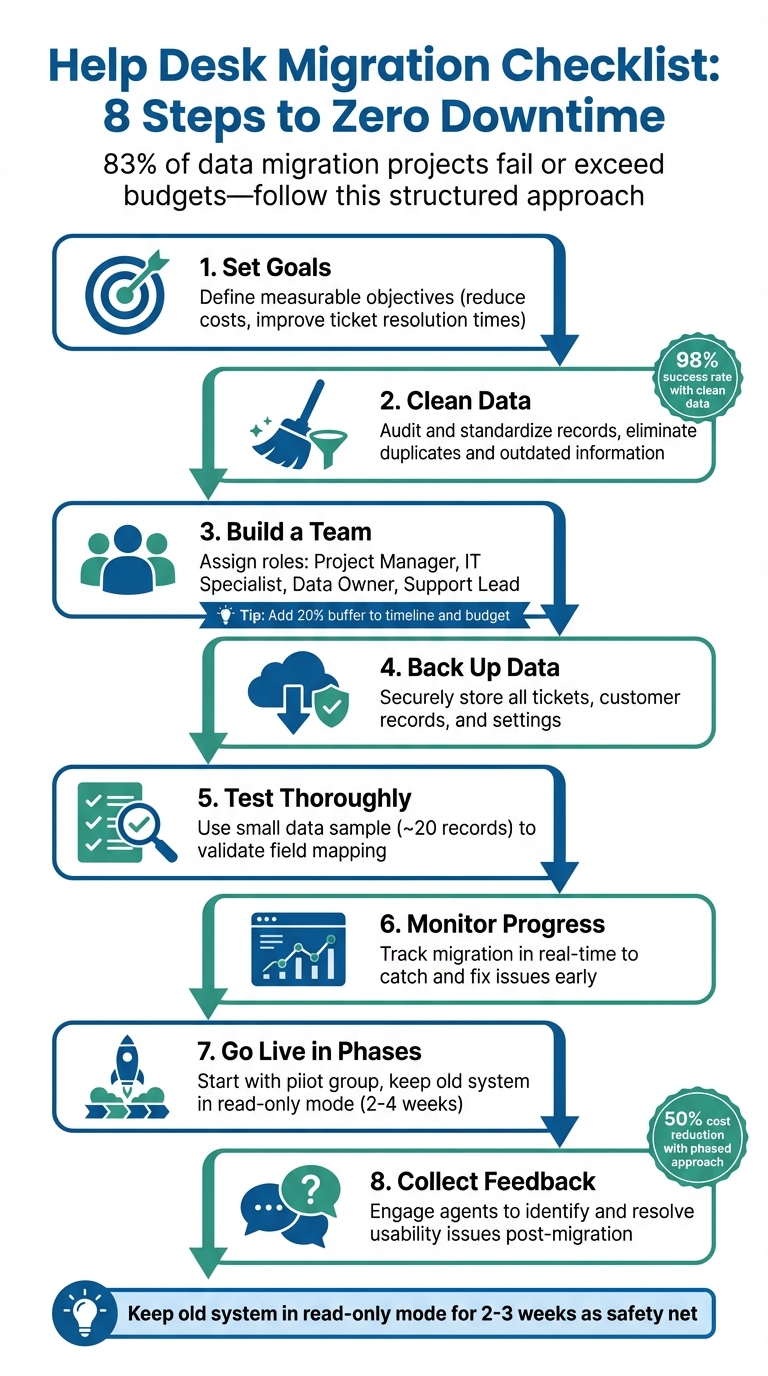
8-Step Help Desk Migration Checklist for Zero Downtime
How Does the Help Desk Migration Wizard Work?
Pre-Migration Planning
Laying a strong foundation before migrating any ticket or contact record is crucial. This early phase ensures a smooth transition, avoids downtime, and keeps your support operations running without interruptions. The steps below set the groundwork for the detailed planning covered in the next sections.
Set Clear Migration Goals
Start by defining specific, measurable goals for your migration. Are you aiming to reduce agent onboarding time from six weeks to one? Lower ticket resolution times by 30%? Cut infrastructure costs by half? These objectives will guide every decision – from data mapping to feature prioritization.
"Your ‘why’ is your North Star. It’s the goal you’ll point to when a teammate asks why you’re spending so much time on data mapping, or when your boss questions the budget." – ClonePartner
Focus on the data that aligns with your goals, and avoid carrying over unnecessary legacy records. For example, in July 2025, Rossi Residencial, a leading Brazilian construction company, partnered with Sky.One and Google Cloud to migrate four SAP environments to a scalable cloud platform. By conducting a pre-migration assessment and rolling out changes in phases, they achieved their first zero-downtime migration, cut infrastructure costs by 50%, and avoided any service disruptions during the process.
Clean Up Your Existing Data
A clean slate makes for a smoother migration. Start with a comprehensive audit of your help desk system. Eliminate duplicate customer records, remove tickets from test accounts, and discard outdated data that no longer serves a purpose. Companies that prioritize data integrity during migrations have seen a 98% success rate in their help desk transitions.
Pay close attention to how your team is currently using the system. Are agents creating manual workarounds, like custom tags, to compensate for missing features? Are date formats inconsistent across records? These details matter. Standardize everything now – currency codes, phone number formats, time zones – to avoid troubleshooting mismatches later.
"There’s no benefit to moving junk. A clean dataset saves time, reduces risk, and improves results in the new system." – Supportbench
Make sure your cleaned-up data aligns with the goals you’ve set for the migration.
Build Your Migration Team
Assemble a diverse team to tackle the migration from all angles. Start by appointing a project manager to oversee the timeline and budget, a support lead to define success from the agents’ perspective, and IT specialists to handle the technical aspects like API configurations and security.
Include experienced agents who know the system inside and out – they’ll catch workflow issues during testing that others might overlook. Also, assign a data owner to manage cleanup and ensure field mapping accuracy. If other departments, like finance or marketing, rely on help desk reports, make sure they’re involved too.
| Role | Responsibility | Contribution |
|---|---|---|
| Project Manager | Timeline & Budget | Keeps the project on track and manages risks |
| Support Lead | Strategy & Goals | Ensures the tool addresses core support needs |
| IT Specialist | Technical Execution | Handles APIs, security, and system integrations |
| Power Agent | Testing & Feedback | Validates usability and supports user testing |
| Data Owner | Data Integrity | Oversees cleanup and ensures field mapping is accurate |
To keep everyone aligned, set up a shared Slack channel or collaborative document from day one. And here’s a practical tip: add a 20% buffer to both your timeline and budget. Unexpected technical issues and data mismatches are almost inevitable, and this cushion will help you stay on track when they arise.
Prepare Your Current Platform
Once you’ve set clear migration goals and ensured your data is clean, the next step is preparing your existing platform. This critical phase helps protect against data loss and ensures a smooth, accurate transfer.
Back Up All Your Data
Start by creating a complete backup of your help desk data – this includes tickets, customer records, knowledge base articles, attachments, and system settings. Store the backup securely, whether off-site or in cloud storage, and test it in a sandbox environment to confirm everything is intact.
For added safety, consider freezing changes during the backup and migration process. Temporarily disable integrations like email, chat, and social media to maintain consistency and avoid missing new tickets.
| Backup Component | Description | Recommended Action |
|---|---|---|
| Tickets & Comments | Full history of customer interactions | Export in a structured format (CSV/JSON) with metadata included |
| Customer Records | Contact info, organizations, and fields | Check for GDPR/CCPA compliance before saving |
| Knowledge Base | Articles and internal links | Preserve HTML formatting and document image locations |
| Attachments | Screenshots, logs, and documents | Verify file integrity and accessibility after export |
| System Settings | Macros, triggers, and automation rules | Manually document or screenshot these for recreation in the new system |
One detail often overlooked is documenting your business rules, macros, and automation settings manually. These rarely transfer automatically, so having clear records will save time when setting up your new platform. Also, keep your original help desk account active until the migration is fully validated and the new system is operational. This provides a backup plan if anything goes awry.
Standardize Data Fields
Before exporting your data, standardize and clean it to eliminate inconsistencies. Create a detailed mapping document that outlines how each data field will translate into the new platform. This should include renaming fields, reformatting dates, aligning currency codes, and matching user IDs with the new system’s conventions. Maintaining these relationships is essential to ensure that links between records, like tickets and users or attachments and tickets, remain functional.
Here’s a practical tip: disable mandatory field checks temporarily during migration. This prevents errors caused by missing values in older records. For fields with missing data, assign default values to ensure every record is accepted by the new platform.
"A clean dataset saves time, reduces risk, and improves results in the new system." – Eric Klimuk, Founder and CTO, Supportbench
By standardizing your data, you set the foundation for a seamless transfer and smooth integration into your new system.
Communicate with Your Team and Customers
Clear communication is key during migration to avoid confusion. Notify your internal teams and customers about the process, including any temporary disruptions and timelines. Share updated instructions and ensure automated alerts are disabled during the data transfer to prevent customers from receiving unnecessary or confusing notifications.
Prepare your support agents with response templates so they can provide consistent and accurate updates to customers. Technically, disabling automated alerts and triggers in your current system during the migration process prevents unwanted emails from being sent while records are being moved.
"A successful data migration isn’t just a technical achievement – it’s also a communication project." – Supportbench
Conduct a thorough audit of all incoming support channels – such as old forum links, API integrations, and embedded widgets – and ensure they are redirected properly. Clearly communicate these changes to users. Finally, schedule the migration during a low-activity period to minimize disruptions. With your current system backed up, standardized, and your team prepared, you’re ready to configure the new platform.
Set Up Your New Platform
Now that your data is backed up and standardized, it’s time to configure your new help desk system. Laying a strong foundation ensures that incoming data fits into a well-organized structure, minimizing errors during import and saving you from extra work down the line.
Configure User Roles and SLAs
Start by creating agent profiles with their full names and email addresses. This step is crucial for maintaining accurate historical record mapping. For any former employees, manually reassign their historical data to an active user to ensure no records are left unaccounted for.
Assign a "Default Agent" – usually the person overseeing the migration – to take ownership of any records linked to unassigned, inactive, or deleted agents from your old system. This avoids the issue of orphaned tickets without a clear owner. Double-check your platform’s user seat limits and reporting capabilities to confirm they align with your team’s structure and budget.
Rebuild your Service Level Agreements (SLAs) in the new system. Be sure to include automated alerts for overdue tickets and escalation rules so operations can continue seamlessly from day one. Before importing any data, disable email notifications, observer rules, and automation workflows in the new platform. This precaution prevents an overwhelming flood of emails to both customers and agents during the migration process.
Map Your Data Fields
Create a detailed mapping document that outlines how each data element will translate into the new system. Temporarily set mandatory fields to "optional" during the migration to avoid import errors caused by empty values. Carefully match field types – like text, dropdown, checkbox, and date – between the two platforms to ensure everything transfers correctly. Don’t forget to manually set up any custom fields in the new system’s admin center before starting the import.
Pay particular attention to relational data. For example, tickets need to stay connected to the correct contacts, organizations, and agents to maintain conversation history. Check the API limits of your new platform as well – higher limits can speed up the migration and allow for more intricate field mapping.
Test with Sample Data
Before diving into a full migration, run a test with a small sample of about 20 records. This sample should include edge cases, such as inactive users, legacy formats, unusual record types, and tickets with numerous attachments or replies. Review the results for any failed or skipped entries, and refine your field mapping until everything aligns perfectly.
Ensure relational data remains intact by verifying that comments appear in chronological order and that links between tickets, users, and organizations are preserved. Invite frontline support agents to test the migrated sample data. Their hands-on experience can help identify usability issues or workflow challenges before the full migration goes live.
Once the sample data tests confirm that your configurations and mappings are spot on, you’re ready to move forward with the complete migration.
sbb-itb-e60d259
Execute the Data Migration
With your configurations thoroughly tested and validated, it’s time to proceed with moving your entire dataset. This step demands precision and focus, especially considering that 83% of data migration projects either fail outright or go over budget and timeline expectations.
Transfer Your Data
Start by freezing changes in the source system. Disable notifications and automation in both the source and target systems, and request temporary API limit increases to avoid bottlenecks. Freezing changes during migration is critical to prevent issues like corrupted or incomplete data.
Employ an interval migration strategy, which allows you to pause and resume transfers during off-peak hours. After completing the initial data transfer, perform a delta migration to capture any updates made since the process began. This ensures that data remains current without creating duplicates. For example, in July 2025, Rossi Residencial – a prominent Brazilian construction company – successfully migrated four SAP environments to Google Cloud using a phased rollout strategy with mirrored architecture. This approach resulted in a zero-downtime migration, a 50% reduction in infrastructure costs, and no service interruptions.
Throughout the transfer, closely monitor progress to identify and address any issues early.
Monitor the Transfer Process
Once the transfer begins, shift your focus to continuous monitoring. Leverage real-time dashboards to track the progress of tickets, contacts, and custom fields as they migrate. As Eric Klimuk, Founder and CTO of Supportbench, explains:
"Real-time dashboards to monitor performance and progress… helps teams catch anomalies quickly – before they cascade into larger problems".
Monitor data in manageable batches instead of waiting for the entire migration to finish. This approach allows you to pinpoint specific failures or anomalies early on, minimizing potential disruptions. Keep an eye on API request usage – hitting your vendor’s limit could halt or even fail the migration process. Regularly review audit logs to track changes and simplify troubleshooting.
If any records fail to migrate, download error reports to identify and resolve issues related to field mapping or formatting.
Verify Data Accuracy
After completing the transfer and monitoring phases, it’s essential to validate the accuracy of the migrated data. Select samples from different time periods to confirm field integrity and ensure relational data remains correct. Verify that IDs, subjects, descriptions, statuses, and custom fields match exactly. Pay particular attention to relational data, ensuring that tickets are still linked to the correct contacts and that ticket comments maintain their original chronological order.
Manually check a selection of attachments to ensure they are accessible and intact. Since help desk platforms often use different URL structures, review your knowledge base to confirm that internal cross-links and embedded images are still functional. Update any macros or templates referencing outdated URLs as needed.
Finally, generate key reports – such as first response time, resolution time, and ticket volume – in your new system. Compare these reports to historical data from your old platform to ensure everything has transferred correctly. As Eric Klimuk points out:
"Validation is your safety net – it confirms that everything moved as expected and continues to function correctly in the new system".
Make post-transfer verification a priority to capture detailed migration records and address any lingering issues promptly.
Test the New System
Once your data has been successfully transferred and verified, the next step is to make sure everything works as it should. This phase is all about quality assurance, ensuring that your team can hit the ground running without interruptions. As ClonePartner wisely points out:
"A QA plan shouldn’t be an afterthought; it should be developed during the initial planning stage to define what a successful migration looks like."
This testing stage connects the dots between your migration efforts and deployment, ensuring your system is fully operational.
Run Complete System Tests
Start by testing every channel – email, web portal, social media, and API – to confirm that tickets are created correctly and all fields populate as they should. Simulate real-world scenarios to test business rules, macros, and automations. Check that routing, group assignments, and automated notifications are functioning as expected.
Make sure to log in with various user profiles (like admin, team lead, and agent) to confirm access levels are properly set. Test how data flows between your help desk and third-party tools to avoid data silos. Verify that Service Level Agreements (SLAs) are both visible and enforceable in real time. Don’t forget to review your knowledge base articles for formatting problems and conduct a link audit to ensure internal links and embedded media work without issues.
Once you’ve confirmed the basics, it’s time to focus on testing your system’s AI features.
Test AI Features
After verifying standard operations, turn your attention to the platform’s AI-driven capabilities. Test automated tagging, routing, notification templates, and AI-generated reports to ensure they align with historical data. Send sample inquiries to see if automated tagging captures the intent and context of messages accurately, and create test cases to confirm AI-driven routing works as intended.
Check that automated notifications and templates are correctly populating dynamic fields like customer names and ticket IDs, while also maintaining consistent branding. Generate reports, such as predictive CSAT scores and first response times, and compare them to historical benchmarks to validate accuracy. Since many AI features rely on API requests, confirm that your platform’s API limits can handle the workload. Lastly, manually update knowledge base article links to prevent broken references in AI-powered auto-responses.
Get Agent Feedback
Your agents’ feedback is invaluable for identifying issues that automated tests might miss. Have them try out common tasks in a sandbox environment, such as handling tickets, managing escalations, and generating reports. Pay extra attention to collaborative tools like @mentions, collision detection, internal notes, and conversation assignments to ensure the workflow feels smooth and intuitive.
Encourage agents to participate in "break it if you can" sessions, where they intentionally test complex or less common workflows to uncover hidden flaws. Set up a dedicated feedback channel for agents to report issues like broken links, missing attachments, or incorrect fields.
As Supportbench highlights:
"Your agents are the first to notice friction – missing features, sluggish response, confusing UI. Make space for daily check-ins or pulse surveys during the rollout week to surface issues early."
Use this input to fine-tune permissions, templates, workflows, and UI settings before rolling out the system more broadly.
Go Live and Monitor Performance
After thorough testing and pre-launch preparation, it’s time to take the leap and go live. A well-planned, phased approach can make the transition smoother and reduce the chances of major disruptions.
Launch in Phases
Start with a careful, step-by-step rollout. Begin with small data batches or a pilot group during off-peak hours. To ensure stability, run the old and new platforms side by side for 2–4 weeks. This overlap allows you to spot any missed workflows or unexpected issues. Keep a fallback plan ready, and perform a delta sync to capture any recent updates. For added safety, keep the old system in read-only mode for 2–3 weeks after the switch. During this time, update all support touchpoints – like email forwarding, web forms, and chat widgets – to align with the new platform once the initial data transfer is verified.
Set up a live troubleshooting channel to handle any real-time issues during the transition.
Track Performance Metrics
From day one, start monitoring key performance metrics to establish a baseline and quickly identify potential problems. Use live dashboards to track data points such as first response time, resolution rate, ticket volume, and customer satisfaction. Compare these metrics with historical data from your legacy system to ensure accuracy. Pay close attention to anomalies, like duplicate tickets or missed communications, which might indicate routing errors. According to Gartner, 83% of data migration projects either fail completely or exceed their budgets and timelines. Keeping a close eye on these metrics will help you make necessary adjustments during the rollout.
Collect Feedback and Adjust
Your agents are your best source of insight – they’ll notice any issues first, whether it’s a missing feature, slow response times, or a confusing interface. During the initial week, conduct daily check-ins or pulse surveys to identify problems early. As Eric Klimuk puts it:
"The post-migration phase isn’t just about spotting problems – it’s your window to build momentum."
Create a dedicated feedback channel where agents can report issues like broken links, missing attachments, or mislabeled fields. Work closely with your platform’s onboarding team to tweak ticket flows, automation rules, and SLA compliance based on the initial data and feedback. This continuous feedback loop ensures your new help desk platform adapts to your needs and stays effective as your business grows.
Conclusion
Switching to a new help desk platform doesn’t have to mean downtime or lost data. The secret lies in sticking to a structured plan: plan carefully, clean your data thoroughly, test extensively, and keep monitoring. As Eric Klimuk wisely states, "Switching platforms is a strategic move – one that should be guided by data, not frustration". Considering that 83% of data migration projects either fail or go over budget, having a clear, step-by-step approach isn’t just helpful – it’s absolutely necessary.
Every step in the process matters. Setting clear goals, cleaning up your data, mapping fields accurately, and rolling out the new system in phases are all non-negotiable. A good tip? Keep your old system in read-only mode for a couple of weeks as a safety net. And from day one, track performance metrics closely so you can catch and fix any issues early. These are the cornerstones of a smooth migration process.
Modern tools, like Supportbench, make this easier. With built-in sandbox environments and real-time dashboards, you can test workflows and monitor ticket flows without putting live data at risk. Plus, you get enterprise-level features like predictive CSAT, automated triage, and dynamic SLAs – all starting at just $32 per agent per month.
Once the migration is complete, the work isn’t over. The post-migration phase is all about fine-tuning. Use your agents’ feedback to spot usability issues – they’re the ones who will notice them first. Set up dedicated feedback channels and hold daily check-ins during the first week. This feedback will help you refine ticket flows, tweak automation rules, and ensure SLA compliance. A well-executed migration doesn’t just solve immediate challenges – it sets the stage for scalable, efficient support operations.
FAQs
How can I keep my data accurate and secure during a help desk migration?
Maintaining data accuracy and security during a help desk migration requires thorough preparation. Start by identifying the specific data you need to move – this could include customer records, support tickets, and user settings. Then, plan how this data will fit into the new platform to prevent errors or mismatches.
Before diving into the actual migration, conduct test transfers. This step can help spot potential issues and confirm that everything is functioning as it should. Once the migration is complete, review the results to ensure all data transferred successfully and that workflows, automations, and integrations are operating correctly.
To reduce risks, always create backups of your data and have a rollback plan in place. These precautions will help protect your data’s integrity and keep it secure throughout the migration process.
What should I do if my help desk migration project goes over budget?
If your migration project is running over budget, the first step is to take a closer look at the project scope and pinpoint where costs are exceeding expectations. This often happens due to underestimating the migration’s complexity or running into unforeseen technical hurdles. To regain control, focus on migrating the most critical features and data first. You can also scale back or delay non-essential elements to help manage expenses.
Another way to save money is by leveraging automation tools. These can cut down on manual labor and help avoid transferring unnecessary data. If budget challenges persist, consider breaking the migration into phases to spread costs over a longer period. You might also want to revisit agreements with vendors to explore more cost-effective options.
Above all, maintain open and honest communication with stakeholders. Keep them informed about the challenges, adjustments to the plan, and any extra resources needed. This transparency helps align expectations and ensures everyone stays on the same page as you work to keep the project moving forward.
How can I prevent downtime when migrating to a new help desk platform?
Preventing downtime during a help desk migration takes thoughtful planning and precise execution. The first step is to schedule the migration during low-traffic periods to reduce its impact on your customers. A well-structured migration plan is essential – this should include backing up all data, mapping current workflows to the new system, and identifying any potential risks that could arise.
Before making the switch, run thorough testing to confirm that all data has been transferred correctly and that the new platform operates smoothly. Once the migration is complete, keep a close eye on the system to quickly resolve any unexpected issues that might pop up. Throughout the process, maintain clear communication with both your team and your customers to ensure transparency, preserve trust, and minimize disruptions.