
Switching to Freshdesk without a plan can lead to delays, data loss, and frustrated teams. This guide outlines a clear migration process to ensure success. Key steps include:
- Pre-Migration Planning: Audit your current system, define migration scope, and assemble a team.
- Data Cleanup: Back up data, test migrations, and map fields to avoid errors.
- Execution: Choose between Big Bang or Phased migration, test workflows, and validate data integrity.
- Risk Mitigation: Disable automations, monitor API limits, and have a rollback plan.
- Post-Migration: Monitor performance, train teams, and optimize workflows.
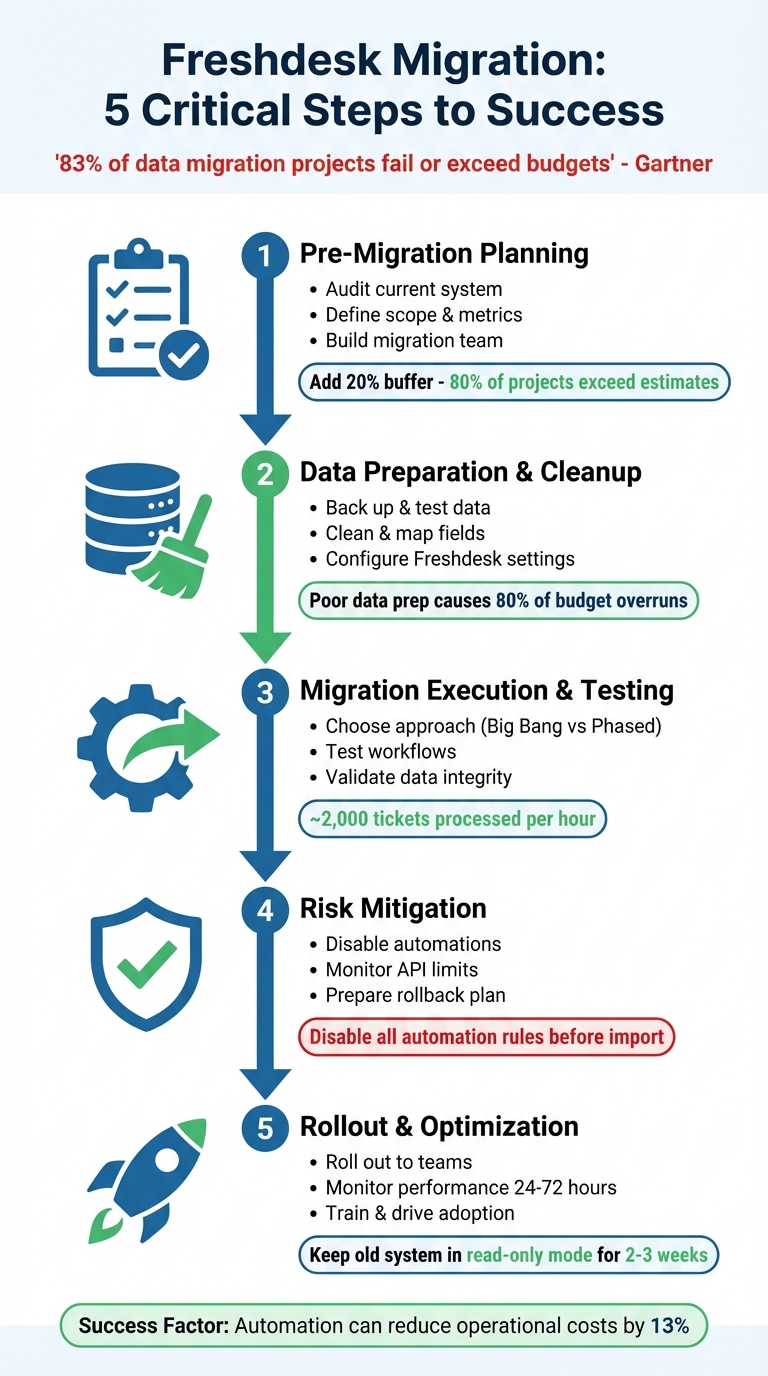
5-Step Freshdesk Migration Process: From Planning to Optimization
Step 1: Pre-Migration Planning
A solid pre-migration plan can make or break your project. According to Gartner, 83% of data migration projects fail outright or exceed their budgets and timelines. What separates success from failure? Careful preparation that digs deeper than surface-level planning and addresses operational realities.
Audit Your Current System and Data
Start by assessing your current setup. Review contract renewal terms and end dates to avoid unexpected auto-renewals or hidden cancellation fees during the migration process. Then, evaluate your data quality – look for duplicates, empty fields, and broken attachments that could disrupt the migration.
Take stock of your workflows, macros, and automation rules to identify inefficiencies. Pay attention to critical integrations like your CRM, Slack, or billing tools that need to work seamlessly in Freshdesk.
If you manage sensitive customer data, check whether your current system complies with regulations like GDPR or HIPAA. Pinpoint any weak spots in your data security that need addressing. Finally, speak with frontline agents – they can provide insight into "tool fatigue", clunky interfaces, and manual tasks that slow down their work. These details often get overlooked in technical specs.
| Assessment Category | Key Factors to Review |
|---|---|
| Data Quality | Duplicates, broken records, attachment sizes, historical volume |
| Technical | API rate limits, data structure compatibility, custom field mapping |
| Operations | SLA adherence, response times, manual workflow bottlenecks |
| Financial | Hidden costs (API caps, seat limits), contract exit fees |
| Compliance | GDPR/HIPAA standards, data encryption, access controls |
Once you’ve documented your findings, define exactly what will be migrated.
Define Migration Scope and Success Metrics
With a clear understanding of your current system, decide what data and configurations to move. Break it into two categories: Data (tickets, contacts, companies, knowledge base articles, attachments) and Configuration (automations, SLAs, business hours, roles, integrations). Determine how much historical data to migrate – everything, or just the last 12 months of tickets?
Use filters to streamline the process. For example, migrate only open or pending tickets, specific agent queues, or certain brands if you operate a multi-brand setup. This approach saves both time and money.
Set success metrics that align with your business goals. For operational efficiency, track first response times and SLA adherence. For customer impact, monitor CSAT scores and retention rates. On the financial side, measure reduced manual processing costs – automation can lower operational expenses by as much as 13%. And don’t forget technical stability: aim for zero data loss and minimal downtime during the transition.
Here’s a tip: establish a "migration war room", like a dedicated Slack channel or daily standup, to monitor progress and address issues in real time. Schedule your cutover during weekends or low-activity periods to minimize disruption. Keep the old helpdesk in read-only mode for 2–3 weeks post-migration as a safety net.
These steps ensure a smoother transition and set the stage for effective data cleanup and migration execution.
Build Your Migration Team
Now that you’ve defined your scope and metrics, it’s time to assemble a team. Remember, a migration isn’t just an IT task – it’s a company-wide effort that requires input from multiple departments. As ClonePartner puts it:
"A migration isn’t an IT project; it’s a business project."
Your team needs "champions" who can provide feedback, secure departmental buy-in, and identify potential roadblocks early on. Assign specific roles like Project Manager, Support Lead, IT staff, and Finance to handle various aspects of the migration. For example, the Support Lead oversees success metrics and workflow mapping, while a key Support Agent tests the new system for usability and friction points.
Finance and legal teams should review contract terms and hidden costs. Management ensures the migration aligns with long-term goals, and engineering handles technical integrations. Don’t forget to assign a "default agent" in Freshdesk to manage tickets from inactive or deleted users. Set a clear "stop date" for using the old system, and send reminders to avoid accidental data entry post-migration.
Plan for the unexpected by adding a 20% buffer to your budget and timeline. Research shows 80% of data migration projects exceed their original estimates.
| Role | Key Responsibilities |
|---|---|
| Project Manager | Oversees the plan, manages the timeline/budget, and coordinates across teams |
| Support Lead | Defines metrics, maps workflows, and leads agent training |
| Key Support Agent | Conducts User Acceptance Testing (UAT) and identifies workflow issues |
| IT Staff | Handles data mapping, API integrations, and security compliance |
| Finance/Legal | Reviews contracts, identifies hidden costs, and ensures financial compliance |
A well-prepared team ensures your migration stays on track and avoids costly surprises.
sbb-itb-e60d259
Step 2: Data Preparation and Cleanup
Now that your migration team is ready, it’s time to focus on preparing your data. This step is crucial – without proper planning, your migration could face delays or even exceed its budget. In fact, poor data preparation is a major reason why 80% of data migration projects go over budget and fail to meet deadlines. The key? Clean your data, test thoroughly, and configure Freshdesk settings to align with your business needs.
Back Up and Test Your Data
Start by securely backing up your current system in an off-site or cloud environment, and double-check that the backup can be restored if needed.
Next, perform a demo migration with a small sample of your data. Many teams test with 20 random tickets and 20 knowledge base articles to simulate the process. Be sure to include some edge cases, such as inactive users, legacy formats, or unusual record types, to uncover potential issues early.
Before testing, disable all Freshdesk automations – like ticket creation rules, time-based workflows, and email notifications – to avoid unintended updates during the trial. Once the demo migration is complete, review the migration report to identify which records transferred successfully and which didn’t.
Check that relationships between records remain intact. For example, tickets should still link correctly to users and companies. Have your frontline agents interact with the migrated data to confirm that the system is functional and retains the necessary context. Repeat the demo migration as often as needed to refine data mapping and resolve any problems.
If you’re using Freshdesk Estate or Forest plans, disable parent-child ticketing before starting the migration. Missing relation fields can cause ticket migration errors. Also, ask Freshdesk and your source tool provider to temporarily increase API limits to speed up the process.
Once your backups are verified and the demo migration is successful, proceed to clean and map your data for a seamless transition.
Clean and Map Data Fields
Avoid transferring unnecessary or outdated data. Identify duplicates, incomplete records, and inconsistencies in formatting. Then, create a mapping document that aligns each source field with its Freshdesk counterpart. Standardize key elements like date formats, currency codes, and user IDs. Decide what to merge, update, or delete. A clean dataset not only saves time but also minimizes risks in the new system.
For instance, map your "Organization" field to Freshdesk’s "Company" field and ensure secondary emails are correctly aligned to maintain email threading. Use API filters to migrate only essential data, such as tickets from the past 12 months or specific agent queues, to reduce costs and improve efficiency.
Load data in the correct order to maintain relationships: start with companies, then contacts, followed by the ticket schema, and finally tickets with their conversation history. Pay close attention to agents. If an agent in your source system is inactive or deleted, assign their tickets to a default agent in Freshdesk to keep everything accessible.
Set up the migration to move inline images as attachments so they remain visible after your old system is decommissioned. Also, keep in mind that Freshdesk uses UTC time, which may cause timestamp discrepancies if your source system uses a different time zone.
Taking these steps will significantly reduce errors and disruptions after the migration.
Configure Freshdesk Settings
Manually create all custom fields for tickets, contacts, and companies through Admin > Workflows > Ticket Fields, or use a migration wizard. Without these fields, your data won’t have a proper destination.
Set up agents and groups to mirror your source system. Even if an agent has left the company, create their profile or reassign their tickets to a default agent to preserve ticket history. Recreate ticket forms, custom statuses, and priority levels to match your current structure.
If you’re migrating knowledge base articles, ensure the Freshdesk Help Center is activated under Guide > Settings. This step must be completed by the account owner before importing articles. When creating custom dropdown fields, assign a default value for any required field to avoid errors when importing records with empty values.
These configurations are critical for maintaining data relationships and ensuring a smooth migration process.
| Setting Category | Action Required | Navigation Path in Freshdesk |
|---|---|---|
| Workflows | Disable Ticket Creation & Time-Triggered Automations | Admin > Workflows > Automations |
| Productivity | Disable Parent-Child Ticketing | Admin > Helpdesk Productivity > Advanced Ticketing |
| Communications | Disable Agent & Requester Email Notifications | Admin > Workflows > Email Notifications |
| Knowledge Base | Activate Help Center/Solutions | Guide > Settings > Activate |
| User Access | Create Agents and Groups | Admin > Team > Agents / Groups |
| Data Structure | Recreate Custom Fields (Tickets/Contacts/Companies) | Admin > Workflows > Ticket Fields |
With your data cleaned, mapped, and Freshdesk settings configured, you’re ready to move forward with the migration.
Step 3: Migration Execution and Testing
With your data cleaned up and Freshdesk set up, it’s time to get the migration underway. This step requires careful planning and thorough testing to ensure everything runs smoothly. According to Gartner, about 83% of data migration projects either fail completely or go over budget. That’s why proper execution is so important. Building on your earlier prep work, this phase focuses on carrying out and verifying the migration process.
Choose Your Migration Approach
When it comes to migration, you’ve got two main strategies: Big Bang or Phased Migration.
- Big Bang Migration: Everything moves at once during a scheduled cutover. It’s faster and often less expensive initially, but it doesn’t leave much room for recovery if something goes wrong.
- Phased Migration: Data is transferred in smaller batches over time. This allows both systems to run in parallel, giving you time to test and troubleshoot as you go. While it takes longer and may cost more due to system overlap, it lowers the overall risk.
Big Bang is often preferred for its speed and upfront cost savings. It’s typically scheduled during quieter business periods, like weekends or holidays, to minimize disruptions. Freshdesk migrations can process around 2,000 tickets per hour, so plan your timeline based on the total number of records you need to transfer.
Before launching the full migration, make sure all necessary adjustments are in place. After the main migration, follow up with a Delta Migration to capture any new or updated records created in the source system during the transfer.
Test Workflows and Integrations
Testing is crucial to identify and resolve any issues before going live. Use a staging environment to replicate real support scenarios. Have your top agents test key processes like ticket creation, macros, escalations, and reporting.
"Thorough testing is what separates a smooth launch from a chaotic one." – ClonePartner
Ensure all connected tools – such as your CRM, analytics platforms, SLA trackers, and reporting systems – are fully functional in the new setup. Test automation rules individually to confirm they’re working as intended without causing customer spam or duplicate tickets. Encourage pilot users to flag any issues, so you can fine-tune permissions, templates, and UI settings before the full rollout. Once workflows and integrations pass the test, move on to validating your data.
Validate Data Integrity After Migration
To keep your support operations running seamlessly, confirm that all data relationships and workflows have migrated correctly. Start by comparing high-level counts: check the total number of tickets by status, group, and category in both your old system and Freshdesk. Use the migration wizard dashboard to monitor migrated, failed, and skipped records in real time.
Take a closer look at a sample of tickets to ensure key details – like subject, status, and custom fields – have transferred accurately. Verify that ticket links and comment histories are intact. For knowledge base articles, confirm they’re in the right folders, formatted properly, and that inline images or hyperlinks are still functional.
"Validation is your safety net – it confirms that everything moved as expected and continues to function correctly in the new system." – Supportbench
Set up a dedicated triage channel so agents can quickly report any issues, like missing attachments, broken links, or mislabeled fields, after the system goes live.
Step 4: Migration Risks and How to Reduce Them
Once you’ve executed your migration, it’s essential to address potential risks to keep operations running smoothly. Even the best-laid plans can face setbacks. In fact, studies reveal that 80% of data migration projects go over budget and miss deadlines. Knowing what might go wrong – and preparing for it – can mean the difference between a seamless transition and a chaotic aftermath.
Common Migration Risks
One of the biggest challenges is maintaining data integrity. Problems like lost attachments, broken inline images, or tickets that aren’t linked to the right contacts or companies can arise. Freshdesk has its own quirks, too. For instance, during import, it often applies a new "created at" timestamp, which can erase your historical timeline. If you’re migrating from another platform, you might also lose the original author attribution for the first comment, as Freshdesk doesn’t allow agents to be ticket creators.
Operational disruptions are another potential headache. Downtime during migration can leave your support team scrambling and customers waiting for answers. A common mistake? Forgetting to disable automations. This oversight can result in thousands of "ticket created" emails being sent to customers for old tickets. On top of that, agents may struggle to adapt to the new system initially, leading to reduced productivity.
Lastly, technical failures can derail the process. Missing relation fields in Parent-Child Ticketing, API rate limit stalls, or soft-deleted contacts causing ticket misrouting are just a few examples of what could go wrong.
Let’s look at how to minimize these risks.
How to Reduce Migration Risks
To tackle these challenges, follow these steps:
- Disable Freshdesk automations before starting the migration. This includes Ticket Creation, Time-Triggered, and Scenario rules.
- Conduct a demo migration with about 20 real tickets, focusing on edge cases like unusual custom fields, large attachments, or inactive users. This test will expose mapping errors or formatting issues early on.
- Schedule the migration during off-peak hours, such as weekends or holidays. Freshdesk processes about 2,000 tickets per hour, so plan your timeline accordingly.
- Always test your backups by restoring them in a separate environment before starting the migration. As Eric Klimuk, Founder and CTO of Supportbench, advises:
"Even if the migration plan feels airtight, unexpected failures can and do happen. That’s why creating a reliable backup is non-negotiable".
- Map agents and groups in Freshdesk ahead of time to avoid orphaned ticket assignments.
- Prepare a rollback plan in case of critical issues. This could include reactivating your old system or rerouting emails temporarily.
The table below summarizes key risks, their impact, and strategies to address them:
| Migration Risk | Operational Impact | Mitigation Strategy |
|---|---|---|
| Active Automations | Customers receive thousands of old notifications | Disable all workflow rules before import |
| Data Mismatch | Reporting becomes inaccurate; custom fields are empty | Create a field-level mapping document |
| API Limits | Migration slows or stalls mid-process | Request a temporary API limit increase |
| Soft-deleted Contacts | Migrated tickets are sent to the Spam folder | Reactivate or permanently delete contacts first |
| Broken Relationships | Tickets lose their links to the correct Company | Import Companies first, then Contacts, then Tickets |
Step 5: Rollout and Post-Migration Optimization
With the risk mitigation strategies already in place, this phase ensures a smooth operational transition. The focus now shifts to launching Freshdesk and fine-tuning its performance. As Eric Klimuk, Founder and CTO of Supportbench, puts it:
"Deciding to switch platforms, providers, or tools is a big step – especially when it directly affects your team’s efficiency, your clients’ experience, and your company’s long-term goals."
Roll Out Freshdesk to Your Teams
Start by creating a "War Room" – a dedicated Slack or Microsoft Teams channel – to manage the first 24–72 hours of hypercare. This serves as a real-time hub for identifying and resolving bugs or data discrepancies. To avoid last-minute issues, enforce a 48-hour code freeze before going live.
Announce the launch to your team with clear login instructions and updated internal guides. Redirect support emails, update CNAME records to point to Freshdesk, and ensure all agents have activated their accounts. For customers, enable the "User Activation Email" feature so they can access the new portal seamlessly.
Rebuild key elements like agent views, SLA policies, and automation rules to ensure the environment feels familiar and functional from day one.
Monitor Performance and Fix Issues
Begin tracking response times, resolution times, and ticket volumes immediately to compare performance with your legacy system. Use test tickets to confirm SLA timers and automation rules are functioning as expected.
Keep an eye out for duplicate tickets or missed communications, as these may signal misrouted emails or configuration problems. Test third-party integrations – such as Jira, Salesforce, or Slack – with live data to confirm they’re syncing correctly after the DNS flip.
Conduct daily pulse surveys during the first week to gather feedback on user interface issues or workflow gaps. ClonePartner emphasizes the importance of this step:
"Skipping the QA phase is one of the most disastrous Common Help Desk Migration Mistakes you can make. It’s like building a new house and not checking if the plumbing or electricity works before moving in."
Keep your old help desk in read-only mode for several weeks after the migration. This ensures historical data is preserved and prevents agents from accidentally responding to tickets in the decommissioned system.
| Monitoring Category | Specific Metrics/Actions to Track | Purpose |
|---|---|---|
| Data Integrity | Ticket counts, attachment accessibility, field mapping accuracy | Ensure all historical context is preserved |
| System Performance | Page load times, search latency, report generation speed | Identify productivity bottlenecks |
| Operational Health | SLA violation rates, first response time, CSAT, CES, and NPS scores | Benchmark performance against the previous system |
| Technical Stability | API error rates, integration sync status, automation trigger success | Ensure core functionality of support operations |
Once system performance is stable, focus on helping your team adapt to the new workflows.
Train Teams and Drive Adoption
With the technical transition complete, the next step is ensuring your team is fully prepared and engaged with the new system.
Distribute concise, one-page quick-reference guides for common tasks. Identify internal champions from your top support agents who participated in the QA phase. These champions can address workflow issues and mentor peers during the rollout. Offer role-specific training sessions tailored to different user needs, such as agents versus administrators.
Set up a dedicated transition support channel to handle immediate questions during the first few weeks. To cap off the process, schedule a formal post-mortem one week after go-live. Use this session to document lessons learned, celebrate team achievements, and pinpoint areas for improvement in future migrations.
Conclusion: How to Ensure a Successful Freshdesk Migration
Key Takeaways
Making your Freshdesk migration a success hinges on solid preparation, thorough testing, and vigilant monitoring. Start by auditing your data to spot duplicates and inconsistencies. Detailed field mapping is essential, especially for maintaining relationships like ticket-to-contact links, ensuring the migration flows smoothly.
Run a small-scale pilot to identify any mapping or formatting issues before diving into the full migration. Be sure to disable all automation rules and email notifications in Freshdesk during the process to avoid accidental customer communications. Once the migration is live, immediately verify the data. Check attachments, tags, agent assignments, and live workflows to confirm everything is functioning as expected.
The key difference between a successful migration and one that stumbles often lies in how teams validate data and monitor performance in those critical first hours. As Eric Klimuk, Founder and CTO of Supportbench, explains:
"Data migration is more than just copying files from one system to another – it’s a delicate, high-stakes process that can affect everything from day-to-day operations to long-term compliance."
By following a structured approach – from planning to post-migration review – you can minimize risks and ensure a smooth transition. These strategies set the stage for ongoing improvements.
Next Steps
From day one, track key customer service metrics like response times, resolution times, and CSAT scores to compare performance against your previous system. After one week, hold a formal retrospective to document successes and challenges, creating a roadmap for future improvements.
FAQs
What’s the difference between a Big Bang and a Phased migration approach?
The key difference between these two migration approaches lies in how the transition is executed and the potential effects on daily operations.
A Big Bang migration involves transferring all data and switching to the new system in a single event. This method is quicker but comes with higher risks, such as possible downtime or even data loss if something goes wrong. It’s most effective when meticulous preparation can be done in advance, and disruptions can be limited – often by scheduling the switch during times of low activity.
In contrast, a Phased migration spreads the process out over several steps, moving data or system features incrementally. This approach lowers the risks and provides opportunities for testing and making adjustments along the way. However, it’s more time-intensive and requires careful planning. It’s particularly suited for complex systems where maintaining smooth, ongoing operations is essential.
The choice between these methods depends on factors like your organization’s size, the complexity of its systems, and how much risk it can handle during the transition.
How do we maintain data integrity during a Freshdesk migration?
Maintaining data integrity during a Freshdesk migration demands thoughtful preparation and precise execution. Begin by mapping all your data types – like tickets, customer profiles, and knowledge base articles – to their corresponding fields in Freshdesk. This step is crucial to ensure that the relationships and dependencies between data remain intact during the move.
It’s wise to conduct a test or pilot migration beforehand to uncover any potential issues early on. Leveraging secure and dependable migration tools can streamline the process, minimize manual errors, and ensure data is transferred accurately. Once the migration is complete, validate the results by comparing the migrated data with the original source. Check for ticket relationships, verify custom fields, and test automations to confirm everything is functioning as expected. Careful planning, thorough testing, and meticulous validation are essential to protect your data throughout the transition.
How can we reduce disruptions after migrating to a new helpdesk system?
To keep things running smoothly after a migration, preparation is key. Start by cleaning up your data to avoid transferring unnecessary or outdated information. Configure the new system in advance and run a small pilot test to identify and fix any potential problems before the full migration begins. This step helps ensure your data is accurate and reduces the risk of surprises during the main rollout.
Another critical factor is reducing downtime. Use tools or methods that allow for incremental updates, so you don’t risk losing important data during the transition. Once the migration is complete, take the time to validate everything – double-check data accuracy, test workflows, and make sure your team knows how to navigate the new system. Retraining your team is an essential step to help them feel confident and ready to work effectively.
Lastly, prioritize clear communication. Keep your team informed about the migration timeline and any changes to their day-to-day tasks. A well-planned, thoroughly tested process combined with open communication can make the transition seamless and minimize any disruption to operations.
Related Blog Posts
- Help Desk Migration Checklist: How to Switch Platforms Without Downtime
- How do you run a successful help desk migration project (timeline, roles, and cutover plan)?
- How do you migrate away from Freshdesk without losing tickets, contacts, or history?
- How do you map Freshdesk fields, groups, and statuses to a new helpdesk?