

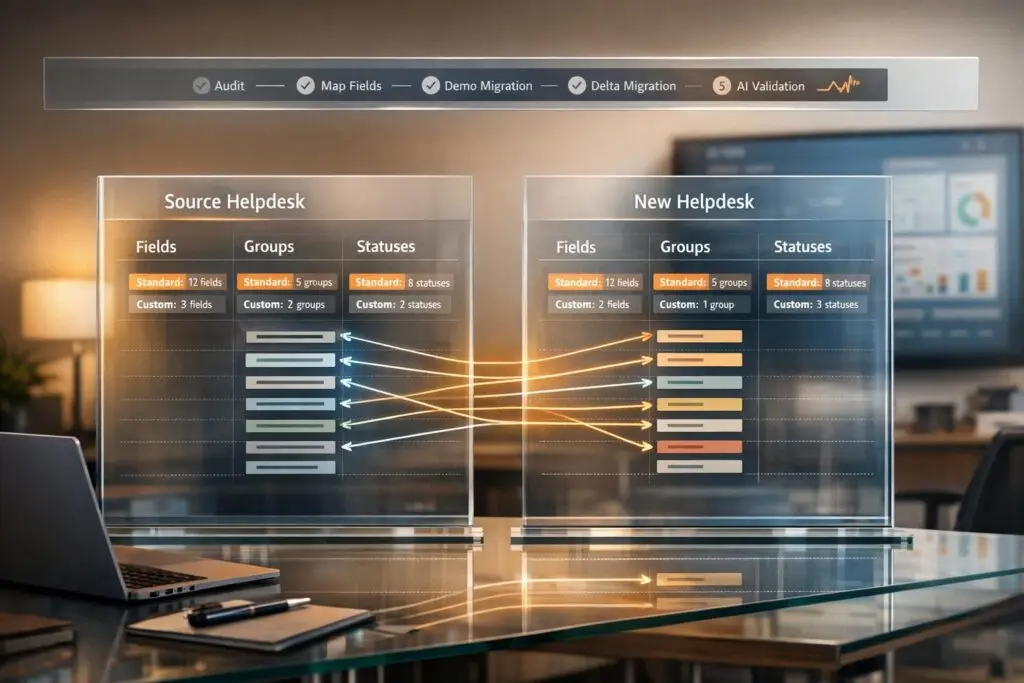
Migrating from Freshdesk to a new helpdesk system can be complex, but it boils down to three key steps: mapping fields, aligning groups and agents, and transferring ticket statuses. Proper planning ensures your ticket data, workflows, and relationships remain intact, avoiding disruptions to your support operations. Here’s how to do it:
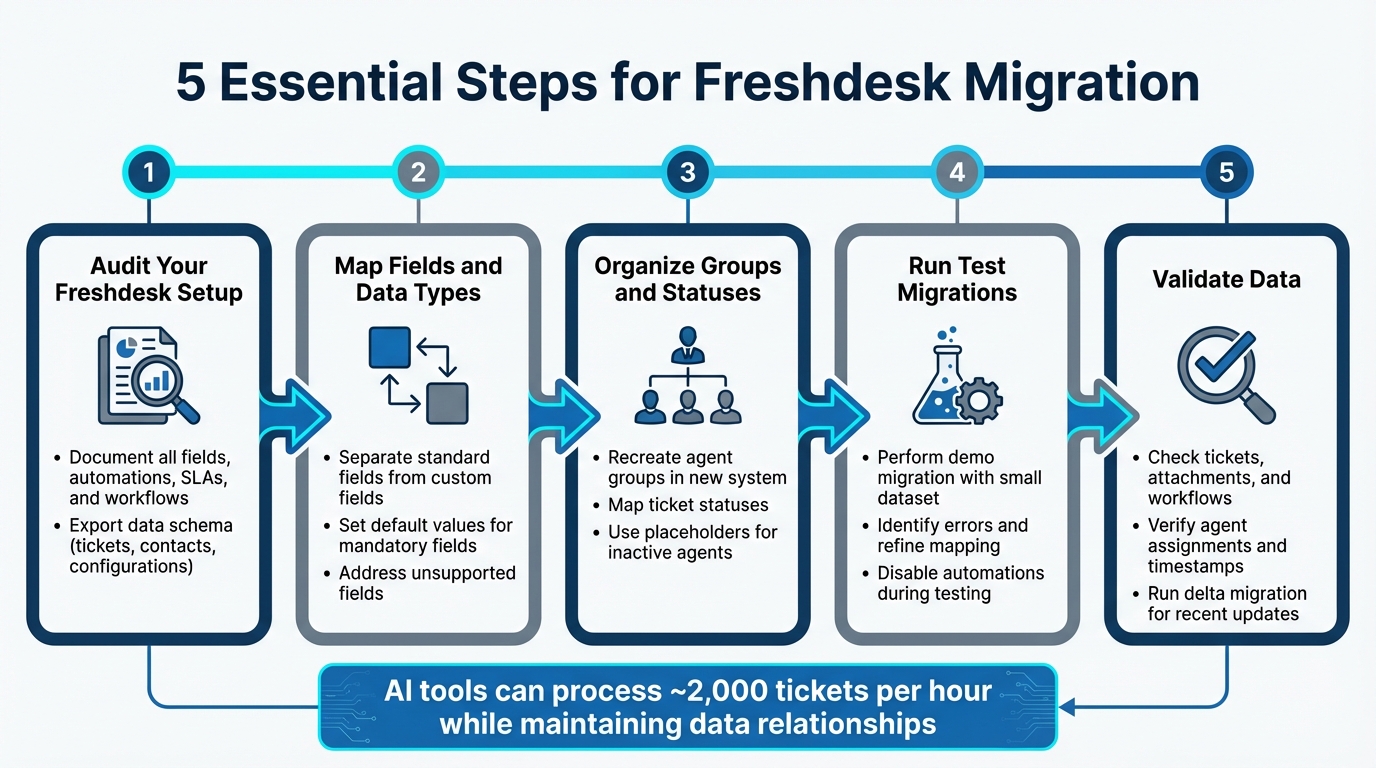
- Audit your Freshdesk setup: Document all fields, automations, SLAs, and workflows. Export your data schema to capture tickets, contacts, and configurations.
- Map fields and data types: Separate standard fields (e.g., Subject, Status) from custom ones. Set default values for mandatory fields and address any unsupported fields.
- Organize groups and statuses: Recreate agent groups and ticket statuses in the new system. Use placeholders for inactive agents or unsupported statuses.
- Run test migrations: Perform a demo migration with a small dataset to identify errors and refine your mapping.
- Validate data: Check tickets, attachments, and workflows post-migration to ensure accuracy.
Using AI tools can simplify mapping and validation, saving time and reducing errors. By carefully preparing and testing, you can ensure a smooth transition to your new helpdesk system.
5-Step Freshdesk to New Helpdesk Migration Process
How the Help Desk Migration Wizard Works
sbb-itb-e60d259
How to Prepare for Mapping Freshdesk Configurations
Before starting your migration, take the time to thoroughly document your entire Freshdesk setup. Preparation is where most migration issues are avoided, not during the actual transfer process. Focus on recording every detail, exporting your schema, and setting up a tracking system to stay organized.
Review Your Current Freshdesk Setup
Break your migration into two main categories: Data (tickets, contacts, companies, attachments, custom fields) and Configuration (automations, SLAs, business hours, views, roles). While data can be migrated directly, configurations need to be manually recreated in the new system.
Start by documenting all custom fields for tickets, contacts, and accounts. Navigate to Admin > Workflows > Ticket Fields to find this information. These fields must be set up in your target system before migration begins, or you risk leaving behind orphaned data. If you’re using Parent-Child ticketing, check its status under Admin > Helpdesk Productivity > Advanced Ticketing. Disable it temporarily to avoid errors with "Task" type tickets during the migration process.
Next, review agent roles and group memberships. Reassign historical tickets from agents who won’t be migrating to a default agent or staging group. Don’t forget to check for soft-deleted contacts – Freshdesk treats these as spam, and they’ll migrate that way unless reactivated beforehand.
Export Your Freshdesk Data Schema
To ensure you capture your entire helpdesk structure, including archived tickets and full conversation histories, use the Account Export feature. Access it by going to Admin > Account > Account Details > Export data. This provides the comprehensive dataset needed for mapping.
For deeper analysis, go to the Tickets tab, apply filters (set "Created time" to "Any time"), and click Export. Expand the "Show multiline text fields" option to include details like ticket descriptions, which are often overlooked. Additionally, use Scheduled Exports in JSON format to examine how ticket activities, automations, and notes are structured. This will reveal numerical codes for priorities and sources that must be mapped to your new system.
Run a Free Demo Migration with 20 random tickets to test your mapping. This step helps identify errors early, so you can fix them before committing to the full migration. Once your schema is exported, organize the information into a structured mapping spreadsheet.
Build a Mapping Spreadsheet
With your documentation and schema in hand, create a mapping spreadsheet to streamline the migration process. Key columns to include are: Source Field ID, Target Field Name, Data Type (e.g., string, dropdown, date, number), Default Value, and Transformation Notes. Be sure to include the original Freshdesk IDs (like zd_ticket_id) as external references. This prevents duplicates, supports delta migrations, and simplifies audits.
Highlight required fields in the target system. These fields cannot be skipped and must have a value, even if it’s a placeholder like "Low" for priority. For fields that exist in the target system but not in Freshdesk, mark them as "Skip this field" instead of filling them with incorrect data. Finally, organize the migration in a logical order: Companies first, followed by Contacts, then Ticket Schema, and lastly Tickets. This sequence ensures that relationships between records are preserved.
How to Map Freshdesk Fields to Your New Helpdesk
Once your mapping spreadsheet is ready, the next step is aligning Freshdesk fields with their counterparts in your new helpdesk. This step is critical because field mapping is where migration errors often occur. To avoid issues, understand the differences between standard and custom fields, verify that data types align, and plan for handling fields that don’t transfer easily.
Separate Standard Fields from Custom Fields
Start by navigating to Admin > Workflows > Ticket Fields in Freshdesk to review your field inventory. Standard fields like Subject, Type, Source, Status, Priority, Group, Agent, Product, Description, and Company are pre-configured for core operations. These fields are hard-coded, meaning you can’t delete them or change their backend names.
Custom fields, available on Growth plans or higher, come in eight types: Single-line text, Multi-line text, Checkbox, Dropdown, Dependent field (with a 3-level hierarchy), Date, Number, and Decimal. If you’re on a Pro plan or higher, you’ll also find Dynamic Sections – custom fields that appear based on specific dropdown selections. These conditional fields need special attention, so document them carefully.
Pay attention to field properties such as "Required when submitting", "Can view", and "Can edit." Identifying which fields are critical versus internal-only helps you prioritize which fields need to be recreated in the new system. Choosing dropdown fields over text fields where possible can also improve data consistency. Once you’ve reviewed these details, check for data type compatibility and set default values to ensure a smooth migration.
Match Data Types and Set Default Values
Compare the field structures and data types in both systems to spot inconsistencies. For example, Freshdesk’s Dependent fields (e.g., Category > Subcategory > Item) might not translate directly if your new helpdesk doesn’t support nested fields. In such cases, you can flatten the hierarchy into separate fields or map it to the closest available alternative.
Set default values for all mandatory fields in the target system to avoid migration errors. For instance, if a required field in the new system is empty in Freshdesk, use placeholders like "0" for numeric fields or "Low" for priority. During migration setup, temporarily mark mandatory fields as optional to prevent errors caused by missing data. Once the migration is complete, you can reapply validation rules.
Run a sample migration to test your field mappings. Afterward, compare the record count in your source file with the count in the new helpdesk to ensure no data was lost. With compatible field types and default values in place, the next step is addressing unsupported fields to complete the process.
Deal with Unsupported or Outdated Fields
Some Freshdesk components might not have direct equivalents in your new helpdesk. Items like ticket audit trails, time logs, side conversations, and metric events are often not imported as native objects. For these, export the data as CSV or JSON files and store them securely in external storage solutions like Amazon S3 or Google Drive. You can also create read-only custom fields, such as "Original Ticket ID" or "Legacy Audit Reference", to store identifiers and archive links.
If your new helpdesk doesn’t allow backdating of "Created At" or "Updated At" fields, save the original timestamps in custom date fields or include them in the first private note on the ticket. For tickets assigned to inactive agents or groups that won’t be migrating, include the agent’s name and email in the note body to preserve history. Assign tickets from inactive agents or groups to a "staging group" or "default agent" to maintain data integrity.
Use filters to exclude redundant data like spam, system events, or tickets older than a specific date. This keeps your import clean and helps lower migration costs. To prevent automation rules from triggering on migrated tickets, tag them with something like "migrated_2026". Additionally, sanitize HTML in ticket descriptions and convert base64 inline images into file attachments to avoid broken formatting and database issues. These steps help maintain data accuracy and reduce the need for post-migration fixes.
How to Map Freshdesk Groups, Agents, and Statuses
When moving from Freshdesk to a new helpdesk platform, ensuring groups, agents, and statuses are properly mapped is crucial for keeping support operations running smoothly. This setup helps maintain ticket ownership and ensures workflows remain intact.
Set Up Groups and Assign Agents
Start by reviewing your existing group structure in Freshdesk. Navigate to Admin > Team > Groups to see how groups are organized – whether by function (e.g., Sales, Billing), region (e.g., North America, EMEA), channel (e.g., Chat, Phone), or customer type (e.g., VIP, Enterprise). Make a note of agent lists and group settings like business hours, ticket routing rules, and canned responses.
Before migrating, replicate these groups in the new platform. This step ensures that tickets are assigned to the correct teams as soon as they are imported. Use unique identifiers like email addresses or user IDs to match agents to their groups. For agents who aren’t present in the new system, assign tickets to a default agent or staging group to prevent gaps in ticket ownership.
Run a small demo migration – about 20 tickets – to confirm that group assignments and agent ownership transfer correctly. Once this is verified, you can move on to configuring ticket statuses and priorities.
Create a Status and Priority Mapping Table
After setting up groups, map ticket statuses from Freshdesk to their equivalents in the new platform. If the new system doesn’t have a direct match, create custom statuses to reflect your original workflow. For instance, if Freshdesk has a status like "Waiting for Dev", you’ll need to create a similar custom status (e.g., "Engineering") in the new system before migration.
| Freshdesk Status | New Helpdesk Status | Notes |
|---|---|---|
| Open | Open | Direct mapping |
| Pending | Awaiting Info | Map to a "waiting" state |
| Resolved | Solved | Disable "Resolved" triggers pre-import |
| Closed | Closed | Ensure required fields are completed |
| Custom: "Waiting for Dev" | Custom: "Engineering" | Create this custom status in advance |
To preserve historical data, store the original Freshdesk status in a read-only custom field (e.g., original_status). This helps with reporting and audits. Assign default values for missing statuses to avoid leaving tickets in an invalid state. After the main migration, perform a delta migration to capture any tickets created or updated during the transition period.
Review Custom Workflows and SLA Settings
Recreate all workflows and SLA settings in the new system. Many Freshdesk workflows are triggered by status changes, group assignments, or priority updates. Missing these automations could lead to service interruptions or missed SLA targets.
Document escalation rules, such as automated triggers for unassigned tickets, and replicate them in the new platform. If Freshdesk uses routing methods like round-robin, load-based, or skill-based logic, configure equivalent settings in the new system. Don’t forget to export and re-upload group-specific canned responses so agents can maintain consistent communication.
For users of Freshdesk’s Parent-Child Ticketing feature (available on Estate/Forest plans), disable this feature during migration. Its absence in the new system could cause errors if the "Parent-Child relation" field is missing on "Task" type tickets. For agents no longer with the company, prefix historical notes with the agent’s name and email to retain context even if their profile isn’t recreated in the new platform.
These steps are essential for ensuring a seamless migration process and maintaining the integrity of your support operations.
Using AI to Speed Up Mapping and Validation
Mapping fields and assignments manually can be time-consuming and prone to mistakes. AI-powered migration tools take over much of this tedious work, reducing the chances of errors and making the process faster and more efficient.
AI-Assisted Field Mapping
Today’s migration tools use AI to suggest how fields from Freshdesk should map to your new helpdesk system. These tools analyze field names, data types, and past patterns to match standard fields like ticket ID, subject, status, and priority. They also ensure that relationships between tickets, agents, and companies remain intact, preserving the historical context for accountability through knowledge-centric support solutions.
For custom fields, advanced tools can identify configurations missing in the target system. They even let you create matching dropdowns, text boxes, or checkboxes directly within the mapping interface.
This approach isn’t just faster – it’s also more precise. Automated migration tools can process data at speeds of around 2,000 tickets per hour, all while maintaining the relationships necessary for a seamless transition. Next, we’ll look at how AI enhances the accuracy of field mapping.
AI-Powered Error Detection and Validation
AI tools don’t just help with mapping – they also catch problems before they become major issues. Validation reports generated by these tools scan for missing or invalid records and display real-time dashboards that categorize records by their status. This makes it easy to find mismatches and fix them before the full migration begins.
Before running a demo migration, disable automations in the new helpdesk to avoid unintended notifications. Afterward, carefully review the reports on skipped and failed records. Any issues that show up during the demo are likely to occur during the full migration as well, so addressing them early is crucial.
Test Workflows with AI Simulations
AI simulations take error detection a step further by testing workflows before the actual migration happens. These simulations use historical ticket data to predict resolution rates and pinpoint potential issues in workflow logic. Some tools even provide highly accurate forecasts, allowing you to go live with greater confidence.
Running multiple demo migrations is a smart way to ensure everything – from custom field values to agent assignments and status transitions – appears correctly in the new system. AI agents can also simulate common user actions like ticket creation, status updates, or escalations to confirm that automated workflows behave as expected. By comparing outputs from the old and new systems, you can catch any discrepancies before they affect live operations.
For companies using cloud-based testing environments, this type of testing has cut costs by up to 45% while improving test coverage by 30%.
How to Verify and Test After Migration
After completing the mapping and using AI tools for validation, it’s time to ensure your new helpdesk functions exactly as intended. According to Gartner, 83% of data migration projects either fail or go over budget, often due to skipping thorough post-migration testing and quality checks. A well-structured verification process can help you catch issues before they affect live operations.
Run a Test Migration First
Begin with a demo migration to see how your mapped fields, agent assignments, and statuses look in the new system. This trial run mimics the full migration process, so any issues that arise here are likely to repeat during the actual migration if left unresolved.
"The Migration Wizard processes Demo and Full Migrations the same way. If any ticket data is missing or incorrect during the Demo, the same issue will likely occur in the Full Migration." – Help Desk Migration
Make sure to disable all automations in the target system during this phase. This prevents accidental customer notifications or unexpected triggers on historical data.
After the demo migration, carefully review reports showing migrated, failed, and skipped records. Use this information to adjust your mapping spreadsheet and resolve any issues before moving on. Once adjustments are complete, test detailed workflows to ensure everything functions as expected.
Test Tickets and Workflows in Batches
Choose a sample of complex tickets to test, such as those with long threads, multiple attachments, or custom statuses. Go through these tickets with an agent lead, comparing the source and target systems side-by-side. Check that ticket IDs, subjects, creation dates, and custom field values match perfectly.
Next, test channel ticket creation, group routing, and permission settings using various user profiles. Once workflows and permissions are verified, shift focus to validating overall data integrity.
Check Data Integrity and Report Accuracy
Review key metrics like ticket counts, statuses, and groups to identify discrepancies. Ensure ticket links are intact, comments are in chronological order, and attachments are accessible. Generate operational reports (e.g., first response time, resolution time, ticket volume) and compare them to historical data to confirm accuracy.
After completing the full migration, run a delta migration to capture any new tickets or updates made during the transfer process. This ensures your new system is fully up-to-date before the final cutover. Additionally, if inline images in knowledge base articles appear broken, you may need to manually re-upload them, as Base64 encoded images can disappear if the source helpdesk expires.
Common Migration Mistakes and How to Avoid Them
Even with careful planning, migration projects can hit unexpected roadblocks. In fact, 80% of migrations exceed their budgets and deadlines due to errors that could have been avoided during the mapping and transfer process. Many of these issues boil down to a few common mistakes.
Don’t Overlook Custom Fields
Custom fields often hold critical data, but they won’t transfer automatically if they don’t exist in your new helpdesk system. To avoid losing this information, you’ll need to manually recreate every custom field – like dropdowns, checkboxes, and text fields – before starting the migration.
Here’s a step to make it easier: export your entire field schema from Freshdesk (navigate to Admin > Workflows > Ticket Fields) and compare it against the new system. During the migration, temporarily set required custom fields to optional. This ensures that records with missing values won’t be blocked. Once the migration is complete, you can restore the fields to their required status.
Preserve Parent-Child Ticket Relationships
If you’re using Advanced Ticketing, keep an eye on Parent-Child ticket relationships. Leaving this feature active during migration can cause tickets to be skipped, especially if a "Task" type ticket lacks the required parent-child relation field.
To avoid this, disable Parent-Child Ticketing before migrating. You can do this by going to Admin > Helpdesk Productivity > Advanced Ticketing. After the migration is complete and you’ve confirmed the data integrity, re-enable the feature and manually recreate any essential relationships.
Plan for Delta Migrations
Your support team doesn’t pause during migration. New tickets are created, ongoing threads are updated, and statuses change. Ignoring these updates can leave gaps in your support data.
A delta migration solves this by capturing changes made after the initial transfer. Schedule the final delta migration during a low-traffic period, just before the cutover, to include the most recent updates. This ensures your migration is as complete and accurate as possible, complementing the earlier steps for a seamless transition.
Conclusion
Migrating Freshdesk fields, groups, and statuses to a new helpdesk can feel daunting, but breaking it into clear, actionable steps makes the process much more manageable. Start by auditing your current setup, exporting your data schema, and creating a detailed mapping spreadsheet. Then, run a demo migration to test everything before committing to a full transfer. Each step helps ensure your new system is set up correctly and ready to go.
Following data migration best practices is essential to avoid unexpected costs or delays. Recreate your field structure in the new platform, temporarily disable automations during the migration, and plan for delta migrations to keep everything running smoothly while your team continues to assist customers.
Testing is critical. A demo migration with a small set of tickets – especially ones with complex attachments, inline images, or custom field data – can reveal any mapping issues before they escalate into larger problems. This proactive approach saves time and effort down the line.
Maintaining relationships between records is equally important. Following the correct import sequence ensures agents, customers, and support threads stay connected in the new system, preserving the integrity of your data.
After the migration, verify data accuracy by reviewing a random selection of tickets. Check for correct agent assignments, intact attachments, and accurate timestamps. With careful planning and thorough testing, your team can confidently transition to the new helpdesk while keeping operations running without a hitch. Incorporating AI tools can also simplify post-migration validation, helping ensure everything is in place for a seamless start.
FAQs
How can I successfully migrate Freshdesk fields, groups, and statuses to a new helpdesk?
To ensure moving Freshdesk fields, groups, and statuses to a new helpdesk goes smoothly, start with careful planning. Determine exactly what data needs transferring – like tickets, contacts, organizations, and custom fields – and map these elements to their counterparts in the new system. It’s crucial to preserve the relationships between data to maintain context and functionality.
Using automated migration tools can help minimize risks such as losing data or disrupting workflows. Many of these tools offer test migration options, allowing you to validate and fine-tune your mappings before finalizing the process. Once the migration is complete, take the time to verify the accuracy of the data and test workflows to ensure everything works as intended. Thoughtful preparation and thorough validation will help keep the transition smooth and minimize interruptions.
How can AI improve the accuracy of helpdesk data migration?
AI tools play a crucial role in making helpdesk data migration more accurate by automating essential tasks like data mapping, validation, and anomaly detection. These tools help spot and fix inconsistencies or errors in your data, reducing the chances of data loss or corruption during the migration process.
Take data mapping, for instance. AI can handle intricate mappings automatically, ensuring that relationships such as ticket histories and custom fields are preserved while minimizing human errors. Additionally, AI excels at identifying irregularities in large or unstructured datasets – issues that might easily slip past manual checks. By automating these steps, AI not only shortens migration timelines but also ensures your data remains intact, making the entire process smoother and more dependable.
What mistakes should I avoid when migrating from Freshdesk to a new helpdesk?
Migrating from Freshdesk can feel like a big task, but avoiding a few common pitfalls can make the process much smoother.
One major misstep is not planning thoroughly. Skipping this step can result in missing critical data or configurations. Before diving in, make a clear list of what needs to be migrated – this could include tickets, contacts, and custom fields. Also, identify any elements that require manual setup, like workflows or automations, to ensure nothing important gets overlooked.
Another common issue is ignoring detailed field mapping. If relationships between tickets, contacts, and fields aren’t mapped correctly, it can disrupt workflows and compromise your data’s integrity. Running a demo or pilot migration is a smart way to catch any mapping errors before they create bigger problems.
Lastly, don’t rush. Take time to validate all data and workflows after the migration. Double-checking for accuracy and functionality can prevent operational hiccups and ensure everything runs smoothly once the migration is complete.
Related Blog Posts
- How do you map Zendesk fields, tags, and statuses to a new help desk correctly?
- How do you migrate from Salesforce Service Cloud to a helpdesk without losing case history?
- How do you map Salesforce Case fields, Record Types, and Statuses to a new helpdesk?
- How do you migrate away from Freshdesk without losing tickets, contacts, or history?