


Exporting Freshdesk tickets and attachments can sometimes be tricky, but getting it right is crucial for accurate reporting and effective data analysis. Here’s a quick summary of the best methods and common pitfalls:
- CSV Exports: Great for quick reports. Use filters carefully to include custom fields and set the right time ranges. Note: CSV exports don’t include full conversation histories or archived tickets.
- API Exports: Ideal for large-scale operations. Access attachments, full conversations, and handle massive datasets. Requires technical setup and managing rate limits.
- Account Exports: Use XML format for complete data, including archived tickets and full histories.
Key Tips:
- Always check filters and permissions before exporting.
- Use scheduled exports for regular reporting.
- For attachments, use the API’s
GET /api/v2/tickets/[id]endpoint. - Manage API rate limits and pagination for large datasets.
CSV vs API: Choose CSV for simplicity and API for flexibility and deeper data access. Avoid common mistakes like missing custom fields or misconfigured filters to ensure complete exports.
Let’s dive into how to avoid errors and streamline your Freshdesk exports.
Freshdesk to Google Sheets – Export New Freshdesk Tickets to Google Sheets
sbb-itb-e60d259
How to Export Freshdesk Tickets via CSV: Step-by-Step
Exporting tickets from Freshdesk into a CSV file is a straightforward process, but missing a single configuration step can result in incomplete data. To avoid issues, follow these steps carefully to ensure you capture all the necessary details.
Configuring Your CSV Export
Start by navigating to the Tickets tab and selecting "All tickets." Use the filters on the right-hand side to narrow down tickets based on status, agent, group, or custom fields. Set the Created time filter on the main ticket list to "Any time", then define the specific time range in the export window. This method prevents filter conflicts that might lead to missing data.
Once your filters are applied, click Export to open the export slider. Here, manually select the ticket fields you need, such as custom product SKUs or customer IDs. To include full ticket details, expand the "Show multiline text fields" option and select Description.
"The time frame set on the ticket list page has to be greater than the time frame set in the Export window. It is recommended to set the Created time field as ‘Any time’ on the list page and apply the desired time in the export window." – Freshdesk Support
If the Export button isn’t visible, check with your administrator to ensure export permissions are enabled under Admin > Roles. For automated, recurring reports, administrators can schedule exports by going to Analytics > Settings (gear icon) > Data Exports and setting up daily, weekly, or monthly deliveries.
Before proceeding, it’s important to understand the limitations of CSV exports to avoid surprises.
Understanding CSV Export Limitations
CSV exports come with certain restrictions. They do not include complete conversation histories or archived tickets. For that level of detail, you’ll need to perform an account export in XML format.
"This export will NOT give you the entire conversation from the ticket or historical data (archived tickets) – for that, you will have to perform an account export." – Freshdesk Support
To access a complete dataset, including full conversations and archived tickets, go to Admin > Account > Account Details and initiate an "Account Export" in XML format. Keep in mind that exports generated through Analytics also have limitations. When exporting data from widgets, you can select a maximum of 10 fields as columns. Additionally, export links sent via email expire after 30 days.
With these constraints in mind, building a seamless customer support management system requires formatting your CSV data correctly.
Formatting CSV Data Correctly
After downloading your CSV file, open it in Excel or Google Sheets to verify that all custom fields are included. Map numerical codes (e.g., "1" for Email, "4" for Urgent), and reformat time strings like "2h 2m 12s" into a standard HH:MM:SS format using functions such as REGEXEXTRACT or TEXT.
While CSV files are commonly used for importing data into BI tools, opting for Excel (.xlsx) can provide cleaner formatting for more complex datasets. Proper formatting ensures your data is ready for analysis and can be effectively used for tasks like training AI models or generating insights. For teams relying on external dashboards, scheduling exports through Analytics often proves more efficient than manual downloads.
How to Export Freshdesk Attachments via API
If CSV exports don’t meet your needs, the Freshdesk API offers a more flexible way to access ticket data and attachments. While it requires some technical setup, it gives you complete control over the export process.
Creating an API Key for Authentication
Start by logging into your Freshdesk Support Portal. Click on your profile icon in the top right corner, go to Profile settings, and you’ll find your API key on the right side below the password change section.
Freshdesk uses Basic Authentication for API calls. Here’s how it works: use your API key as the username and any random character (like "X") as the password. Make sure all requests are made over HTTPS.
"You can use your personal API key to authenticate the request. If you use the API key, there is no need for a password. You can use any set of characters as a dummy password." – Freshdesk API Reference
Remember, your API permissions align with the access level of your agent profile. If you can’t view a ticket in the web portal, you won’t be able to access it through the API either.
Once you have your API key, you’re ready to start retrieving ticket data and attachments.
Retrieving Ticket Data and Attachments
Attachments are stored within ticket or conversation objects in Freshdesk. To access them, use the GET /api/v2/tickets/[id] endpoint. If you want the ticket’s full history, include the include=conversations parameter. The API response will have an attachments array, where each file is linked through a content_url.
For tickets with multiple conversations, you’ll need to fetch attachments from all threads. Use the GET /api/v2/tickets/[id]/conversations endpoint to retrieve all conversation-related attachment URLs. Both description (HTML) and description_text (plain text) fields are provided, making it easier to process the data.
All timestamps in the API responses are in UTC format (YYYY-MM-DDTHH:MM:SSZ). Be prepared to handle timezone conversions as needed.
Handling Large-Scale API Exports
When exporting data at scale, managing rate limits and pagination is crucial. Freshdesk applies rate limits across your account, regardless of the number of agents or IP addresses. Trial accounts are limited to 50 calls per minute, while Enterprise plans allow up to 700 calls per minute.
| Plan | Rate Limit (per minute) | Ticket Create Sub-limit |
|---|---|---|
| Growth | 200 | 80 |
| Pro | 400 | 160 |
| Enterprise | 700 | 280 |
The API provides traffic management headers: X-RateLimit-Total, X-RateLimit-Remaining, and X-RateLimit-Used-CurrentRequest. If you hit the limit, you’ll receive a 429 error along with a Retry-After header indicating how many seconds to wait before trying again. To avoid wasting requests, implement an exponential backoff strategy based on this value.
For pagination, you can retrieve up to 100 records per page using the per_page and page parameters. When working with large datasets, process each page methodically and monitor the X-RateLimit-Remaining header to ensure you don’t exceed your limits. Keep in mind that even failed requests (like 400 or 404 errors) count against your rate limit.
CSV vs API Exports: Which Method to Use
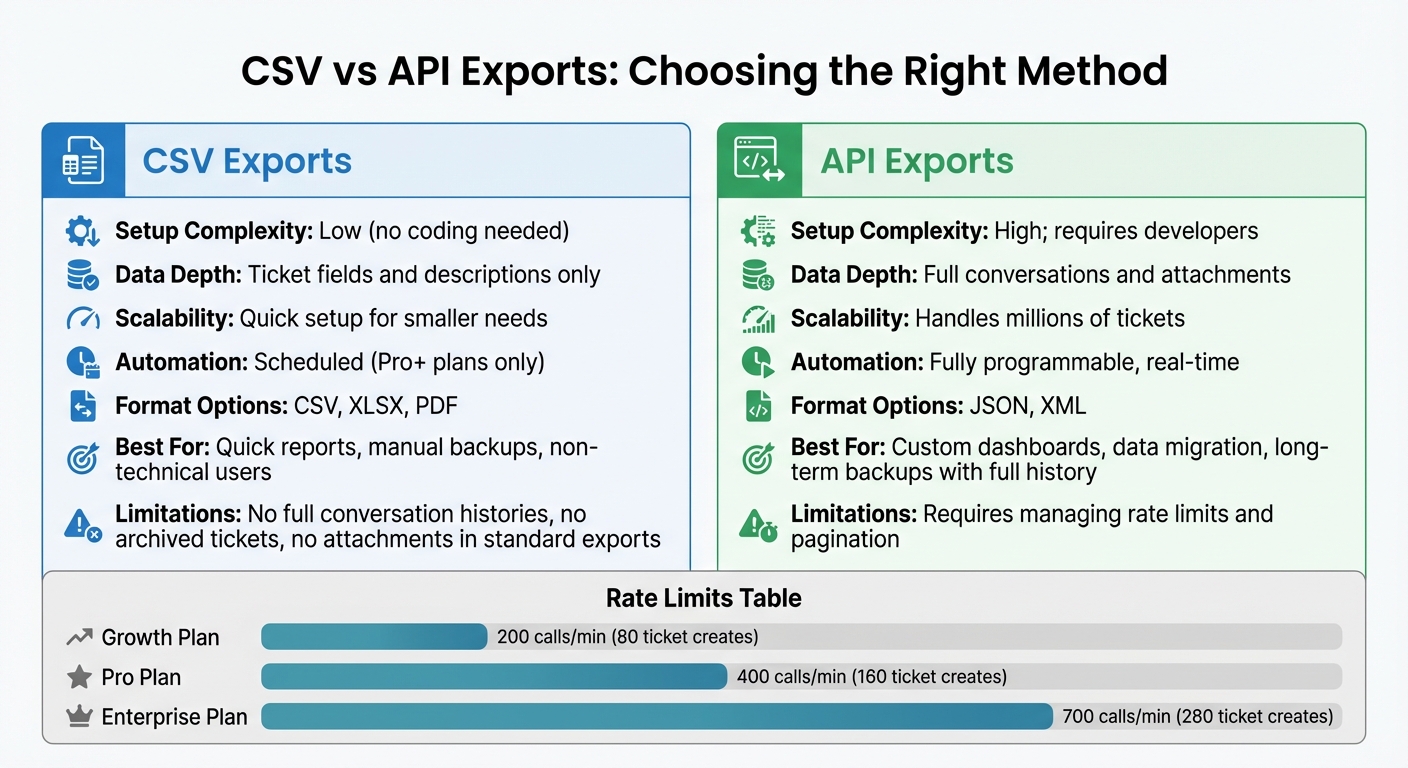
CSV vs API Export Methods for Freshdesk: Features and Capabilities Comparison
Pros and Cons of Each Export Method
Choosing between CSV and API exports depends on your specific needs and how you plan to use the data. Each method has its strengths and limitations, making them suitable for different scenarios.
CSV exports are perfect for quick snapshots and straightforward reporting. They don’t require any coding knowledge and are easy to set up through the user interface. However, they come with limitations – they don’t include full conversation histories or attachments in standard exports. If you’re on a Pro or Enterprise plan, you can schedule these exports to run automatically on a daily, weekly, or monthly basis.
API exports, on the other hand, offer complete flexibility. They allow you to access full conversation threads, download attachments, and handle massive datasets with incremental exports. This makes them ideal for large-scale operations. The downside? You’ll need to manage rate limits, pagination, and build integrations, which can be resource-intensive.
| Feature | CSV Export (Manual/Scheduled) | API Export |
|---|---|---|
| Setup Complexity | Low (no coding needed) | High; requires developers |
| Data Depth | Ticket fields and descriptions only | Full conversations and attachments |
| Scalability | Quick setup for smaller needs | Handles millions of tickets |
| Automation | Scheduled (Pro+ plans) | Fully programmable, real-time |
| Format Options | CSV, XLSX, PDF | JSON, XML |
This breakdown highlights which method aligns better with your goals and operational demands.
Choosing Between CSV and API Exports
When deciding which method to use, consider your technical resources, the volume of data you’re working with, and how you intend to use the exported information.
CSV exports are ideal for one-off reports or quick analyses in tools like Excel or Google Sheets. They’re particularly useful if you don’t have access to developer resources and need a simple, self-service option.
API exports are the way to go if you’re working on building custom dashboards in tools like Tableau or Power BI, migrating data to a new platform, or maintaining long-term backups that include full conversation histories and attachments. For large-scale operations – especially accounts with over 200,000 tickets – API exports are often the only viable option, as CSV exports may not handle the sheer volume effectively.
If you require API-level functionality but lack in-house developers, third-party ETL tools like Skyvia or Help Desk Migration can help bridge the gap. Keep in mind, though, that you’ll still need to address challenges like rate limits and proper data formatting, even with these tools.
Choosing the right export method ensures you’re set up to efficiently manage and analyze your data, especially in B2B support environments driven by AI insights.
Common Freshdesk Export Mistakes to Avoid
Fixing Missing or Incomplete Data
One frequent issue with Freshdesk exports is missing key information. For example, hidden multiline fields can lead to incomplete exports. By default, ticket exports leave out the "Description" and custom multiline text fields unless you manually select the "Show multiline text fields" option in the export slider. Another crucial step is ensuring the "Created time" on the ticket list page is set to "Any time" before applying a specific date range in the export window. Skipping this step can cause data gaps.
Another problem arises from time frame conflicts. If the date filters on your ticket list page don’t align with those in the export window, tickets may be omitted. The solution? Set the "Created time" field on the ticket list page to "Any time" first, then apply your desired date range in the export window.
Standard exports also have limitations. They don’t include full conversation histories or archived tickets, which require a full Account Export in XML format. You can access this through Admin > Account > Account Details. If you’re exporting from Analytics and notice missing data despite setting filters correctly, you can customize customer support data reports or try a workaround: remove the date range filter, save the report, reapply the filter, and save again before exporting.
Now, let’s look at permissions and delays, which can also disrupt the export process.
Handling Permissions and Export Delays
Permissions and timing play a big role in ensuring smooth data exports. If the Export button is missing, check permissions under Admin > Roles. Only Account Administrators have access to perform full helpdesk data exports or retrieve billing-related export data.
Large exports can take time to process, often requiring several minutes to complete. You can track the progress under Admin > Accounts exports and download the file once the progress bar finishes. For API-based scheduled exports, make sure the developer uses the API key of the user who created the schedule. Keep in mind that API-generated links expire after 30 days.
Using AI Workflows to Automate Exports
In today’s AI-driven support operations, automating export processes not only simplifies data handling but also ensures the accuracy and consistency of your support metrics.
Automating Data Formatting and Cleanup
Manual data cleanup can be tedious and prone to errors. AI workflows, however, can standardize data formats automatically. Unlike traditional rule-based systems, AI adapts to variations in data without frequent manual adjustments.
For example, AI workflows can standardize time formats, validate data, and ensure consistency in elements like date formats, currency symbols, or custom fields. This ensures that the exported data is ready for analysis right away.
Natural Language Processing (NLP) adds another layer of sophistication by understanding context. If one ticket mentions "copier" and another says "printer", AI can recognize the connection and categorize them consistently before exporting. This eliminates the need for manual re-sorting and results in cleaner, more reliable data for reporting. A practical example comes from the University of Aberdeen’s IT team, which implemented AI workflows in 2025, enabling them to process 208% more tickets while cutting resolution times by 81%.
These automated workflows also pave the way for proactive error detection during data exports.
Detecting Export Errors Automatically
Beyond formatting, AI ensures data integrity by identifying errors in real time. This means incomplete or problematic data never reaches your dashboards. Instead of discovering missing fields or attachments after the fact, AI flags these issues during the export process.
Some advanced AI platforms even offer simulation modes. These allow teams to test workflows against historical data, identifying gaps in automation logic before going live. For instance, Databricks leveraged AI workflow automation for smart triage in 2025, successfully deflecting over 23% of support tickets. They’re now aiming to surpass 50% as they scale.
"AI is only as good as the data it uses. Standardize formats, clean duplicates, and validate sources." – Freshworks
Automating alerts for anomalies, like missing custom fields, ensures that export errors don’t disrupt business intelligence reports.
Connecting Exports to AI-Driven Workflows
Once formatting and error detection are automated, AI can seamlessly integrate exports with real-time dashboards. Instead of just moving raw data, AI workflows analyze ticket data directly, turning it into actionable insights. This eliminates the need for static CSV exports, which are often outdated as soon as they’re created.
Platforms like Supportbench integrate AI directly into case management systems, providing real-time insights without requiring manual exports or developer input. These platforms automate prioritization, predict metrics like CSAT and CES, and maintain a clear view of customer relationships – all while ensuring data remains accurate and up-to-date.
For teams still using older systems, API-based integrations offer a practical solution. For instance, the Freshdesk Analytics API URL can feed data directly into tools like Tableau or Power BI, enabling real-time dashboard updates. This approach avoids the "stale data" issue associated with static exports. It’s no surprise that nearly 70% of customer service leaders plan to invest in automation, with AI-powered agents achieving resolution rates of up to 80% for routine inquiries.
Conclusion: Getting Freshdesk Exports Right
Understanding the methods outlined above can help ensure your Freshdesk exports are accurate and efficient.
Key Takeaways
The best export method depends on your technical resources and the level of data you need. CSV exports work well for quick reports or manual backups, especially when non-technical users need immediate access to ticket data. However, these exports lack full conversation histories and archived tickets. For complete historical records, you’ll need an account-level XML export.
For those integrating data into BI tools or automating workflows, API exports are the way to go. The Analytics module offers a convenient option to schedule exports – daily, weekly, or monthly – via email or an API link. Keep in mind, though, that API export links expire after 30 days.
Common export errors often stem from issues like misconfigured permissions or inconsistent filters. Resolving these problems ensures your exports are complete and accurate.
Next Steps for Better Export Processes
To improve your export workflow, start by auditing your current process. If you’re manually downloading CSV files, consider switching to scheduled Analytics exports. Scheduling these outside of working hours can also help maintain data accuracy and avoid system performance issues.
If you’re still struggling with formatting issues, tedious manual processes, or outdated dashboard data, it might be time to explore AI-powered platforms. For instance, Supportbench integrates AI to automate data formatting, detect errors, and provide live dashboards with predictive analytics – eliminating the need for manual exports or developer involvement. Modern customer support operations thrive on real-time insights and automated workflows, making static exports a thing of the past. By adopting these tools, you can transition to dynamic, actionable data that keeps your team ahead of the curve.
FAQs
How can I make sure my Freshdesk CSV exports include all the ticket details I need?
To get all the essential ticket details in your Freshdesk CSV exports, start by going to the "All tickets" view. Apply filters like creation date, agents, groups, ticket type, and status to narrow down the tickets you need. After setting the filters, click the Export button, pick CSV as the format, and select the ticket fields you want included. Don’t forget to expand the "Show multiline text fields" option to add fields like Description and any custom text fields for more detailed data.
For the most accurate export, set the "Created time" filter to "Any time" in the ticket list, then specify the exact date range in the export window. This approach ensures you capture all relevant tickets, including comments and detailed information. By carefully customizing the filters and fields, you can create an export that fits your reporting or operational needs perfectly.
What makes API exports better than CSV for exporting Freshdesk data?
API exports provide automation, adaptability, and access to in-depth data, making them ideal for managing large-scale or recurring Freshdesk data exports. With API exports, you can retrieve detailed ticket information – such as comments and email addresses – without needing to handle the process manually.
On the other hand, CSV exports are more manual and often come with limitations in terms of scope. This can make them less practical for handling complex or ongoing data needs. For those managing a high volume of tickets or requiring specific data formats, API exports not only save time but also minimize errors, ensuring you capture all the essential details.
How can I handle Freshdesk API rate limits when exporting large ticket datasets?
When exporting large ticket datasets from Freshdesk, it’s important to manage API rate limits carefully to keep the process running smoothly. Freshdesk imposes restrictions on API calls, and these limits depend on your subscription plan. For instance, the ‘list all tickets’ API has a cap of 9,000 tickets because of a 300-page limit, with each page containing 100 tickets.
To navigate these restrictions, you can use a few strategies. Throttling your requests or introducing delays between API calls can help you stay within the limits. Alternatively, you can use the account data export feature available in the Freshdesk interface, which allows for exporting larger datasets without being bound by API limits.
Another helpful approach is to integrate AI workflows. These workflows can automate the process, space out requests to avoid hitting limits, detect errors, and ensure the export proceeds efficiently. This method not only simplifies the task but also minimizes the risk of disruptions when handling large datasets.
Related Blog Posts
- How do you migrate away from Zendesk without losing ticket history or customer data?
- How do you migrate from Salesforce Service Cloud to a helpdesk without losing case history?
- How do you export Salesforce Cases, Emails, and Attachments (step-by-step)?
- How do you migrate away from Freshdesk without losing tickets, contacts, or history?
Moving off Freshdesk? See how a clean migration to Supportbench works.