
When customers encounter issues, they expect clear and professional updates. Transforming raw ticket history into a polished incident report achieves this by summarizing events, actions, and outcomes in a way that’s easy to understand. This process not only improves communication but also demonstrates accountability and builds trust.
Here’s a quick overview of the process:
- Why it matters: Incident reports help customers understand what happened, document compliance, and reassure stakeholders.
- Challenges with raw ticket history: Internal notes are often messy, technical, and confusing for customers, though AI in customer support can help streamline these insights.
- Key steps:
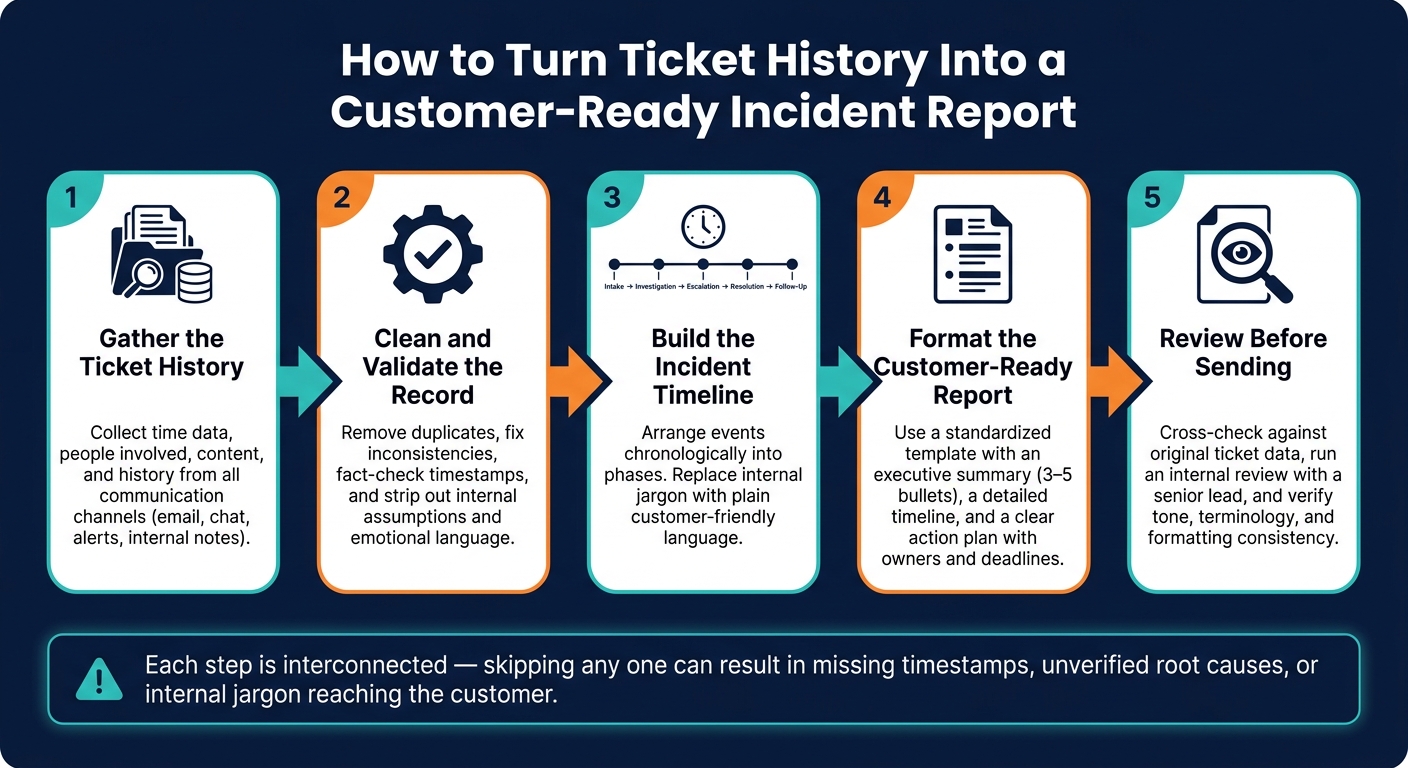
- Gather data: Collect all relevant ticket details, communications, and timestamps.
- Clean and verify: Remove duplicates, fix inconsistencies, and focus on factual information.
- Build a timeline: Organize events into clear phases like intake, investigation, and resolution.
- Format professionally: Use a standardized template with plain language and consistent formatting.
- Review thoroughly: Double-check details, tone, and clarity before sharing with customers.
By following these steps, support teams can turn disorganized ticket data into clear, customer-friendly reports that enhance transparency and trust.
How to Turn Ticket History Into a Customer-Ready Incident Report
Step 1: Gather the Ticket History
The first step in creating a thorough incident report is collecting all relevant data. This includes the primary ticket and any related communications. By pulling together this information, you can build a detailed timeline of events. From there, focus on identifying the fields that will form the foundation of your report.
Key Ticket Fields to Include
When compiling your report, organize the data into four main categories: time data, people involved, content, and history.
| Field Category | Essential Fields |
|---|---|
| Time Data | When the incident occurred, was discovered, reported, and resolved; total duration [2][5][7] |
| People | Requester name, contact details, witnesses, assigned technician, supervisor [2][3][6] |
| Content | Initial symptoms reported, chronological event details, supporting evidence (logs, photos), resolution notes [2][3][6] |
| History | Escalation records, internal comments, notification timestamps [2][6][5] |
One often-overlooked detail is priority classification. Incidents are generally categorized as High (critical systems down for multiple users), Medium (a single user facing critical system failure or degraded performance), or Low (a non-critical issue affecting one user) [6]. Including this prioritization ensures that the report reflects how the issue was handled and its urgency.
After identifying the key fields, consolidate data from all communication channels to complete the record.
Combining Data from Multiple Sources
A single ticket rarely tells the full story. To create a comprehensive record, include data from email threads, chat logs, automated alerts, and internal comments. Since these details often come from different sources, integrating your ticketing system with communication and monitoring tools is crucial. This reduces manual work and ensures no data is missed. Platforms like Supportbench can seamlessly pull in data from multiple sources, providing a unified timeline without added effort.
"Visibility allows organizations to gain a comprehensive, real-time view of their internal and external environments, enabling them to track emerging risks earlier." – Resolver [4]
Common Data Errors to Watch For
Data inaccuracies can disrupt the incident report and hinder future analysis. Before moving forward, audit your ticket fields to catch common errors.
"The goal of incident reporting is to create a reliable record that supports an investigation process to establish the root cause of the issue and make process improvements." – Heather Cox, Senior Content Manager, Onspring [3]
Here are three frequent issues to look out for:
- Missing timestamps: Without accurate time data, the incident timeline falls apart, making root cause analysis nearly impossible. Always cross-check reported times with system logs or automated audit trails [2].
- Inconsistent logging: When senior technicians skip "minor" details while junior staff log everything, the resulting data becomes unreliable. This inconsistency can distort performance analysis [6].
- Early resolution marking: Marking a ticket as resolved before the customer confirms the fix can mask recurring problems and lead to customer frustration later [6].
Taking the time to address these errors ensures your incident report is both accurate and actionable.
sbb-itb-e60d259
Step 2: Clean and Validate the Record
After gathering raw ticket data, it’s tempting to dive straight into writing the report. But raw ticket history is often chaotic – it includes duplicate entries, conflicting updates, and internal notes that were never intended for a customer’s eyes. Taking the time to clean and validate the record transforms a jumbled data set into a professional, clear incident report. This process ensures that only accurate and consistent information moves forward to build the timeline.
Removing Duplicates and Inconsistencies
When ticket data comes from multiple sources, overlapping entries are common. Review the data carefully, using unique Ticket IDs, timestamps, and descriptions to identify and remove duplicates. Also, check for missing categorizations – fields like product area, severity, or customer experience metrics. Gaps in these areas can leave the report incomplete. By sorting entries by category and scanning for blanks, you can quickly spot and address these issues. Standardizing these details upfront ensures the final report is structured and easy to understand [8][9].
Fact-Checking Key Details
Double-check critical details like submission dates, ownership changes, and resolution timestamps against system logs or audit trails. Look out for inconsistencies, such as tickets marked as resolved but reopened shortly afterward – this often signals that the initial fix didn’t fully address the issue.
"If CSAT rises but reopens with a spike, you may be celebrating incomplete fixes." – Radu, Head of Digital Transformation, BlueTweak [9]
When you encounter conflicting information, rely on observable events recorded in the ticket history rather than making internal assumptions [9].
Separating Facts from Internal Assumptions
Internal ticket notes can be a minefield of shorthand, speculation, and emotional language – none of which belong in a polished report. Go through these notes and keep only the documented facts, such as timestamps, error codes, steps taken, and confirmed resolutions. Subjective assessments should be excluded. AI-driven sentiment analysis tools can help flag emotional language, making it easier to focus on the technical facts [9].
Once the record is clean and validated, you’re ready to piece together an accurate and reliable incident timeline.
Step 3: Build the Incident Timeline
Creating a timeline for customers involves transforming the validated data from Step 2 into a clear, easy-to-follow account. The goal is to present events in a structured way that avoids internal details, focusing instead on customer understanding.
Reconstructing the Sequence of Events
Begin by arranging all validated ticket entries in chronological order. Then, break the timeline into distinct phases: intake, investigation, escalation, resolution, and follow-up. This structure makes it easier for customers to follow the progression of events without feeling overwhelmed by a long list of timestamps, a process often streamlined through workflow automation.
Each phase should have clear start and end points based on the ticket data. For instance, the "intake" phase starts when the ticket is submitted and ends once the issue is categorized and assigned. Similarly, "escalation" begins when the issue is passed to a senior team and concludes when a fix is actively implemented. Keeping these boundaries precise ensures the timeline remains focused and avoids unnecessary complexity.
Grouping Events for Clarity
Not every ticket entry needs to be listed individually. Once the sequence is established, group related events to make the timeline easier to digest. For example, consecutive status updates can be summarized into a single entry. This approach reduces clutter and makes the timeline more readable.
"Organizing and categorizing support tickets is the foundational step… This process enhances the visibility of patterns that often arise, simplifying subsequent analysis." – Bella Williams, Insight7 [10]
You can also group events by themes or activity types, such as technical investigations, customer communications, or resolution actions. This method not only simplifies the timeline but also highlights any gaps that might need additional explanation, such as delays between escalation and resolution.
Writing Descriptions Without Internal Jargon
Customer-facing reports should avoid internal shorthand and technical jargon. Replace these terms with plain, customer-friendly language. A consistent mapping system can help translate internal details into terms customers can easily understand:
| Internal Detail (Avoid) | Customer-Facing Equivalent (Use) |
|---|---|
| Service-Alpha-API | Primary Login Service |
| Stack Trace / Error 500 | Service Interruption |
| Deploy ID #88291 | System Update |
| DB Latency > 500ms | Slow Response Times |
| Root Cause Speculation | Preliminary Investigation |
Descriptions should focus on the impact – what was broken and who was affected – rather than diving into technical mechanics. If the root cause is not yet confirmed, make that clear to manage expectations. For example, label it as a "preliminary investigation" rather than presenting it as a finalized conclusion.
"A customer-facing update that references internal service names erodes confidence instantly." – Autoheal [11]
The aim is to create a timeline that feels like a straightforward narrative of events, not a heavily edited engineering log. By prioritizing clear, customer-friendly language, the report reinforces the support team’s dedication to transparency and effective communication.
Step 4: Format the Customer-Ready Report
Once you have a clear, easy-to-understand timeline, the next step is transforming it into a polished, professional document.
Using a Standardized Report Template
A consistent report template does more than just save time – it helps customers quickly locate the information they need, fostering trust through familiarity. Every incident report should include the following core elements: what happened, why it happened, the actions taken, and the current status. This structure ensures clarity and builds confidence.
"Standardize once so the team can deliver consistently and spend their energy helping customers, not formatting slides." – BlueTweak [9]
The template should act as a layered document. Start with an executive summary of 3–5 bullet points at the top, followed by a detailed incident timeline and a clear action plan with assigned owners and deadlines. This approach naturally creates a streamlined, predictable format that improves customer comprehension.
Keeping the Report Clear and Professional
With the structure in place, focus on crafting a narrative that’s customer-oriented. Stick to a single date and time format throughout the document (e.g., May 21, 2026, 2:30 PM ET) for consistency. Leave out internal notes, irrelevant ticket IDs, and unnecessary performance commentary. Before finalizing, ensure every data point is accompanied by a brief explanation in plain English to provide context.
"The tool provides graphs. Your report provides meaning." – Radu, Head of Digital Transformation, BlueTweak [9]
Using AI to Speed Up Formatting
AI tools, integrated into platforms like Supportbench, can improve customer support with AI-driven sentiment and create a well-structured first draft in minutes, offering both efficiency and accuracy for B2B incident reporting [9]. Instead of manually compiling reports from raw ticket data, teams can focus on refining the content where it matters most. By setting clear guidelines – such as maintaining a formal tone and capping the summary at 500 words – AI-generated drafts stay concise and aligned with the brand voice [1].
Step 5: Review Before Sending
Before sending out the report, take the time to carefully review it, ensuring every detail matches the original ticket data.
Matching the Report to the Ticket History
Start by cross-checking the report against the original ticket data, point by point. Make sure the timeline accurately reflects the incident, including specifics like impacted systems, event duration, and affected customers. If any root causes are still unconfirmed, label them as "preliminary" to maintain transparency. Additionally, confirm the report includes links to key resources like the original tickets, dashboards, or runbooks to create a clear audit trail [11]. Once you’ve verified these details, have a senior team member review the report to ensure it’s clear and aligns with the original data.
Running an Internal Review
For reports meant to be seen by customers, a second review is a must. Assign this task to an incident commander or a senior support lead. Their job is to ensure the report is transparent, professional, and consistent with previous incident reports. They’ll also check for any missed internal service names or speculative language. The report must clearly answer critical questions like "What is broken?", "Who is affected?", and "What is the current status?" If these answers aren’t immediately clear, the report needs restructuring.
Checking Tone, Terminology, and Formatting
After the initial review, focus on the tone and formatting. Consistency in language is key. Stick to the present tense and avoid speculative phrases like "we think", "might be", or "possibly caused by."
"Tone discipline is the hardest part. Use present tense, state clear facts, and omit speculation." – Autoheal
Use a standardized vocabulary for status updates, such as Investigating, Identified, Mitigating, Monitoring, and Resolved. This ensures clarity and uniformity across reports. Lastly, make sure any outlined next steps have clear ownership and deadlines to avoid unnecessary follow-up questions.
Conclusion: Faster, More Accurate Incident Reporting with AI-Native Tools
Key Takeaways
Effective incident reporting boils down to five essential steps: collecting accurate data, cleaning and validating records, creating a clear timeline, consistent formatting, and thorough review before submission. Each step is interconnected, and skipping any of them can lead to issues like missing timestamps, unverified root causes, or confusing internal jargon making its way to the customer. Automating data collection eliminates manual entry, reduces errors, and ensures every report is complete and reliable. This structured approach paves the way for tools like Supportbench to take incident reporting to the next level.
"A well-structured Support Ticket Report transforms data into actionable strategies, driving continuous improvement in the support experience." – Insight7 [8]
How Supportbench Simplifies Incident Reporting

Supportbench makes incident reporting easier and faster by leveraging AI-driven case summaries and sentiment analysis. These tools automatically create structured overviews, addressing the common issues of fragmented data and subjective notes. By capturing both positive and negative customer signals from the entire case history, Supportbench provides a balanced, data-supported view of the incident.
With its AI Agent Copilot, Supportbench reviews past interactions to craft logical summaries, cutting down report creation time from hours to just minutes. Additionally, predictive customer satisfaction and effort scores help teams identify high-risk accounts before reports are finalized, ensuring critical issues get the attention they deserve. And at $32 per agent per month, these AI capabilities come standard – no extra fees, no hidden licensing tiers.
FAQs
What should I include in a customer-ready incident report?
When preparing an incident report for customers, clarity and simplicity are key. The report should focus on what matters most to the user – the impact on their experience and the steps being taken to resolve the issue.
Here’s what to include:
- What’s happening: Clearly describe the issue in simple terms.
- Who is affected: Specify the users or services impacted.
- Actions being taken: Outline what’s being done to address the problem.
- Next update timing: Let customers know when they can expect more information.
Avoid using technical jargon or internal terminology that customers might not understand. Instead, aim for a tone that’s straightforward and factual, steering clear of any speculation.
For structure, consider breaking the report into these sections:
- Brief Overview: A short summary of the incident.
- Business Impact: Explain how the issue affects customers or their operations.
- Timeline of Actions: Provide a clear sequence of what has been done so far.
- Next Steps: Share what will happen next and when updates will be provided.
By keeping the report focused and well-organized, you’ll ensure customers remain informed and reassured during the incident.
How do I remove internal notes and jargon without losing key details?
When addressing customer issues, it’s essential to translate internal jargon into language that’s easy to understand. Avoid technical terms like commit hashes or internal IDs, and focus on presenting errors in a way that highlights the benefits of the resolution. Here’s a structured approach to achieve this:
- Problem: Clearly describe the issue the customer experienced in plain language.
- Environment: Briefly outline the relevant details, such as the platform, software version, or tools involved, without overwhelming the customer with unnecessary technical specifics.
- Resolution: Focus on the steps taken to fix the problem and how it benefits the customer. Use positive, reassuring language to highlight the outcome.
- Cause: If appropriate, explain the root cause in simple terms, avoiding technical jargon. This helps build trust and transparency.
Always manually review the output to ensure sensitive details are redacted and the tone remains professional and customer-focused. This approach keeps communication clear, builds trust, and enhances the customer experience.
How can AI speed up incident report writing without sacrificing accuracy?
AI simplifies incident reporting by organizing ticket histories into structured formats such as PERC (Problem, Environment, Resolution, Cause). To ensure the reports are precise, it’s crucial to include a human-in-the-loop process where agents review and validate AI-generated drafts. Keeping the AI’s "temperature" setting low (around 0.1) helps produce more factual and consistent outputs. Additionally, using tools that provide inline citations and access to raw data allows agents to quickly verify information, cutting down on manual work while ensuring the reports remain accurate and well-structured.