
Creating an admin onboarding kit can significantly reduce support tickets and improve efficiency. Here’s how you can achieve this:
- Audit Existing Materials: Review and update outdated content. Identify gaps by analyzing how admins interact with your platform during their first week.
- Tailor Onboarding by Role: Define admin personas (e.g., Security Admins, Billing Admins) and create role-specific guides and milestones.
- Use Interactive Tools: Replace static documents with dynamic checklists and a centralized, searchable resource hub to streamline the process.
- Leverage AI: Automate repetitive tasks like reminders and common queries. Use AI to generate and maintain knowledge base articles that actually get used.
- Track and Refine: Monitor metrics like activation rates and support ticket volume. Collect feedback regularly to improve your materials.
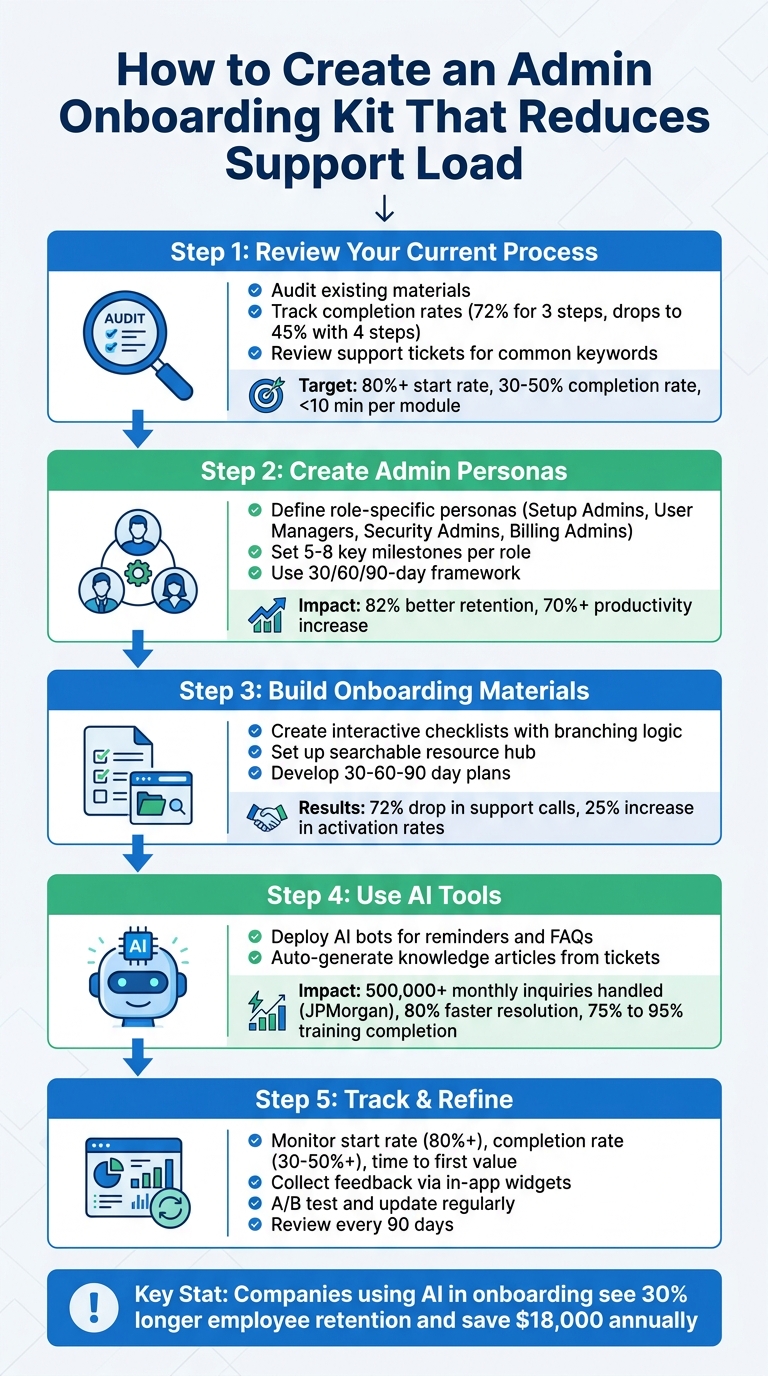
5-Step Process to Create an Admin Onboarding Kit That Reduces Support Load
Step 1: Review Your Current Onboarding Process and Find the Gaps
The first step in creating a more effective onboarding kit is to carefully examine your current process. This helps you uncover areas that may confuse admins or increase support needs. Start by auditing all existing onboarding materials – note where they’re stored and when they were last updated [5]. Outdated or unclear content can create unnecessary hurdles for new admins.
Take it a step further by observing how admins actually use your product. For example, watch experienced admins during their first week as they handle tasks like setting up single sign-on (SSO) or managing user permissions. This can reveal shortcuts or workarounds that aren’t included in your official guides [8].
Document Onboarding Steps and Track Completion Rates
Lay out the entire admin onboarding journey, from account creation to completing their first configuration. Use tools like spreadsheets, flowcharts, or your helpdesk solution to track where admins struggle or abandon the process. The data can be eye-opening: checklists with only three steps have a 72% completion rate, but that drops to 45% when a fourth step is added [10]. Longer processes with unclear milestones often highlight areas where admins are getting stuck.
Focus your efforts on first-week tasks rather than general orientation goals [8]. Pinpoint the specific actions admins need to take to get their teams operational. Look for skipped steps, moments where they pause to seek help, or areas where they abandon the process altogether. Keep an eye on metrics like a start rate of over 80%, a completion rate between 30% and 50%, and individual module times under 10 minutes [10]. These numbers can tell you where your current process is falling short.
Next, dive into support tickets to uncover recurring pain points and automate workflows to resolve them.
Review Support Tickets and Escalations
Support tickets are a treasure trove of information for identifying gaps in your onboarding process. Analyze ticket history for common keywords like "password resets", "webhooks", "billing", and "integrations." These clusters often point to areas where your product or documentation isn’t providing enough clarity [2]. Pay special attention to tickets with long back-and-forth exchanges – these usually signal missing details or unclear instructions in your onboarding materials [2].
"The best KB pages include the exact data support will ask for anyway. That is how you reduce back and forth." – Apptension [2]
Talk to senior team members to identify the recurring "fifteen questions" that new admins always ask. These represent critical areas where your documentation needs improvement [8]. If a particular issue generates more tickets than expected, it might even point to a product bug rather than just a documentation flaw [2].
Keep in mind that 62% of Customer Success leaders don’t have real-time visibility into where customers are in the onboarding process [5]. Until you have better tracking tools, this type of manual review is essential for finding and fixing gaps.
sbb-itb-e60d259
Step 2: Create Admin Personas and Build Role-Specific Onboarding Paths
Once you’ve identified onboarding gaps, the next step is to tailor your approach to meet the specific needs of different admin roles. Admins have varied responsibilities, and a one-size-fits-all onboarding process often leads to confusion and inefficiency. By customizing onboarding experiences for specific roles, you help admins become self-sufficient more quickly. This process starts with defining clear admin personas.
Define Admin Personas by Role
Admins can be grouped into distinct categories based on their primary responsibilities. Instead of treating all admins as a single group, create personas such as:
- Setup Admins: Handle initial configurations, including SSO setup.
- User Managers: Focus on provisioning and deprovisioning team members.
- Security Admins: Oversee MFA settings and compliance requirements.
- Billing Admins: Manage invoices and seat allocations [1][11].
It’s important to note that many admins aren’t highly technical. They might be office managers, team leads, or operations staff. Avoid using technical terms like "API" or "command-line" when creating materials for these operational personas [1].
"Admins are your most important users, and they are the most underserved by documentation." – ScreenGuide Blog [1]
To support these personas effectively, create a permissions matrix that maps all possible actions in your software to specific roles (e.g., Viewer, Editor, Admin, Owner). This tool helps clarify role boundaries and avoids confusion about permissions. For each persona, focus on outcomes rather than just listing features. For example, a Security Admin’s guide should lead with practical steps like "To require all users to use strong passwords…" instead of merely showing navigation instructions [1].
These clearly defined personas also set the stage for leveraging AI tools (discussed in Step 4) to deliver personalized, scalable support.
Set Clear Milestones for Each Role
Once roles are defined, establish SMART milestones to measure progress effectively. Each persona should have 5-8 key milestones tied to feature adoption and tangible results. A 30/60/90-day framework works well:
- First 30 days: Focus on foundational learning and setup.
- Next 30 days: Build guided independence.
- Final 30 days: Achieve full contribution [6].
For example, a Setup Admin might complete technical configurations in the first 30 days, review security logs by day 60, and optimize integration syncs by day 90. Meanwhile, a User Manager might send their first 20 invites, audit user permissions, and automate deprovisioning within the same timeframe.
Strong onboarding processes can boost employee retention by 82% and increase productivity by over 70% [6]. To avoid overwhelming new admins – something that affects 81% of new hires – set specific and measurable goals. Instead of vague objectives like "learn the platform", use milestones such as "process 30 support tickets independently" for a support admin or "complete all compliance training modules" for a setup admin [6][13]. This structured approach empowers admins to handle tasks independently, reducing the overall support burden on your team.
Step 3: Create Your Onboarding Materials
Now that you’ve identified your target personas and outlined clear milestones, it’s time to develop onboarding materials that help admins work independently. The goal is to reduce their reliance on support teams by giving them the tools to solve problems on their own.
Build Interactive Checklists
Static documents just don’t cut it for dynamic onboarding needs. Instead, interactive checklists can guide admins through tailored steps based on their roles. For instance, Security Admins might focus on compliance settings, User Managers on provisioning tasks, and Billing Admins on managing invoices. Using branching logic ensures each admin sees only the steps relevant to their responsibilities, making the process more efficient and less overwhelming [4][14].
Interactive checklists also tackle one of the biggest onboarding bottlenecks: waiting on access. Imagine a new admin spending their first week submitting tickets for logins, app credentials, or equipment status. Productivity takes a hit before they even get started. A well-designed checklist can automate these requests and monitor progress in real time, eliminating unnecessary delays [12].
Here’s a real-world example: In 2024, Cuepath, a medical-monitoring company, introduced interactive onboarding tools and self-serve options through UserGuiding. The result? A 72% drop in support calls as users turned to in-app resources for answers. Similarly, CitizenShipper, a logistics company, used an in-app resource center to streamline onboarding, leading to a 25% increase in user activation rates by making support resources readily available [7].
Set Up a Searchable Resource Hub
A centralized, searchable hub can be a game changer. By consolidating SOPs, escalation paths, tone guidelines, and FAQs, you can significantly cut down on unnecessary support queries [3].
But here’s the catch: admins need to trust the hub. If it’s full of broken links, outdated screenshots, or missing details, they’ll likely abandon it and go straight to support. Regular audits are crucial – update articles as features evolve, fix broken links, and remove outdated content [3].
"A knowledge base your team actually trusts is one they’ll actually use." – CX Leader Eryn Chesney [3]
Modern resource hubs should be accessible 24/7 and integrated directly into your admin panel or product interface to prevent context switching. Leveraging AI tools within the hub can also act as a digital coach, suggesting relevant actions or answers based on the task at hand. This not only speeds up learning but also helps new admins gain confidence faster [7].
Create 30-60-90 Day Plans
Structured plans for the first three months can set clear expectations and help admins progress smoothly. Here’s a breakdown:
- Days 1–30: Focus on learning and integration. This includes completing training modules, shadowing colleagues, meeting the team, and understanding company policies.
- Days 31–60: Shift to active contribution. Admins begin handling tasks with less supervision and identifying areas for improvement.
- Days 61–90: Move toward ownership and mastery. By this stage, admins should be achieving long-term goals, implementing improvements, and working independently.
Using SMART goals ensures admins understand what success looks like at every stage. Companies with effective onboarding programs have been shown to improve new hire retention by 82% and increase productivity by over 70% [6][15].
Step 4: Use AI Tools to Automate Onboarding Tasks
Once you’ve created tailored onboarding materials, integrating AI tools into your process can take things to the next level by automating repetitive tasks. This not only saves time but also reduces the number of recurring support queries. Support teams often find themselves bogged down with answering the same questions, sending reminders, or updating documentation. AI tools can handle these tasks automatically, allowing your team to focus on more complex challenges that require a human touch.
Use AI Bots for Reminders and Knowledge Base Questions
AI chatbots are great for providing instant answers to common administrative questions and sending reminders when onboarding steps are incomplete. For instance, instead of waiting for someone to respond to inquiries about password resets, SSO configurations, or billing policies, AI bots can provide immediate assistance.
Take JPMorgan Chase as an example. They manage over 500,000 employee inquiries every month with AI assistants, primarily for tasks like password resets and software access requests. This has significantly eased the workload on their IT helpdesk [17]. The key to success here is ensuring that your bot is honest when it doesn’t have an answer, rather than attempting to guess.
"The fastest way to lose trust is a bot that sounds sure and is wrong. The fastest way to earn trust is a bot that is honest about uncertainty and hands off cleanly." – Apptension Guide [2]
AI tools can also send automated follow-ups when onboarding steps remain incomplete. For example, if a new admin hasn’t connected integrations, uploaded tax documents, or finished compliance training, the system can nudge them with reminders. Research shows that automated reminders can boost mandatory training completion rates from 75% to 95% within the first 30 days [18]. Furthermore, companies using AI chatbots for HR and IT queries report resolving issues 80% faster compared to traditional methods [17].
In addition to resolving immediate queries, AI can play a vital role in improving knowledge management, paving the way for even greater efficiency.
Auto-Generate Knowledge Articles
AI tools can automatically create knowledge base articles by analyzing resolved support tickets. For example, when an agent handles a complex issue, AI can turn that case into a structured article, complete with details like symptoms, causes, solutions, and prevention tips. These tools can also audit your existing knowledge base, flagging broken links or outdated content for review.
"If your KB is wrong, your assistant becomes wrong at scale." – Apptension [2]
The impact of AI-driven content creation is measurable. Support agents often spend up to 75% of their time manually researching answers for customers [19]. By automating this process, you can build a comprehensive self-service library that lightens the load on your support team. Features like one-click answers and smarter search options can boost new agents’ efficiency by as much as 35% [19]. Plus, what used to take 90 minutes of manual documentation can now be reduced to a quick two-minute review by a human [16].
These advancements not only improve onboarding but also streamline ongoing support, saving time and resources across the board.
Step 5: Track Results and Improve Your Onboarding Kit
Once your AI-driven tools are up and running, the next step is to measure their performance and refine your onboarding kit based on the results. Without tracking, you’re essentially working in the dark. As Sunboard HQ aptly states:
"If you are not tracking it, you are just guessing" [10].
Monitor Key Metrics
Start by establishing a baseline before rolling out your updated onboarding kit. Collect data on your current activation rates, time to first value (TTFV), and the volume of support tickets. These metrics will help you clearly see the improvements your onboarding efforts bring [9]. Research indicates that tracking these metrics not only validates the value of structured onboarding but also highlights the risks of neglecting it, such as increased churn [5].
Focus on metrics that reveal meaningful user behavior, not just task completion. For example, aim for a Start Rate of 80% or higher and a Completion Rate starting at 30% and improving to 50%+ [10]. But remember, high completion rates don’t mean much if users aren’t engaging with the core actions that drive long-term success. Fahmi Dani, Product Designer at Jimo, cautions:
"A user who clicks through every checklist step without performing the core activation behavior has not been onboarded. They have navigated your UI" [9].
To dig deeper, monitor completion rates for each step and investigate tasks with rates below 60%. Tools like session recordings or support ticket reviews can help identify problem areas [10]. Also, track your Time to First Value – the median time it takes for users to perform a meaningful action. Digitizing onboarding can reduce this time by 25% or more [5].
For support metrics, pay attention to ticket volume, repeat queries with common keywords (like "billing" or "integrations"), resolution times, and the duration of support threads [2]. If AI bots are part of your toolkit, monitor how often they resolve queries without human help and track error reports to maintain user trust [2].
Here’s a quick guide to key metrics and their benchmarks:
| Metric Category | Key Metric | Target/Benchmark |
|---|---|---|
| Engagement | Start Rate | 80%+ [10] |
| Engagement | Completion Rate | 30% – 50%+ [10] |
| Efficiency | Time to Complete | < 10 minutes [10] |
| Efficiency | Time to First Value | 10% – 30% reduction [2] |
| Support | Self-Serve Resolution | Measure deflection vs. successful outcomes [2] |
| Business Impact | Activation Rate | 50%+ improvement [9] |
While numbers are crucial, don’t overlook the importance of qualitative feedback for refining your onboarding materials.
Collect Feedback and Make Updates
Combine your data with direct user feedback to get a fuller picture. Use in-app widgets (like thumbs up/down), text prompts asking what went wrong, and one-on-one check-ins with admins to gather insights. Pair this with behavioral analysis – such as reviewing step-level drop-offs or session recordings – to identify where users struggle. Repeated keywords in support tickets, like questions about SSO configuration or billing, can also reveal gaps in your onboarding content. Conduct formal reviews at 90-day intervals to evaluate the effectiveness of your resources and identify areas for improvement [6].
Act on feedback quickly. No-code tools make it easy to test updates to task order, copy, or support materials on a weekly basis rather than waiting for quarterly overhauls [20]. Even small tweaks can significantly improve activation rates and revenue [10]. To keep your materials relevant, establish a "doc freshness" system and tie updates to product release cycles. Outdated documentation can erode user trust faster than having no documentation at all.
A/B testing is another powerful tool. Experiment with task order, copy, and design elements to find what drives the best activation rates. For example, while 3-step tours often achieve a 72% completion rate, adding just one more step can drop that figure to 45% [10]. Finally, compare 30-day retention rates between users who completed the onboarding kit and those who didn’t. This will help you confirm whether your kit’s tasks are genuinely contributing to long-term retention [20].
Common Mistakes and How to Avoid Them
To get the most out of a tailored onboarding process, avoid common mistakes that can weaken its impact. Even with a well-prepared admin onboarding kit, skipping over key strategies can increase support demands. Interestingly, the biggest errors aren’t technical – they’re strategic. In fact, U.S. businesses lose about $1 trillion every year due to voluntary turnover, and replacing just one employee can cost anywhere from half to twice their annual salary [21]. Let’s break down some of the most frequent mistakes and how to sidestep them.
Don’t Use Generic Onboarding for All Admins
A one-size-fits-all approach to onboarding doesn’t work. Different roles have different needs. For example, a developer admin requires API keys and integration guides, while a marketing admin needs access to campaign tools and analytics. Generic onboarding materials often fail to address these role-specific needs. This lack of customization can lead to frustration, and as a result, 20.5% of HR leaders report that up to half of new hires leave within the first 90 days when onboarding is poorly executed [12].
To fix this, segment your onboarding process. Create admin personas based on their roles, account tiers, and the complexity of their responsibilities. For instance:
- Self-serve admins on basic plans benefit from automated email sequences and searchable help documents.
- Mid-market admins thrive with a mix of automated tools and optional check-ins.
- Enterprise admins often need dedicated onboarding managers and regular progress reviews.
Also, make sure tasks align with responsibilities. If someone doesn’t have the authority to manage API keys, don’t include that step in their checklist [2].
A great example of this in action: In 2025, Hitachi replaced their traditional 10–15 day onboarding process for 300,000 employees with a custom AI digital assistant. By tailoring role-specific content from manuals and PDFs, they cut onboarding time by four days and reduced HR workload from 20 hours to 12 hours per hire [22]. That’s how personalization can transform the onboarding experience.
Next up? Move away from outdated, static documents.
Replace Static Documents with Interactive Tools
Static documentation is often disorganized and frustrating to navigate. As Docsio aptly puts it:
"A pile of documents in a shared drive isn’t a system. It’s a scavenger hunt" [5].
Static knowledge bases are notorious for broken links, outdated visuals, and irrelevant procedures, which can erode trust in the resource [3]. It’s no surprise that only 12% of employees strongly believe their company excels at onboarding [5].
Instead, shift to interactive tools that are easy to navigate and update. Here’s how:
- Use dynamic checklists that track progress in real time and provide step-by-step guidance when needed.
- Start with a high-level overview, followed by short, focused guides (5–10 minutes), and include deeper reference materials for those who need them.
- Organize your knowledge base with clear templates that outline symptoms, causes, fixes, and preventative measures to make content easier to find and use for both humans and AI [2].
Consider Texans Credit Union’s approach. In September 2024, they implemented Robotic Process Automation (RPA) to streamline system access provisioning. This reduced the time it took to grant system access from 15–20 minutes to under one minute, enabling new hires to dive into their work on day one [22]. Interactive tools like these save time and boost efficiency.
Set Up Regular Feedback Loops
Onboarding isn’t a one-and-done process. Treating it that way leads to outdated materials and wasted time. For example, office administrators spend an average of three hours each week just searching for the information they need [21].
To keep your onboarding materials relevant, tie updates to product release cycles. This helps prevent "doc drift" – when content becomes outdated or inaccurate. Before every new hire’s first day, audit your knowledge base for broken links and obsolete articles [3]. Regularly review the effectiveness of your onboarding materials and assign someone to oversee their quality. As Swifteq explains:
"Knowledge bases are living documents. They grow, they change, and they break. Links go dead. Images stop loading. Articles become outdated" [3].
Conclusion
Creating an admin onboarding kit that reduces support demands involves five key steps: evaluating your current process to identify gaps, designing role-specific onboarding paths, developing interactive resources instead of static documents, leveraging AI tools to automate repetitive tasks, and tracking performance to refine the process. Companies that integrate AI into onboarding report that new hires stay 30% longer in their first year, while automation can save organizations around $18,000 annually [22].
This approach emphasizes the value of personalization. By tailoring the process, you avoid suggesting actions that admins can’t implement, which would otherwise lead to unnecessary support tickets [2]. Combining customized content with AI-powered assistants also reduces the burden on senior staff, freeing them to focus on strategic priorities rather than repeatedly addressing the same questions [3].
"AI isn’t just for back-office automation. This is about giving every employee from the frontline to the C-suite with the information they need, exactly when they need it" [22].
To ensure your onboarding kit remains effective, schedule regular updates. Align review cycles with product releases, assign someone to oversee documentation quality, and incorporate feedback from new admins to identify gaps that seasoned employees might overlook [3]. Without consistent maintenance, your knowledge base risks becoming outdated, links may break, and trust could erode – ultimately driving admins back to your support team.
FAQs
What should an admin onboarding kit include?
An admin onboarding kit needs to empower admins to operate independently, grasp key workflows, and handle intricate account requirements. Here’s what it should include:
- Step-by-step guides: Detailed instructions for daily tools and workflows to eliminate guesswork.
- Comprehensive checklists: Cover all essential onboarding tasks to ensure nothing is overlooked.
- Well-organized knowledge bases: Provide clear, easy-to-navigate resources for quick problem-solving.
The kit should be tailored to specific roles, scalable for growing teams, and free of unclear directions or incomplete details. This reduces reliance on support and ensures a smoother onboarding experience.
How do I tailor onboarding for different admin roles?
To make onboarding more relevant for various admin roles, begin by pinpointing key positions such as security managers, user provisioning specialists, and billing admins. Develop materials tailored to each role – think detailed checklists, step-by-step workflows, and role-specific guides – to address their unique responsibilities and permissions.
A well-organized knowledge base can support self-guided learning, allowing admins to find the information they need quickly. Keep this content updated to reflect any changes in responsibilities or tools. Additionally, AI-driven workflows can help customize the onboarding process by adapting to the admin’s role and level of experience, ensuring a smoother and more efficient start.
Which metrics prove the kit is reducing support tickets?
Metrics that show the kit’s effectiveness include reduced ticket volume, fewer support requests per customer, and increased self-service resolution rates. You can monitor these through support analytics and key performance indicators (KPIs) such as CSAT scores and first contact resolution rates.