


Exporting data from Kayako – whether you’re transitioning platforms, conducting audits, or analyzing support performance – requires careful planning. You have two main options:
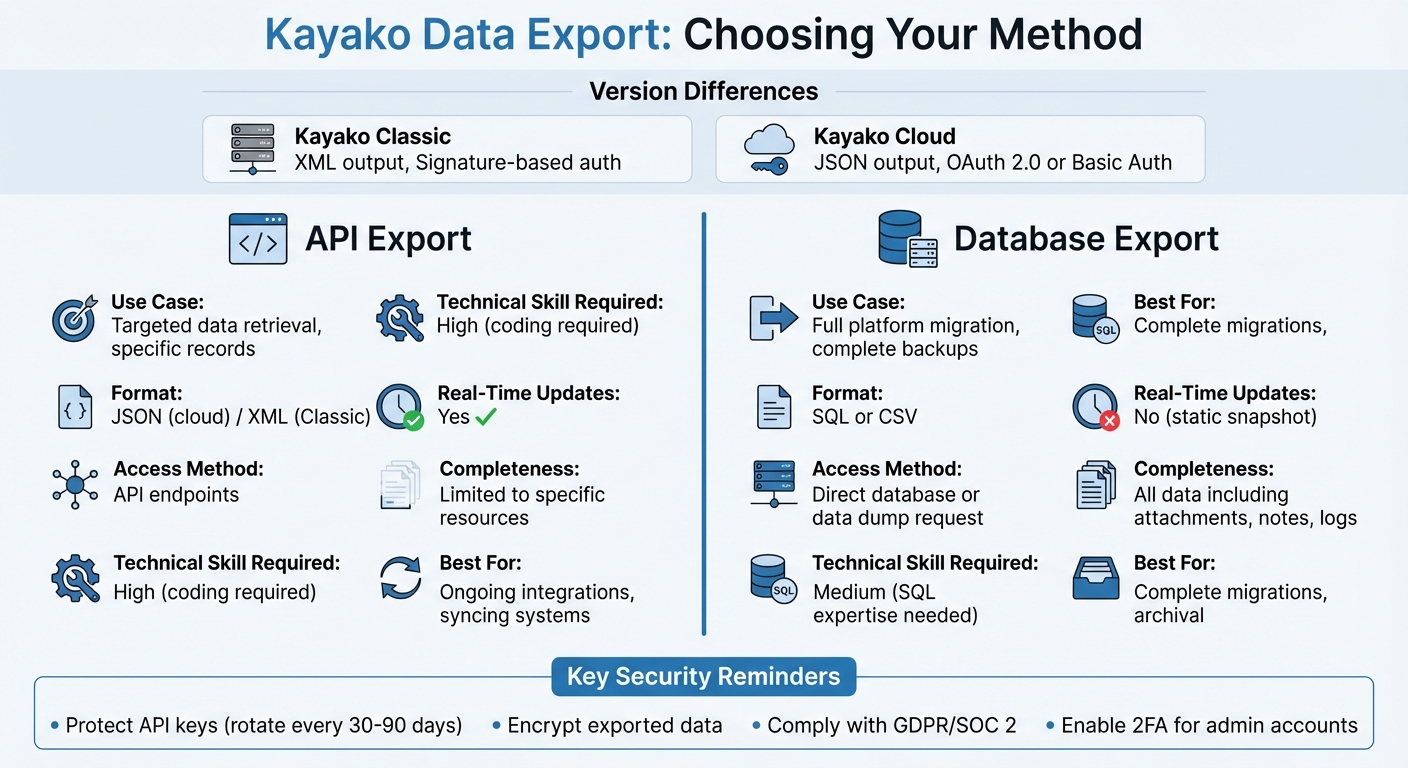
- API Export: Ideal for specific data like tickets or customer records. Kayako offers both REST API (Classic) and RESTless API (cloud version). Outputs are in JSON (cloud) or XML (Classic). This method is flexible but needs coding expertise.
- Database Export: Suitable for full data snapshots. Self-hosted users can directly access the MySQL database, while cloud users must request a data dump from Kayako’s team.
Key Considerations:
- Security: Protect API keys, encrypt data, and comply with GDPR or SOC 2.
- Data Accuracy: Maintain relationships between tickets, users, and organizations.
- Version Differences: Classic uses XML and signature-based authentication; cloud uses JSON and OAuth 2.0 or Basic Auth.
Quick Comparison:
| Feature | API Export | Database Export |
|---|---|---|
| Use Case | Targeted data retrieval | Full platform migration |
| Format | JSON (cloud) / XML (Classic) | SQL or CSV |
| Access | API endpoints | Direct database or request |
| Technical Skill | High (coding required) | Medium (SQL expertise needed) |
| Real-Time Updates | Yes | No |
Choose the method based on your needs, technical skills, and the data volume. Always test with a small dataset first to ensure accuracy.
Kayako API vs Database Export Methods Comparison
What You Need to Know Before Exporting Kayako Data
Before diving into exporting data from Kayako, it’s crucial to pinpoint your version and understand the type of data you’re dealing with. The steps for a cloud-based setup differ from a self-hosted one, and exporting ticket histories isn’t the same as exporting customer records. Getting these details right from the start helps you avoid errors and ensures your data remains intact.
Cloud vs. Self-Hosted Kayako: Key Differences
The biggest distinction lies in how data is accessed and formatted. Kayako Classic (usually self-hosted) uses a REST API that outputs data in XML. This API requires signature-based authentication, involving an API key, a secret key, and a salt hashed with SHA256. On the other hand, the modern cloud-based Kayako uses a "RESTless" API that delivers data in JSON format and supports either Basic HTTP authentication (with Base64 credentials) or OAuth 2.0.
If you’re using the cloud version, you can request a complete data dump from Kayako’s Infrastructure team. This package includes conversations, attachments, notes, user profiles, and Help Center articles. To make the request, you’ll need to provide a previously paid invoice along with your registered billing or mailing address.
To identify which version you’re using, head to the Admin Control Panel and check under API > Settings. If the URL contains api/index.php, you’re likely using Kayako Classic. The endpoint structures also differ between versions: Classic relies on controller-based paths (e.g., /api/index.php?e=/App/Controller/Action), while the cloud version uses resource-based paths like /api/v1/cases.
Tickets vs. Customer Records: Differentiating Data Types
Ticket history includes the entire conversation thread – subject lines, tags, status updates, comments, attachments, and even inline images. These records document every step of a customer interaction, from the initial inquiry to resolution. Customer records, by contrast, contain user details such as names, email addresses, organization affiliations, and any custom fields you’ve set up.
Because tickets and customer records are stored in separate tables and accessed through different API endpoints, maintaining relational links (e.g., between conversations, users, agents, and organizations) is critical. Customer records are generally easier to export, but they often include Personal Identifiable Information (PII) such as names and emails, which might require extra compliance measures.
To ensure a smooth process, run a demo migration with about 20 records. This lets you verify field mappings and catch any errors early. You can also filter records by date, tags, or organizations to exclude irrelevant or outdated data. Once you’ve defined your data types, the next step is securing the export process.
Security and Compliance Requirements
Whether you’re exporting via API or directly from the database, security is non-negotiable. The Kayako REST API grants unrestricted access to all helpdesk data, with no staff, team, or department-level permissions enforced. This makes protecting your API keys and credentials absolutely essential. As Kayako Classic Support puts it:
"The REST API has no concept of staff, team or department permissions. This means that the REST API has no concept of staff, team or department permissions… using the API key your connecting application has access to all of your helpdesk’s data." – Kayako Classic Support
Kayako’s infrastructure is hosted on AWS and meets standards like SSAE-16 (SOC 1, 2, and 3), PCI DSS, and ISO 27001/27017/27018. All data is encrypted both at rest and during transit over HTTPS (Port 443). Before exporting, enable two-factor authentication for the admin account and set up IP restrictions in Kayako’s security settings. If you’re using third-party migration tools, check that they’re SOC 2 Type II certified and willing to sign a Data Processing Agreement (DPA) to comply with GDPR.
Additionally, database access is tightly controlled, and support teams require explicit customer approval before accessing specific instances.
sbb-itb-e60d259
How to Export Kayako Data Using the API
Setting Up API Access and Authentication
The process for authentication depends on which version of Kayako you’re using. Kayako v1 (the modern cloud version) supports both Basic HTTP Authentication and OAuth 2.0. On the other hand, Kayako Classic uses a signature-based method that requires an API Key, Secret Key, Salt, and a generated Signature.
For Kayako v1, start by including an Authorization header with Basic base64($email:$password) in your request. Once authenticated, you’ll receive a session_id. Be sure to capture this immediately and include it in the X-Session-ID header for subsequent requests. If you’re using OAuth 2.0, request the conversations:read scope for ticket data and users:read for customer records.
In Kayako Classic, enable the API by going to the Admin Control Panel under REST API > Settings and setting "Enable API" to "Yes." Then, retrieve your API Key and Secret Key from Admin CP > REST API > API Information. To generate a signature, create a Salt, hash it with your Secret Key using SHA256, and then base64 and URL encode the result. Your request URL should look like this:
https://yourdomain.kayako.com/api/index.php?e=/App/Controller/Action&apikey=[key]&salt=[salt]&signature=[signature]. Remember, the Secret Key is only used locally to generate the signature and is never included in the request.
| Component | Kayako v1 (Cloud) | Kayako Classic |
|---|---|---|
| Primary Auth Method | Basic Auth or OAuth 2.0 | API Key + Secret Key Signature |
| Credentials Location | User login credentials | Admin CP > REST API |
| Data Format | JSON | XML |
| Session Handling | X-Session-ID header | Stateless (Signature required per request) |
Once authentication is set up, you’re ready to start retrieving ticket histories.
Pulling Ticket History Through API Endpoints
After authenticating, you can access ticket history using specific endpoints. For Kayako Classic, use /Tickets/TicketPost/ListAll/[TicketID] to pull all replies and notes for a ticket, or /Tickets/TicketPost/[TicketID]/[PostID] to retrieve specific entries. To export a broader list, the /Tickets/Ticket endpoint provides a collection of tickets. Keep in mind that responses in Kayako Classic are in XML format, so you’ll need to parse the data accordingly.
In Kayako v1, the structure is resource-based, such as /api/v1/cases. Responses are provided in JSON, and GET requests are used to fetch data. Be sure to include the X-Session-ID header to maintain performance. Tools like Postman can help test your queries.
For larger datasets, use filters like date ranges, tags, or organizations to narrow down the data. You can also skip unnecessary attachments or schedule exports during non-peak hours to stay within API limits and reduce processing time. These strategies help you export relevant support data efficiently.
Once you’ve exported ticket data, you can follow a similar process to retrieve customer records.
Pulling Customer Records Through API Endpoints
For customer information in Kayako Classic, use the /Base/User endpoint. This will return user profiles, including names, email addresses, organization details, and any custom fields. Since customer records often include sensitive personal information, ensure your export complies with regulations like GDPR or similar data protection laws.
In Kayako v1, if you’re using OAuth 2.0, make sure you’ve requested the users:read scope. The JSON response will include user details, and you can streamline the export by filtering out empty records using _empty=false. Maintaining the relationships between users, tickets, and organizations is critical, especially if you’re migrating to a new platform or generating detailed reports.
Handling Pagination, Rate Limits, and Large Data Sets
When working with large datasets, pagination and rate limits are key to managing the process effectively. Use the count parameter to split large exports into smaller, more manageable batches. For example, appending ?count=45 to your endpoint URL will limit the response to 45 resources per request. To further optimize, use the fields parameter to request only the data you need, reducing payload size and speeding up the process.
For extremely large datasets, you can also request a full data dump directly from Kayako’s infrastructure team. This approach ensures you can handle massive exports without overwhelming the system or hitting API limits.
How to Export Kayako Data Using Database Access
Database exports provide a detailed snapshot of your helpdesk data, complementing API methods for a fuller view.
Access to the Kayako Database
The method to access the database depends on whether you’re using Kayako Cloud or Kayako Classic (self-hosted). Self-hosted installations allow direct access to the MySQL database. You can find the necessary credentials in the config/config.php file. Make sure you have secure access to maintain data integrity during the export process.
For Kayako Cloud users, direct SQL database access isn’t available. Instead, you’ll need to request a data dump or full backup from the Kayako infrastructure team. To do this, submit a support ticket and include the following:
- A copy of a previously paid invoice
- The registered billing email
- The account’s associated mailing address
Once the request is approved, you’ll receive download links for backup files, which include conversations, attachments, and user records.
| Access Type | Method of Access | Required Credentials/Information |
|---|---|---|
| Kayako Classic (Self-hosted) | Direct SQL Connection | Hostname, DB Name, Username, Password (from config/config.php) |
| Kayako Cloud | Data Dump Request | Paid invoice, billing email, mailing address |
For self-hosted users, you can connect to the database using MySQL CLI or any standard SQL client. Before exporting data, ensure directories like __swift/cache, geoip, logs, and files have full read, write, and execute permissions.
Database Tables That Store Tickets and Customer Records
After gaining access, the next step is identifying the key tables where Kayako stores its data. Ticket-related information is spread across several tables:
Ticket: Stores metadata like subject, status, and priority.TicketPost: Contains the conversation history, including replies and comments.TicketNote: Holds internal staff notes.TicketAttachment: Stores metadata for attached files.
Customer data is stored in the following tables:
User: Contains individual customer profiles.UserOrganization: Holds company-level details.Staff: Stores help desk agent information.
These tables are interconnected through foreign keys, so maintaining these relationships during export is crucial for ensuring data integrity.
SQL Queries for Exporting Data
For self-hosted installations, you can create custom SQL queries to extract the necessary data. Below are examples of basic queries:
To export ticket data along with customer information:
SELECT t.ticketid, t.subject, t.dateline, u.fullname, u.email, tp.contents FROM swtickets t JOIN swusers u ON t.userid = u.userid JOIN swticketposts tp ON t.ticketid = tp.ticketid WHERE t.dateline >= UNIX_TIMESTAMP('2025-01-01') ORDER BY t.ticketid, tp.dateline; To export customer records along with their organization details:
SELECT u.userid, u.fullname, u.email, u.phone, uo.organizationname FROM swusers u LEFT JOIN swuserorganizations uo ON u.userorganizationid = uo.userorganizationid; Always export data using UTF-8 encoding to prevent issues with special characters in ticket bodies or customer names. When exporting ticket history, check for records tied to deactivated or deleted agents. Additionally, cross-reference attachment IDs with their related comments to ensure proper relational integrity, which is critical for smooth migrations.
For more complex exports involving custom fields, you may need to include additional tables that store these fields separately. These could include string, boolean, date, number, or select-type custom fields. If performing a live migration, disable monitors and triggers temporarily to prevent data changes during the process.
Common Problems and How to Avoid Them
The export methods available are powerful, but there are common issues that can jeopardize data integrity during migration. Paying attention to these challenges is crucial for ensuring smooth and efficient B2B support operations.
Maintaining Data Accuracy and Relationships
Exports often miss critical details like inline images, CC users, and original timestamps, particularly when dealing with Knowledge Base content. Additionally, deactivated agent records might not transfer, leaving tickets without proper ownership history.
To address these issues, start with a demo export of 20 random tickets. This helps identify skipped or problematic records before committing to a full migration. It’s also important to disable email notifications, monitors, and triggers during the export to avoid unintended changes or unnecessary emails being sent to users.
For high-volume desks, consider an incremental (delta) migration to capture records created or updated during the main export. Pre-map custom fields and test a sample of attachments to ensure everything transfers correctly. Also, avoid changing your Help Center URL until the export is complete, as doing so can break attachment links. Keep DNS settings consistent to prevent these disruptions.
Once you’ve ensured data accuracy, the next step is securing your credentials and exported files.
Securing Your API Keys, Database Credentials, and Export Files
API security breaches can be expensive and damaging. To avoid this, never hardcode API keys directly into source code or application files. Instead, store them in environment variables or secure configuration files. For Kayako Classic, remember that the secret key should only be used locally to compute the SHA256 signature, not sent in API requests.
"Once you have pushed a commit to GitHub, you should consider any data it contains to be compromised. If you committed a password, change it! If you committed a key, generate a new one." – GitHub
Rotate API keys every 30 to 90 days, and enable Two-Factor Authentication (2FA) for accounts managing these keys. Restrict database access by whitelisting specific IP addresses. If a key is accidentally exposed, such as being pushed to a public repository, revoke and regenerate it immediately. Additionally, keep exported files only as long as necessary and ensure they are encrypted when stored. Many migration services automatically archive and delete data within 3 to 10 days after completion.
These security practices play a key role in deciding between API and database export methods.
API vs. Database Export: Which Method to Use
Choosing the best export method depends on your data needs, technical expertise, and timeline. API exports are ideal for retrieving specific records or syncing data with other systems. On the other hand, database dumps work well for full platform migrations or comprehensive backups.
| Feature | API Export Method | Database / Data Dump Method |
|---|---|---|
| Use Case | Targeted data retrieval or syncing specific records | Entire platform migrations or archival backups |
| Completeness | Limited to specific resources (e.g., Cases, Users) | Includes all data, such as attachments, notes, and logs |
| Complexity | High; requires custom scripting and signature logic | Medium; involves SQL expertise or infrastructure requests |
| Real-time Access | Possible with repeated GET requests | Static snapshot of data at a specific point in time |
| Format | JSON (New Kayako) or XML (Classic) | SQL, CSV, or proprietary backup formats |
| Security | Managed via API Keys, Salts, and Signatures | Managed through encrypted files and secure download links |
For large datasets, you can request temporary API rate limit increases from Kayako support to avoid timeouts. If you have SQL expertise and are working with a self-hosted installation, database exports offer quicker access to relational data. For cloud users without direct database access, data dumps can be requested from the infrastructure team.
Conclusion
Exporting Kayako ticket history and customer records requires choosing the approach that aligns best with your goals and technical expertise. For precise data retrieval or ongoing integrations, API exports are a strong option, though they require coding skills and secure signature generation. On the other hand, database dumps are better suited for comprehensive migrations but require administrative approval and proof of a valid invoice.
During the export process, prioritize security and accuracy. Disable email notifications, monitors, and triggers to avoid unintended data changes. Additionally, safeguard your API keys by storing them securely and rotating them regularly.
For cloud-hosted systems, requesting a full data dump from your infrastructure team ensures you capture the entire dataset, including attachments and articles. Self-hosted users with SQL expertise can directly access database tables for a quicker and more thorough export. Always verify the integrity of attachments and review migration reports to maintain data relationships.
Choose your export method based on your technical skills and data requirements. If you’re moving to a customer support software for B2B teams, a complete database export can offer a solid foundation for building efficient B2B support operations without the constraints of legacy systems. Use these strategies to simplify your migration and set the stage for streamlined, next-generation support.
FAQs
How can I export specific tickets or customer records from Kayako?
Kayako makes it simple to export tickets or customer records, thanks to its filtering options and API capabilities. If you’re using the platform’s built-in export tools, you can narrow down your data by applying filters like date ranges, ticket status, or assigned agents before generating a CSV file. For customer records, filters such as customer group or activity level can help you refine your selection.
When the default tools don’t quite meet your needs, Kayako’s API steps in as a more flexible solution. With custom API queries, you can extract exactly what you need – whether it’s tickets assigned to specific agents or users created within a certain timeframe. This approach is especially useful for targeted data migrations, detailed reporting, or archiving specific records.
The API gives you full control over the data you retrieve, making it an excellent choice when the built-in filters fall short.
How can I securely export ticket history and customer records from Kayako while protecting sensitive data?
Exporting ticket history and customer records from Kayako requires careful attention to data protection. Start by ensuring that only authorized personnel have access to the data. Use secure transfer methods like HTTPS to guard against unauthorized interception during the process. Kayako also provides encryption to protect data both at rest and in transit, adding an extra layer of security.
For further safety, consider anonymizing or redacting any Personally Identifiable Information (PII) if the data will be used outside of a secure environment. It’s equally important to comply with relevant regulations, such as GDPR, and ensure your organization’s policies align with these standards. By combining encryption, access restrictions, and regulatory compliance, you can effectively safeguard sensitive data during exports.
How can I ensure attachments and links are included when exporting ticket history and customer records?
To include attachments and links in your export, it’s essential to know where Kayako stores these files. Depending on your system setup, attachments might be saved either in the database or in a specific files directory. When exporting data through the API or database methods, make sure to account for these files or extract the related attachment details.
For ticket conversations, comments, and associated links, ensure the export includes the full comment text and references to attachments. If attachments are stored in a files directory, back up that directory separately. Also, double-check that all links and URLs still work after the export. This ensures you retain all necessary data for reporting, migration, or archiving.
Related Blog Posts
- How do you migrate away from Freshdesk without losing tickets, contacts, or history?
- How do you export Freshdesk tickets + attachments (API + CSV) the right way?
- How do you export Pylon conversations, tickets, and customer data (step-by-step)?
- How do you migrate away from Kayako without losing tickets, users, and attachments?