

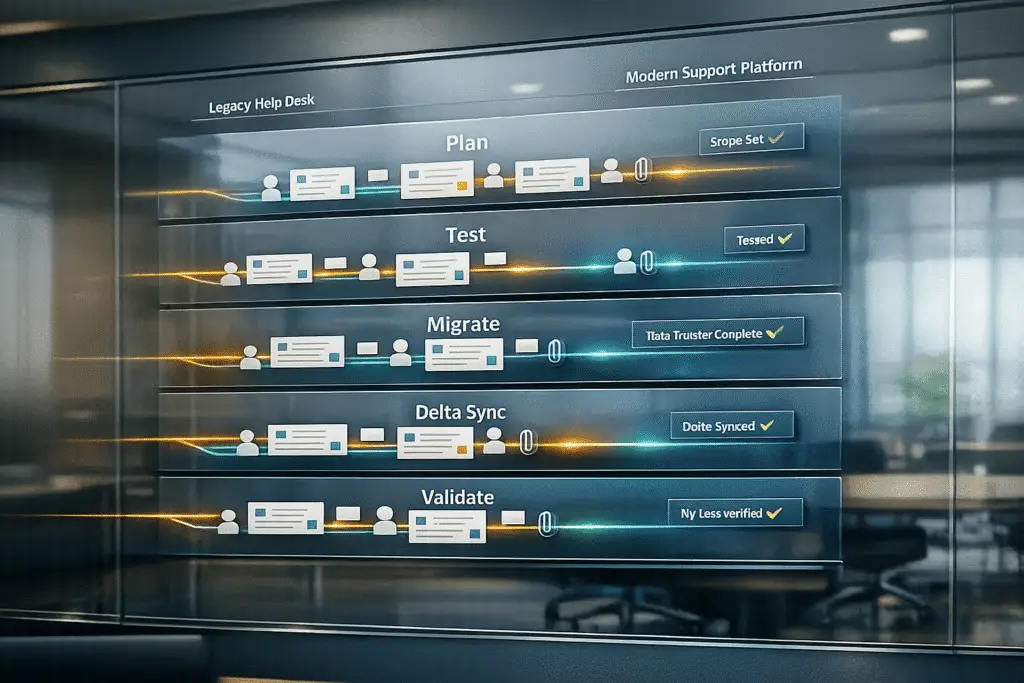
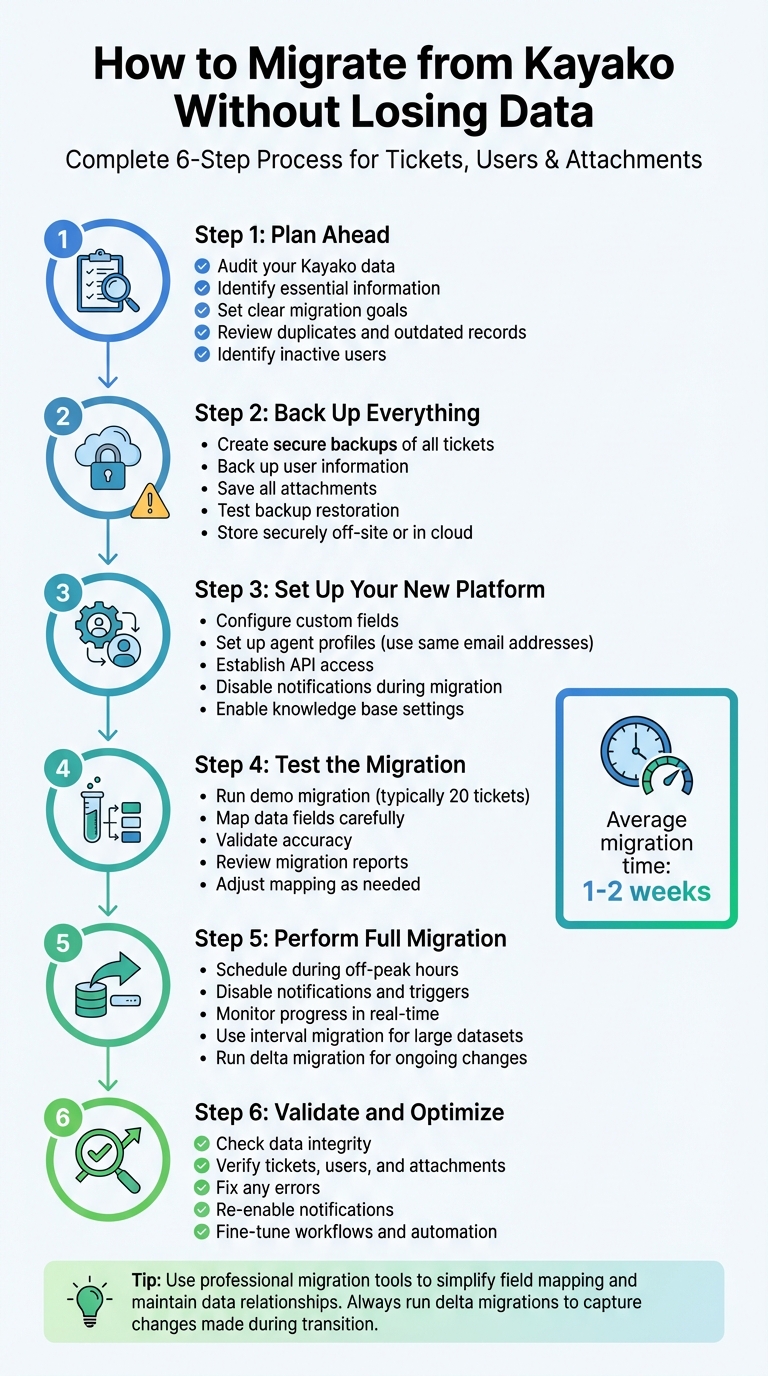
Migrating from Kayako can feel challenging, but it doesn’t have to be. The process involves careful planning, testing, and execution to ensure you don’t lose critical data like tickets, user information, or attachments. Here’s the quick answer:
- Plan Ahead: Audit your Kayako data, identify what’s essential, and set clear migration goals.
- Back Up Everything: Create secure backups of all tickets, users, and attachments before starting.
- Set Up Your New Platform: Configure custom fields, agent profiles, and API access to match your existing setup.
- Test the Migration: Run a demo migration with a small dataset to ensure accuracy.
- Perform the Full Migration: Schedule it during off-peak hours, disable notifications, and monitor progress.
- Validate and Optimize: Check data integrity, fix any errors, and fine-tune workflows in the new system.
Key Tip: Use professional tools or services to simplify the process, especially for mapping fields and maintaining data relationships. Don’t forget to run delta migrations to capture any changes made during the transition.
6-Step Kayako Migration Process: Complete Guide to Migrating Tickets, Users, and Attachments
How to Export from Kayako Classic? | Kayako Classic Migration Tutorial
sbb-itb-e60d259
Step 1: Prepare Your Migration
Getting your migration off to a strong start requires careful planning. On average, help desk migrations take one to two weeks, and a solid preparation phase can save you from unnecessary delays and headaches. Start by thoroughly reviewing your data to determine exactly what needs to be migrated.
Review Your Kayako Data
Begin with a detailed audit of your Kayako data. Look for duplicates, outdated records, incomplete fields, and inconsistencies in formatting. This step helps you decide what is worth keeping and what can be left behind.
Kayako organizes data into two primary categories: records (such as Agents, Contacts, Companies, Tickets, Articles, Categories, and Folders) and related data (like Attachments, Comments, and Notes). Understanding this structure ensures you can prioritize essential data while archiving or deleting what’s no longer needed.
Don’t overlook inactive users. Identify inactive agents and reassign their tickets to active administrators. You can locate these users by navigating to the Agent area > Customers section in Kayako. Use filters to segment your customer base. For older conversations, the search string in:conversations (status:closed) can help you find closed tickets that might be suitable for archiving.
It’s also important to evaluate how your team uses the platform. Manual tags, custom fields, and unique workflows will need to be accounted for when configuring the new system.
Once your audit is complete, the next step is setting clear goals for your migration.
Set Your Migration Goals
Define what success looks like for your migration. Are you aiming to reduce costs, improve scalability, or leverage advanced features?
Establish measurable goals such as ensuring no data loss, speeding up data access, enhancing reporting capabilities, or maintaining compliance with regulations like GDPR or HIPAA. Then, determine the scope of your migration. For example, will you transfer all historical data, or just focus on the last two years of ticket history?
Choose a migration strategy that matches your business needs. A "Big Bang" approach moves everything at once, which is quicker but carries higher risks. Alternatively, a "Phased" migration transfers data in smaller increments, reducing risk but adding complexity. Your decision will impact service availability and operational continuity, so factor in constraints like maintenance windows and SLAs.
Here’s a breakdown of the main migration phases:
| Phase | Focus | Purpose |
|---|---|---|
| Discovery | Audit Legacy Systems | Understand data structure, volume, and quality |
| Mapping | Source-to-Target Matching | Prevent misalignment or omissions |
| Pilot | Test with Data Subset | Validate mapping and performance |
| Execution | Full Dataset Migration | Complete transfer with real-time monitoring |
| Validation | Pre- and Post-Migration | Ensure data integrity and completeness |
An essential part of this process is deciding what not to migrate, which can be just as impactful as deciding what to move.
Back Up Your Kayako Data
Before you start the migration, create a complete backup of all your Kayako data, including tickets, contacts, attachments, and associated information. This step is critical for safeguarding against unexpected issues during the transfer.
"Even if the migration plan feels airtight, unexpected failures can and do happen. That’s why creating a reliable backup is non-negotiable." – Eric Klimuk, Founder and CTO, Supportbench
Test your backup to ensure it can be restored successfully. Store it securely in an off-site or cloud-based location to protect against local system failures. Use encryption for both stored and transmitted data, limit access to essential personnel, and include metadata like timestamps and user IDs to maintain historical accuracy.
Consider freezing system changes temporarily to avoid mismatches during the migration.
For example, when Rossi Residencial migrated four SAP environments in July 2025, they achieved zero downtime and reduced costs by 50% – a testament to the importance of meticulous preparation.
Step 2: Set Up Your New Platform
Once you’ve backed up your Kayako dataset and clarified your migration goals, it’s time to prepare your new platform. This involves ensuring data compatibility and maintaining smooth workflows. Start by configuring your data structures to align with your existing setup and secure API access for a hassle-free transfer.
Configure Data Structures
To handle incoming data effectively, your new platform needs to be set up properly. Here’s how to get started:
- Custom Fields: Recreate Kayako’s custom fields (e.g., string, Boolean, date, number, dropdown) in your new platform. This step is crucial to retain the context your team depends on.
- Agent Profiles: Use the same email addresses for migrating agent profiles. This ensures ticket ownership is mapped correctly. Activate at least one admin account, and have agents accept invitations to avoid ticket assignment issues. Assign a default agent to handle tickets from deleted or inactive Kayako users.
- Knowledge Base Migration: If you’re moving a knowledge base, enable settings for "potentially unsafe HTML." This ensures that embedded content and external links work as intended in the new system.
- Disable Notifications: Turn off email notifications, ticket triggers, and automated monitors during the migration to prevent accidental emails from being sent.
Set Up API Access and Permissions
With your data structures in place, the next step is to establish secure API connections for a smooth migration.
- Credentials: You’ll need your Kayako URL, admin email, and API token or password to connect Kayako to your new platform. Ensure you have administrative permissions on both platforms to facilitate the process.
- API Rate Limits: Before starting the migration, contact Kayako support to temporarily increase API rate limits. This helps avoid "time-out" errors during large data transfers and speeds up the process.
- New Account Setup: If migrating to a new account, confirm the channel via the post-registration email. Failing to do so could cause API connection issues during demo migrations.
| Required Credential | Purpose |
|---|---|
| Account URL | Identifies the specific instance of the source and target platforms |
| Admin Email | Authenticates the connection with sufficient permissions for data access |
| API Token/Password | Establishes a secure, authorized link for data transfer |
Professional migration tools use a read-only process for Kayako, meaning your original records remain untouched during the transfer. Additionally, all data is encrypted during both transfer and storage, ensuring that it stays secure and protected from unauthorized access.
Step 3: Map and Test Your Data Migration
With your new platform set up, it’s time to ensure that every piece of data from Kayako is properly aligned. This step is all about preserving data accuracy during the migration process. By catching mismatches and potential issues early, you can avoid problems when performing the full transfer.
Map Data Fields for Tickets, Users, and Attachments
The first task is to map each Kayako field to its equivalent in the new system. Most modern migration tools simplify this with dropdown menus, allowing you to match fields like Subject, Status, Type, and Priority without needing to write custom code.
Pay special attention to custom fields in Kayako that store unique information, such as contract IDs or subscription levels. Create corresponding custom fields in the new platform before you start mapping; otherwise, you risk losing this valuable context.
For agents and users, the email address serves as the primary identifier. The migration tool will use this to match agents and contacts between the two systems. If any inactive or deleted agents in Kayako still own tickets, reassign those tickets to an active admin or a placeholder account in the new system. This step ensures you maintain ticket history and avoid orphaned records.
Attachments require careful handling, too. Map both inline images (like those embedded in ticket comments) and file attachments to keep them linked to their original records. Make sure your migration tool maintains proper relationships between tickets, agents, users, and companies.
"Mismatched relationships are one of the most common sources of integrity issues in poorly executed migrations." – Eric Klimuk, Founder and CTO of Supportbench
| Validation Check | What to Verify |
|---|---|
| Field Mapping | Ensure ticket fields, priorities, and statuses align with the target platform |
| Relational Integrity | Confirm tickets remain linked to the correct agents, users, and companies |
| Attachment Integrity | Verify files and inline images are preserved and accessible |
| Custom Field Data | Check that unique data like contract IDs or subscription levels is intact |
Run a Test Migration
After completing the mapping, perform a demo migration with a small sample of data. These test migrations typically include 20 random tickets and 20 knowledge base articles, and they’re often free to run. The process usually takes just a few minutes.
To test more complex scenarios, supplement the random sample with custom demo IDs. For example, include tickets with multiple attachments or inline images. These edge cases help you identify issues that might not show up in simpler records.
Once the demo migration is complete, review the migration report to see which records were successful, failed, or skipped. Look for patterns in any failures – these might point to missing fields or incorrect mapping setups.
Have your support agents review the test data for accuracy. They should check ticket details, comment histories, timestamps, and attachments to confirm everything transferred correctly.
"A free demo lets you test and refine your migration setup without risk. You can check every detail, optimize field mapping, and preview your workflow on the new platform."
– Help Desk Migration
If the demo reveals any issues, adjust your mapping and run additional test migrations until everything is just right. According to Help Desk Migration, which has handled over 50,000 migrations, multiple test iterations are completely normal. Use these tests to fine-tune your setup before committing to the full migration.
Step 4: Execute the Full Migration
After successfully completing your test migrations, it’s time to move forward with the full migration. This step requires careful planning to ensure smooth, secure transfers while maintaining support continuity.
Transfer All Data
Start by scheduling the migration during off-peak hours, such as weekends or late evenings, when customer interactions are minimal. This timing reduces disruptions for your support team and gives you room to handle any unexpected hiccups.
Before initiating the migration, disable email notifications, triggers, and Observer rules, and contact Kayako support to request a temporary API limit increase. This will help speed up the data extraction process.
If you’re looking for a streamlined approach, services like Help Desk Migration can automate the transfer of critical elements such as conversations, agents, users, attachments, and custom fields. These tools use encrypted protocols to ensure data security both during transfer and while stored. To reduce risks, restrict access to these tools to only essential personnel.
For particularly large datasets, consider interval migration to break the transfer into smaller segments, easing the load during off-peak hours. Another option is the "newest records first" strategy, which prioritizes urgent tickets. This allows your team to start working on the most recent data in the new platform while older records continue transferring in the background.
Handle Ongoing Data Changes
During the full migration, it’s crucial to maintain data consistency, especially if your team continues working in Kayako. Any new or updated records created after the migration begins will need to be captured. To manage this, implement Delta Migration, which ensures these changes are included.
Delta Migration is often available in premium support plans, such as the Signature support tier, and must be initiated within 10 days of the full migration to avoid data being purged for security reasons.
"Delta Migration captures subsequent changes, keeping data synced without restarting the full process." – Help Desk Migration
If you need to keep both systems running simultaneously for a while, consider using a Recurring Delta Migration. This allows for multiple updates over time. However, the simplest and cleanest method is to temporarily freeze changes in Kayako during the final cutover. This prevents mismatches caused by last-minute edits.
Once the migration is complete, take time to manually check a sample of attachments to ensure everything transferred correctly. This step is crucial for catching issues early, before they disrupt your team’s workflow.
Step 5: Validate and Optimize After Migration
After completing the migration, your top priority should be ensuring everything transferred correctly. To do this, focus on validating the data and fine-tuning workflows to make the most of the new system. Start by reviewing migration summary reports, which categorize records as migrated, failed, or skipped. These reports are often available for only about five days before being archived, so download them right away.
Verify Migrated Data
Use a structured validation process to spot any discrepancies before the system goes live. Here’s what to check:
- Tickets: Confirm that Ticket Type, Status, Priority, Source, Custom Fields, Requester, Agent, and Tags transferred accurately.
- Conversation Comments: Ensure all comments migrated correctly, with the original authors properly identified.
- Attachments: Verify their presence and integrity by opening samples from different ticket types.
- Relationships: Check that ticket-to-user and ticket-to-company links, as well as thread order, are intact.
| Verification Category | Specific Elements to Check |
|---|---|
| Tickets | Status, Priority, Type, Tags, Custom Fields, Source, Legacy ID |
| Users/Agents | Requester, Assignee, Comment authors, Permissions |
| Attachments | File integrity (can it be opened?), Inline images, Call recordings |
| Relationships | Ticket-to-User links, Ticket-to-Company links, Thread order |
To ensure everything is in order, check thread chronology – messages should appear in the correct sequence. If data seems to be missing, review your search filters in the new platform, as tickets might be hidden by default views like “last 30 days” or “open only”. Run comparative analytics by generating identical reports on both platforms; metrics like ticket volume by status or agent should match.
"Validation is your safety net – it confirms that everything moved as expected and continues to function correctly in the new system."
– Eric Klimuk, Founder and CTO of Supportbench
Ask your frontline team to flag any issues they encounter during their initial use – such as broken links, mislabeled fields, or navigation problems. If a knowledge base was migrated, ensure article statuses are correct and that internal links now point to the updated platform URLs rather than the old Kayako addresses.
Once you’ve confirmed data integrity, you can shift your focus to optimizing workflows for better performance.
Improve Workflows on the New Platform
Fine-tuning your new platform is key to ensuring it operates at its best. Start by re-enabling email notifications, triggers, and automation rules that were paused during the migration. Also, make sure all support channels – like email, chat, and embedded widgets – are correctly redirected to the new system.
This is a perfect opportunity to introduce modern workflows that can boost efficiency. For example:
- Set up SLA tracking with escalation rules to avoid missed deadlines.
- Begin monitoring key metrics immediately, such as response times, resolution times, and customer experience metrics like CSAT, to catch any performance drops early.
- Hold daily check-ins with agents during the first week to address any interface issues or missing features.
"A high-performing helpdesk doesn’t stay that way by accident. Ongoing review, iteration, and user collaboration ensure it stays fit for purpose as your business evolves."
– Eric Klimuk, Founder and CTO of Supportbench
Common Migration Problems and How to Avoid Them
When migrating data, even the best-laid plans can encounter bumps in the road. These challenges can jeopardize your data and lead to unnecessary stress for your team. By identifying common issues and planning ahead, you can sidestep costly mistakes and ensure a smoother process.
Prevent Data Loss or Corruption
Data inconsistencies and failures often occur during migration. One common issue is leaving triggers and notifications active, which can result in spam notifications or unintended data changes during the import process. Another frequent problem is hitting API rate limits, which can cause timeouts and incomplete transfers. In addition, Kayako’s default settings block "unsafe" HTML, potentially stripping embedded images, links, and formatting from articles and tickets unless adjusted beforehand. Poor mapping can also break connections between tickets and their associated users, attachments, or company histories.
To minimize these risks:
- Run a demo migration with a small sample of tickets – about 20 – to confirm that custom fields, attachments, and user relationships are correctly mapped.
- Disable all triggers and notifications in your target system before starting the import to avoid unintended updates or spam.
- Adjust Kayako’s security settings to allow "potentially unsafe HTML" under the Security Policies section in the admin panel. This helps preserve formatting and embedded elements.
- Increase API limits to avoid timeouts and ensure a complete data transfer.
"Mismatched relationships are one of the most common sources of integrity issues in poorly executed migrations."
– Eric Klimuk, Founder and CTO, Supportbench
Finally, use a delta migration after completing the main transfer. This step captures any new or updated records created during the migration window, ensuring no data is left behind.
Reduce Downtime and Service Interruptions
Nobody likes downtime, especially your customers. Interruptions during migration can frustrate users and overwhelm your support team. To keep disruptions to a minimum:
- Schedule migrations during off-peak hours and briefly run parallel systems to monitor stability.
- Use interval migration, pausing and resuming the transfer to align with business hours. For example, migrate only on weekends or after hours.
- Migrate the newest records first so agents can immediately address current customer issues while older data continues importing in the background.
Wait to redirect support channels – emails, contact forms, widgets – until you’ve fully validated the data import. Have a rollback plan ready, such as reactivating legacy access or backup email routing, in case something goes wrong during the transition.
Fix Mismatched Data Structures
Structural mismatches can lead to missing or corrupted data. To maintain consistency:
- Create detailed field-mapping documents to ensure custom fields align perfectly between platforms.
- Use consistent agent email addresses to preserve ticket ownership and accountability.
- Assign a default admin to capture tickets for inactive agents, avoiding orphaned records.
- If your new platform doesn’t support Kayako’s inline images, convert these images into attachments to retain their visual information.
Before the full migration, test a small data set to uncover mismatches. Afterward, download reports on migrated, failed, and skipped records to identify and resolve any remaining issues. Conduct a thorough audit of Kayako data to spot duplicates, incomplete fields, and formatting inconsistencies before transferring to avoid mapping errors.
"Losing these [custom] fields during migration can mean losing critical context. Help Desk Migration ensures that structure – and the data behind it – stays intact throughout the migration."
– Help Desk Migration
Use AI Tools to Simplify Migration
Once you’ve laid out your data migration strategy, AI tools can make the process even smoother by simplifying tasks like mapping, validation, and improving operations. These tools significantly cut down the time and effort involved in migrating data from Kayako. For instance, Help Desk Migration has successfully completed over 50,000 migrations across various industries, and in some cases, automated transfers have been completed in as little as 15 minutes, depending on the size of the data set.
Automate Data Field Mapping
AI-based mapping engines can automatically detect and align Kayako’s data structures, such as ticket priorities, statuses, groups, and custom fields, all with just a single click. These tools also maintain crucial relationships between tickets, agents, and companies, ensuring historical context and accountability remain intact throughout the migration process.
"The system recommends mappings automatically, saving time while keeping you in control." – Help Desk Migration
To get the best results, make sure your data is up-to-date before initiating the AI mapping process.
Validate Data with AI
AI validation tools, like the Datafold Migration Agent (DMA), take the guesswork out of ensuring data accuracy. These tools compare every record across systems and provide detailed audit logs to confirm the success of your migration. They perform full-scale comparisons across databases, ensuring that the data in your new system matches perfectly with the legacy system.
"DMA provides an audit log of migration success. It is the only tool to both automate code conversion and validate that the data migration is complete because both inputs and outputs match across systems." – Datafold
After verifying data integrity with AI validation, you can focus on leveraging advanced AI capabilities to enhance everyday operations.
Improve Operations with AI Features
Post-migration, AI tools on your new platform can revolutionize your daily workflows. Advanced support systems now use features like automated workflows and intelligent ticket routing to assign cases to the right agents and monitor response deadlines, ensuring your team consistently meets service level agreements (SLAs). AI-powered knowledge bases equipped with smart search functions allow customers to find answers on their own, effectively reducing repetitive ticket submissions.
Customizable dashboards provide predictive insights and performance metrics, helping managers spot workflow bottlenecks and refine strategies. Features such as predictive CSAT and CES scoring, automated case prioritization, and first-contact resolution tracking can significantly boost your support team’s efficiency. These AI-driven improvements not only enhance post-migration operations but also ensure your data remains consistently reliable moving forward.
Conclusion
Migrating from Kayako requires more than just transferring data – it’s about aligning the process with your operational goals for both today and the future. To start on the right foot, conduct a detailed audit and define clear objectives for the migration process. A demo migration using real data samples, which typically takes about 5 minutes, can help identify potential issues like formatting errors or broken links before they become larger problems during the full migration.
The challenges of data migration aren’t just technical – they can also affect daily workflows and compliance. To reduce risks, ensure you perform full backups, temporarily halt system changes during the transfer, and track any new records created in the migration window.
AI-powered tools can make a big difference here. They can cut your migration timeline by 50% to 80% while improving accuracy with automated field mapping and validation. Once the migration is complete, these tools can also enhance your operations with features like intelligent ticket routing and predictive analytics, helping your team work smarter and more efficiently. Real-world examples show that phased rollouts and careful planning can minimize downtime and save costs.
FAQs
How can I migrate from Kayako without losing tickets, user data, or attachments?
Migrating from Kayako while keeping essential data – like tickets, user profiles, and attachments – requires careful planning and execution. The first step? Clean up your current data and set clear migration objectives. This ensures you’re only transferring what truly matters and have a clear roadmap for the process.
Get your new system ready ahead of time to prevent any mismatches or errors during the move. Use reliable migration tools or services designed to handle everything, including ticket histories, timestamps, attachments, and user relationships. Before committing to the full migration, run a test to confirm that all data transfers correctly. Afterward, validate the migrated data to ensure everything is accurate and works as expected.
To avoid downtime, use techniques like delta migration, which allows you to sync updates made during the process. A final sync will help capture any last-minute changes. By following these steps, you can protect your data’s integrity and ensure a seamless switch to your new platform.
How can AI simplify migrating from Kayako while keeping all your data intact?
AI tools can take the headache out of migrating from Kayako by automating tricky processes and keeping your data secure. They manage the transfer of tickets, user profiles, attachments, and custom fields with minimal manual input. Plus, they maintain the connections between your data, ensuring everything stays accurate.
What’s more, AI doesn’t stop at just moving your data. It validates everything after the migration, flagging any mismatches or issues so you can fix them quickly. This ensures your support system remains reliable and functional.
Another perk? AI analyzes migration logs to spot potential problems early. It can even optimize the sequence of data exports and imports, cutting down on downtime and keeping disruptions to a minimum. By using AI, you’re setting the stage for a smoother, more efficient migration process while saving yourself a ton of effort.
How can I prevent downtime and service interruptions during a migration from Kayako?
To avoid downtime when migrating from Kayako, a well-thought-out plan and careful execution are essential. Start by implementing delta migration, which allows you to transfer data in smaller, incremental batches. This method ensures that any new tickets or updates made during the migration process are captured seamlessly, keeping operations running smoothly and maintaining data accuracy.
Another crucial step is to test and validate the migration process before fully committing. Conduct a pilot migration to uncover potential issues, like mismatched data or broken links, so they can be addressed ahead of time. After completing the migration, double-check that all tickets, user details, and attachments have been transferred correctly.
Lastly, plan the migration during off-peak hours or periods of low activity to reduce the impact on customer service. By combining incremental data transfers, thorough testing, and smart timing, you can carry out the migration with minimal disruptions to your support operations.
Related Blog Posts
- Help Desk Migration Checklist: How to Switch Platforms Without Downtime
- How do you migrate from Salesforce Service Cloud to a helpdesk without losing case history?
- How do you migrate away from Freshdesk without losing tickets, contacts, or history?
- How do you migrate away from Pylon without losing shared inbox history and customer context?