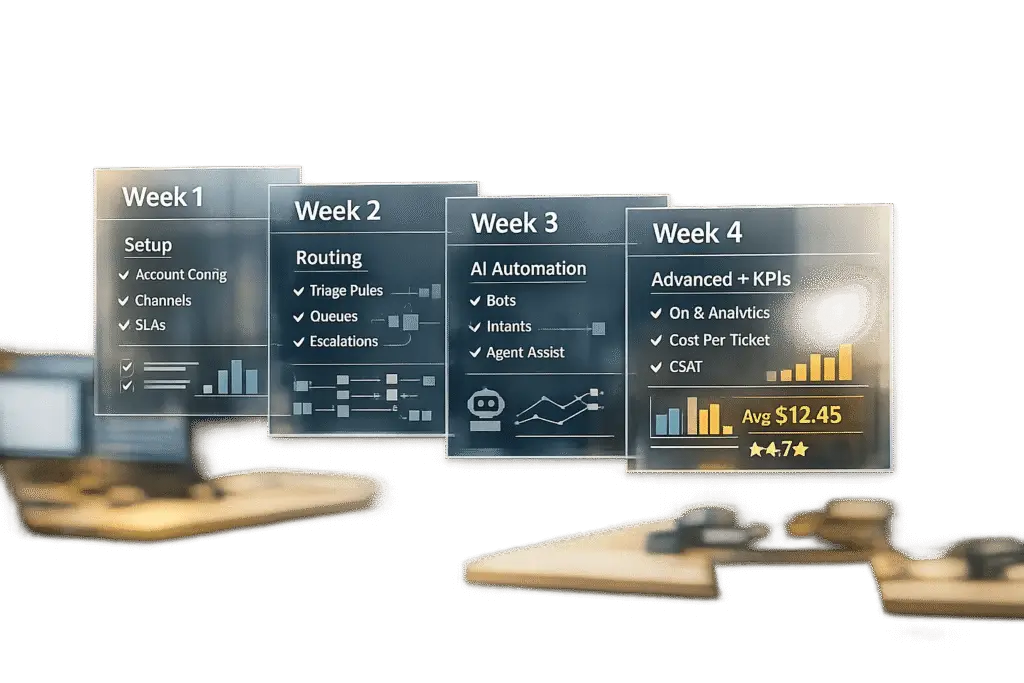
A structured 4-week pilot plan is key to testing a support tool effectively. It prevents delays, sets clear goals, and ensures measurable progress. Here’s a quick breakdown of what to focus on each week:
- Week 1: Set up systems, document workflows, and test basic features like ticket creation and AI responses.
- Week 2: Enable AI automation, test routing accuracy, and track deflection rates to reduce agent workload.
- Week 3: Test advanced features like predictive analytics, refine workflows, and gather agent feedback on complex scenarios.
- Week 4: Compare metrics, debrief the team, and decide whether to scale, adjust, or pause the tool.
4-Week Support Tool Pilot Plan Timeline and Key Metrics
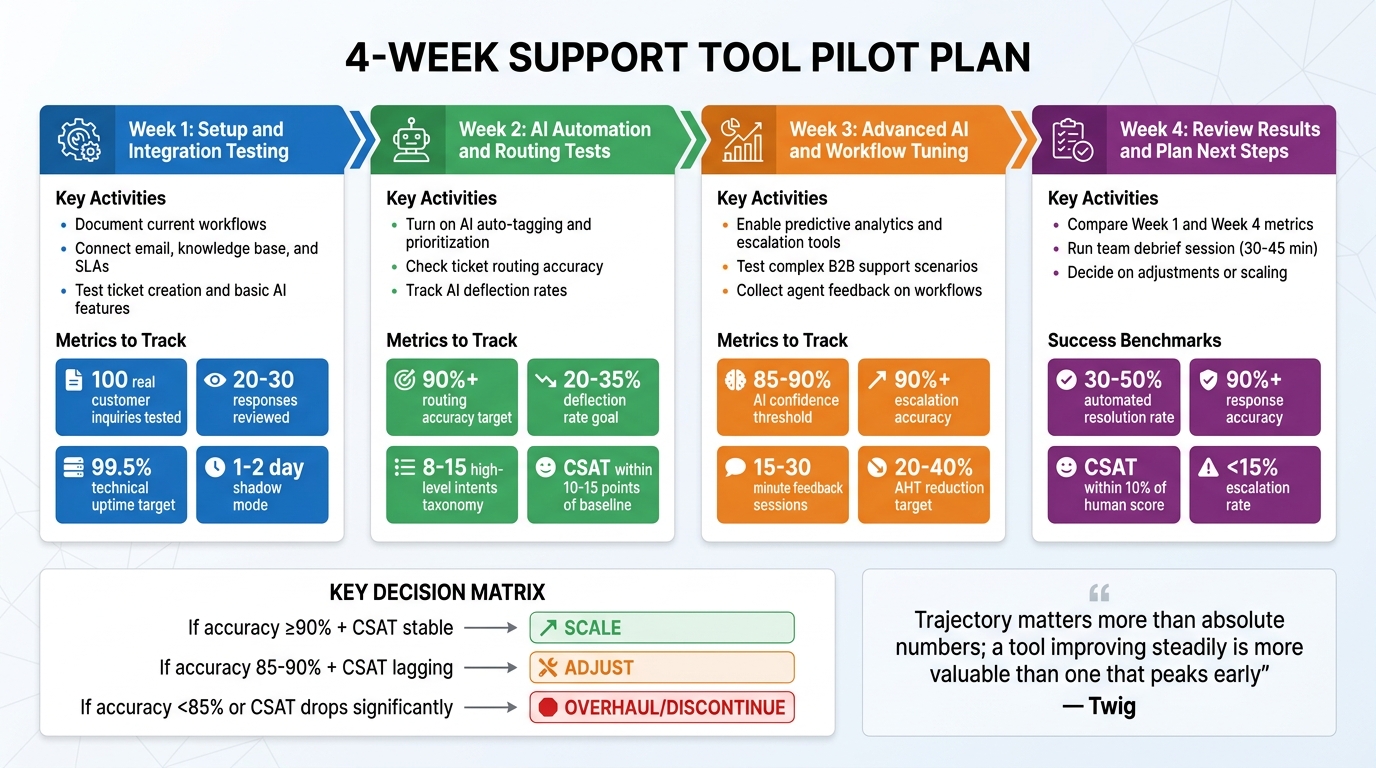
Week 1: Setup and Integration Testing
The first week of your four-week pilot is all about ensuring the basics are in place. This means checking that core systems are connected, basic functions work as expected, and the system is stable enough to move forward. As Ayush Kumar from FeatherFlow explains:
A 30-day pilot is not about building a perfect system… It is a controlled experiment with clear boundaries. [6]
These steps create a solid starting point for the automation and testing phases that follow.
Document Your Current Workflows
Before you dive into integrating new tools, take the time to map out your existing ticket-handling processes. Collaborate with your support leads to document who does what, how often tasks are performed, how long they take, and where errors tend to happen [6]. Pay special attention to repetitive tasks – these are prime candidates for automation. Be specific in your documentation. For example, instead of a broad goal like "improve customer support", focus on measurable tasks such as "draft first responses to billing inquiries under $500" [6].
Also, uncover any unwritten practices that your team relies on. These informal policies should be clearly detailed so the AI can use them effectively [4]. Don’t forget your knowledge base – conduct an audit of your top 50 most-viewed help articles to make sure the information is accurate and up to date [2].
Once workflows are clearly outlined, you’re ready to move on to system integration.
Connect Email, Knowledge Base, and SLAs
Start by securing admin access to all the systems you’ll be integrating, including your help desk, CRM, e-commerce platform, and knowledge base [4]. Upload 90 days’ worth of historical tickets so the AI can learn your brand’s tone and common customer questions [4]. Then, sync your knowledge base by adding key policies like return rules, shipping terms, warranty details, and product catalogs [4].
Set up escalation rules to ensure certain ticket types – like messages mentioning "lawyer", "BBB complaint", or refund requests over $500 – are automatically assigned to human agents [4]. Establish a "thin workflow" by directly linking your shared inbox to an AI draft generator [6]. To catch any early issues, plan for a 1–2 day "shadow mode", where human agents review every AI-generated response before it’s sent [4].
Test Ticket Creation and Basic AI Features
With systems connected, it’s time to test whether tickets are being created, routed, and tagged correctly. Have 2–3 agents submit 100 real customer inquiries to evaluate the system’s accuracy, tone, and overall performance [2]. This internal test will help identify problems before customers encounter them.
Next, test the AI’s basic features like auto-tagging, classification, and response drafting. Check whether the tool can correctly categorize inquiries (e.g., distinguishing billing questions from technical issues) and extract essential details from unstructured messages. Review 20–30 sample responses to fine-tune the AI’s tone [4]. Finally, confirm the system maintains technical uptime of at least 99.5% [1] and compare AI-assisted first-response times to your current manual process to establish a baseline [6].
Getting the setup and integration right in Week 1 is vital for the more advanced AI testing planned for the weeks ahead.
sbb-itb-e60d259
Week 2: AI Automation and Routing Tests
Building on the groundwork from Week 1, Week 2 focuses on testing the AI’s automation capabilities. The goal is to enhance ticket flow, lighten the load on agents, and keep customer satisfaction intact.
Turn On AI Auto-Tagging and Prioritization
AI-powered ticket routing and prioritization helps classify incoming tickets based on intent, enabling faster and more efficient routing [8][11]. Start by creating a taxonomy with 8–15 high-level, non-overlapping intents to ensure accuracy [8]. Common categories might include billing inquiries, technical problems, product-related questions, and account access issues.
To avoid disrupting the customer experience, run the AI in shadow mode for 10–14 days. During this time, agents can review and correct the AI’s tagging and prioritization, generating valuable training data [8][9]. For prioritization, implement a weighted scoring system. For example:
- Urgency and impact: 0–3 points
- Customer tier and SLA risk: 0–2 points
A ticket should be flagged as "Urgent" if its score reaches 9–10 [8].
Critical categories like security breaches, payment disputes, or legal issues should always be flagged for manual review [11]. To improve the system over time, ensure agents can easily provide feedback on tagging accuracy with just one click [8][9].
Check Ticket Routing Accuracy
Routing accuracy is about ensuring tickets are assigned to the correct queue on the first attempt. Aim for 90% or higher routing accuracy [8]. A key metric to track here is the reassignment rate, which measures how often tickets are moved between teams after the AI’s initial assignment [8][11].
Use a hybrid routing approach: rely on machine learning for general intent detection but enforce strict rules for VIP or SLA-sensitive tickets [8]. Auto-routing should only be enabled when the AI’s confidence score exceeds a set threshold, like 0.75. Tickets with lower confidence should go to human review [8].
Pay attention to the "Other" or "General" category. If this bucket becomes too large, it’s a sign that your taxonomy needs refinement [8]. To maintain quality, randomly sample 50–100 AI-handled tickets weekly and grade them on a 1–5 scale for accuracy, completeness, and tone [12]. These insights will help fine-tune your system in Week 4.
Once routing accuracy is solid, the next step is to evaluate how well the AI handles deflection.
Track AI Deflection Rates
Deflection rate measures how many inquiries the AI resolves without human intervention. For Week 2, aim for a 20–35% deflection rate [13]. However, deflection alone isn’t enough; you need to differentiate between real deflection (where the customer is satisfied) and false deflection (where the customer leaves frustrated).
One way to identify false deflection is by tracking whether customers return within 24–48 hours with the same issue [13][12]. If they do, the initial resolution wasn’t effective. Also, watch for channel shifts – if chatbot deflection improves but email or phone volumes increase, customers might be avoiding the AI altogether [13][12].
Deflection should always be measured alongside Customer Satisfaction (CSAT). A well-functioning AI system keeps CSAT scores within 10–15 points of the baseline for human agents [12][1]. As Twig aptly puts it:
Deflection without customer satisfaction is abandonment, not success. [13]
Monitor deflection rates while keeping an eye on CSAT benchmarks and escalation quality. This ensures the AI doesn’t inadvertently increase the time agents spend triaging escalated issues [13].
Week 3: Advanced AI Features and Workflow Tuning
By Week 3, the focus shifts to testing advanced AI capabilities and refining workflows to handle the more intricate challenges typical in B2B support. This phase is all about ensuring your system can manage complex scenarios with precision and efficiency.
Enable Predictive Analytics and Escalation Tools
Incorporate predictive tools like CSAT, CES, and NPS scoring to anticipate customer satisfaction based on factors like conversation tone, resolution steps, and customer history. These scores can help identify when human intervention is needed.
Set up three escalation triggers for seamless transitions:
- Sentiment-based: Detect when a customer’s tone becomes negative and immediately route the case to a human agent.
- Complexity-based: Escalate cases involving tasks like account changes or refunds that require nuanced handling.
- Timeout-based: Automatically escalate if a ticket remains unresolved after a set number of exchanges[10].
Establish a confidence threshold – if the AI’s confidence in its solution falls below 85–90%, the ticket should automatically escalate to a human[14][15]. Monitor the accuracy of these escalations weekly, aiming for at least 90% accuracy to ensure the AI is only escalating when necessary, while still managing simpler cases independently[14][3].
Additionally, experiment with dynamic SLA management. For instance, tighten response times for VIP clients or during critical periods like customer renewals.
Test Complex B2B Support Scenarios
Put the system through its paces with challenging, real-world scenarios. Examples include multi-step troubleshooting, subscription entitlement checks, or supply chain disruptions that require coordination across multiple departments[14][3].
For instance, simulate a case where a customer reports a delayed shipment linked to a billing issue. The AI should gather all relevant details – order history, payment records, and shipping updates – and forward the case to a specialist with full context. This approach ensures customers don’t have to repeat themselves, streamlining the process[10].
Focus on the 15–20% of intents that generate the majority (around 70%) of support volume[3]. These tests help identify gaps in the knowledge base, ensuring the AI is well-prepared for real-world demands. The goal is to bridge basic automation with the complexity of modern B2B needs while setting the stage for incorporating agent feedback.
Collect Agent Feedback on Workflows
Agent input is essential for refining these advanced workflows. Host short, focused feedback sessions (15–30 minutes) with frontline staff to understand how the system performs. Key questions include:
- Does the AI provide enough context during escalations?
- Are handoff triggers functioning as expected?
- How does the interface impact efficiency?[16]
Enable one-click feedback options for agents to rate AI suggestions and flag gaps in the knowledge base[9]. Each identified gap should lead to the creation of a new support article, ensuring the AI can handle similar cases better in the future[10].
Conduct a "Day-in-the-Life-Of" (DILO) analysis to assess how these workflows affect agents’ daily tasks[5]. Are they spending less time on repetitive Tier-1 issues and more on high-value tasks? Track metrics like Average Handle Time (AHT) to see if AI-prepared summaries and context are speeding up resolutions once cases are escalated[9][3]. The ultimate aim is to ensure that when a ticket is handed off, agents have all the tools and information they need to resolve it efficiently, without customers needing to repeat their concerns.
Week 4: Review Results and Plan Next Steps
Week 4 is all about turning the data you’ve gathered into actionable decisions. This is the time to evaluate your progress by comparing metrics, gathering honest feedback from your team, and deciding whether to expand, refine, or rethink your approach.
Compare Week 1 and Week 4 Metrics
Start by pulling up your baseline metrics from Week 1 – things like historical CSAT, average handle time (AHT), and cost per ticket. Then, compare these numbers with your Week 4 results. This side-by-side comparison will show whether your pilot delivered measurable improvements or highlighted areas that need more attention.
| Metric | Week 1 (Baseline/Shadow) | Week 4 (Pilot End) | Target Benchmark |
|---|---|---|---|
| Automated Resolution Rate | 0% (Shadow Mode) | 30–50% | 40–60% for Tier-1 [12] |
| Response Accuracy | Agent Approval Rate | QA Score | 90%+ [12] |
| Average Handle Time (AHT) | Baseline (e.g., 12 min) | 20–40% Reduction | 30–45% Productivity Gain [12] |
| CSAT Score | Historical Average | Pilot Average | Within 10% of Human Score [12] |
| Escalation Rate | N/A | 5–15% | <15% for simple intents [4] |
If your automated resolution rate is still at 0% because you stayed in shadow mode, that’s a sign you missed the chance to test autonomous resolution. Response accuracy should hit at least 90% before considering scaling [12]. For AHT, aim for a 20–40% reduction compared to your baseline [12]. If the AI’s CSAT score is more than 10 points lower than human-handled scores, it could mean the AI is creating poor customer experiences [12]. Also, keep an eye on tickets that are reopened within 24–48 hours – these "false resolutions" indicate the AI may not be fully solving issues [12].
These metrics give you a clear picture of where things stand and set the stage for deeper discussions with your team.
Run a Team Debrief Session
Bring your support team together for a focused debrief session – 30 to 45 minutes should be enough. The goal is to go beyond the numbers and gather qualitative feedback on things like usability, workflow gaps, and overall agent impressions.
Review how AI-suggested responses compared to what agents actually sent. If the match rate is under 90%, dig into why – are agents tweaking tone, adding details, or fixing inaccuracies? [9]. Look at escalation patterns, too. Are tickets being escalated because of technical glitches, overly complex scenarios, or conservative thresholds? [12].
Ask agents to rate 50–100 AI-handled interactions on a 1–5 scale for accuracy, tone, completeness, and resolution [12]. This will help you pinpoint weaknesses, such as incomplete troubleshooting or inappropriate tone for upset customers. Also, ask for feedback on any recurring knowledge gaps – these might signal that your support documentation needs updates.
"AI succeeds when agents see it as an assistant, not a threat. Position AI as handling the repetitive, so people handle the exceptional." – Christopher Good, EverWorker [9]
Pay attention to how your team feels about the AI. If agents are frustrated because the AI is mishandling issues or setting unrealistic customer expectations, you may need to revisit its prompts or improve its knowledge base. Consider appointing an AI champion – someone who reviews 20–30 conversations daily and leads ongoing feedback sessions [2].
Use this feedback to guide your next steps, whether that’s scaling up or making adjustments.
Decide on Adjustments or Scaling
Now that you have data from Weeks 1–4, it’s time to decide how to move forward. If accuracy is at 90% or higher, CSAT is steady or improving, and your team sees value in the tool, it’s a green light to scale [9]. Scaling might mean expanding AI coverage to 24/7 support or moving from triage to full autonomous resolution for Tier-1 issues [10].
If accuracy is between 85–90% and CSAT is lagging, focus on adjustments. Identify knowledge base articles that need updates, based on gaps flagged in your debrief [2]. Fine-tune escalation rules by tweaking the AI’s confidence thresholds. If escalations are too frequent, adjust thresholds upward. If they’re too rare and customers are unhappy, lower the thresholds or add sentiment-based triggers.
If accuracy is below 85% or CSAT drops significantly compared to human interactions, it might be time for a major overhaul – or even discontinuation [2]. Calculate the ROI to see if the tool is worth keeping. For instance, saving 200 agent hours at $25/hour ($5,000) against a $1,500/month tool cost gives you a 3.3x return [10].
To maintain progress, establish a weekly QA routine. Dedicate 2–3 hours each week to reviewing AI-handled interactions to ensure accuracy stays above 90% [12]. Regular reviews can help catch issues early and keep the AI aligned with evolving customer needs.
Conclusion: What You Learned from the 4-Week Pilot
The four-week pilot gave you a structured roadmap, moving from setup to autonomous operation. In Week 1, you focused on establishing a baseline by documenting key performance metrics and integrating existing systems. This step created the groundwork for measuring progress. Week 2 tested AI auto-tagging and ticket routing in real-world conditions, helping you identify which workflows needed adjustments. By Week 3, the focus shifted to handling complex B2B scenarios, where predictive analytics and escalation tools either proved their value or highlighted gaps in your knowledge base.
Finally, in Week 4, the data-driven insights provided a complete picture of the AI’s impact. If accuracy surpassed 85% and agents acknowledged the productivity benefits, it signaled readiness for scaling [3][4].
The key takeaway? As Twig put it:
Trajectory matters more than absolute numbers; a tool improving steadily is more valuable than one that peaks early [1].
This reinforces the idea that consistent progress beats short-lived performance spikes. Effective pilots treat AI as a system that evolves, requiring weekly updates, ongoing QA, and regular feedback loops to maintain and enhance performance [7][4].
This approach equips your team to maximize AI-native tools designed for B2B challenges – like managing long-term cases, renewal-based relationships, and multi-stakeholder accounts. Winning organizations in 2026 won’t just have the most tools; they’ll have AI systems capable of learning, adapting, and scaling operations efficiently [9]. Your pilot data now serves as a guide, helping you decide whether to scale or refine your process. These insights are crucial for optimizing AI-driven support and achieving meaningful cost savings.
FAQs
What should I pilot first: AI drafts, routing, or full automation?
Testing AI drafts and routing is a smart first step before diving into full automation. Starting with drafts allows you to evaluate how well the AI generates responses and handles routing tasks without relying on it entirely for resolving tickets. This gradual approach helps you spot and address potential issues early, giving your team time to fine-tune the AI’s performance. Rushing into full automation too quickly could lead to errors and, ultimately, unhappy customers.
How do I set confidence thresholds and escalation rules safely?
To establish confidence thresholds and escalation rules effectively, start by defining precise success and failure benchmarks for your AI system. For instance, you might set a minimum confidence level – say, 80% – for automated responses. If the confidence score falls below this level, the system can escalate the query to a human for review.
It’s crucial to test these thresholds during the pilot phase to confirm they function as expected. Additionally, keep an eye on metrics like escalation rates and refine your thresholds over time based on performance data. This iterative approach helps maintain efficiency and accuracy.
What are the 3 best metrics to prove ROI by the end of week 4?
The top three metrics to showcase ROI by the end of week 4 are:
- Customer satisfaction: Measured through tools like surveys, this shows how well the solution meets user needs.
- Engagement percentage: Tracks how actively users are interacting with the tool, offering a glimpse into its adoption and usability.
- Cost savings or efficiency improvements: Highlights measurable benefits, such as reduced expenses or streamlined processes.
These metrics are key indicators for assessing the success of a pilot program and understanding the tool’s performance and impact.