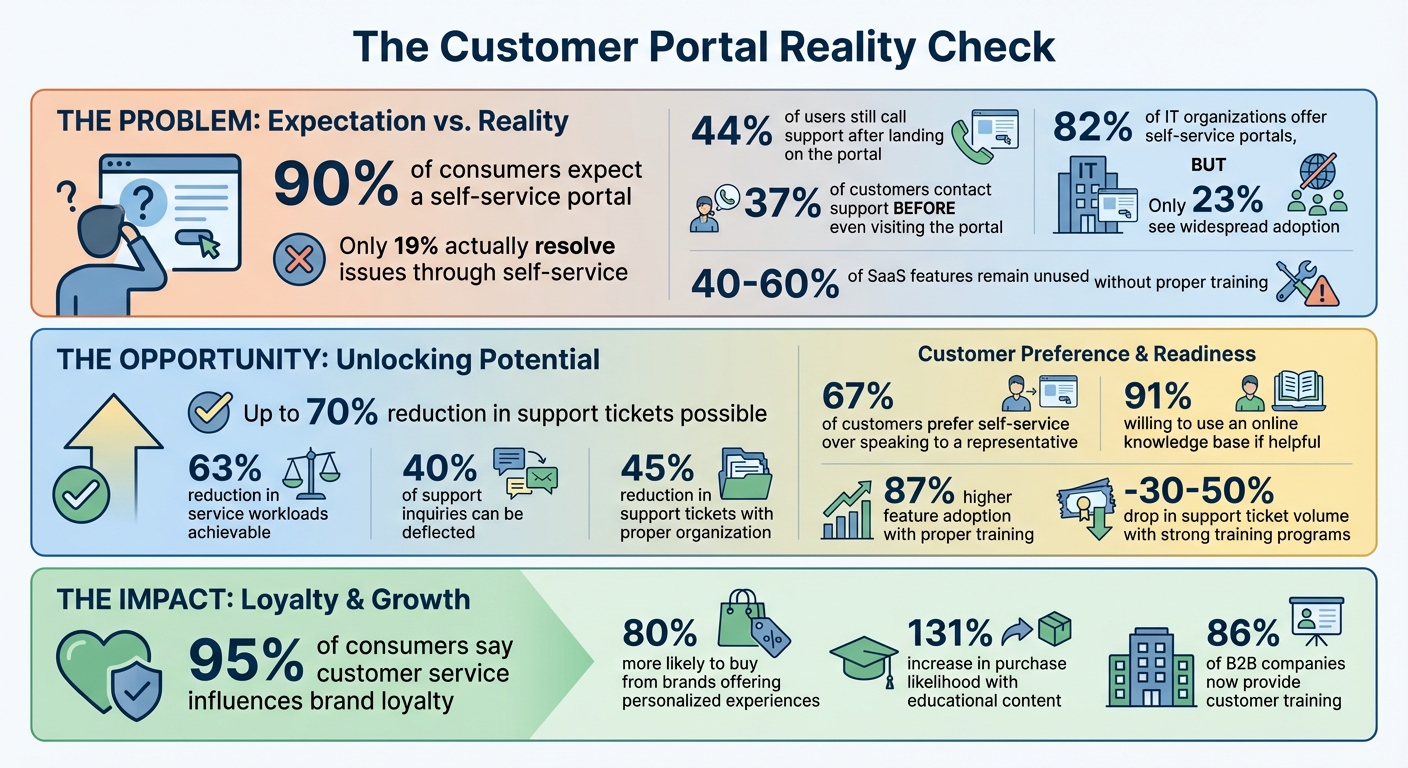
Want to launch a customer portal that actually works? Here’s the deal: most companies build portals around their internal processes, not customer needs. The result? 44% of users still call support, and only 19% resolve issues through self-service. But with the right approach, you can cut support tickets by up to 70% and boost portal adoption.
Here’s how to do it:
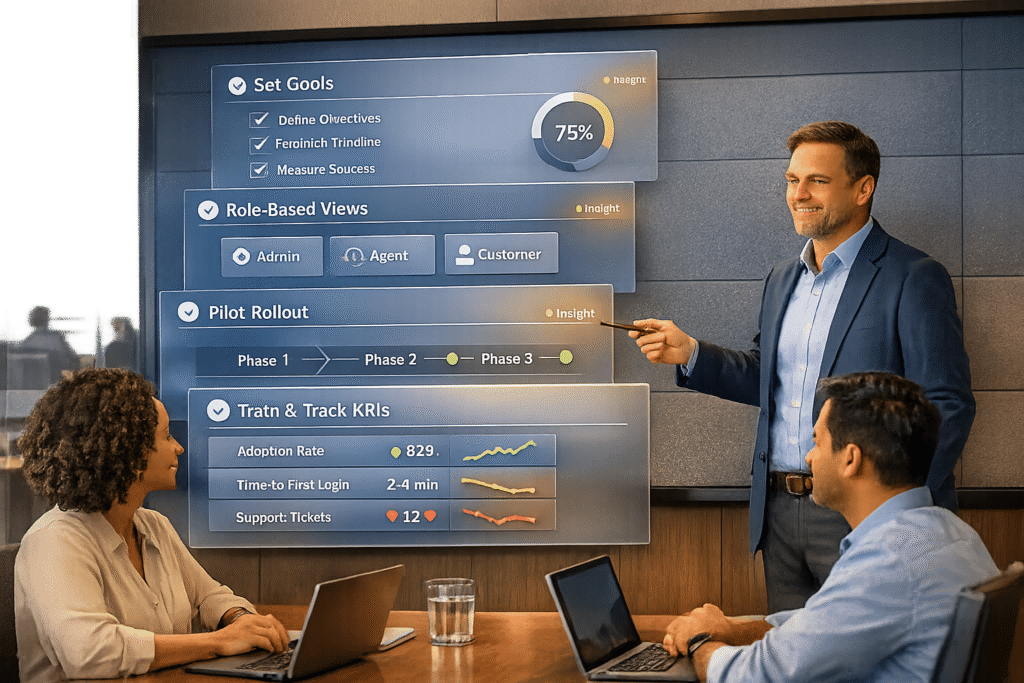
- Set clear goals: Focus on reducing ticket volume, improving customer satisfaction, and increasing self-service success rates.
- Personalize the experience: Tailor the portal to specific user roles with role-based dashboards and navigation.
- Roll out in phases: Test with a small group, fix issues, and expand gradually to avoid chaos.
- Train users effectively: Offer step-by-step guides, videos, and in-portal walkthroughs to build confidence.
- Track and improve: Monitor metrics like task completion rates, search success, and user feedback to refine the portal.
When done right, a customer portal isn’t just a tool – it’s a game-changer for reducing costs and improving customer satisfaction. Start small, measure everything, and keep improving based on what your users need.
Customer Portal Statistics: Adoption Gaps and Success Metrics
Is Client Feedback the Key to Optimising Portal Launch Strategies? 🤔
sbb-itb-e60d259
Set Clear Goals and Success Metrics
Before launching a portal, it’s essential to define clear success metrics. Without them, it’s hard to pinpoint whether low adoption stems from onboarding issues, navigation problems, or content shortcomings. The difference between a successful portal and one that struggles often lies in how well you define and track these metrics from the very beginning.
Identify Your Business Goals
Start by focusing on the outcomes that matter most to your organization. For many, reducing support costs is a top priority. Portals are designed to handle routine inquiries, freeing up agents to tackle more complex problems. For example, you might set a goal to cut routine ticket volume by 30% within six months[3].
Customer satisfaction is another key area. While most customers prefer self-service options[1], a poorly designed portal can negatively impact satisfaction scores. It’s crucial to monitor satisfaction specifically for portal interactions. If users can’t find answers easily, they’ll likely revert to calling support. High support call rates often indicate that the portal isn’t meeting user needs[2].
Another key metric is self-service containment – how often customers resolve issues entirely through the portal without escalating to phone or email support. If only 19% of your customers currently resolve their issues via self-service[2], aim to improve this over time. This is especially critical given that 90% of consumers expect companies to offer a self-service portal[1].
Once your business goals are clear, the next step is to measure how users interact with the portal.
Set Adoption Metrics
Adoption metrics help answer a fundamental question: Are customers making the portal a regular part of their routine? Metrics like Weekly Active Users (WAU) and Monthly Active Users (MAU) can show whether users are returning consistently. A thriving portal sees increasing rates of repeat logins, as users come back after finding value in their initial visit[6].
Another important metric is the time it takes from a user’s first login to their first meaningful action. If this time increases over weeks or months, it could signal that your onboarding process needs improvement[6].
Keep an eye on bounce rates and no-results searches as well. High bounce rates or frequent searches returning no results can highlight content gaps or usability challenges[6]. These issues often push users back to traditional support channels, defeating the purpose of the portal.
These adoption metrics lay the groundwork for long-term performance tracking.
Define Post-Launch KPIs
Long-term success isn’t just about adoption – it’s about outcomes. As Kaitlynn Sirotkin from FastSlowMotion explains:
If you only track logins and pageviews → then you won’t know whether the portal reduced work[6].
Focus on task completion rates for key user actions. For instance, if users frequently start but fail to complete a support case, investigate where they’re dropping off. High task completion rates indicate that your retraining efforts are paying off.
Channel shift is another critical indicator. Track whether the volume of phone calls and emails decreases as portal usage grows[5][6]. Pair this with guardrail metrics like customer satisfaction (CSAT) and case reopen rates to ensure that fewer tickets don’t simply mean users are giving up on getting help.
Operational efficiency is also worth monitoring. Compare time-to-resolution and cost-per-transaction for portal-submitted cases against traditional support channels[5][6]. These numbers not only demonstrate ROI to stakeholders but also justify continued investment in portal improvements. To keep things manageable, consider creating a weekly scorecard with 10–15 high-impact KPIs[6]. This approach helps you spot trends without getting lost in the data.
Personalize the Portal for Different User Roles
A one-size-fits-all portal can overwhelm users with irrelevant information, often leading them to call support instead of solving issues themselves. Gartner reports that 37% of customers contact support before even visiting a portal, and 44% call after landing on it because they can’t find what they need[2]. Tailoring the portal to specific roles not only simplifies the user experience but also encourages self-service and reduces support inquiries. The key? Role-based personalization that presents users with content and tools relevant to their specific tasks.
Map User Roles to Portal Features
Start by identifying the distinct roles of your users and understanding their unique needs. For instance, a procurement manager might prioritize customer management tools, billing history, and compliance tracking. On the other hand, a technical user will likely need access to troubleshooting workflows, software patches, and a searchable knowledge base[2][7].
Design the portal around these workflows, not internal departments. Replace generic labels like "Billing" or "Support" with task-oriented hubs such as Manage My Account or Troubleshoot an Issue. This approach reduces cognitive load and makes navigation more intuitive[2].
Here’s an example: A software company cut support tickets by 45% after reorganizing their knowledge base to reflect actual customer inquiries instead of internal team structures[3]. When users encounter content that directly addresses their needs, they’re more likely to solve problems independently.
Once roles and features are mapped, the next step is to create a user interface that aligns with these needs.
Build Role-Based Views
Mapping roles lays the groundwork, but creating role-specific dashboards brings it all to life. These dashboards should display only the content and tools relevant to the user’s role, such as FAQs or product-specific resources[7]. For example, CRM-linked forms can auto-fill existing data and show only necessary fields, streamlining tasks like updating account details[2].
Navigation menus should adapt dynamically based on the user’s role. For example:
- Partners might see options for managing contracts or accessing co-marketing resources.
- Customers could find tools for billing, product support, or renewals.
- Administrators might access advanced settings or compliance tools.
For more complex workflows – like onboarding or compliance – break tasks into smaller, manageable steps with clear progress indicators. This keeps users engaged and reduces confusion.
But personalization isn’t just about ease of use – it’s also about security.
Add Governance and Security Controls
Personalization doesn’t just improve usability; it also strengthens security. Implement Role-Based Access Control (RBAC) to ensure sensitive data, like billing information or admin settings, is only visible to authorized users[2]. Add Multi-Factor Authentication (MFA) through SMS or app-based verification to bolster security without sacrificing convenience[3].
To maintain data accuracy, link portal forms directly to your CRM. This ensures that updates sync in real time, reducing errors and eliminating data silos[2]. For community features, consider moderated, role-specific forums to keep peer-to-peer interactions secure and compliant with company policies[2].
These measures don’t just protect sensitive information – they also build trust with enterprise clients, ensuring the portal remains both effective and secure.
Use a Phased Rollout Approach
Once you’ve customized the portal for different user roles, the next step is to ensure a smooth and controlled launch. Rolling out a new portal to your entire customer base all at once can be risky. Imagine the chaos if integrations fail, security measures falter, or users find the interface confusing. A phased rollout helps you avoid these pitfalls. By starting with a smaller group, you can catch and fix issues early, while also building a group of advocates who can promote the platform during the broader launch[8].
The statistics are telling: while 82% of IT organizations offer self-service portals, only 23% see widespread adoption[8]. Often, rushing to launch without validating the user experience leads to a disconnect between availability and actual usage. A phased approach turns this around – you begin small, learn quickly, and expand with confidence.
Launch High-Value Features First
Prioritize the 5–10 most common customer queries or high-impact workflows, such as order tracking, invoice management, or account dashboards[8][10]. These features provide immediate value and can significantly reduce support requests right from the start. To make the portal truly useful, aim to launch with at least 20–30 high-quality knowledge base articles that address frequent support issues. Anything less might not be enough to encourage customers to switch from calling your support team to using the portal[10].
Take Gateway Ticketing Systems as an example. Faced with a tight six-week deadline, they launched a Minimum Viable Product (MVP) by integrating Jira Service Desk and ADFS for single sign-on. Led by Brandon Carper, the team focused on essential features to meet their deadline. They piloted the portal with a select group of users, gathered feedback, and managed a backlog of enhancement requests. Within five months, they introduced community forums and migrated all support tickets, successfully transitioning 400+ customer organizations from phone-based support to a modern online platform[9].
This kind of focused rollout lays the groundwork for a successful pilot test.
Run a Pilot Test with Early Adopters
Choose a small, tech-savvy group of customers who represent your broader audience. Before starting, document baseline metrics like average email volume per project or ticket resolution times to measure improvements accurately. Keep the pilot’s scope narrow – limit it to a single department or workflow, such as onboarding or billing, to make it manageable[8].
"Pilots act as an insurance policy for technology adoption. Instead of rolling out a portal to everyone at once, you test it with a small group, fix issues early and build champions." – The Moxo Team[8]
During this phase, offer dedicated support – live chat, customized knowledge base articles, and direct access to your team. This extra attention helps early adopters succeed and creates advocates who can share their positive experiences when the portal is rolled out more broadly[8]. Additionally, track what users search for within the portal. If certain search terms yield no results, you’ve identified content gaps that need to be addressed before scaling up[10].
Plan Feature Releases in Phases
After completing the pilot, focus on enhancement requests that deliver the most time savings and benefit the largest number of users[8]. Roll out the portal in stages, segmented by factors like region, organization size, or complexity. This approach allows for adjustments tailored to specific groups and reduces overall risk[8]. Typically, pilot programs last 4–8 weeks, with full rollouts taking an additional 3–6 months[8].
| Rollout Phase | Timeline | Key Focus |
|---|---|---|
| Pilot Program | 4–8 Weeks | Test core workflows, gather feedback, fix bugs. |
| Evaluation & Refinement | Ongoing | Analyze performance, update training materials. |
| Company-Wide Rollout | 3–6 Months | Segment rollout, provide robust support. |
The ultimate goal isn’t just to launch a portal – it’s to create a system that customers actually want to use. When done right, portals can reduce service workloads by as much as 63% and deflect up to 40% of support inquiries. This level of success comes from careful planning and phased execution[8][10].
Communicate the Portal’s Value
Building on the goals and phased rollout approach mentioned earlier, it’s essential to effectively communicate the portal’s value to encourage adoption. The challenge isn’t just making the portal available – it’s making its benefits crystal clear. If customers don’t see how the portal simplifies their lives, they’ll stick to calling your support team.
Explain the Business Value
Focus on what matters most to your audience: 24/7 accessibility. The portal offers round-the-clock access, removing the frustration of waiting for support [3][4]. By analyzing previous interactions, it can recommend tailored FAQs and troubleshooting guides, creating a personalized experience. This matters because 80% of consumers are more likely to stick with brands offering personalized services [1].
Position the portal as a tool for self-sufficiency. With 67% of customers preferring self-service over speaking to a representative [1], and 91% willing to use an online knowledge base if it’s helpful [4], showing how the portal combines multiple functions – like submitting forms, tracking orders, and accessing training – can make a big difference [2]. Take Retail Zoo, for example. This parent company of Boost Juice and Betty’s Burgers introduced a self-service help center across 660+ stores worldwide. Their portal improved communication between individual stores and central support [11].
Finally, address any concerns or hesitations customers might have to establish trust in the portal.
Address Common Objections
Hesitation often arises from concerns about usability or security. Customers may worry about complicated navigation or managing yet another password. Address these objections directly. For instance, if login fatigue is an issue, integrate Single Sign-On (SSO) using OAuth or SAML, so customers only need one set of credentials [12]. For security concerns, emphasize features like end-to-end encryption and multi-factor authentication, and make security badges visible.
| Objection | Solution |
|---|---|
| "It’s too complicated to find anything." | Use clear, goal-based navigation like "Get Started" or "Troubleshoot an Issue" [2]. |
| "I don’t want another password to remember." | Offer Single Sign-On (SSO) for easy access [12]. |
| "Is my data safe?" | Highlight encryption, multi-factor authentication, and display security badges [12]. |
| "The search never works right." | Use AI-powered search that understands natural language and indexes full documents [2]. |
Another common worry is that unresolved issues in the portal will require starting from scratch with a live agent. Reassure users by explaining how the portal integrates with live support, ensuring all context is preserved. Replace technical jargon like “initiate password recovery protocol” with user-friendly prompts such as “Forgot your password?” [3].
Share Customer Success Stories
Highlighting success stories helps demonstrate the portal’s tangible benefits. Use testimonials from early adopters as proof of its effectiveness. Add a "Spotlight on Success" section within the portal to showcase case studies. These stories can detail how specific users reduced support tickets, saved time, or streamlined their workflows.
Create a sense of community by encouraging peer-to-peer support through forums. This builds trust, provides social proof, and creates a self-sustaining knowledge base. Keep customers engaged by regularly updating the portal’s news section with announcements about new features, special offers, or success stories [13].
As customer service expert Shep Hyken aptly puts it:
"Customers today want the very best service at their fingertips. They demand quick, efficient, and personalized service." [1]
Onboard and Train Customers
Once customers see the value of your portal, the next step is helping them feel confident using it. Here’s why this matters: 86% of B2B companies now provide customer training [15], and it pays off. Trained customers show 87% higher feature adoption rates compared to those left to figure things out on their own [15]. Without structured onboarding, 40-60% of SaaS features remain unused [15], which means your portal won’t perform as expected.
Create a Multi-Channel Training Program
Start by reviewing your existing guides, FAQs, and manuals. Identify what can be repurposed into more engaging formats – like short, sub-90-second videos that focus on specific tasks. Map out the customer journey from onboarding to ongoing engagement, so you can prioritize what materials to create at each stage.
Use multiple channels to deliver training and reinforce learning. For example:
- Send a "First Steps" guide via email right after the onboarding call.
- Use in-portal prompts to guide users through tasks in real time.
- Offer live webinars or personal follow-ups from account managers.
This approach works. Well-crafted educational content can increase purchase likelihood by 131% [14]. Here’s how different training channels can serve unique purposes:
| Training Channel | Best Use Case | Key Benefit |
|---|---|---|
| Email Nurture | Automated reminders and "First Steps" guides | Keeps the portal top-of-mind post-launch |
| In-Portal Walkthroughs | Real-time guidance for complex features | Reduces friction during key tasks |
| Micro-learning Videos | Quick troubleshooting and feature overviews | Easy to digest and highly engaging |
| AI Chatbots | Answering repetitive support questions | Provides instant 24/7 self-service |
To keep users motivated, break large processes into smaller, manageable steps with progress indicators like visual bars. If users haven’t logged in or completed training, set up automated reminders to re-engage them and reduce drop-off rates.
Provide Role-Specific Training Materials
Generic training can frustrate users when they’re forced to sift through irrelevant information. Instead, customize materials for specific roles:
- End users: Step-by-step guides for core features.
- Administrators: Configuration guides, setup instructions, and user management tips.
- Developers: Technical documentation and API integration resources.
- Executives: High-level strategy insights, ROI analysis, and success stories [15].
Organize training around user workflows, not internal departments. For example, instead of categories like "Billing" or "Support", use task-based sections such as "Get Started", "Troubleshoot an Issue", or "Manage My Account" [2]. This makes it easier for users to find what they need without feeling overwhelmed. Role-based navigation can further streamline the experience by showing only the menus and resources relevant to each user’s role.
Offer structured learning paths to cater to different user needs. A 90-minute "Getting Started" path works for new users, while an in-depth 6-8 hour "Power User" path can cover advanced features [15]. Tailored training like this not only ensures smooth adoption but also reduces the need for support. In fact, companies with strong training programs report a 30-50% drop in support ticket volume [15].
Offer Continuous Support
Initial training is just the start. To maintain engagement, provide ongoing support. Host regular Q&A sessions where users can address specific challenges, and schedule refresher workshops to reinforce workflows and prevent backsliding into old habits. Identify "super users" within customer teams to act as peer support experts.
Keep improving your resources by monitoring search queries that yield no results – this highlights gaps in your AI-powered knowledge base. Track metrics like support ticket volume and training completion rates to refine materials as your product evolves. As ClonePartner puts it:
"A well-designed post-migration training plan will help to ensure long-term adoption of the new helpdesk and prevent your team from falling back into old habits." [16]
Encourage peer-to-peer problem-solving by setting up community forums. This builds a self-sustaining knowledge base that scales better than traditional support. Gamification can also help – award points, badges, or leaderboard rankings for completing training modules [15][2]. Finally, ensure your documentation stays current by connecting your portal’s AI to live source systems. This way, users always get answers based on the latest updates.
Monitor Adoption and Iterate
Keeping an eye on how your portal is being used helps you catch and fix issues early. If you’re not tracking the right data, you risk missing chances to improve before users get frustrated.
Track Adoption Metrics
It’s important to separate adoption metrics (how users are engaging) from outcome metrics (the impact on your business) [6]. Stick to a weekly scorecard with 10–15 key performance indicators (KPIs) to avoid drowning in data [6]. Useful metrics include weekly or monthly active users, repeat logins, and new registrations to see if users are forming habits. For self-service tools, track your ticket deflection rate and search success rate. Pay close attention to the "no-results rate", which shows how often users search for something and come up empty [5][17][6]. This matters because 67% of customers prefer self-service over contacting support [1]. If they can’t find answers, they’ll turn to traditional support channels instead.
Don’t stop at tracking logins – dig deeper. Measure task completion rates, which show how many users successfully finish top tasks like finding an answer, tracking a case, or registering a deal. This metric directly reflects your portal’s return on investment (ROI) [6]. Another key metric is "time to first value", which measures how long it takes a new user to complete a meaningful action after logging in for the first time. This indicates how effective your onboarding process is [6].
Pair these metrics with customer satisfaction (CSAT) scores. A drop in support tickets might seem like a win, but if it’s due to frustrated users giving up, you’ve got a bigger issue [6]. Also, segment your data by customer tier, region, or product line to uncover user experience (UX) issues that may be hiding in the overall numbers [6]. This approach not only reduces the support workload but also improves satisfaction.
Once you’ve got the numbers, focus on gathering qualitative insights to dig into the reasons behind the trends.
Gather Customer Feedback
Metrics tell you what’s happening, but customer feedback reveals why. Use multiple channels to collect input, such as in-portal surveys, feedback forms, article helpfulness ratings (e.g., "Was this helpful?"), and direct messaging [5]. Don’t forget indirect sources like support tickets, social media, and input from your sales and support teams.
Analyze "no-results" queries to identify missing content. Prioritize creating new articles or videos to address these gaps. In one case, optimizing portal content based on user feedback reduced support tickets by 15% [17]. Use tools like sentiment analysis and customer health scoring to identify features that aren’t meeting user expectations, so you can address them quickly [1].
Conduct usability testing by observing real users as they navigate the portal. Automated analytics might show where users drop off, but watching someone struggle with navigation uncovers friction points that data alone can’t reveal [5]. A/B testing can also be helpful – compare different layouts, designs, or calls-to-action to find what drives better results [5].
Use this feedback to make meaningful updates to your portal.
Refine and Expand the Portal
Take the insights you’ve gathered and turn them into targeted improvements. For instance, if search queries highlight content gaps, create resources to fill them. If users abandon a specific workflow, simplify the process or add progress indicators. Shift from department-based structures (like "Billing" or "Support") to workflows that make sense to users (like "Get Started" or "Troubleshoot an Issue") if your data shows the current setup is confusing [2]. These changes should align with the personalized experiences discussed earlier.
Keep evolving your portal based on user behavior. When rolling out new features, use granular access controls to release them to specific user groups first. This prevents clutter for users who don’t need the tools [18][19]. Use in-app notifications to announce updates while users are actively engaged, and link these features to searchable guides or video tutorials to help users troubleshoot on their own [18].
Monitor how new features affect your core metrics. If a change doesn’t improve task completion rates or reduce support tickets within a few weeks, adjust quickly. Focus on making steady improvements based on real user behavior rather than aiming for perfection right away.
Conclusion
Launching a customer portal is more than just a one-time project – it’s a commitment to improving support and making operations more efficient. To succeed, focus on setting clear objectives, tailoring the experience to your users, and rolling it out in phases. Continuous improvement is the key to ensuring long-term success.
Even though 90% of consumers expect a self-service portal [1], only 19% actually resolve their issues through one [2]. This disconnect often happens when portals are designed around internal processes rather than customer workflows. By prioritizing user needs, you can turn your portal into a genuinely helpful resource.
Think of your portal as a living, evolving tool. Start small – address the top 20 most common customer issues first. Test thoroughly, gather data, and refine based on user feedback. Feedback loops are essential for identifying friction points early, allowing you to make quick adjustments when necessary. As Shep Hyken aptly said:
"Customers today want the very best service at their fingertips. They demand quick, efficient, and personalized service" [1].
When executed well, a customer portal doesn’t just cut support costs – it strengthens loyalty. Consider that 95% of consumers say customer service directly influences their brand loyalty [13], and 80% are more likely to buy from brands offering personalized experiences [1]. A well-designed portal is one of the most direct ways to deliver on these expectations, aligning with modern, AI-powered support strategies.
Rather than chasing perfection, focus on steady, data-driven progress. The most successful portals are those that adapt and grow with their users, ensuring they remain relevant and effective over time. By embracing ongoing refinements, your portal can meet the evolving needs of your customers and drive lasting success.
FAQs
What are the best first metrics to track after launch?
After launching your portal, keeping an eye on key metrics is crucial. Focus on tracking customer satisfaction (CSAT), first response time, resolution rates, support costs as a percentage of revenue, and customer churn. These numbers offer insights into how well your portal is performing, how efficiently it operates, and how it influences the overall customer experience.
How do I decide which portal tasks to launch first?
When deciding where to focus your efforts, start with tasks that deliver quick wins and directly address customer needs. Use support data to identify frequent issues or requests – these could include creating self-service resources or adding features that cut down on support inquiries. Prioritize functionalities that make life easier for your customers, like order tracking or ticket viewing. Additionally, consider incorporating tools that leverage AI-driven automation, such as dynamic forms, to streamline processes and boost user engagement.
How do I get customers to switch from email to the portal?
Encourage customers to make the switch by emphasizing the portal’s advantages, such as quicker, more organized support and tailored experiences. Make the transition easier by taking steps like running a pilot program to familiarize users, offering customized onboarding to address specific needs, and leveraging AI tools to enhance self-service options.
Keep customers in the loop with regular updates about new features or improvements and consider offering incentives for early adoption to spark interest and build trust. The goal is to make the process as smooth as possible while clearly showcasing the portal’s value.
Related Blog Posts
- How do you create a self-serve portal customers will actually use?
- How do you build a change management plan for switching helpdesks (adoption + resistance)?
- Slack vs. The Customer Portal: Why Enterprise Clients Demand a Proper Dashboard
- Customizing Portals for Strategic Accounts: Why One Size Doesn’t Fit All