
Migrating from Help Scout to a full helpdesk system can be challenging but manageable with proper planning. Here’s a quick summary of the process:
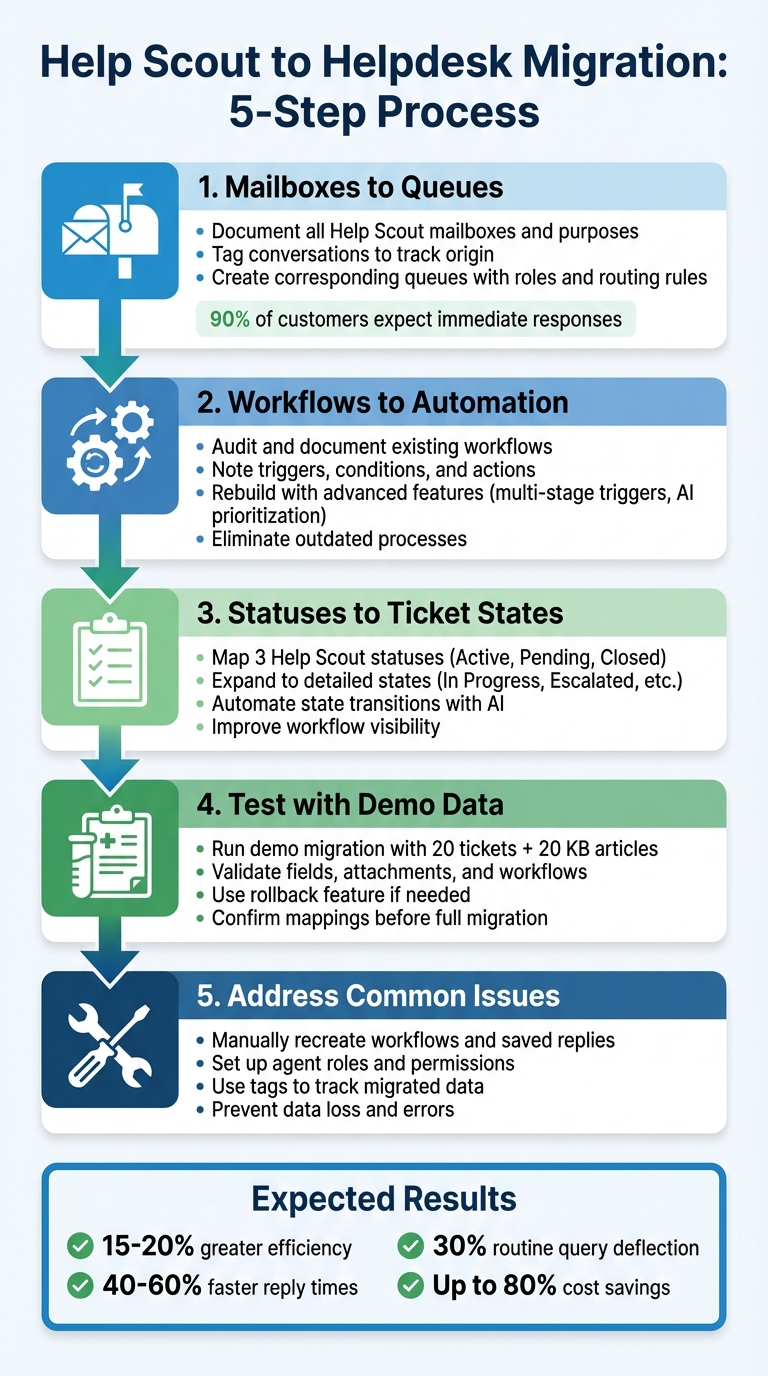
- Mailboxes to Queues:
- Document all Help Scout mailboxes and their purposes (e.g., sales, billing, support).
- Tag conversations to track their origin during migration.
- Create corresponding queues in the new helpdesk with roles, ticket routing rules, and prioritization.
- Workflows to Automation:
- Audit and document existing workflows, including triggers, conditions, and actions.
- Rebuild workflows in the new system, using advanced features like multi-stage triggers and AI-driven prioritization.
- Statuses to Ticket States:
- Map Help Scout’s three statuses (Active, Pending, Closed) to a more detailed ticket state system.
- Add states like "In Progress" or "Escalated" to reflect your workflow.
- Automate state transitions with AI tools.
- Test with Demo Data:
- Run a demo migration with sample data to identify issues.
- Validate ticket fields, attachments, and workflows before the full migration.
- Address Common Issues:
- Prepare for manual recreation of workflows and saved replies.
- Ensure agent roles and permissions are correctly set up.
- Use tags to track migrated data and prevent errors.
5-Step Help Scout to Helpdesk Migration Process
Step 1: Map Help Scout Mailboxes to Helpdesk Queues
Review Your Help Scout Mailboxes
Start by documenting all the ways your customers reach out for support – whether it’s through website forms, emails, phone lines, forums, or reviews. Take stock of any old email aliases to ensure nothing slips through the cracks during the migration process.
Group each mailbox by its main purpose. For instance, is it handling sales inquiries, billing issues, technical support, account management, or general questions? Pay close attention to how workflows in Help Scout currently operate. Look at how conversations are routed, tagged, or prioritized, and study the use of tags, folders, and custom fields to get a clear picture of your existing setup.
Another key step is differentiating between full inboxes and aliases. Remember, multiple email addresses might funnel into a single Help Scout inbox. To maintain clarity about where communications originate, tag conversations from specific mailboxes (e.g., source-billing-mailbox) before starting the migration.
Once you’ve documented and organized everything, you’re ready to set up matching queues in your new helpdesk system.
Create Matching Queues in Your Helpdesk
Next, replicate your Help Scout mailboxes by creating corresponding queues in your new helpdesk platform. Modern helpdesk systems rely on role-based security instead of shared passwords, so assign specific roles like "light users" for team members who need access but won’t be replying to tickets. This approach keeps things secure while encouraging collaboration across departments.
Set up dynamic routing to direct tickets based on keywords and establish a prioritization system (such as Critical, High, or Low) to ensure urgent issues get addressed first. Advanced systems often allow AI-driven routing rules, which can further refine ticket assignments for efficiency.
Enable collision detection to prevent multiple agents from replying to the same ticket. Before migration begins, ensure all agent accounts are created in the new helpdesk to avoid any assignment errors during the transition.
Why Queue Mapping Matters
Mapping mailboxes to queues consolidates customer interactions across channels, ensuring no message gets overlooked.
Consider this: 90% of customers expect immediate responses to their support requests, with 60% anticipating a reply within just 10 minutes. High-performing support teams typically achieve First Contact Resolution rates of 70%–79% and resolve 80% of issues within a single business day. Proper queue mapping is critical to hitting these goals, as it improves visibility and helps prioritize tasks effectively.
Justin Rochell from Pocket highlighted the importance of planning ahead for a smooth transition:
"Because I invested time to have discussions about the switch with our new help desk provider, and my own team, we achieved a seamless transition with no downtime for our customers."
sbb-itb-e60d259
Step 2: Convert Help Scout Workflows to Advanced Automation
Document Your Help Scout Workflows
Migrating from Help Scout means manually recreating workflows, so it’s essential to start with a thorough review. Audit your workflows to identify and remove anything that’s outdated, duplicated, or no longer useful.
Carefully document each workflow, noting its conditions (triggers), operators (logic), and actions (results). Pay special attention to workflows that rely on regex patterns or custom fields, as these will need precise mapping in your new system. Help Scout’s workflows typically run only once per conversation to avoid loops, which may have required workarounds. Be sure to document any tag-based triggers, as these can often be converted into native features in your new platform.
As Aprill Allen from Knowledge Bird highlights:
"Often you’ll end up with stale content, or content that’s been written from the perspective of a technical person and not from a customer."
Take this opportunity to review any automated responses generated by workflows. Ensure they are written in a way that’s easy for customers to understand, avoiding overly technical language. Proper documentation at this stage will make it easier to create improved workflows in your new helpdesk.
Build Better Workflows in Your Helpdesk
With your Help Scout workflows fully documented, it’s time to rebuild them in your new helpdesk – this time with improvements. Modern platforms often address Help Scout’s limitations, such as its "run once" restriction, by offering multi-stage or recurring triggers.
You can now set up dynamic routing based on keywords, customer properties, or urgency, and implement AI-powered ticket routing and prioritization to flag high-priority tickets. Advanced platforms also allow for conditional logic, enabling workflows to adapt based on factors like customer history, sentiment, or SLA requirements.
Configure automatic ticket assignments using criteria like team skills, workload distribution, and availability. Dynamic SLAs can also be set to adjust based on ticket priority, customer tier, or even time of day, ensuring urgent issues are handled promptly. Test your new workflows using historical data to confirm that custom fields and tags – often critical for automation – are functioning as intended. Once your workflows are solid, consider adding AI tools to further streamline and elevate your automation.
Use AI to Improve Your Workflows
After documenting and rebuilding your workflows, advanced AI tools can take automation to the next level. These tools can handle ticket categorization and escalation by analyzing historical patterns, predicting urgency, and even assessing customer sentiment. This reduces response times and increases accuracy.
AI can also automate tasks like categorizing tickets, suggesting knowledge base articles, and drafting responses. Some systems can identify signs of frustration or urgency in messages and automatically escalate tickets that need immediate attention.
Professional migration services often use smart scripts and bulk APIs to speed up the process – sometimes up to 50 times faster than manual imports – while minimizing errors. These tools also ensure custom fields are mapped correctly, enabling advanced triggers and automation from the start.
Mathew Patterson from Help Scout emphasizes the importance of using migration as a chance to reevaluate your approach:
"Revisiting your tagging strategy and workflows through the lens of your current needs will help you make significant performance improvements."
This is a perfect moment to eliminate outdated processes and create automation that can grow with your support team’s needs.
Step 3: Map Help Scout Statuses to Full Ticket States
List Your Help Scout Statuses
Help Scout operates with a straightforward three-status system: Active, Pending, and Closed. While this simplicity can be useful, it also comes with limitations – there are no custom statuses or built-in ticket types. For instance, a ticket remains under "Active" from the moment it’s created until it’s being actively worked on. This can make it tricky to track progress or spot when an issue needs escalation.
Start by documenting how your team currently uses these statuses. Take note of any workarounds you’ve implemented, like using Tags, Folders, or Custom Fields to better define ticket stages. For example, you might use tags such as "In Progress" or "Escalated" to fill in the gaps where Help Scout’s basic statuses fall short.
This documentation will serve as the groundwork for creating a more detailed and automated ticket state system.
Create Detailed Ticket States in Your Helpdesk
Modern helpdesk tools with native integrations let you build ticket states that closely match your team’s workflow. Begin by mapping Help Scout’s statuses to more descriptive ones: Active might translate to "Open" or "New", Pending could become "Awaiting Customer" or "On-hold", and Closed might align with "Resolved".
From there, expand the system to include states that reflect your team’s specific needs. For example, you might add "In Progress" for tickets actively being worked on, "Escalated" for issues requiring management attention, or "Awaiting Third Party" for cases involving external vendors. If you’re using custom fields for ticket categorization, make sure to map those fields to their equivalents in the new system to keep your data consistent. These additional states give your team clearer insight into ticket progress and make it easier to pinpoint bottlenecks.
With this structure in place, you can start using AI tools to automate transitions between these states.
Add AI Features to Ticket States
Once your ticket states are configured, AI can take your support process to the next level by automating state changes based on specific triggers, like ticket inactivity or customer feedback. For example, you can set up workflows to automatically escalate tickets or follow up on unresolved issues.
A great example of this in action comes from early 2024, when Michael Julian successfully migrated over 8,000 support tickets by using ChatGPT as a coding assistant. He wrote Python scripts to handle ticket state transitions and metadata mapping. One clever move was tagging imported tickets with do_not_sync to ensure that old "Closed" tickets didn’t accidentally trigger automations or syncs with the CRM. Reflecting on the process, Julian said:
"It [ChatGPT] wasn’t a replacement for knowledge. It was a multiplier of the knowledge I brought to the table."
When testing your migration, start small – process just three to five tickets at a time. This allows you to confirm that your new helpdesk is interpreting the mapped states correctly before moving on to the full dataset. With this step complete, you’ll be ready to test your full migration using demo data in the next phase.
Step 4: Test Your Migration with Demo Data
Test with Sample Cases
Before transferring your entire Help Scout database, start with a demo migration using 20 tickets and 20 knowledge base articles. This step allows you to confirm that your mapped mailboxes, workflows, and statuses are functioning as expected in the new system – without putting your full dataset at risk.
Many migration tools, like Import2 or Help Desk Migration, include a demo migration feature that moves a small portion of your data to the target system. For the best results, manually set up all users and mailboxes in the new helpdesk beforehand to ensure proper data mapping. Additionally, tag the demo records with a unique identifier so you can easily spot them in the new environment.
After completing the demo, use the View Records feature to review the transferred data. Check that essential fields like Type, Source, Status, Priority, Custom Fields, Requester, Agent, and Tags have been migrated correctly. Also, verify that more complex elements – such as attachments, inline images, and call recordings – are intact. If you’re migrating a help center, ensure articles are placed in the correct collections and that their visibility settings (published or draft) are preserved.
If the demo results don’t meet your expectations, use the Rollback Demo feature to remove the test data and refine your mappings before trying again. This trial-and-error approach helps identify and resolve issues early, minimizing risks for the full migration. Once everything checks out, you can confidently use these validated mappings to proceed.
Use AI to Optimize After Migration
Once your demo migration is successful, you can leverage AI customer support tools to improve data accuracy and streamline ongoing processes. These tools analyze the source and target schemas to uncover patterns, relationships, and potential issues that might escape manual review. They also validate records by comparing data before and after migration, ensuring a high level of accuracy.
AI can also generate test cases and highlight anomalies. For instance, machine learning models can examine your data to detect redundancies or outliers that traditional methods might miss. AI-powered observability tools go a step further by learning normal data patterns and automatically flagging anything unusual – no need for manual rule-setting. Companies using AI-assisted migration frameworks often report completing projects 30% to 40% faster.
Beyond testing, AI can continue to enhance your helpdesk operations. You can set up automated workflows where AI routes tickets based on content, suggests responses to frequently asked questions, or escalates issues that indicate customer dissatisfaction. However, it’s crucial to maintain human oversight for any actions that could alter or delete production data – avoid granting AI systems full write or delete permissions. With a validated demo migration and AI tools in place, you’ll be better equipped to handle the challenges of transitioning from Help Scout.
Common Problems When Migrating from Help Scout
When you’re transitioning from Help Scout, several challenges can crop up. While mapping queues, workflows, and ticket states is a good starting point, certain limitations in migration tools can derail your plans if not addressed. For example, workflows, automation rules, and saved replies won’t transfer automatically – you’ll need to recreate these manually in the new system. Similarly, knowledge base articles and collections require specialized tools or API access to migrate. If you rely on tags or custom fields to track ticket types or statuses, ensure these are mapped correctly, as Help Scout doesn’t support custom statuses natively.
A helpful tip: Tag all records in Help Scout with a unique identifier, like imported, before starting the migration. This makes it easier to identify migrated data in the new system.
Agent Roles and Permissions Issues
Agent roles and permissions can cause headaches during migration. For instance, migrating tickets to agents who don’t yet exist in the new system creates delays and mapping errors. To avoid this, set up agent profiles with the correct permissions before starting the transfer. The user handling the migration must have Administrator or Owner status and verified access to all mailboxes in Help Scout. Check this by navigating to "Permissions" and ensuring all mailboxes are selected.
If you’re migrating between Help Scout accounts, temporarily change agent emails in the source system to allow identical accounts in the target system. Automated tools can also help by reassigning tickets from deleted or inactive agents to active administrators, preventing orphaned data.
Lost Attachments and Data
Attachments and certain types of data often don’t survive the migration intact. Inline images, for example, may fail to display correctly unless they’re extracted and converted into standard attachments. CSV-based migrations can also result in the loss of SLA metrics, login histories, or message formatting. Additionally, improper email forwarding can strand tickets in the old system once the migration begins.
To minimize data loss, always run a demo migration first. This allows you to spot failed records, broken links, or mapping issues early on. After the initial migration, use a Delta Migration to capture any new or updated records created during the transition period.
Missing Workflows and Automation
One of the biggest challenges is the loss of workflows and automation. These can’t be transferred automatically, so it’s crucial to document all automation rules, saved replies, and macros before starting the migration. In most cases, Help Scout “Workflows” will translate to “Triggers” or “Automations” in other systems, while “Saved Replies” become “Macros” or “Canned Responses”.
As Data Migration Specialist Ashley Milne notes, the migration process is a good time to clean up your helpdesk setup. Instead of recreating everything, take the opportunity to delete outdated content and unused workflows.
Before finalizing your new setup, conduct a thorough ticket audit to ensure all support sources – like old forum emails and API integrations – are accounted for. AI-driven tools can also assist by suggesting improved routing logic, identifying SLA risks, and flagging tickets needing escalation based on sentiment analysis. Test these workflows with small datasets to ensure they perform as expected before rolling them out across your team.
Conclusion
Switching from Help Scout can be a smooth process when you plan carefully. By mapping mailboxes, converting workflows, and reassigning statuses, you set the stage for success. Running a demo migration with sample data helps identify potential issues early, while thorough documentation ensures everything stays on track. This approach allows you to address Help Scout’s limitations effectively.
The real advantage, however, lies in upgrading to an AI-powered platform that goes beyond simply replicating your previous setup. These modern tools deliver impressive results: 15–20% greater efficiency, 40–60% faster reply times, saving up to 10 minutes on reviews, and deflecting 30% of routine queries.
Cost savings are another compelling reason to make the switch. Adopting a modern support platform can cut annual support expenses by up to 80% while doubling productivity. These platforms come equipped with built-in automation, custom fields, knowledge bases, and AI tools – eliminating the need for costly add-ons. Plus, optimizing your data during the migration process enhances overall performance.
Migrating is also an opportunity to tidy up. As ClonePartner aptly puts it, "Leaving ‘rot’ behind is one of the best parts of migrating". This is your chance to clear out outdated workflows, duplicate tags, and old tickets. Starting fresh with a cleaner system improves performance and ensures more accurate reporting from day one.
FAQs
What should we clean up in Help Scout before migrating?
Before making the move, it’s important to tidy up your Help Scout data for a smoother transition. Start by clearing out duplicates, outdated records, and any custom fields or tags you no longer need. Standardizing contact and organization fields can help avoid inconsistencies, while consolidating similar tags and statuses will streamline your data. Taking these steps will cut down on clutter, reduce mistakes, and help maintain accurate data in your new helpdesk system.
How do we prevent automations from affecting imported tickets?
To ensure automations don’t interfere with imported tickets during migration, it’s a good idea to temporarily disable or modify them in the source system before starting the process. Once the migration is finished, take the time to review and adjust workflows in the new system as needed. Running a trial migration beforehand can help spot and fix any potential issues, preventing unwanted automation triggers and protecting data accuracy.
How can we validate attachments and fields won’t break after migration?
To keep attachments and fields intact during migration, it’s a good idea to run a pilot or demo migration first. This allows you to test how data transfers. Check that attachments – like images and files – are properly transferred, and ensure custom fields maintain their data types and values. Pay close attention to supported data types and handle specific cases, such as inline images, with care. Once the migration is complete, compare the source data with the migrated data to make sure attachments are accessible and fields are correctly mapped.
Related Blog Posts
- How do you map Freshdesk fields, groups, and statuses to a new helpdesk?
- How do you map Kayako statuses, priorities, and custom fields to a new helpdesk?
- How do you map HappyFox categories, custom fields, and statuses to a new system?
- How do you migrate away from Help Scout without losing conversations or history?