


Migrating from HappyFox requires careful mapping of categories, custom fields, and statuses to ensure workflows and data integrity remain intact. Here’s how to do it effectively:
- Review Your Current Setup:
- Export data (categories, custom fields, statuses) in CSV or XLSX format.
- Analyze patterns, dependencies, and eliminate outdated configurations.
- Identify rarely used fields and redundant items to streamline your setup.
- Map Categories:
- Understand category hierarchies and their dependencies, such as category-wise statuses.
- Consolidate underutilized categories for a more efficient structure.
- Create a category mapping table to align source and destination categories.
- Align Custom Fields:
- Document field types (text, dropdown, etc.) and attributes (required, internal, parent-child relationships).
- Define transformation rules for format changes (e.g., date formats, currency).
- Use tools with smart mapping features to automate and validate field alignment.
- Map Statuses:
- Export and document current statuses and their workflow triggers.
- Build a status mapping table to align source and target statuses while preserving SLA and automation rules.
- Address custom or unmappable statuses by creating equivalents or using notes to retain context.
- Test and Validate:
- Conduct a pilot migration with a small data sample to catch errors early.
- Use AI-powered tools to validate mappings, ensure relational integrity, and generate reports.
- Refine mapping rules based on test results to ensure accuracy.
- Full Migration and Final Validation:
- Schedule the migration during low-activity periods and freeze data updates in HappyFox.
- Audit post-migration data for accuracy, including ticket counts, workflows, and metadata.
- Use AI tools to monitor performance metrics and optimize the new system.
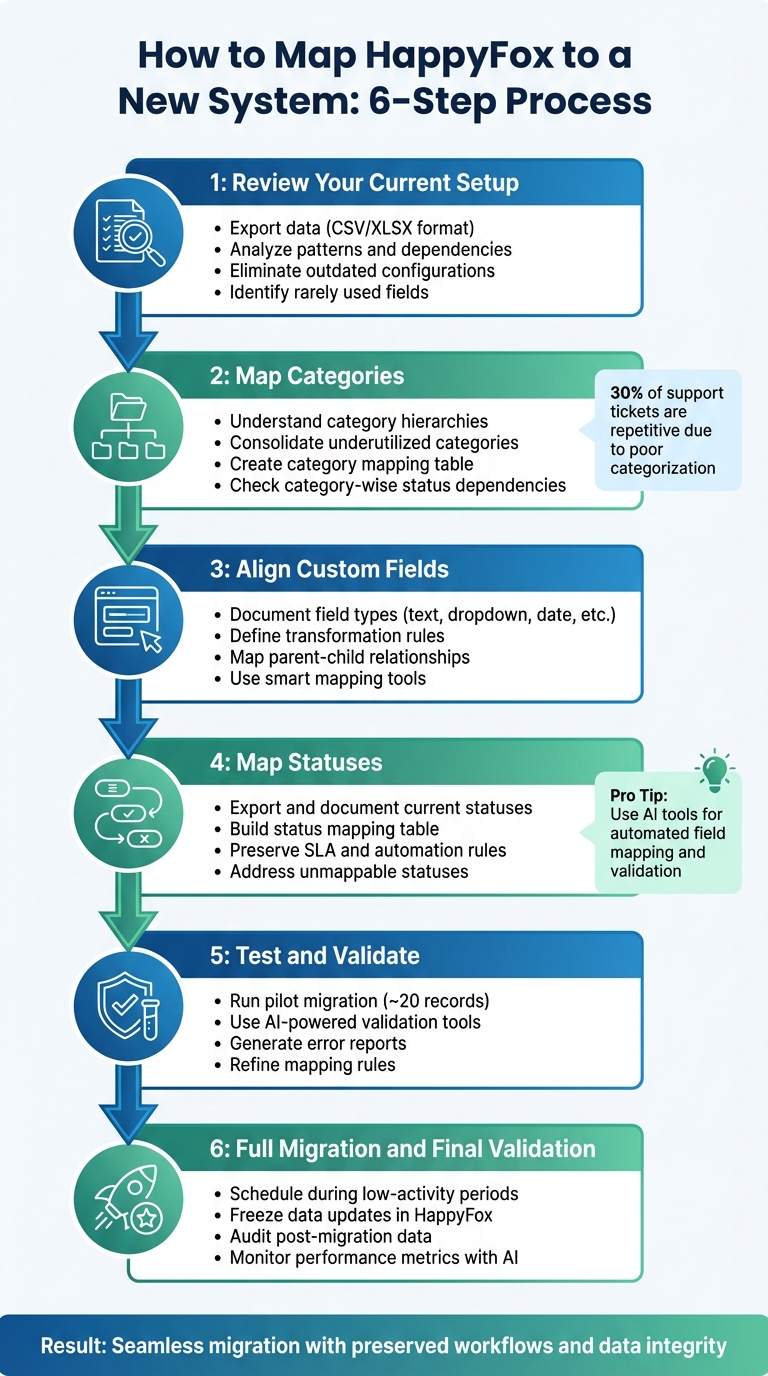
6-Step HappyFox Migration Mapping Process
Review Your Current HappyFox Setup
Start by taking a comprehensive look at your entire HappyFox setup. This step is crucial for ensuring an accurate mapping process later on. To begin, export your categories, custom fields, and statuses by navigating to Reports >> Exports. Make sure your agent role has the "Export reports" permission enabled – without it, you won’t be able to access this data.
When exporting, choose either .csv or .xlsx formats. CSV files are ideal for automated scripts, while XLSX files are better suited for manual reviews. Use the "Additional Filters" option to fine-tune your export by "Created time", "Resolved time", or "Updated time" to focus on the most relevant historical data. Remember, download links expire within three days, so don’t delay.
Once you’ve exported your data, it’s time to analyze it for patterns and dependencies. For example, you can run a Custom Fields Report to identify fields that agents or customers rarely fill out. If a field has a very low fill rate, it’s probably unnecessary and can be removed. Be sure to check the "Depends on" property to confirm parent-child relationships – removing a parent field without this step could disrupt workflows.
Next, eliminate outdated or redundant configurations. Look for default items, like "[Sample]" asset types or categories, that were created during the initial setup but never used. You can also filter your exports by "Updated time" to identify legacy data that hasn’t been touched in months or even years. As the HappyFox Blog puts it:
"Your help desk is the heart of your customer support operations. It holds years of invaluable data, including customer interactions, support workflows, and valuable insights."
While this data is important, its relevance is key. Outdated configurations can clutter your system and increase the chances of migration errors. Take a close look at fields marked as "Required" or "Required on Ticket Completion." If these fields no longer align with your business processes, consider consolidating or removing them before moving forward. Streamlining your setup now will save you time and effort in the long run. This is especially true if you are moving from email to a helpdesk for the first time.
sbb-itb-e60d259
Map Categories to the New System
Now that you’ve reviewed HappyFox thoroughly, it’s time to align your category structure with the framework of the new system.
Understand Category Hierarchies and Relationships
Categories in HappyFox play a crucial role in organizing data, but they often come with complex dependencies that require detailed analysis. Start by checking if "Category Wise Statuses" is enabled. You can do this by navigating to Manage > Account Settings > Feature Settings. Also, review how custom fields are tied to categories using the "Associate Category" setting and their "Depends on" relationships. When category-wise statuses are active, certain statuses are exclusive to specific categories, which directly impacts workflow transitions. As highlighted by HappyFox Support:
"When a category is deleted, the source category statuses should be mapped/shared to destination category, else a validation will be thrown."
Additionally, audit automation dependencies like Smart Rules, SLAs, Canned Actions, and Queues. Changes to category structures can disrupt these automated workflows, so ensure that any modifications are reflected in related automation rules to maintain workflow continuity.
Consolidate and Simplify Categories
Before diving into mapping, take the opportunity to streamline and simplify your categories. Export your ticket data and analyze usage patterns to identify which categories handle the most volume and which are underutilized. Studies show that around 30% of support tickets are repetitive due to poor categorization, so simplifying the structure can improve ticket routing and prioritization and reduce confusion.
If you have nested categories that add unnecessary layers of complexity, consider merging them. Group categories by team expertise – such as Infrastructure or Apps – to streamline ticket allocation and prevent inefficiencies like "queue jumping". Natalie Sansone, PhD, Senior Research Analyst at Info-Tech Research Group, emphasizes the importance of clear ownership:
"If everybody is managing the queue, then nobody is. Without clear ownership and accountability over each and every queue, then it becomes too easy for everyone to assume someone else is handling or monitoring a ticket when in fact nobody is."
By simplifying your categories now, you can avoid future manual fixes and set the stage for a smoother AI-native migration.
Create a Category Mapping Table
Develop a table that lists each source category, its equivalent in the new system, and any notes on consolidation. Ensure all mandatory fields in the destination system are mapped to a corresponding source field – missing mappings can block the migration process. For fields that no longer serve a purpose, mark them as "discard" to avoid transferring unnecessary data.
Use this table to document status-category associations, particularly if you’re using category-wise statuses. Keep in mind that bulk status changes in HappyFox only work when tickets share the same status-category pairing, so your mapping should account for these restrictions to prevent migration errors. Test your mapping on a small sample of about 20 records to catch any mismatches before proceeding with the full migration. This table will act as a blueprint for transitioning custom fields and statuses effectively.
Align Custom Fields for Data Consistency
After mapping categories, the next step is aligning custom fields to maintain the integrity of your data and workflows. Custom fields are critical for preserving historical context and ensuring smooth operations during migration.
Match Field Types and Attributes
HappyFox supports a variety of custom field types, including Text, Number, Dropdown, Multiple Options, Date, and Currency. Begin by documenting the field types in your current setup. This is important because, as HappyFox University points out:
"You cannot edit the field type once the ticket field is created."
Beyond field types, pay attention to attributes such as "Required", "Internal" (visible only to agents), and "Depends on" (parent-child logic). These attributes dictate how fields behave and who can access them. For instance, if you have a "Product" dropdown linked to an "Issue Type" dependent field, both must be mapped together to retain their hierarchical relationship. When moving a parent field, ensure its child fields are transferred as well to maintain these connections.
Visibility settings are equally crucial. Internal fields should map to agent-only fields in the new system, while External fields should remain visible to customers. Also, prioritize mandatory fields, as missing these can cause migration issues. If the target system requires a field that doesn’t exist in HappyFox, you’ll need to either create it or map a similar field from the source system.
Once field types and attributes are documented, you can move on to defining transformation rules.
Define Data Transformation Rules
Not every field will transfer exactly as it is. Differences in formats, character limits, or data structures may require adjustments. Set up transformation rules to handle these variations. For example, ensure date formats, currency symbols, and character limits align with the target system’s requirements.
Create a detailed mapping document that lists each source field, its destination field, and the transformation rules applied. For Dropdown fields, ensure option values match precisely. If HappyFox uses "Open", "In Progress", and "Closed", the target system should use the same or mapped equivalents. For Multiple Option fields, confirm that the new system supports multi-select arrays or plan to split the data. If a field is no longer needed, mark it as "discard", but remember that discarding fields will result in the loss of historical data.
Before mapping, conduct data cleansing to address issues like duplicate entries, missing values, or outdated information. This step minimizes the risk of transferring bad data and simplifies the migration process.
Validate Field Mappings with AI Tools
Modern migration tools offer Smart Mapping features that suggest matches between source and target fields, helping to reduce manual errors. These tools can even identify and create missing custom fields to preserve your data structure. According to Help Desk Migration:
"The smart mapping tool lets you review and adjust data fields before migration. This ensures everything moves correctly and your support operations continue without disruption."
Before finalizing the migration, test the process to verify field mappings. Testing helps catch issues like mismatched data types, broken dependencies, or formatting errors early. Use validation checks during extraction and loading to ensure data types such as dates or decimals remain consistent. After testing, audit the results to confirm that relational links – like custom fields connecting tickets to users or companies – are intact.
Finally, involve your frontline agents in reviewing the migrated data. While automated tools are powerful, human insight can catch issues that might otherwise slip through, like fields that technically migrated but don’t align with the new system’s workflows. This extra step ensures the data remains practical and usable in its new environment.
Map Statuses and Workflow Transitions
Now that you’ve streamlined your categories and aligned custom fields, it’s time to tackle status mapping. This step is crucial for preserving your existing support workflows. Unlike categories or custom fields, statuses are deeply tied to SLAs, escalation rules, and automated ticket routing. These elements determine how tickets are assigned, escalated, or closed. Even a small mismatch in status mapping can disrupt workflows and confuse your team.
Document Current Status Configurations
Start by exporting a complete list of your current statuses and their associated business rules. This process is similar to the earlier export steps. Pay close attention to "Required on Ticket Completion" settings, which ensure that specific custom fields are filled out before a ticket can be marked as "Closed." These settings are essential for maintaining data integrity and need to be replicated in the new system to avoid workflow interruptions.
Also, document your SLA timers and escalation triggers. For example, if a ticket in "Pending Customer Response" pauses the SLA clock, make a note of that behavior. Similarly, if the "Escalated" status automatically reassigns tickets to senior agents, ensure this rule is included. As HappyFox explains:
"A well-planned migration ensures minimal disruption to your team’s productivity while preserving critical customer information and setting the stage for improved customer service."
Don’t forget to audit both active and historical tickets. This will help you identify any workarounds, such as manual tags or custom fields, that might have been used to handle unique workflows.
Build a Status Mapping Table
Create a detailed status mapping table that includes source and target statuses, workflow triggers, and transformation rules. For instance, if HappyFox uses "Awaiting Reply" and the new system only offers "Pending", map these statuses together and verify whether the SLA behavior remains consistent.
Pay close attention to workflow triggers tied to statuses. For example, if status changes in HappyFox trigger agent assignments or ticket ownership updates – such as routing "Escalated" tickets to a specific team – make sure the new system can replicate this logic. Tools rated highly for ease of use (4.8/5) can help preserve these relationships during migration.
Use AI to validate these mappings, just as you did with custom fields. Share the mapping table with your support team to confirm that it aligns with your operational workflows.
Handle Custom or Unmappable Statuses
Not all statuses will have a direct match. For example, if HappyFox uses a unique status like "Awaiting Internal Review" and the new system doesn’t support it, you have three options: map it to the closest equivalent, create a custom status, or discard it. Keep in mind that discarding a status will result in the loss of its historical data.
For statuses that don’t map neatly, consider using custom fields or private notes to retain the audit trail. For instance, if "Awaiting Internal Review" doesn’t exist in the new system, you could map it to "Pending" and add a note field to capture the original status. This approach helps maintain data integrity while adapting to the new system’s workflow requirements.
Test these mappings with a pilot migration. Use a sample dataset that includes inactive statuses, edge-case workflows, and complex ticket dependencies. Eric Klimuk, Founder and CTO of Supportbench, highlights the importance of this step:
"Data migration is more than just copying files from one system to another – it’s a delicate, high-stakes process that can affect everything from day-to-day operations to long-term compliance."
Involve your frontline agents in reviewing the pilot results. Their feedback will help ensure that unmapped or custom statuses haven’t disrupted daily operations. Once you’re confident in the mappings, freeze status changes in HappyFox during the final migration to avoid mismatches caused by live updates. A successful pilot migration will pave the way for a smoother full transition.
Test and Validate the Migration
Before diving into a full migration, it’s smart to start small. Use a representative sample of your data, including tricky edge cases like inactive users, outdated formats, unusual ticket types, and complex dependencies. This lets you catch potential issues early without putting your entire dataset at risk. A structured test run ensures your mappings are correct before moving forward.
Run a Test Migration
Start with a small set – around 20 diverse records. Include examples with multiple attachments, inactive agents, legacy custom fields, and uncommon status transitions. Many migration tools offer free demos that mimic the full migration process. These demos let you preview how your categories, custom fields, and statuses will look in the new system. Be sure to disable email alerts and triggers during testing to avoid duplicate notifications.
Pay close attention to relational integrity. This means checking that the connections between tickets, agents, companies, and contacts remain intact. For instance, if a ticket was assigned to a specific agent in your old system, like HappyFox, that relationship should carry over seamlessly. Also, verify that metadata – such as timestamps, user IDs, inline images, and attachments – remains accurate and displays as expected. As Help Desk Migration puts it:
"Previewing your migration upfront helps eliminate surprises and ensures a smoother, error-free process." – Help Desk Migration
Once the test migration is complete, use automated tools to validate and document the results.
Use AI Tools to Confirm Test Outcomes
Modern migration tools often come equipped with smart mapping engines. These tools suggest field alignments automatically and provide real-time validation to catch errors before data is transferred. They also generate detailed status reports during test runs, outlining which records transferred successfully, which failed, and why. This automation reduces the need for manual checks and quickly identifies mapping issues.
Involve your support agents in testing the migrated data. Have them interact with it to confirm that both context and usability are preserved. Eric Klimuk, Founder and CTO of Supportbench, highlights the importance of this step:
"Have support agents and stakeholders interact with the migrated test data to ensure usability and context haven’t been lost." – Eric Klimuk, Founder and CTO of Supportbench
Refine Mappings Based on Test Results
After reviewing the test results, fine-tune your mapping rules to fix any problems. For example, if custom fields didn’t transfer properly, map them to the closest available field in the new system or create new custom fields if necessary. Address data format inconsistencies – like differences in date formats or currency symbols – by defining transformation rules to standardize the data during migration.
Continue running demo migrations until the process works flawlessly. Use these test results to identify and clean up issues like duplicate or outdated records in your source system. This iterative approach ensures that when it’s time for the final migration, your mappings are solid, and your team feels confident about the transition.
Complete the Full Migration and Validate Results
After successfully testing your migration and validating mappings, it’s time to tackle the full migration. This step demands careful scheduling, thorough audits, and leveraging AI tools to ensure every aspect of the process is handled with precision. A seamless full migration safeguards your support history, keeps workflows intact, and ensures smooth operations.
Schedule Migration During Low-Activity Periods
Timing is everything. Plan your full migration during off-peak hours – like weekends or periods of low ticket volume – to reduce disruptions. This gives you breathing room to oversee the process without the added pressure of managing live customer interactions. To avoid complications, consider implementing a temporary "data freeze" in your HappyFox system. This prevents live updates from creating mismatches during the migration, ensuring the data snapshot remains consistent throughout.
When it comes to migration methods, you have two main options:
- Big Bang Approach: Move all data at once during a scheduled cutover.
- Phased Approach: Transfer data in smaller, manageable batches over time.
Regardless of the method you choose, success hinges on a solid pre-migration assessment and a clear validation plan. Once the migration is complete, the next step is to audit the results.
Audit Data After Migration
After the migration, it’s crucial to generate detailed reports that highlight migrated, failed, and skipped records. These reports help you identify what transferred successfully and pinpoint any issues that need attention. Compare pre- and post-migration datasets to ensure ticket counts, agent assignments, customer records, tags, custom fields, and priorities match your expectations.
Have your support team run tests on critical workflows – like creating, updating, assigning, and closing tickets – to confirm everything is functioning as it should. As Eric Klimuk, Founder and CTO of Supportbench, explains:
"Validation is your safety net – it confirms that everything moved as expected and continues to function correctly in the new system." – Eric Klimuk, Founder and CTO, Supportbench
Set up an internal communication channel where agents can report issues such as broken links, missing attachments, or mislabeled fields. Use a "Delta" sync to capture any new or updated data created in HappyFox during the migration window, ensuring no information is left behind.
Once you’ve completed the audit, it’s time to put AI tools to work to refine and improve your new system.
Use AI for Ongoing Optimization
The work doesn’t end with validation. AI tools can provide valuable insights to help you fine-tune workflows, close data gaps, and improve overall system performance. From day one, monitor key metrics like ticket resolution times, response times, and customer satisfaction scores to identify and address any performance bottlenecks early.
AI-powered tools, such as chatbots and advanced search, can also verify that your knowledge base articles are properly indexed and accessible. Test cross-links, images, and formatting to ensure everything transferred correctly. Real-time dashboards can help you track ticket flows, SLA management compliance, and agent workloads, giving you the data you need to adjust automation rules, escalation paths, and routing logic based on actual usage patterns. As Eric Klimuk aptly puts it:
"Post-migration isn’t just about catching bugs. It’s about restoring usability, validating trust, and proving the value of your new system." – Eric Klimuk, Founder and CTO, Supportbench
Conclusion
Mapping HappyFox categories, custom fields, and statuses isn’t just about the technical side – it’s about creating a streamlined, clutter-free support system. Start by conducting a thorough audit of your data and cleaning up any outdated or irrelevant information. Next, build detailed mapping tables to align every field with its destination, define how different data types should be transformed, and ensure ticket relationships with customers and agents are preserved. These steps set the stage for a smooth and efficient migration process.
Testing is critical. Use a pilot migration with real-world data, including tricky cases like inactive users or outdated formats, to ensure everything transfers seamlessly. As Eric Klimuk, Founder and CTO of Supportbench, puts it:
"Data migration is more than just copying files from one system to another – it’s a delicate, high-stakes process that can affect everything from day-to-day operations to long-term compliance".
Schedule the full migration during low-traffic periods, perform thorough audits, and establish clear feedback channels to address any issues quickly. By following these strategies, your migration becomes more than a data transfer – it’s a chance to rethink and improve your support operations.
AI-powered tools like Supportbench make this process easier. For instance, automated field mapping can create missing custom fields without requiring manual setup. Sandbox environments allow you to test workflows before going live, while validation tools track changes to ensure data accuracy. Real-time dashboards help monitor key metrics – like SLAs, response times, and customer satisfaction – from the very start. Delta migration even captures new or updated tickets during the transfer window.
The result? A cost-effective, scalable solution that modernizes your support system. With AI-driven tools, B2B support teams can cut expenses, improve first-contact resolution rates, and shift from reactive problem-solving to proactive optimization. Your migration becomes an opportunity to turn operational hurdles into strategic growth.
FAQs
What’s the fastest way to find unused categories and fields before migrating?
To spot unused categories and fields before starting your migration, take a close look at your current data for any inactive elements. Reporting tools can make this easier by letting you analyze field usage – for example, by generating reports on custom fields and categories. You can also use data migration tools with validation features to preview mappings and flag unused elements. By combining report analysis with these validation tools, you can weed out redundant data and make your migration process much smoother.
How do I preserve SLAs and automations when statuses change in the new system?
To keep workflows running smoothly and maintain SLA compliance when statuses change, it’s crucial to map category-specific statuses correctly. Set up automations that activate based on these customized statuses. This approach helps maintain workflow consistency and avoids interruptions during migration, ensuring everything transitions seamlessly.
What should I do with custom fields or statuses that don’t have a direct match?
When dealing with custom fields or statuses that don’t align perfectly, flexible mapping tools can be a lifesaver. These tools let you tweak and adjust data before migration to fit the target system. Need something new? You can create custom fields in the destination system or merge similar ones to keep your data organized and consistent.
Take advantage of preview features in migration tools to spot mismatches early. This helps you catch potential issues before they become bigger problems, ensuring everything flows seamlessly. Always double-check your mappings before completing the migration to avoid any hiccups in your workflows.
Related Blog Posts
- How do you map Salesforce Case fields, Record Types, and Statuses to a new helpdesk?
- How do you map Freshdesk fields, groups, and statuses to a new helpdesk?
- How do you map Kayako statuses, priorities, and custom fields to a new helpdesk?
- How do you migrate away from HappyFox without losing ticket history or attachments?