Migrating to Kayako can be a complex process, and without proper planning, it can disrupt your support operations. Here’s what you need to know:
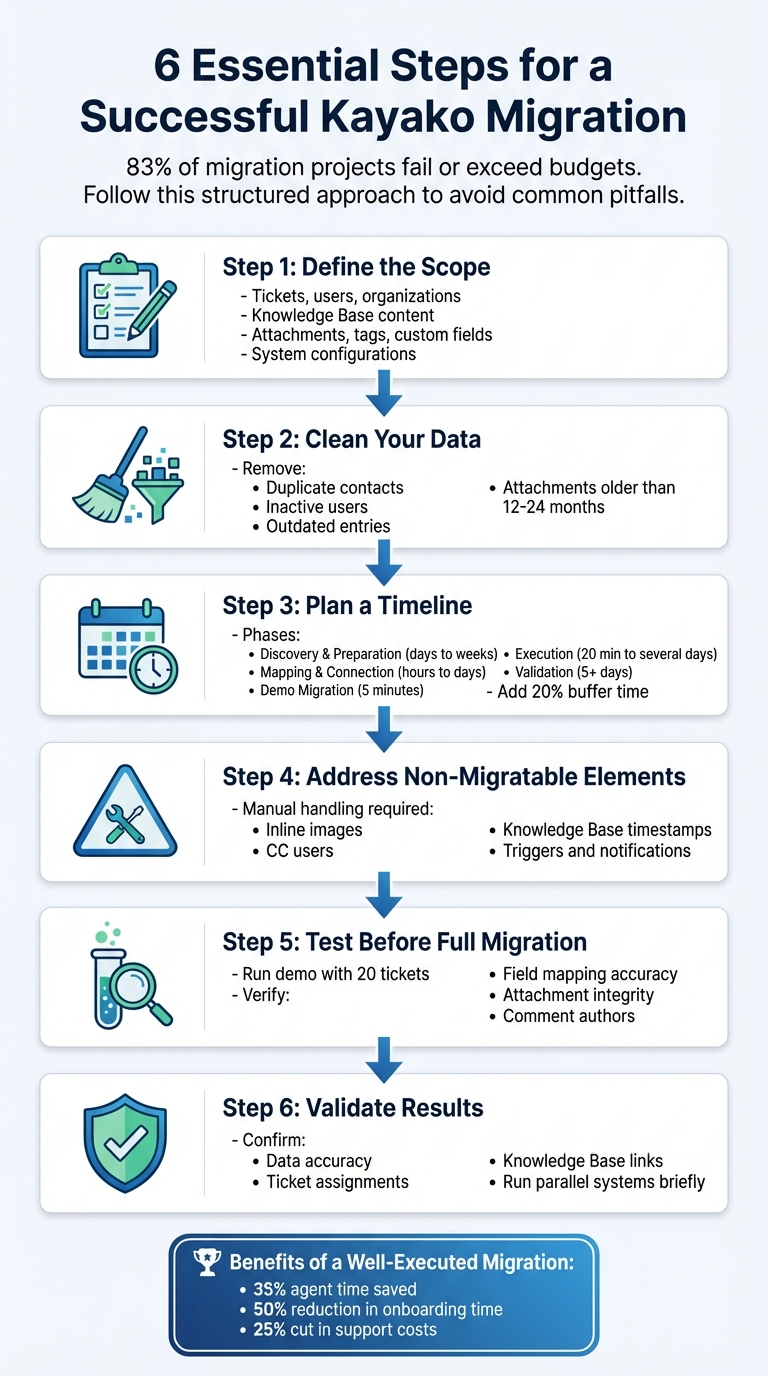
- 83% of migration projects fail or exceed budgets and timelines.
- Poor planning can cause downtime, broken workflows, and data issues like lost ticket links or corrupted attachments.
- A well-executed migration can save 35% of agent time, reduce onboarding time by 50%, and cut support costs by 25%.
Key steps for success:
- Define the scope: Identify all data to migrate, including tickets, users, organizations, and Knowledge Base content.
- Clean your data: Remove duplicates, inactive users, and outdated entries to avoid transferring unnecessary or incorrect information.
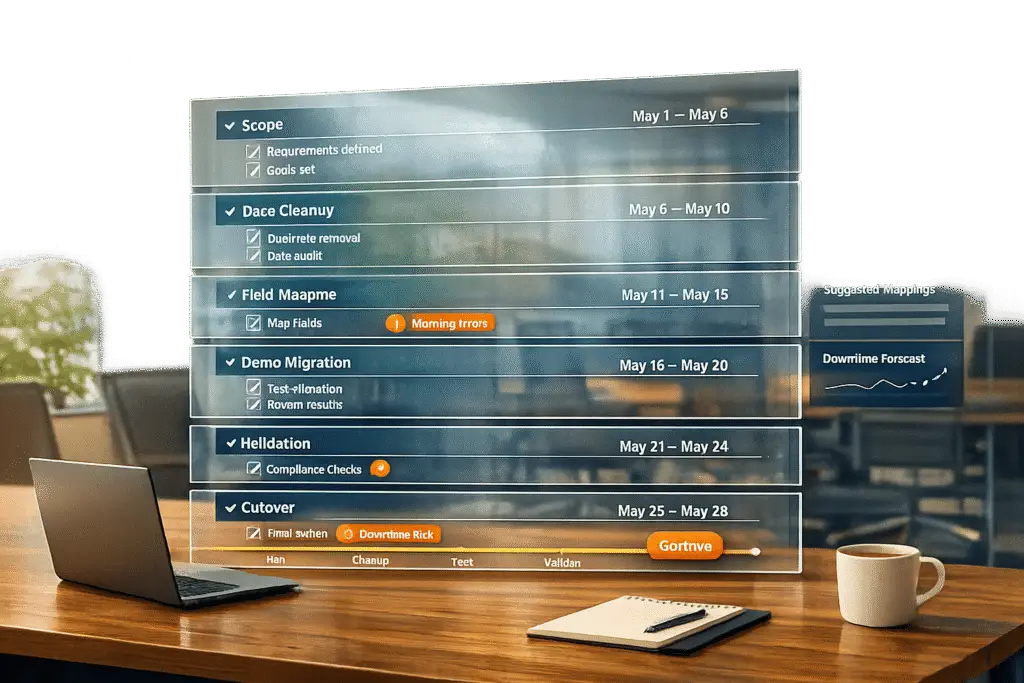
- Plan a timeline: Break the process into phases – preparation, demo migration, execution, and validation.
- Address non-migratable elements: Inline images, CC users, and Knowledge Base article timestamps need manual handling.
- Test before full migration: Run a demo with 20 tickets to catch errors early.
- Validate results: Check data accuracy, ticket assignments, and Knowledge Base links after migration.
Avoid pitfalls like incomplete data transfers, mapping errors, and downtime by following a structured approach. Proper preparation and testing are crucial to ensuring a smooth transition.
6-Step Kayako Migration Process: From Scope Definition to Validation
Defining the Migration Scope
Getting your migration scope right from the start can make all the difference in avoiding disruptions and ensuring a smooth transition to Kayako. The key is to clearly outline what needs to be moved before diving into the process. Start by listing everything in your current system: conversations (tickets), agents, users, teams, organizations, notes, attachments, tags, and custom fields. Don’t forget about your Knowledge Base, including its categories, sections, articles, and attachments.
You’ll also need to include conversation details like subject lines, statuses, group assignments, and full comment histories, complete with authors, privacy settings, and timestamps. If you’re working in a B2B context, organization-level data like names, custom fields, and unique objects (e.g., assets or warranties) that tie records together are especially critical. Additionally, document system configurations such as triggers, notifications, and monitors. These will need to be identified upfront, disabled during migration, and then manually reconfigured afterward. Taking the time to map all of this out will save headaches down the line.
Assessing Existing Data and Systems
Before migrating, take a deep dive into your legacy system. Understand the structure, volume, and quality of your data. Look beyond just ticket counts – examine how data is actually used. Are there manual tags, custom field workarounds, or informal processes that agents rely on but aren’t officially documented? These hidden details often don’t translate easily to a new system and may require special handling.
Pay close attention to user and organization fields. Critical information includes names, emails, phone numbers, company associations, and custom field types like strings, booleans, dates, and numbers. To maintain ticket assignments, set up at least one admin agent in Kayako using the same email address as in your current platform.
Once you’ve got a clear picture of your data, it’s time to address its quality.
Identifying Data Cleaning Requirements
Migrating messy data can waste time and create unnecessary risks. As Eric Klimuk, Founder and CTO of Supportbench, wisely points out:
"There’s no benefit to moving junk. A clean dataset saves time, reduces risk, and improves results in the new system".
Focus your cleanup efforts on areas like inactive or deleted agents, duplicate contacts, and incomplete records. Decide early whether to migrate data for inactive users or reassign their tickets to active admins.
You might also want to filter data by creation date, tags, or ticket status. For instance, skipping attachments older than 12 or 24 months can streamline the process and cut costs. Don’t overlook your Knowledge Base – check for outdated articles and broken internal links that will need fixing after the migration. To minimize surprises, run a demo migration with a small sample, like 20 random tickets, to spot formatting issues or mismatched data before committing to the full migration.
Another crucial step is pre-creating all necessary custom fields in Kayako. This ensures every data point from your source system has a corresponding destination. With your data cleaned up, you’ll also need to identify what won’t transfer automatically.
Documenting Non-Migratable Elements
Not everything will move over seamlessly. For example, CC users and inline images aren’t migrated by default and will require custom solutions or alternative approaches. Similarly, Knowledge Base article dates will reset to the migration date, losing their original timestamps. During the migration, active triggers, monitors, and email notifications must be disabled to avoid creating data loops. These will need to be manually reconfigured afterward.
Address these gaps early. For instance, map CC users to a custom field to retain that information. Review all internal Knowledge Base links before the migration and plan to update them post-move to match your new URL structure. If your articles include embedded content, you’ll need to manually enable the option "Allow potentially unsafe HTML in Help Center articles" in Kayako’s admin panel under Security > Security policies > Help Center content.
Lastly, decide which team members should be agents versus collaborators. Collaborators have limited permissions – they can’t send public replies or change ticket statuses – so it’s important to document these distinctions clearly. Taking these steps will help ensure a smoother transition to Kayako.
sbb-itb-e60d259
Establishing a Migration Timeline
Creating a clear, phased timeline is key to reducing the risk of migration failures. Break the process into manageable phases, assign durations to each, and include buffer time for unexpected challenges.
Start with Discovery and Preparation, which can range from a few days to several weeks depending on the size of your data and the complexity of your system. During this phase, audit your legacy system, configure custom fields, synchronize agent profiles, and notify your team about the upcoming changes. After that, move to Mapping and Connection, a phase that typically takes a few hours to a couple of days. This involves securely connecting your source platform to Kayako and aligning agents, groups, and ticket or article fields.
Before diving into the full migration, run a quick demo migration. This takes only about 5 minutes for 20 random tickets and helps confirm that your setup is working correctly. Then, move to the Execution phase, where the actual migration happens. The time required here depends heavily on your data volume – automated migration processes handle records sequentially, so it could take anywhere from 20 minutes to several days. To streamline this step, request a temporary API limit increase and consider excluding attachments older than 6–24 months to save both time and costs.
Once the migration is complete, plan for a Validation period lasting at least 5 days. Use this time to check reports, ensure data accuracy, redirect support channels to Kayako, and reactivate any triggers or notifications disabled during the migration. Schedule the final cutover during a slow business period with minimal ticket activity to avoid disruptions. To account for unforeseen issues, set aside an extra 20% of your time and budget. If your team needs to continue working in the old system during the migration, plan a Delta Migration afterward to capture any new or updated records.
With your timeline in place, you’re ready to move forward with the step-by-step migration process.
Step-by-Step Migration Process
Securely Connecting Systems
Before transferring data, establish a secure connection. For Kayako Classic, you’ll need a REST API key and secret key, which can be found in the administrator control panel under the REST API tab. On the other hand, Kayako Cloud requires your account URL, admin email, and password.
Make sure the account used for the connection has full administrative permissions. Without these, the migration may fail or result in incomplete data transfer. Additionally, confirm the post-registration Channel before connecting to avoid errors. If you’re working with a large dataset, reach out to Kayako support to temporarily increase API rate limits, which can significantly speed up the migration process.
To avoid unnecessary disruptions, disable all triggers, monitors, and email notifications in Kayako’s Administration panel. This prevents automated messages from being sent to customers during the data transfer. If you’re migrating Knowledge Base content that includes embedded links or special formatting, go to Security > Security policies and enable the option to "Allow potentially unsafe HTML in Help Center articles." This ensures the content displays correctly after the migration.
Mapping Data Fields and Elements
Mapping your data accurately is key to ensuring everything – agents, tickets, custom fields, and Knowledge Base articles – ends up in the right place. Start by creating all required custom fields in Kayako’s Agent area (Administration > Customization > Custom fields) before starting the migration. This allows you to match these fields with those in your source platform.
Agents should be matched by their email addresses. If your old system includes deleted, unassigned, or inactive agents, reassign their tickets to an active admin or agent in Kayako to maintain proper ticket assignments. For Knowledge Base content, Kayako uses a three-level hierarchy: Category > Folder > Article. If your source system only has two levels, you may need to create a "Source Default" folder during the mapping process to keep things compatible.
Before proceeding with the full migration, run a demo migration with at least 20 random records. This helps verify that mapping rules for statuses, tags, and custom fields are working correctly. Afterward, download reports for "migrated", "failed", and "skipped" records. These reports will help you confirm that comment authors are accurate and that attachments are accessible and uncorrupted.
Executing Demo and Full Migrations
With your secure connection and mapping in place, you can begin the migration. A demo migration transfers a small sample – typically 20 tickets and 20 Knowledge Base articles – so you can see how your data will appear in Kayako. For more complex cases, use a "Custom Demo" to select ticket IDs that include attachments, multiple comments, or unique custom fields. This helps catch mapping issues before moving forward with the full migration.
Once the demo results are verified, freeze any changes to your source data. This ensures that the dataset being transferred remains consistent. For large migrations, you can use "Interval Migration" to split the process into smaller chunks during off-peak hours. Alternatively, "Delta Migration" can be used to transfer new or updated records created during the migration process.
Validating Data and Finalizing Migration
After the migration is complete, validation ensures everything has transitioned smoothly. Manually review sample attachments to confirm they transferred without corruption. Double-check that comment authors, ticket requesters, and the relationships between tickets, contacts, and attachments are all correct. Run reports in Kayako to verify that ticket counts, user profiles, and Knowledge Base articles match your source data.
To ensure stability, consider running your old and new systems in parallel for a short time. This allows you to identify any missing workflows or issues before retiring the legacy platform. Once you’re confident everything is functioning properly, reactivate the triggers and notifications you disabled earlier. Finally, redirect your support channels to Kayako to complete the transition.
Common Pitfalls and How to Avoid Them
Even with a solid migration strategy, there are common stumbling blocks that can throw your plans off course. Let’s dive into what they are and how to sidestep them.
Data Loss or Incompleteness
One of the most frequent issues is incomplete data transfers. Default settings on migration tools often skip over certain elements, like inline images or CC users, unless you specifically configure them. Another common scenario? Tickets tied to deactivated or unassigned agents may not transfer at all unless you assign them to an active "default" agent beforehand.
To avoid these problems, don’t update source data or change Knowledge Base URLs during the migration. Doing so can lead to broken links or missing attachments. Also, keep in mind that API keys and tokens may expire mid-process – refreshing them during migration can cause the entire operation to fail.
Run a demo migration with a small batch of data (e.g., 20 tickets) to identify any mapping issues or skipped records. Use Delta Migration to capture new or updated records created after the full migration begins, ensuring no data is left behind. Additionally, reach out to your help desk vendor to temporarily boost API limits, which can speed up the process and reduce the risk of timeouts.
Mapping Errors
Mapping errors can wreak havoc on your workflows. Custom fields and agent assignments that don’t align between systems can result in tickets ending up in the wrong categories or losing critical information. For example, if your source system uses different field types or naming conventions than Kayako, you might lose metadata or links between records, such as tickets and user profiles.
Kayako’s Knowledge Base structure involves a three-level hierarchy (Category > Folder > Article). If your current system uses only two levels, you’ll need to create temporary folders during mapping to ensure compatibility. Another issue arises with inactive agents – historical tickets linked to them won’t migrate unless reassigned to an active user.
Before starting the migration, adjust Kayako’s security settings to allow “potentially unsafe HTML” in Knowledge Base articles. This ensures that all links and formatting remain intact.
Downtime and Operational Disruptions
Unplanned downtime can throw a wrench into customer support operations, leaving your team unable to respond to urgent tickets. A “big bang” migration – where all data is transferred at once – can lead to prolonged unavailability, frustrating both your team and your customers.
"Data migration is more than just copying files from one system to another – it’s a delicate, high-stakes process that can affect everything from day-to-day operations to long-term compliance".
To minimize disruptions, use Interval Migration, breaking the process into smaller chunks and scheduling them during off-peak hours. Pair this with Delta Migration to capture any new or updated records created after the full migration begins, allowing your team to continue working in the source system while the process runs. Running the old and new systems in parallel for a short period can also help you monitor stability before fully switching over. Finally, disable all email notifications, triggers, and monitors in the target system to prevent customers from receiving confusing automated messages during the import.
Compliance and Security Oversights
Data security is critical during migration. Missteps can expose sensitive customer information or result in non-compliance with regulations like GDPR or HIPAA. For instance, Kayako’s default settings block “unsafe” HTML in Knowledge Base articles, which can lead to broken links or missing content if not adjusted.
Ensure the API connection is set up using an account with full administrative permissions to avoid incomplete transfers. If you enable “potentially unsafe HTML,” review the content carefully to ensure it doesn’t pose security risks.
User Resistance and Training Challenges
Resistance from your team can derail even the best migration plans. If agents aren’t involved in the planning process, they may struggle with new workflows or feel frustrated by unfamiliar interfaces. Usability issues often surface only after the system is live, potentially impacting customer interactions.
To ease the transition, involve agents early by giving them access to a sandbox environment where they can test and get comfortable with the new system. Assign them roles in data cleaning or validation to familiarize them with the new structure. During the initial weeks post-launch, provide live support or set up dedicated chat channels to address technical hiccups. Once the system stabilizes, hold a retrospective to identify pain points and document learnings for future updates.
Tackling these challenges head-on ensures a smoother migration process and sets your team up for success.
Conclusion
The key to a smooth Kayako migration lies in three main steps: preparation, testing, and involving your team. Start by auditing your existing systems to fully understand your data’s structure and quality. This includes creating detailed field-level mapping to ensure critical connections – like those between tickets, users, and custom fields – are preserved. Skipping this step can lead to disaster; Gartner reports that 83% of data migration projects either fail outright or go over budget and timelines.
Testing is absolutely essential. Before diving into the full migration, run a demo migration with a small, randomized sample (about 20 tickets). This lets you confirm that attachments, comments, and custom fields transfer correctly. It’s a critical step to catch issues like mapping errors, character encoding problems, or metadata glitches while they’re still manageable.
Your frontline agents are invaluable during this process. Get them involved early by giving them sandbox access to test workflows in the new system. They’ll spot practical issues that technical audits might overlook. As Eric Klimuk, Founder and CTO of Supportbench, explains:
"A successful data migration isn’t just a technical achievement – it’s also a communication project".
This collaboration ensures the system is functional and ready for daily use, while building confidence among your team.
Once the migration is complete, immediately monitor key metrics like response time, resolution time, and customer experience metrics like CSAT, CES, and NPS. Set up dedicated feedback channels during the first week to address any hiccups, such as broken links or missing attachments, before they escalate.
The difference between a seamless migration and an expensive failure comes down to this: plan thoroughly, test rigorously, and keep your team engaged every step of the way.
FAQs
What data should we migrate to Kayako first?
Migrating core support data should always be your first step. This includes tickets, users, and organizations – the foundation of your support operations and the key to preserving customer histories. Once these critical elements are in place, you can shift your focus to knowledge base articles and categories. While important, these are less urgent for immediate functionality.
By prioritizing in phases, you reduce risks, ensure essential data is ready to go first, and give yourself time to validate everything before tackling less pressing information. This approach keeps your migration process smooth and controlled.
How can we estimate a realistic Kayako migration timeline?
To determine a practical timeline for migrating from Kayako, begin by evaluating the scope of the project. This includes analyzing the volume of data and its complexity – such as tickets, user information, and any custom fields involved. Choose a low-traffic period for the migration to reduce potential disruptions. Make sure to set aside enough time for thorough testing and validation to maintain data accuracy and integrity. Depending on the size of the data and the methods used, the entire process can take anywhere from a few days to several weeks, accounting for preparation, testing, and training your team.
How can we prevent downtime during the cutover?
To keep downtime to a minimum during a Kayako migration cutover, careful preparation is key. Schedule the migration during low-traffic times, such as after business hours, to minimize disruption. Before the actual cutover, run tests in a staging environment to spot potential issues and verify that all data remains intact.
It’s also smart to create backups of your data beforehand. This ensures you can quickly recover if anything goes wrong. Clear communication with your team is essential – everyone should know the plan and their role in the process. Automating tasks like data transfers can help reduce errors and make the transition smoother.
Related Blog Posts
- Help Desk Migration Checklist: How to Switch Platforms Without Downtime
- How do you migrate away from Freshdesk without losing tickets, contacts, or history?
- How do you migrate away from Kayako without losing tickets, users, and attachments?
- How do you map Kayako statuses, priorities, and custom fields to a new helpdesk?