Struggling with emails going to spam? Fixing this starts with understanding SPF, DKIM, and DMARC. These email authentication protocols ensure your messages are trusted by email providers, leading to better inbox placement and fewer customer frustrations.
Here’s what you need to know:
- SPF: Authorizes specific servers to send emails for your domain.
- DKIM: Confirms message integrity using cryptographic signatures.
- DMARC: Sets policies for handling unauthenticated emails and prevents spoofing.
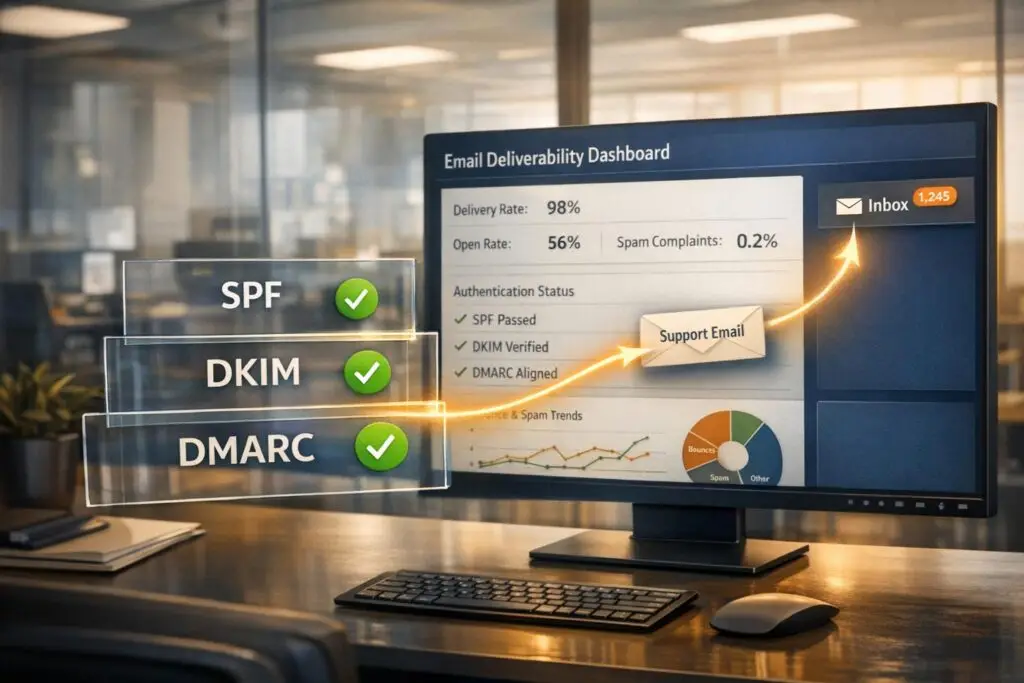
By implementing these steps, your emails are more likely to reach customers’ inboxes. Major email providers like Google and Yahoo now require these protocols, especially for bulk senders. Without them, your emails might be rejected outright.
Key Stats:
- Emails with proper authentication have 10–15% higher inbox placement.
- Open rates can increase by up to 28%.
- DMARC reduces spoofing attacks by nearly 99%.
Set up SPF first, then DKIM, and finally DMARC. Monitor reports to fine-tune your setup and transition to stricter policies over time. This ensures smoother communication with your customers and protects your brand’s reputation.
How to Configure SPF, DKIM, and DMARC for Your Domain
sbb-itb-e60d259
Understanding SPF, DKIM, and DMARC
Think of email authentication as a layered security checkpoint: SPF acts like a guest list, confirming whether a mail server is authorized to send on behalf of your domain. DKIM is the ID badge, ensuring that the message content hasn’t been tampered with during transit. DMARC is the overarching policy that determines what happens when a message fails these checks.
SPF works by validating the envelope sender (the Return-Path used during the SMTP process), not the visible "From" address you see in your inbox. DKIM uses a public/private key pair to verify that the message remains unaltered. DMARC connects the dots by ensuring that the domain in the "From" header aligns with the domains authenticated by SPF or DKIM. Together, these protocols provide a robust framework for email security.
"SPF is the guest list. DKIM is your ID badge. DMARC is the security policy that tells the guard what to do when someone doesn’t have proper credentials."
– Akash Bhadange, AutoSend [4]
Starting in 2024, Gmail and Yahoo require bulk senders (sending 5,000+ messages daily) to implement SPF, DKIM, and DMARC [7][8]. Without these protocols, your messages could face outright rejection. In fact, Gmail began issuing permanent "550" rejections for non-compliant emails in November 2025 [9].
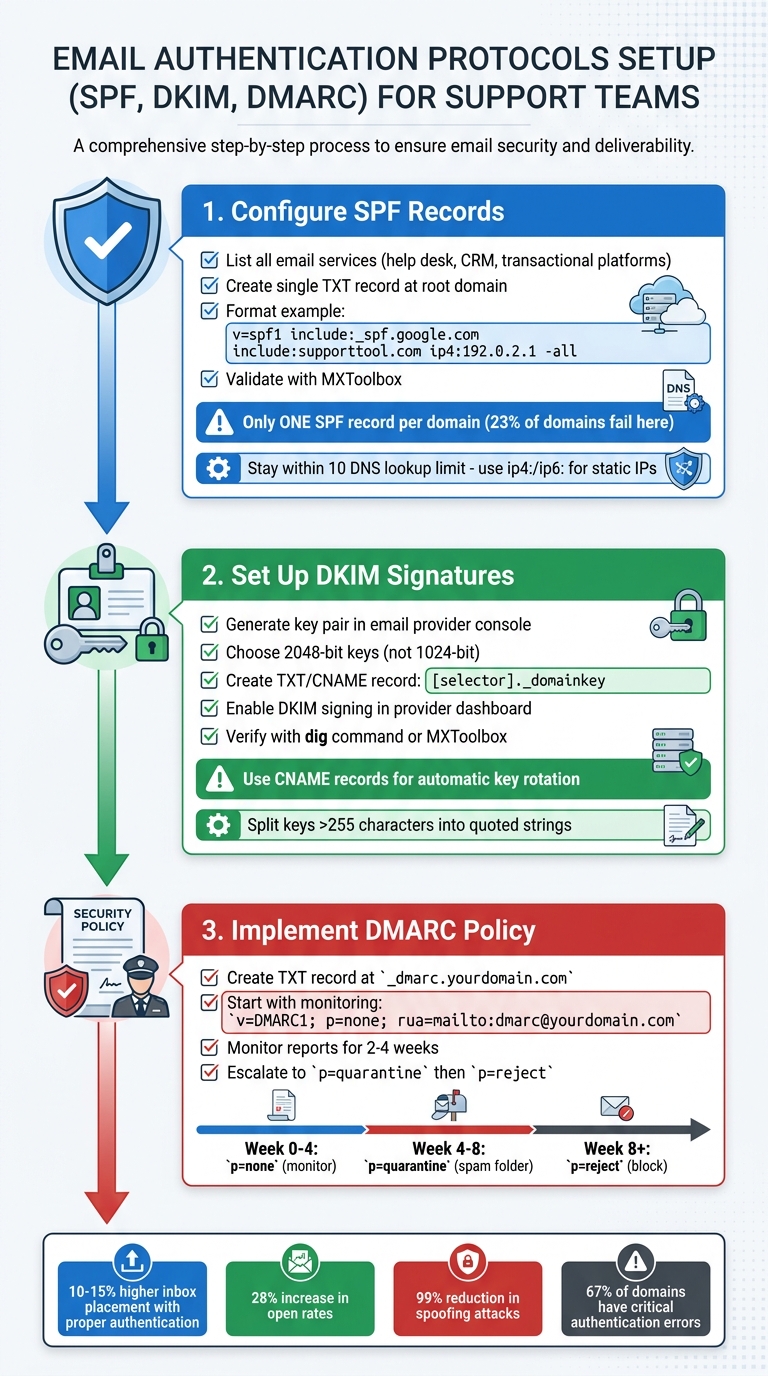
Setting Up SPF, DKIM, and DMARC
The order of setup is crucial. Begin with SPF, followed by DKIM, and finish with DMARC [7]. Here are key points to keep in mind:
- SPF: Be aware of the 10 DNS lookup limit. Exceeding this causes a "permerror", leading to authentication failure.
- DKIM: Use at least 2048-bit keys, as 1024-bit keys are now considered weak and may be rejected by major providers.
- DMARC: Start with a
p=nonepolicy (monitoring mode) for 2–4 weeks to collect data via reports. Afterward, you can transition to stricter policies likep=quarantineorp=reject.
Additional Tips
- Publish only one SPF record per domain to avoid conflicts.
- Use CNAME records for DKIM to enable automatic key rotation.
- Enable both RUA (daily aggregate summaries) and RUF (forensic alerts) DMARC reports for better visibility into authentication issues.
Understanding these fundamentals is essential for setting up and managing email authentication protocols effectively, ensuring your messages land where they’re supposed to.
How to Set Up SPF, DKIM, and DMARC
SPF DKIM DMARC Email Authentication Setup Guide for Support Teams
When it comes to email authentication, there’s a specific order: SPF first, then DKIM, and finally DMARC. This sequence is crucial since DMARC depends on the other two protocols to work effectively.
Configuring SPF Records
Start by listing all the email services your team uses, such as help desk tools, transactional email platforms, and CRMs. Each service must be authorized in your SPF record. To do this, create a single TXT record in your DNS settings at your root domain. The record begins with v=spf1, includes the authorized senders, and ends with a qualifier like -all for production environments.
For example, a support team’s SPF record might look like this:
v=spf1 include:_spf.google.com include:supporttool.com ip4:192.0.2.1 -all.
This record authorizes Google Workspace, your support platform, and a specific IP address. Only publish one SPF record – having multiple records is a common mistake that causes silent authentication failures for 23% of domains [3]. If multiple services are used, merge their details into one record.
Stay within the DNS lookup limit. For services with static IPs, use ip4: or ip6: mechanisms to avoid exceeding the limit [3][4]. After publishing, validate your SPF record using tools like MXToolbox to ensure it’s correctly configured. Once verified, move on to setting up DKIM for an added layer of security.
Setting Up DKIM Signatures
Log in to your email provider’s admin console (e.g., Google Workspace, Microsoft 365, or your support platform) and generate a DKIM key pair. Choose 2048-bit keys for stronger security [3][8]. Your provider will give you a selector (e.g., google or s1) and a public key.
In your DNS settings, create a TXT or CNAME record. The host should follow this format: [selector]._domainkey (e.g., google._domainkey), and the value will be the public key provided by your email provider. If your provider supports a CNAME setup, use it – it simplifies key rotation without requiring manual DNS updates [4]. Keep in mind that some DNS providers limit TXT records to 255 characters. If your DKIM key exceeds this limit, split it into multiple quoted strings within the same record [11][3].
Once the DNS record is added, return to your email provider’s dashboard and enable DKIM signing. To confirm the record is live, you can use the command dig TXT selector._domainkey.yourdomain.com +short in your terminal or check with an online tool like MXToolbox [11].
Implementing a DMARC Policy
After setting up SPF and DKIM, the final step is to enforce a DMARC policy. Create a TXT record at _dmarc.yourdomain.com with your policy settings. Start with a monitoring policy (p=none) to collect reports:
v=DMARC1; p=none; rua=mailto:dmarc@yourdomain.com; ruf=mailto:dmarc@yourdomain.com; pct=100.
This setup ensures all emails are delivered while sending daily aggregate reports (rua) and forensic alerts (ruf) to the specified email address [3][10].
Monitor these reports for 2–4 weeks to identify any legitimate senders failing authentication. Once everything aligns, update your policy to p=quarantine (sends failed emails to spam) and eventually to p=reject (blocks unauthorized emails entirely) [3][10][12]. If you’re a bulk sender, Google requires your spam rate to stay below 0.3%, as shown in Postmaster Tools, so keep an eye on these metrics during the transition [12].
Common Mistakes and How to Avoid Them
When it comes to email authentication, even small missteps can have a big impact. A 2026 audit of over 1,000 domains revealed that 67% had at least one critical authentication error [3]. These errors can silently disrupt email deliverability, sending legitimate messages to spam folders – or blocking them entirely.
Misconfigured SPF Records
One common issue is publishing multiple SPF records, which causes a permanent error. About 23% of domains examined in the audit faced this problem. Remember: you can only have one TXT record starting with v=spf1 [3]. For example, if you’re using Google Workspace alongside another email service, you’ll need to merge the entries into a single record like this:
v=spf1 include:_spf.google.com include:spf.example.com -all
This avoids the need for multiple records [3][4].
Another common mistake is exceeding the 10-DNS lookup limit, which happens when too many mechanisms like include:, a:, or mx: are used. This silent failure affected 12% of domains in the audit [3]. To fix this, replace some include: mechanisms with ip4: or ip6: addresses, as these don’t count toward the lookup limit [3][4].
"Using +all… is the equivalent of leaving your front door wide open with a sign that says ‘come on in.’"
– Akash Bhadange, AutoSend [4]
Using the +all qualifier is another critical error, found in 14% of domains. This essentially allows any server to send emails on your behalf. Always use -all for production environments after verifying all legitimate senders. And don’t forget: SPF records don’t automatically apply to subdomains. If you’re sending emails from a subdomain (e.g., support.domain.com), that subdomain needs its own SPF record [8][4].
Once your SPF setup is sorted, the next step is tackling DKIM-related issues.
DKIM Key Management Issues
The audit revealed that 11% of domains had DKIM disabled, even though their providers supported it [3]. Key management can be tricky, especially when it comes to rotation and record types. To simplify this, use CNAME records instead of TXT records whenever possible. CNAME records allow your provider to handle key rotations automatically, reducing the risk of failures caused by outdated keys [4][2].
Another common issue is sticking with 1024-bit keys. Instead, opt for 2048-bit keys for greater security. Pair this with CNAME records for smoother key rotation [3][4][2]. Additionally, 4% of domains encountered "Wrong DKIM Selector" errors, which occur when the selector in your DNS record doesn’t match the one used by your email server. Ensure your record is correctly placed at [selector]._domainkey.yourdomain.com, as specified by your provider [3].
DKIM misalignment is another frequent problem. Even if your DKIM signature is valid, DMARC will fail if the d= domain in the signature doesn’t match the "From" header. If you’re using multiple third-party services, like CRMs or helpdesks, ensure each service has its own unique DKIM record and selector to avoid conflicts [13][3].
After addressing SPF and DKIM issues, it’s time to review your DMARC policies.
Incorrect DMARC Policies
Nineteen percent of domains lack a DMARC record entirely, while 9% use a p=none policy, which provides no protection [3]. However, jumping straight to a p=reject policy without preparation can backfire.
"Jumping directly to p=reject is one of the most common and damaging mistakes organizations make."
– MailValid Team [8]
Instead, start with p=none and include the rua=mailto: tag to collect aggregate reports. Monitor these reports for 2–4 weeks to identify any legitimate senders failing authentication. Once you’re confident all valid senders are passing, transition to p=quarantine (which moves failed emails to spam) before eventually adopting p=reject [8][4][13]. Also, ensure the email address in your rua= tag exists and is actively monitored.
DMARC will fail if the domain in the "From" header doesn’t align with the domain validated by SPF or DKIM, even if those protocols pass individually [8][4]. To reduce alignment issues – especially for subdomains – use relaxed alignment settings (aspf=r and adkim=r), which allow subdomains to match your primary domain [8][4][2].
Finally, keep in mind that as of February 2024, both Google and Yahoo require DMARC compliance for bulk senders (those sending 5,000+ emails per day). Non-compliance can lead to outright rejection with error code 550 5.7.26 [8][3][6].
Monitoring and Improving Email Deliverability
Email deliverability isn’t a one-and-done task – it requires ongoing attention. A MailDeck audit of 1,000 domains conducted between January 2025 and March 2026 found that 67% of domains had at least one critical authentication error, even after their initial setup [3]. Teams that actively monitor and address authentication issues resolve failures three times faster than those who don’t [8].
Using DMARC Reports to Identify Issues
DMARC generates two types of reports: aggregate reports (RUA) and forensic reports (RUF). Aggregate reports, sent daily as XML files, summarize all IP addresses attempting to send emails on your behalf, along with SPF and DKIM pass/fail data [8][10]. Forensic reports, on the other hand, provide detailed information about failed authentication attempts, although privacy concerns often lead to redacted versions [8][10].
To make sense of these reports, tools like DMARC Analyzer, Postmark DMARC, or dmarcian can visualize the data, highlighting unauthorized senders, alignment issues, and whether your domain is ready to move from p=none (monitoring) to p=quarantine (spam folder) or p=reject (blocking) [10][4]. Domains with authentication pass rates below 95% should be investigated promptly [5].
"Staying on p=none is like installing a security camera but telling the guards to never actually stop anyone."
– Akash Bhadange, Founder, AutoSend [4]
Review your reports to ensure third-party tools, such as CRMs or helpdesk platforms, are correctly configured. If the domain in your "From" header doesn’t match the domain authenticated by SPF or DKIM, DMARC will fail [8][4]. Additionally, monitor bounce logs for SMTP error codes like 550 5.7.26 (DMARC policy failure) or 550 5.7.1 (SPF rejection) [8].
AI tools can further simplify this monitoring process by automating key steps.
Using AI for Continuous Monitoring
Manually analyzing DMARC reports can be time-consuming, but AI-powered tools simplify the process by automating detection and real-time alerting. These systems parse XML reports, flag anomalies, and send notifications via webhooks when authentication issues arise [5]. For instance, AI-driven platforms can automate the escalation of DMARC policies, gradually moving from p=none to enforcement over 4–8 weeks without requiring manual intervention [5].
"DMARC policy should start in monitor mode (p=none), then escalate gradually – a multi-step process that is error-prone without tooling."
– Nikita Stoletov, CTO, MailDeck [5]
AI tools also perform multi-layer pre-send checks, including syntax, MX, and SMTP validations, helping keep bounce rates below the 2% threshold that could harm your reputation [8]. They can track SMTP response codes, such as 421 deferrals or 550 rejections, to catch potential issues before they escalate into blocklisting [8]. Automated DKIM key rotation every 6–12 months adds another layer of security while reducing manual workloads [8][14].
Testing and Validating Email Authentication
Every time you make a change – whether it’s adding a new provider, updating DNS records, or altering email routing – you should validate your email authentication [14]. Start by manually inspecting email headers using "Show Original" in Gmail or "View Message Details" in Outlook. Look for "PASS" statuses for SPF, DKIM, and DMARC from the recipient’s perspective [13][2].
For basic checks, tools like MXToolbox, Mail-Tester, or Valydex Email Security Checker can verify your configuration and syntax [14][3][2]. Command-line utilities like dig or nslookup are useful for confirming DNS propagation [3][2][10].
To go deeper, ISP dashboards such as Google Postmaster Tools and Microsoft SNDS provide insights into domain reputation and authentication performance at major inbox providers [3][2]. These tools help you understand how your emails are perceived and identify potential issues early. Proper authentication can improve inbox placement rates by 10–15 percentage points compared to unauthenticated senders [8].
Conclusion
Email authentication is no longer a luxury – it’s a necessity for dependable support operations. Starting February 2024, Google and Yahoo will require SPF, DKIM, and DMARC for bulk senders (those sending 5,000+ emails daily), with Microsoft implementing similar rules by early 2025 [8]. Without these protocols, your support emails could fail to reach inboxes, often leading to errors like 550 5.7.26 [8].
When used together, these protocols create a strong defense, enhancing trust and improving email performance. For instance, organizations adopting all three have reported email open rates increasing by up to 28%. Additionally, enforcing DMARC alone can reduce spoofing attacks on your brand by nearly 99% [1].
Key Takeaways for Support Teams
To build a reliable support email system, these protocols are essential. Start with a diagnostic check using tools like MXToolbox or mail-tester.com to evaluate your current setup [3]. Follow these steps for implementation:
- Ensure each domain has a single SPF record.
- Upgrade DKIM keys to 2048-bit for added security.
- Roll out DMARC in phases: begin with
p=noneto gather data for 2–4 weeks, then move top=quarantineafter verifying legitimate sources, and finally enforcep=rejectfor full protection [3].
Authenticated senders experience inbox placement rates that are 10–15 percentage points higher than those without proper protocols [8]. To maintain this advantage, actively monitor your setup using DMARC reports, set up AI-driven alerts for any authentication issues, and validate configurations after DNS or provider changes. These practices should become part of your regular workflow [8].
FAQs
How do I know which systems need to be in my SPF record?
To set up your SPF record correctly, you need to identify all servers and services that are authorized to send emails on behalf of your domain. These typically include:
- Your domain’s mail servers: This could be your SMTP servers or any hosted email services you use.
- Third-party email services: Platforms like SendGrid, Amazon SES, or Google Workspace often send emails on your behalf.
- Other platforms using your domain: Any system or tool that sends emails under your domain name.
Make sure every authorized sender is included in your SPF record to prevent authentication issues.
What should I do if DMARC passes for some emails but support replies still hit spam?
If your DMARC is passing but support replies are still ending up in spam, the problem might be tied to email alignment or spam filters. Start by confirming that SPF and DKIM records align properly with the From domain used in support replies. Implement ARC (Authenticated Received Chain) to resolve any forwarding-related issues. Additionally, review the email content to ensure it doesn’t contain spam-triggering elements. Keep an eye on your DMARC reports regularly to spot alignment issues and make necessary updates to your DNS records.
How can I monitor DMARC without spending hours reading XML reports?
To make DMARC monitoring easier, consider using automated tools that transform XML reports into clear, user-friendly dashboards. These tools streamline the process by collecting DMARC data, presenting authentication results visually, and identifying email sources and policy enforcement. This saves you the hassle of manually sorting through raw XML files while keeping you updated on compliance and deliverability metrics with minimal effort.