When you switch to a new support platform, your emails might end up in spam due to changes in authentication settings, new IP addresses, or missing suppression lists. Here’s how to prevent that:
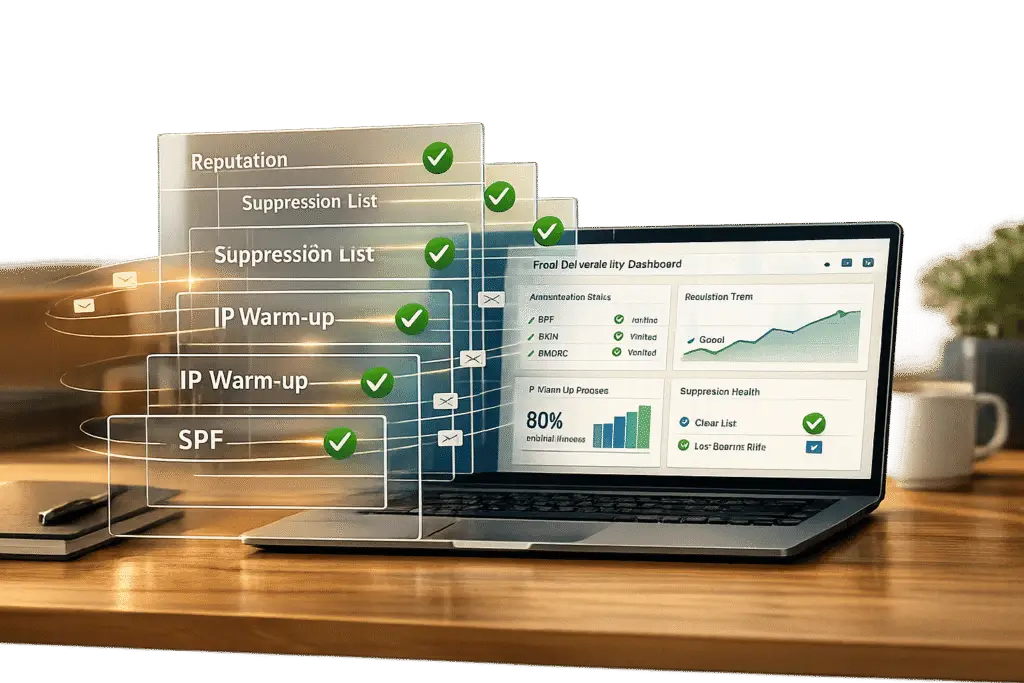
- Fix Authentication Settings: Update SPF, DKIM, and DMARC records for your domain. Ensure they’re correctly configured to pass email authentication checks.
- Warm Up New IPs: Gradually increase email volume from new IP addresses to establish a good reputation with mailbox providers.
- Migrate Suppression Lists: Transfer historical bounces, unsubscribes, and complaints to avoid sending emails to invalid addresses.
- Monitor Reputation: Use tools like Google Postmaster Tools to track your domain and IP reputation. Keep spam complaints under 0.1%.
- Test Before Sending: Check emails for spam triggers, clean formatting, and proper authentication using tools like Mail-Tester or GlockApps.
Key Tip: A "delivered" status doesn’t guarantee inbox placement. Always verify where your emails land and adjust your settings as needed.
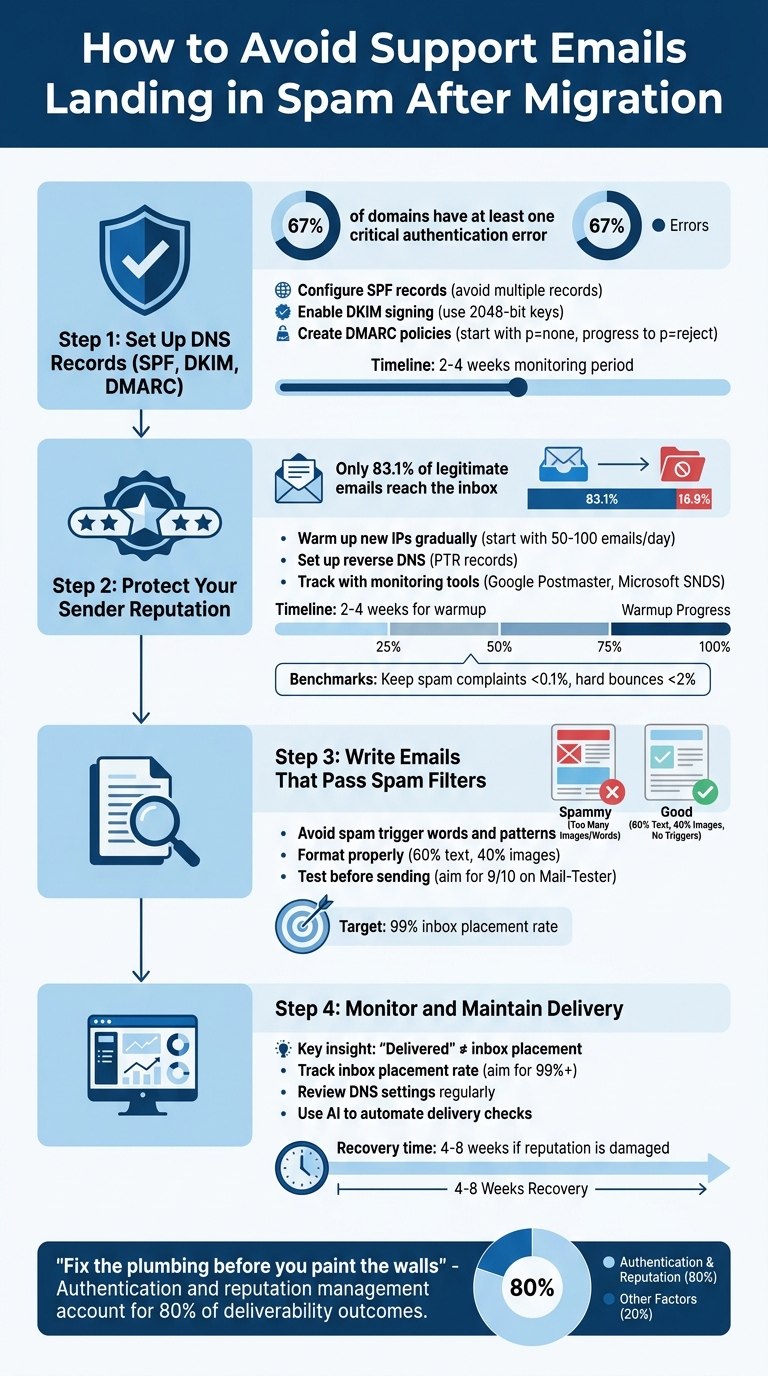
4-Step Process to Prevent Support Emails from Landing in Spam After Tool Migration
How to Migrate Email Platforms Without Killing Deliverability
sbb-itb-e60d259
Step 1: Set Up DNS Records (SPF, DKIM, DMARC)
Proper DNS authentication is essential after a migration – statistics show that 67% of domains have at least one critical error, and 23% contain multiple SPF records [8]. Understanding what each record does can make this process easier to manage.
Configure SPF Records for Your New Platform
SPF (Sender Policy Framework) helps receiving servers verify which IP addresses are allowed to send emails on behalf of your domain. When moving to a new platform, update your existing SPF record to include the new tool’s servers instead of creating a second record. Having multiple SPF records results in a permanent error.
Here’s an example of an SPF record:
v=spf1 include:_spf.google.com include:newtool.com -all
The "-all" qualifier tells receiving servers to reject emails from any unauthorized server. While testing, switch to "~all" for a soft fail, which flags unauthorized mail as suspicious without outright rejecting it.
To avoid exceeding the 10-lookup limit, replace some include: entries with static ip4: addresses. Additionally, lower your DNS TTL (time to live) to 300 seconds to speed up propagation. After updating, verify your record using tools like the dig command:
dig TXT yourdomain.com +short Or use an online service like MXToolbox for validation. Once SPF is in place, move on to securing DKIM signing to ensure email integrity during transit.
Enable and Test DKIM Signing
DKIM (DomainKeys Identified Mail) secures your emails by attaching a cryptographic signature, ensuring they remain unaltered during delivery. The new platform will generate a private key for signing emails, and you’ll publish the corresponding public key in your DNS records.
A typical DKIM record looks like this:
selector._domainkey.yourdomain.com
The "selector" (e.g., "google" or "k1") identifies the key used for signing. Use a 2048-bit key, as 1024-bit keys are becoming outdated and may be rejected by major providers.
Ensure DKIM alignment by having the platform sign emails with your domain. For instance, if the DKIM signature originates from newtool.com but the "From" address is support@yourdomain.com, DMARC will fail.
After publishing the DKIM record, send a test email (e.g., to a Gmail account). Open the email, click the three-dot menu, select "Show Original", and confirm that the authentication summary indicates "DKIM: PASS." Alternatively, send a test email to check-auth@verifier.port25.com for a detailed report.
Once DKIM is verified, you’re ready to implement DMARC policies to manage authentication failures.
Create and Monitor DMARC Policies
DMARC builds on SPF and DKIM by telling servers how to handle emails that fail authentication. Starting February 2024, providers like Google and Yahoo will require DMARC for senders delivering over 5,000 emails daily [8].
Begin with a monitoring-only policy, such as:
v=DMARC1; p=none; rua=mailto:dmarc@yourdomain.com
The p=none setting ensures no action is taken on failures – it simply generates reports. Run this policy for 2–4 weeks to identify any legitimate sending sources that may have been overlooked.
Once confident in your authentication setup, gradually increase the policy’s strictness. Start with p=quarantine (moves failed emails to spam) for another 2–4 weeks, and then move to p=reject (blocks failed emails entirely). This step-by-step approach minimizes the risk of blocking legitimate emails.
"The end goal is ideally a policy of p=reject." – Marcel Becker, Yahoo Postmaster [10]
The rua tag in your DMARC record sends daily XML reports detailing email authentication results. Use tools like Postmark DMARC to convert these reports into a readable dashboard. If you notice legitimate failures, revisit your SPF and DKIM settings to address the issues before enforcing stricter DMARC policies.
Step 2: Protect Your Sender Reputation and Configure IPs
What Sender Reputation Is and Why It Matters
Sender reputation is like the "credit score" of your email-sending efforts. It combines IP reputation (how trustworthy your sending server is) and domain reputation (your domain’s email-sending history)[12]. Email providers such as Gmail and Outlook use this reputation to decide whether your emails land in the inbox or get flagged as spam. On average, only 83.1% of legitimate emails make it to the inbox, meaning one out of six emails gets lost along the way[9].
Keep in mind: a "250 OK" response from an email server only confirms that your message was accepted for delivery – it doesn’t guarantee inbox placement. Additional filters assess your sender reputation after acceptance[5]. Gmail tends to weigh domain reputation more heavily, while Outlook puts more emphasis on IP reputation[6]. If you’re migrating to a new system, you’ll need to carefully manage both aspects to maintain deliverability. Once you’re clear on how reputation works, the next step is warming up your IPs.
Warm Up New IPs and Set Up Reverse DNS
New IPs start with no reputation, so blasting your entire email list on day one is a big no-no. Doing so can look like spammy behavior to email providers. Instead, begin with a small volume – send 50–100 emails per day, gradually doubling that every 2–3 days[7]. For the first two weeks, stick to sending emails to your most engaged contacts – those who’ve opened or clicked on your messages in the past 30 days. This helps generate positive signals like opens and replies, which boost your reputation[7].
Before sending any emails, make sure to configure a PTR record (reverse DNS). This ensures your IP address resolves to your mail server’s fully qualified domain name. Without this setup – or if the PTR record points to a generic hostname like vps12345.provider.com – many providers will reject your emails automatically[2]. Use the command dig -x YOUR.SERVER.IP +short to confirm that your IP resolves correctly to your mail server (e.g., mail.yourdomain.com)[2].
During the warmup process, aim to keep hard bounce rates below 2% and spam complaint rates under 0.1%[7][13]. If you notice deferral codes like "421" in your server logs, pause your volume increase for 2–3 days before resuming[13][2]. A full warmup typically takes 2–4 weeks, but recovering from a damaged reputation can take much longer – up to 4–8 weeks of consistent, clean sending[13][5].
Track Reputation with Monitoring Tools
Once your warmup is underway, keeping a close eye on your reputation is essential. Tools like Google Postmaster Tools provide real-time insights into your domain and IP reputation, using a four-level scale: Bad, Low, Medium/Fair, and High[4]. This free tool also tracks Gmail-specific delivery data and spam complaint rates. For Outlook and Hotmail, signing up for Microsoft SNDS lets you monitor IP reputation and other delivery metrics[2][6].
You can also check your IP’s standing with Talos Intelligence, Cisco’s reputation database. If your IP is rated as "Poor" or "Neutral", it could block your emails from reaching enterprise recipients[12][5]. Additionally, use MXToolbox to ensure your IP isn’t listed on any of the 100+ blacklists monitored by email providers[5]. If you’ve inherited a blacklisted IP, contact the blacklist operator to request removal before beginning your warmup[2].
Regular monitoring helps you stay ahead of potential issues. For example, Gmail starts aggressively filtering emails when spam complaint rates exceed 0.3%[7][5]. Staying proactive can save you from unpleasant surprises.
Step 3: Write Emails That Pass Spam Filters
With your DNS setup and sender reputation in good shape, it’s time to focus on writing emails that can avoid spam filters.
Words and Patterns That Trigger Spam Filters
Spam filters today are smarter than ever. They don’t just flag single "bad" words – they look for combinations of keywords that suggest spam. For instance, phrases like "urgency + money + guarantees" can immediately set off alarms[14]. Be cautious with language such as "Act now", "100% free", "Guaranteed", or "Limited time." Writing in ALL CAPS or overusing punctuation (like "URGENT!!!") not only catches the attention of filters but can also turn off your readers.
Pay special attention to your subject line. Avoid tricks like fake "Re:" or "Fwd:" prefixes that aim to mislead recipients into thinking the email is part of an ongoing conversation. Instead, make sure your subject line reflects the actual content of your email. If people feel deceived, they’re more likely to mark your message as spam.
Once your language is refined, you’ll want to ensure the email’s formatting is just as polished.
Format Emails for Better Delivery
The way your email is structured plays a big role in whether it lands in the inbox or the spam folder. Aim for a 60% text to 40% image ratio; emails with only images are more likely to be flagged[14]. Always include a plain-text version of your email alongside the HTML version. This not only improves compatibility across devices but also signals to spam filters that your email is legitimate[5].
Limit the number of links in your email – stick to 3 to 5 at most. Too many links can make your email look like a "link farm." Also, avoid URL shorteners like bit.ly, as they obscure the final destination and can look suspicious. Instead, use a branded subdomain (e.g., links.yourdomain.com) for tracking, and ensure the anchor text clearly matches the destination URL.
Clean HTML code matters, too. Messy code with broken tags or deeply nested tables can hurt deliverability. Use inline CSS for styling and keep the structure straightforward. Personalization also helps – address recipients by their first name if possible. Generic greetings like "Dear Friend" or "Valued Customer" can come across as impersonal and untrustworthy.
Once your email is formatted, the next step is to test it thoroughly.
Test Emails Before Sending
Before hitting "send", test your emails using specialized tools. Platforms like Mail-Tester can analyze your email for spam triggers, HTML quality, and proper headers, giving you a score out of 10. Aim for at least 9/10 to ensure high deliverability[15]. Tools such as GlockApps allow you to send test emails to accounts on major providers like Gmail, Outlook, and Yahoo. These tests show exactly where your message lands – in the inbox, promotions tab, or spam folder.
You can also do a manual check by sending the email to your own accounts on different platforms. This lets you see firsthand how your email performs. Keep in mind, even the best content can end up in spam if your technical setup isn’t configured correctly[14].
Step 4: Monitor and Maintain Email Delivery After Migration
After migration, keeping your email deliverability on track requires ongoing effort and smart automation. Establishing strong monitoring practices is key to identifying and resolving issues before they escalate.
Set Up Delivery Monitoring
The "delivered" metric only tells you that the server accepted the email (250 OK) – it doesn’t guarantee inbox placement[16]. To ensure your emails actually reach inboxes, track your inbox placement rate, aiming for 99% or higher for critical emails like support messages[16].
Building on the DNS authentication you’ve set up, confirm that these measures are successfully delivering emails to inboxes. Use tools like Google Postmaster Tools and Microsoft SNDS to verify your domain and monitor delivery metrics daily[16]. Pay close attention to key benchmarks: keep spam complaints under 0.1%, hard bounces below 0.3%, and ensure authentication passes exceed 98%[16]. Different email providers may surface issues at varying times, so monitor Gmail, Outlook, and Yahoo separately for better insights[16].
"The single most misleading metric in email marketing is the ESP’s ‘delivered’ rate. I’ve audited accounts showing 98% delivered but only 55% inbox placement." – Braedon, Mailflow Authority[16]
For added security, use DMARC rua reports to receive alerts about unauthorized senders[11]. During the first 2–4 weeks post-migration, keep your DMARC policy in monitoring mode (p=none) while you review these reports[8]. Once you’re confident everything is functioning as expected, move to stricter enforcement.
Review DNS and Email Settings Regularly
DNS settings aren’t a one-and-done task – they need consistent oversight. Conduct weekly blocklist scans and keep an eye on your domain reputation trends to catch potential problems early[1]. A study of over 1,000 domains found that 67% had at least one critical authentication error, with 23% having multiple SPF records that caused silent failures[8].
After making DNS changes, confirm propagation within 72 hours[3]. To speed up this process and allow for quick fixes, lower your DNS Time-to-Live (TTL) to 300 seconds (5 minutes) before making updates[3].
Email lists naturally decay by about 22.5% each year[17]. To maintain high engagement and safeguard your sender reputation, implement a sunset policy. Automatically suppress subscribers who haven’t opened or clicked an email in 60–90 days[11]. This practice ensures your list remains active and engaged.
Once your settings are under control, consider leveraging automation to simplify these routine checks.
Use AI to Automate Delivery Checks
AI-driven platforms can take over much of the heavy lifting in deliverability monitoring. Instead of manually reviewing DMARC XML reports or tracking SPF lookups, AI tools can audit your infrastructure, flag reputation dips, and send alerts before your domain risks being blacklisted[18]. This reduces manual workload while ensuring efficient, technology-supported operations.
Platforms like Supportbench use AI to verify DNS propagation, identify syntax errors (such as exceeding the 10-lookup SPF limit), and monitor reputation across different email providers[8]. These tools can also automate bounce management, immediately suppressing hard-bounced addresses to protect your sender reputation[5].
"The inboxes are gated, and the guards are armed with AI. By treating your email infrastructure as a critical asset… you ensure that when you hit ‘Send,’ your message… actually arrives." – Alexey Bulygin, Founder[18]
If your sender reputation takes a hit during migration, improvements can often be seen within 7–14 days, although full recovery might take 4–8 weeks[17]. Automated monitoring provides real-time updates on reputation recovery, helping you make informed adjustments to your email strategy.
Conclusion
To keep your support emails out of spam folders after a tool migration, focus on four key areas: authentication, reputation, content, and monitoring. Start with the basics – correctly configure your DNS records. SPF, DKIM, and DMARC are no longer optional. By 2026, these will be mandatory for all commercial senders, and they account for about 80% of deliverability outcomes. In other words, getting your infrastructure right matters far more than tweaking your email copy [6][11].
Your sender reputation is a critical asset, and the good news is that it moves with you across platforms. To protect it, warm up new IP addresses gradually over 4–8 weeks, suppress hard bounces immediately, and aim to keep your spam complaint rate below 0.10%. Remember, a "delivered" status doesn’t guarantee inbox placement – it only means the server accepted your email. Always verify where your messages actually land [5][11].
When it comes to crafting emails, make them spam-resistant and test rigorously. But as Braedon from Mailflow Authority wisely puts it: "Fix the plumbing before you paint the walls." In other words, while formatting is important, your priority should be proper authentication and reputation management [6].
Monitoring is the final piece of the puzzle. Tools like Google Postmaster Tools can help you track your domain reputation with major providers, while AI-driven platforms can simplify tasks like bounce suppression and reputation tracking. If your reputation takes a hit, recovery typically takes 4–8 weeks, so catching issues early is essential to maintaining trust with your customers [5].
FAQs
How do I tell if support emails are landing in spam vs. just ‘delivered’?
Delivery status reports simply confirm that emails were accepted by the recipient’s server – they don’t guarantee that the emails actually landed in the inbox. To figure out if an email ended up in the spam folder, you can examine the email headers and look for Authentication-Results. This will show whether SPF, DKIM, and DMARC checks passed. If these checks are successful but the email still lands in spam, it means filtering took place after the email was accepted. You can also use deliverability tools to verify authentication and identify whether emails are being flagged as spam.
What’s the fastest safe way to warm up new sending IPs after a migration?
The best approach is to gradually ramp up your email volume over a few weeks. Begin by sending 50–200 emails per day to your most engaged recipients. Once you’ve established a good baseline, increase your volume by 20–50% daily.
Keep a close eye on metrics like bounce rates, spam complaints, and sender reputation to ensure everything stays on track. Avoid running large-scale campaigns during this time, as they can hurt deliverability and undermine your efforts to build a strong sender reputation.
How do I migrate suppression lists so I don’t ruin my sender reputation?
Before starting your migration, make sure to export your complete suppression list from your current email platform. This list includes all "do not send" addresses, such as hard bounces and unsubscribes. By re-importing this list into your new platform before sending any emails, you can avoid triggering spam traps or generating complaints. Double-check that the list is accurate and up-to-date to help keep your bounce and complaint rates as low as possible.