Auditing your support tags monthly ensures clean data, smooth workflows, and reliable reporting. Messy tags lead to inefficiencies, misrouted tickets, and poor automation performance. By following a structured process, you can maintain an organized system that saves time and improves customer support operations. Here’s a quick summary:
- Why It Matters: Clean tags reduce inefficiencies, improve AI accuracy, and enhance decision-making.
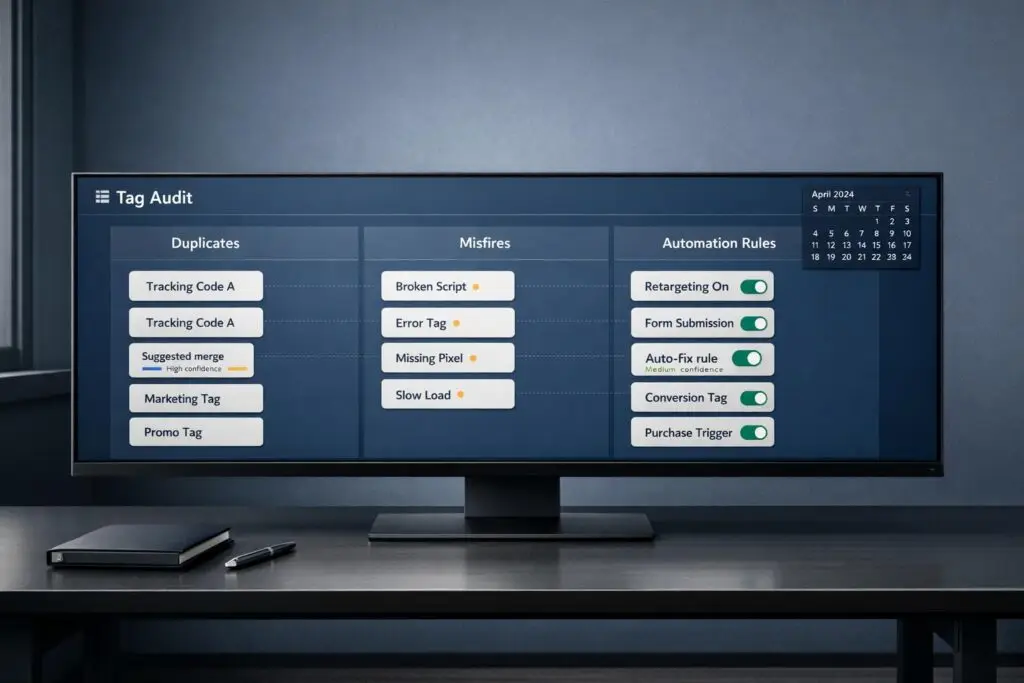
- Common Problems: Tag sprawl, duplicate tags, vague categories like "Other", and outdated tags.
- Steps to Audit:
- Review the top 50 new tags monthly and flag low-use tags.
- Assign ownership to a Support Operations Lead for consistent reviews.
- Create a centralized tag inventory with clear naming conventions.
- Test tags for accuracy and monitor their impact on workflows.
- Deactivate redundant or unused tags carefully to preserve historical data.
- Use automated customer support workflows to maintain long-term tag health.
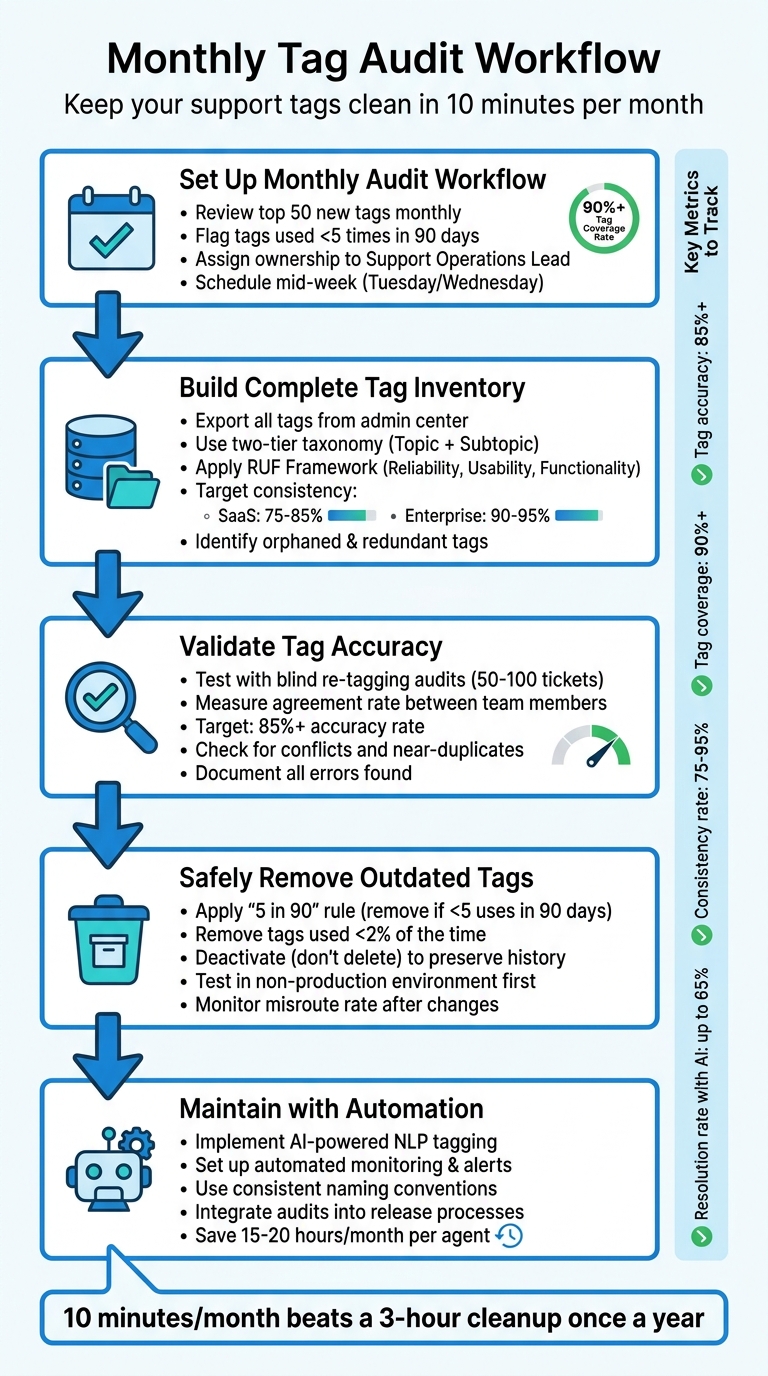
Monthly Tag Audit Process: 5-Step Workflow for Clean Support Data
Step 1: Set Up a Monthly Tag Audit Workflow
A solid tag audit workflow is the backbone of maintaining an organized and effective tag management system. By sticking to a monthly routine, you can keep your tagging system clean and usable over time.
Define Your Audit Scope and Frequency
Start by reviewing the top 50 new ticket tags from the previous month. Any tag that has been used fewer than five times in the last 90 days should be flagged for deactivation [3].
Monthly audits should also focus on spotting redundant or overly similar tags. For instance, tags like "billing_issue" and "bill-issue" can be merged into a single, consistent term [1][3]. Don’t overlook catch-all tags such as "Other" or "General Inquiry." These tags often obscure meaningful data trends [1]. Your goal? Achieve a tag coverage rate of 90% or more across live channels [3].
Assign Ownership and Responsibilities
Put someone in charge. A Support Operations Lead should take the reins for monthly audits, handling tasks like reviewing the top 50 new tags, consolidating duplicates, and archiving irrelevant ones [3].
To ensure accuracy, supervisors can conduct blind re-tagging audits. This involves manually re-tagging a random sample of about 50 tickets per week and comparing their tags to those originally assigned by agents. This hands-on approach can uncover misclassification issues that automated tools might miss [2][3].
Create an Audit Calendar and Documentation Plan
Timing matters. Schedule audits mid-week – Tuesdays or Wednesdays are ideal. This avoids the chaos of Mondays and ensures your team is focused, while steering clear of holidays or company closures when key team members might be unavailable [4].
Additionally, maintain a centralized glossary with concise, one-sentence definitions for each tag category. This prevents inconsistencies and ensures everyone on the team is on the same page [1].
"Ten minutes a month beats a three-hour cleanup once a year, and you keep reporting trustworthy for your agents and customers in the meantime" [3].
sbb-itb-e60d259
Step 2: Build a Complete Tag Inventory
Before diving into a cleanup, you need a clear understanding of what you’re dealing with. A full inventory helps uncover every tag in your system – including ones you might not even know exist.
List All Tags and Their Business Purposes
Start by exporting your entire tag list from the help desk admin center. For each tag, document its owner, purpose, and any workflows it supports.
To bring order to your tags, use a two-tier taxonomy model. This includes a required "Tier 1: Topic" for broad categories like Technical Issue or Billing, and an optional "Tier 2: Subtopic" for more specific contexts like Login Problem or Refund Request [1]. Pair this with the RUF Framework, which organizes tickets into three categories: Reliability (errors or performance issues), Usability (how-to or navigation questions), or Functionality (feature requests) [1].
Analyze tagging data from the past 30 days to identify which tags are actively used and which are just clutter. For reference, SaaS companies often aim for tag consistency rates between 75-85%, while larger companies with 500+ employees can achieve rates of 90-95% [2].
"If a tag doesn’t change how you handle a ticket or how you understand your support data, it’s adding noise instead of clarity." – Jake Bartlett, Writer and Customer Support Expert, Swifteq [1]
Find Orphaned or Redundant Tags
Once your tag list is complete, it’s time to weed out the ones that serve no purpose. Orphaned tags are those that exist in your system but aren’t tied to active workflows, triggers, or ticket categories [1][3]. Redundant tags occur when multiple tags mean the same thing, like billing_issue versus billing-issues or Payments versus Invoicing [1][3].
To identify these, create a master list of all tags and compare it with usage data from the last 90 days. Tags with zero usage are likely orphaned [3]. You can also apply the "Under 5" rule: any tag used fewer than five times in the past 90 days should be flagged for review, deactivation, or merging [3].
Look for synonyms or variations (e.g., "bill", "pay", "refund") that can be consolidated. Also, check for hidden or junk tags – these may come from automated systems or outdated integrations and might not appear in the agent interface but show up in reports [3].
Compile all this information in one place to make managing your tags easier moving forward.
Centralize Your Tag Inventory
To keep your tagging system organized and effective, maintain a centralized inventory that’s accessible to your entire team. This prevents tag sprawl, where similar or duplicate tags pile up, making reports unreliable.
Structure your tags into 3–4 top-level categories based on how they’re used for decision-making, such as product area, issue type, priority level, or customer attributes. This approach goes beyond a simple glossary by creating a hierarchy that helps both agents and automation systems make better choices.
Limit the creation of new tags to a select group of people to maintain consistency. Avoid clutter by using clear naming conventions like category_subcategory, so agents and systems can easily pick the right tags. For repeated reporting dimensions, use custom fields instead of tags. Tags should be reserved for more flexible or emerging labels, while custom fields provide structure for data analysis.
Step 3: Validate Tag Accuracy and Functionality
Now that you’ve built your tag inventory, it’s time to ensure those tags work as intended. Even the best-organized tags can lead to issues if they trigger incorrectly or capture the wrong data.
Test Tag Firing Logic
Start by testing how accurately your tags are working. Use methods like anonymous re-tagging audits and agreement rate testing to assess performance. For re-tagging audits, randomly sample 50–100 tickets weekly or monthly. Have supervisors re-tag these tickets without seeing the original tags. Compare the results to uncover patterns of misinterpretation or tagging errors [2].
Agreement rate testing involves multiple team members tagging the same tickets independently. Measure how often they agree on the tags. Aim for at least an 85% consistency rate before locking in your tagging guidelines [2]. If team members struggle to agree on tags, it’s a sign your taxonomy needs adjustment.
Pay close attention to tags like "other", "general", or "n/a." These catch-all categories often indicate rushed tagging or gaps in your taxonomy [1]. Also, monitor the reassignment rate – the percentage of tickets reassigned after initial routing. High reassignment rates often point to tagging precision problems, as routing logic is typically driven by tags, making AI-powered ticket routing essential for maintaining accuracy [3].
Once you’ve verified tag firing accuracy, focus on resolving conflicts that could compromise your data.
Check for Conflicts and Redundancies
Conflicts between tags can wreak havoc on reporting. Be on the lookout for near-duplicates such as billing_issue, billing-issues, and bill_issue – different names for the same concept. These inconsistencies fragment your data and make reporting unreliable [3].
Regularly audit recent tag entries to catch duplicates early. If your taxonomy has over 400 tags, it’s likely too complex for agents to navigate effectively. Consolidate similar tags to simplify the system [1].
For teams using AI-powered tagging, review the AI’s "justification" or "reasoning" for each tag. This ensures the AI’s logic aligns with your business goals [3]. Keyword-based tagging systems often scan for terms longer than two characters and apply the top three matches. Without monitoring, this can lead to irrelevant or "junk" tags cluttering your data [3].
After addressing conflicts and redundancies, document every error to guide future improvements.
Document Testing Results and Errors
Keep a detailed log of every error uncovered during validation. Note which tags are misfiring, how often they’re applied incorrectly, and the impact on routing or reporting. Organize this information in a centralized log, tracking the tag name, error type, frequency, and suggested fix.
Strive for an accuracy rate of 85% or higher when comparing sampled tickets to a human-reviewed "ground truth" [2][3]. Your tag coverage rate – the percentage of tickets with at least one tag – should reach 90% or higher for live channels [3]. These benchmarks vary by industry: SaaS companies typically achieve 75–85% consistency, while healthcare organizations often hit 85–95% [2].
Assign severity levels to each error. For example, a tag that occasionally misfires on low-priority tickets is less urgent than one that routes high-value customers to the wrong team. This prioritization ensures your cleanup efforts focus where they’ll make the most difference operationally.
Step 4: Safely Remove Outdated or Redundant Tags
Now that you’ve validated your tag list, it’s time to simplify your system. Removing unnecessary tags isn’t just about tidying up; it’s about ensuring your workflows remain efficient and your historical data stays intact.
Criteria for Identifying Tags to Remove
Start by identifying tags that see minimal use. Tags used less than 2% of the time often contribute more clutter than value [2]. A practical guideline is the "5 in 90" rule: if a tag has been applied fewer than five times in the past 90 days, consider removing or merging it [3].
Next, look for duplicate or overlapping tags. For instance, terms like "billing", "payments", and "invoicing" might all point to the same concept. Standardize on one term and eliminate the rest [1]. Similarly, avoid overly broad categories like "other" or "general inquiry." As Jake Bartlett, a Customer Support Expert, explains:
"If a tag doesn’t change how you handle a ticket or how you understand your support data, it’s adding noise instead of clarity" [1].
If your system has over 400 tags, it’s likely over-complicated. Consolidate to keep things manageable [1]. Also, remove tags tied to outdated products or past incidents – they no longer serve current needs and only add confusion.
Once you’ve flagged these tags, plan their removal carefully.
Test and Stage Tag Removals
Avoid deleting tags outright. Instead, deactivate them first to ensure historical ticket data and analytics remain intact [3].
Before implementing changes, test them in a non-production environment. This allows you to see how deactivating tags impacts routing rules, automation, and reporting dashboards. Always back up your tag data by exporting it as a CSV file, and verify the backup immediately to ensure it’s complete and accurate [5].
To monitor the changes, set up specific views in your support platform. These views help you track updates and identify any data integrity issues right after changes are applied [5].
Monitor Impact and Roll Back if Needed
After deploying the changes, keep a close eye on system performance. Pay attention to your misroute rate to ensure tag removals haven’t disrupted ticket routing [3]. Also, monitor metrics like time-to-first-touch to confirm tickets are still being assigned to agents promptly.
Review about 50 tickets weekly to check for accuracy. Ensure that tag accuracy remains above 90% and that at least 90% of tickets in live channels receive a tag, maintaining your operational benchmarks [3].
If you notice any decline in performance, your backup CSV allows for an easy rollback. Simply re-upload the file to restore deactivated tags. Modern AI tagging tools often provide an audit trail, making it easier to identify which specific tag removals caused issues [3]. This ensures you can quickly address any problems without disrupting your operations.
Step 5: Maintain Long-Term Tag Health with Automation
Once you’ve cleaned up your tags, the next step is making sure they stay organized and accurate over time. Manual audits can only take you so far – automation is the key to scaling this process and keeping your tagging system in check without constant hands-on effort.
Automate Tag Monitoring and Alerts
To catch issues early, set up automated systems that monitor tags and send alerts. Modern AI tools, powered by AI-driven sentiment analysis and natural language processing (NLP), can grasp context beyond simple keywords. For instance, they can avoid mistakes like confusing "cancel the cancellation" with a cancellation request [3].
You can also automate checks to flag low-usage tags during your monthly audits. Real-time validation is another helpful feature, as it identifies when agents stray from established tagging norms, allowing for immediate feedback and coaching [2].
These tools go beyond tags – they can automatically populate fields like priority levels, ticket types, and custom fields, ensuring consistent data across your system. This streamlined approach can save agents 15–20 hours every month [6][3]. This is a core component of a modern AI in customer support strategy.
Once monitoring is automated, the next step is to establish clear and consistent naming rules for your tags.
Implement Tag Naming Conventions and Templates
Consistency is critical for keeping your tagging system organized. Before diving into automation, set up clear naming conventions and test them until you achieve at least 85% consistency [2]. For example, use prefixes like "type-bug" for issue types or "p1-urgent" for high-priority tickets [6].
AI tools work best when they follow your rules. Modern systems can merge new tags with existing ones to avoid duplicates and adhere to your naming conventions, preventing "tag sprawl" [3]. High-performing teams aim for 95%+ tag accuracy [6].
To help AI tools interpret tags accurately, define your taxonomy in detail. Move beyond rigid keyword triggers by explaining what each tag represents and when it should be used. This allows AI to analyze historical data, recognize patterns, and adapt to specific industry terminology over time [6]. With this approach, your system keeps improving without constant manual updates.
Integrate Tag Audits into Release Processes
To keep your tagging system aligned with your product, make tag audits part of your release cycles. Whenever you introduce a new feature or update an existing one, review and update your tag taxonomy right away [1][2]. This prevents agents from creating one-off tags that lead to "tag bloat."
Schedule a quick 10-minute monthly audit to review the top 50 new tags created in the past 30 days. Use this time to merge duplicates and archive unnecessary tags before they pile up [3]. Taking these small, proactive steps saves you from larger cleanup efforts later.
Keep an eye on metrics like the misroute rate (tickets reassigned after initial routing) to gauge tagging precision [3]. If this rate spikes after a release, it’s a sign your tags need adjustment. Also, make sure at least 90% of tickets in live channels are tagged to maintain operational benchmarks [3]. Monitoring these indicators helps you catch potential issues early and ensures your tagging system stays effective and aligned with your overall support strategy.
Conclusion: Key Takeaways for Effective Tag Audits
Why Regular Tag Audits Matter
Conducting monthly tag audits keeps your operations running smoothly by ensuring your data remains reliable. This reliability allows AI systems to make better routing decisions and significantly reduce misroutes [3]. For instance, cleaning up redundant tags like "billing_issue" and "bill_issue" eliminates the confusion that slows down both your human agents and automated systems [3].
Top-performing SaaS teams maintain impressive metrics, such as 75-85% tag consistency and 92-98% tag coverage in B2B Enterprise settings. These numbers directly translate to quicker resolutions and happier customers [2]. Even dedicating a short amount of time each month to reviewing your top 50 new tags can ensure your reporting and decision-making stay accurate [3]. These benefits make it clear: regular audits are worth the effort.
Practical Steps to Get Started
To make the most of these benefits, start by auditing your new tags monthly. Focus on the most recent 50 tags from the past 30 days. Eliminate duplicates, deactivate tags with minimal usage, and remove overly broad categories that dilute your data [3][1]. To measure accuracy, randomly review 50-100 tickets and compare the tags applied by agents with the ideal tags they should have used [2][3].
For long-term success, consider integrating AI-powered natural language processing tools. These tools can automatically assign tags, set priority levels, and populate custom fields, all while adhering to your established naming conventions. With clean data, these systems can achieve resolution rates of up to 65% [3]. By adopting workflow automation, you’ll save time – no more spending hours every week manually classifying tickets – and see a quick return on your investment.
FAQs
What’s the fastest way to find which tags are actually hurting routing and reporting?
The fastest way to spot issues with tags is by looking at recent usage trends. Zero in on the most active tags from the past two months to identify redundancies, outdated tags, or ones being used incorrectly. This can reveal problems that might be messing with workflows or distorting data. On top of that, checking overall tag activity can help pinpoint inconsistencies that might be impacting routing efficiency or throwing off reporting accuracy.
When should we use custom fields instead of tags?
When you need to store permanent and specific data – like names, phone numbers, or birthdates – custom fields are the way to go. They’re perfect for tasks like creating personalized messages or generating detailed reports. Custom fields allow for data insertion and advanced filtering, making them indispensable for precise record-keeping.
On the flip side, tags are better suited for temporary or flexible attributes. Think of things like a customer’s current status or their participation in a specific campaign. Tags shine when it comes to segmentation and quick filtering, offering a simple way to group and manage data that’s likely to change over time.
How can we deactivate or merge tags without breaking automations or losing history?
To deactivate or merge tags without causing workflow interruptions, follow a careful process. Start by deactivating tags to stop new usage while ensuring existing tags still work. When merging tags, use bulk editing or an API to replace redundant tags with the preferred one. Double-check that automations are properly aligned with the updated tags. It’s best to carry out these changes during scheduled audits to minimize risks and maintain seamless workflows.