
Mapping customer portal fields to internal ticket fields is essential for keeping workflows intact and avoiding costly errors. Misaligned fields can lead to issues like lost data, misrouted tickets, and disrupted automations. This guide breaks down the process into simple steps:
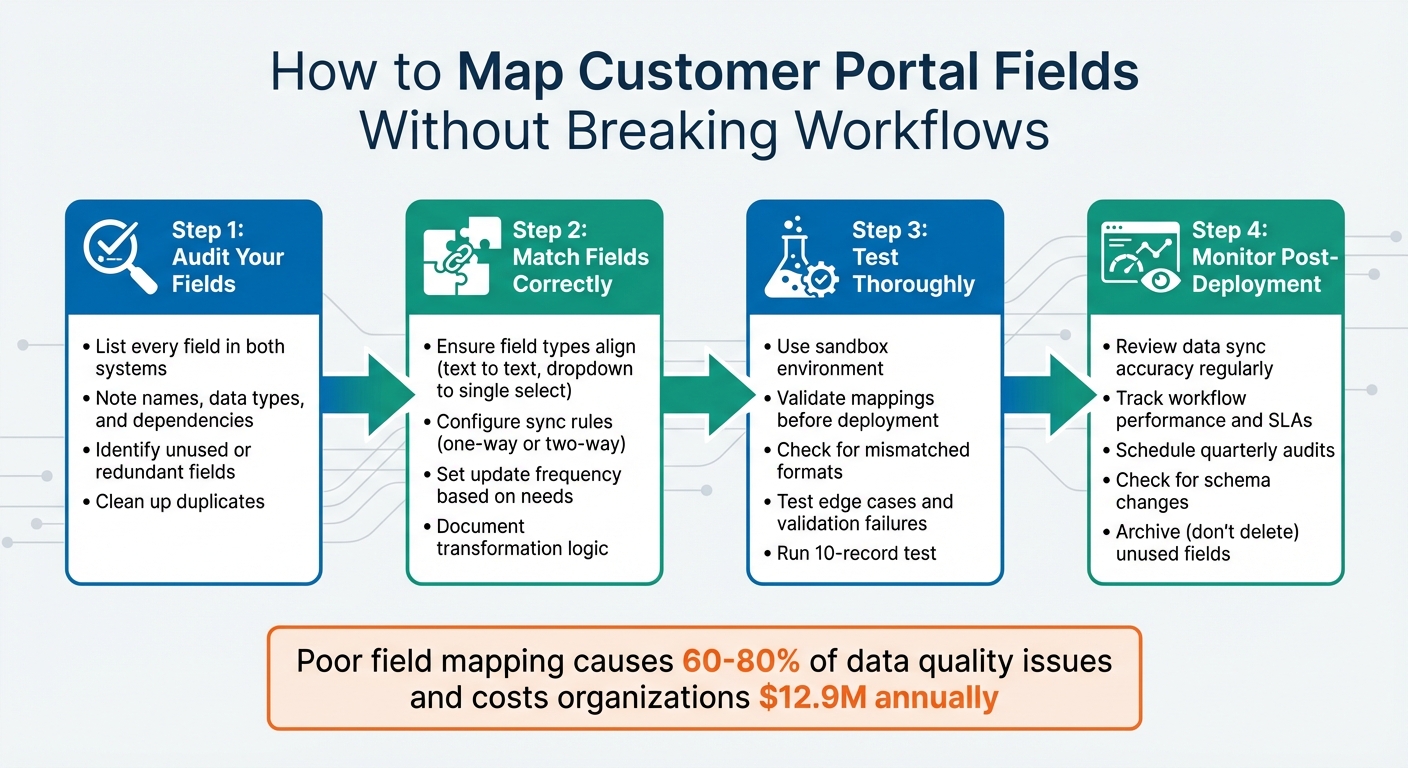
- Audit Your Fields: List every field in both systems, noting their names, data types, and dependencies. Identify unused or redundant fields and clean them up.
- Match Fields Correctly: Ensure field types align (e.g., text to text, dropdown to single select) and configure sync rules (one-way or two-way) based on your needs.
- Test Thoroughly: Use a sandbox environment to validate mappings before deploying. Check for errors like mismatched formats or validation failures.
- Monitor Post-Deployment: Regularly review data sync accuracy, workflow performance, and field usage to catch issues early.
Proper field mapping ensures smooth operations, accurate data, and reliable automations while reducing manual errors and delays.
4-Step Process for Mapping Customer Portal Fields to Internal Ticket Fields
Field Mapping Basics
Field mapping acts as the crucial translator between your customer portal and backend ticket system, defining how fields align across these platforms. Think of it as the bridge that ensures "cust_ID" in your portal correctly translates to "client_id" in your internal system. Without this connection, data can easily get lost, misrouted, or misinterpreted, leading to operational headaches.
Here’s a startling fact: poor field mapping is responsible for 60–80% of data quality issues and costs organizations an average of $12.9 million annually[4]. Imagine a scenario where "Urgent" in your portal doesn’t align with a numeric priority like "P1" in your internal system. This kind of mismatch can break automations, disrupt SLA timers, and require manual fixes, slowing everything down.
Customer Portal Fields vs. Internal Ticket Fields
Customer portal fields are designed to capture user-facing data, such as contact information or priority levels. On the other hand, internal ticket fields handle backend processes, including details like assignee names, status codes, or workflow triggers. The challenge lies in reconciling differences between these field types – things like character limits, required fields, or formats (e.g., date formats, dropdown options, or case sensitivity). For instance, your portal might label a field as "Company Name", while your CRM expects it to map to "Account_Name."
Why Consistency in Field Mapping Matters
Inconsistent field mapping creates what Richie Aharonian, Head of Customer Experience & Revenue Operations at Unito, describes as "compression points" – places where critical data gets lost because the receiving system doesn’t have an equivalent field to capture it[3].
"Every handoff is a compression point. Information gets compressed into whatever the receiving system can accept. Everything else either gets manually summarized in a comment… or simply disappears."
- Richie Aharonian, Head of Customer Experience & Revenue Operations, Unito[3]
For example, if your portal has a "Customer Impact" field but no matching field exists in your internal system, that valuable context could vanish. This loss can delay resolutions and lead to repetitive troubleshooting. Worse, SLA timers may fail to pause or resume correctly when status fields don’t sync, creating "automation black holes" where tickets remain untracked or unresolved.
When field mapping is consistent, data stays organized and actionable. Instead of dumping information into unstructured comment boxes, well-mapped fields allow for precise ticket filtering, trend tracking, and accurate KPI measurement. This structure is essential for AI-powered routing and automated categorization, as clean, properly mapped data keeps your automation tools running smoothly.
With these fundamentals in mind, take time to audit your current field mapping setup. Identifying and addressing any gaps now can save you from bigger issues down the line.
sbb-itb-e60d259
Step 1: Audit Your Current Field Setup
To kick off your field mapping process, start by auditing your existing field setup. This step is crucial for maintaining smooth workflows. Before diving into mapping, take time to document every field in both systems. For each field, note down its name, internal ID, data type (e.g., Checkbox, Date, Dropdown, Numeric, Rich Text, Text), and whether it’s required [5].
Create a comprehensive spreadsheet that lists fields from both systems side by side. This will help you spot naming inconsistencies (like mismatched field labels) and ensure required formats, such as date formats like mm/dd/yyyy, are noted [5]. By listing and categorizing fields, you can identify overlaps and irregularities that might otherwise go unnoticed.
List and Categorize All Existing Fields
Start by pulling detailed information about fields from both platforms. Include metadata like validation rules, character limits, and placeholder text to better understand each field’s format [5]. Group fields by their purpose – for example, contact details, priority levels, workflow triggers, or reporting metrics. This categorization will make it easier to identify duplicate fields, such as when both a "Category" and a "Ticket Type" field are being used for the same purpose. Proper grouping ensures that syncing during mapping goes smoothly.
Find Redundant or Unused Fields
Examine your records for custom fields that frequently return null or empty values. Pay attention to fields that are tied to triggers, automations, or reports. If you decide to delete a field, remember that dropdown or checkbox fields retain their data as tags, while text fields lose their data permanently.
For overlapping fields – like "Product ID" and "Product Name" – consider combining them. You can use concatenation features to merge multiple fields into a single destination text field, which helps reduce clutter. If dropdown options overlap, consider a many-to-one mapping approach where several specific portal options map to one broader internal category. Always test field removal or remapping in a sandbox environment first. Removing a field without testing could disrupt hidden dependencies, causing unexpected issues. Cleaning up redundancies not only improves data quality but also ensures workflows remain reliable.
Document Field Dependencies and Automation Rules
Field dependencies control what options users see based on their selections. Documenting these dependencies is key to avoiding mapping errors and supporting automation [6].
"With dependencies in place, there’s no longer a need to enforce additional validation rules in guiding data entry – one less thing to worry about!" – Mariel Domingo, Technical Content Writer, Salesforce Ben [6]
Review picklist values, both active and inactive, to ensure they don’t conflict with automation rules [6]. If your system uses multiple record types, document these dependencies carefully to confirm mapped values align with the record types used by different teams [6]. Some platforms, like Salesforce, don’t allow field dependencies to be removed through the Metadata API, making thorough documentation critical. Once deployed, these dependencies can be difficult to undo [7]. Proper preparation here ensures workflows stay intact and users only see relevant options during data entry.
Step 2: Map Fields While Preserving Workflows
Now it’s time to configure the mappings. This step demands attention to detail – any mismatched field types or poorly set sync rules can disrupt automations and support processes. The aim here is to link customer portal fields to internal ticket fields in a way that keeps workflows intact and ensures data remains accurate. Essentially, you’re building on your earlier audit to create a seamless connection for every data field.
Match Field Types and Data Structures
Your audit documentation is your guide for this step. Field types between systems must align to avoid data loss or errors during syncing. For example:
- Text fields should map to other text fields.
- Number fields should connect to number fields.
- Date pickers should sync with date or datetime fields.
When the field types don’t match, you’ll need to convert the values appropriately. For instance, a Boolean checkbox can be mapped to dropdown options like "true" and "false."
If needed, you can also merge fields – combine multiple source fields like "Assignee" and "Priority" into one destination field. Additionally, create custom fields for data that shouldn’t be edited, such as unique IDs [1]. This step ensures no data is lost or rejected during syncing.
Configure Sync Rules and Update Frequency
Decide how data will flow between systems by setting up sync directionality. Here’s a breakdown:
- One-way sync: The source system acts as the authority. This works well for scheduled exports.
- Two-way sync: Data flows in both directions, but it requires conflict resolution rules. For example, you can use timestamp-based precedence or a system-of-record hierarchy to resolve conflicts.
Next, choose the update frequency based on your workflow needs. For urgent tasks like support tickets or incident management, real-time sync is ideal. On the other hand, scheduled batch syncs (hourly or nightly) are better for handling large volumes of data without hitting API limits.
Test Mappings Before Going Live
Before deploying your mappings, thorough testing is a must. Never push field mappings directly to production. Instead, use a sandbox or test environment to ensure everything works as expected. Validate that ticket fields, priorities, and statuses show up correctly [8]. Many platforms even offer a "Test User" feature within their workflow editors to help preview mapping results [9].
Run a trial sync to confirm data accuracy [8]. Test for edge cases by tweaking the mapping, and double-check that all mandatory fields are properly mapped to avoid errors. Keep an eye out for silent failures, which can happen due to permission issues. Also, remember that some systems don’t allow updates to closed tickets, which could lead to unexpected sync failures. Proper testing ensures your workflows stay consistent across systems.
Step 3: Avoid Common Field Mapping Errors
Even with the best intentions, mistakes in field mapping can throw your workflows off track. These errors often stem from rushing the process or over-relying on automation without fully understanding your business needs. As Trent Little from Evenbound aptly warns:
"The fastest way to amplify chaos in your business is to automate a messy process" [10]
Spotting and addressing these issues early is crucial to keeping your workflows smooth and your data accurate.
Don’t Map Too Many Fields at Once
Start small. Focus on mapping only the fields that are absolutely necessary. This keeps things manageable and reduces the risk of errors. Prioritize fields that are critical to key operations, like ticket routing, SLA tracking, and customer communication, over optional metadata.
Avoid depending entirely on auto-mapping tools. Instead, document your mappings carefully using a four-column approach: Source Field, Destination Field, Field Type, and Transformation Logic. Before launching your setup fully, conduct a controlled test – often called the "10-Record Test" – by manually syncing a small batch of diverse records. This helps catch potential issues before they escalate [10].
Once you’ve tackled the essentials, shift your focus to ensuring that the data for each field is clean and consistent.
Watch for Data Validation Mismatches
Different systems often have their own validation rules, and mismatches between them can cause syncing errors. For example, one system may allow 500 characters in a field, while another caps it at 255. Similarly, semantic differences – like "High/Medium/Low" in one system versus numerical codes in another – can lead to issues [2].
Data quality problems are no small matter. Businesses lose an estimated 15–25% of revenue opportunities due to poor data, and sales teams often spend up to 30% of their time fixing these issues [11]. To avoid these pitfalls:
- Configure fallback values for optional fields to prevent blank entries from causing sync failures.
- Expand field capacities in your internal systems if needed.
- Use synthetic data in a sandbox environment to rigorously test your mappings.
- Clearly mark required fields early in the process to avoid sync blocks [2] [11] [10].
Once validation issues are resolved, the next step is to protect sensitive data through proper access controls.
Set Proper Permissions and Visibility Controls
Field mapping isn’t just about moving data – it’s also about deciding who gets to see and modify it. Internal ticket fields often include sensitive details, like cost estimates, internal notes, or escalation paths, which should be hidden from external users.
Define roles with specific permissions to control access. For instance, a view-only role might allow team members to see ticket details without making changes, while an edit access role enables updates to assignments, statuses, and priorities. Metadata-driven permissions can even automate role assignments based on attributes like department or region [12].
| Permission Level | Capabilities | Use Case |
|---|---|---|
| View Only | Can see all ticket info; cannot change status, priority, or assignment | Employees who need visibility but not editing rights |
| Edit Access | Can change assignments, status, priority; add comments and sub-tickets | Managers or team leads responsible for ticket resolution |
If your system uses single sign-on (SSO), map SSO attributes to user metadata. This ensures users are automatically assigned to the correct ticket groups and permission levels when they log in. It’s an effective way to minimize manual management and reduce the risk of exposing sensitive internal fields [12].
Step 4: Validate and Monitor After Deployment
Once deployment is complete, the work isn’t over – continuous validation is essential to catch small errors before they snowball into major workflow disruptions. Skipping this step can lead to significant issues with operations and data quality. As Tom Redman, also known as the Data Doc, aptly states in the Harvard Business Review:
"The cost of bad data is an insidious tax on your business. You’re paying for quality problems you don’t even know you have." [11]
After configuring and testing your field mappings, it’s crucial to keep validating and monitoring to ensure your workflows and data remain accurate and aligned with your business needs. This ongoing process helps maintain smooth operations and prevents errors from creeping in as your systems and requirements evolve.
Check Data Sync Accuracy
Start by conducting side-by-side comparisons between your customer portal and internal ticketing system. For datasets larger than 100,000 records, sample at least 5%; for smaller datasets, increase the sample size to 20% [11]. Focus on identifying issues like data truncation, mismatched formats, or incorrect data types.
Make it a habit to review deployment logs. The "Deployment Status" page is a valuable resource, offering success and failure logs from the API. During post-deployment validation, confirm that every mandatory field is correctly mapped. Additionally, check sync triggers to ensure the JSON body structure hasn’t been unintentionally altered – minor changes can cause full sync failures.
These checks naturally feed into the next step: monitoring the overall workflow performance.
Track Workflow Performance and SLAs
Field mapping errors can disrupt automation rules and SLA timers if left unchecked. Use tools like your platform’s "Task History" or "Event Logs" to confirm that field updates trigger the intended downstream actions. Keep an eye on sync timing – some fields update in real time, while others, such as specific URLs or IDs, may only sync during the initial ticket creation and won’t update afterward.
Another critical area to monitor is schema changes, which can silently break your mappings. Many integration settings pages flag errors when a mapped field or dropdown option is removed from either system. If you encounter an issue, use the "pause" feature to halt data synchronization immediately. This prevents further data corruption while you troubleshoot. Also, check that dropdown options are consistently mapped – avoid one-to-many mappings, as they can lead to unpredictable routing and automated workflows.
Review Mappings Regularly
As your business evolves, your field mappings should adapt too. Schedule recurring audits – quarterly reviews are a good starting point for most teams. Features like "Shared Mappings" can help you manage configurations across multiple projects, ensuring consistency as updates are made [1]. These regular reviews allow you to refine mappings over time, keeping operations efficient and aligned with current needs.
Don’t forget to check task logs for recurring sync errors [13]. If you’ve updated a field mapping and need to correct existing records, use "Hard Resync" or "Resync" features to realign the data manually [1]. Always test updates in a sandbox environment before applying changes to live data [13].
Pay attention to details like character limits when merging multiple fields into one. Concatenated data can easily exceed the destination field’s capacity, leading to truncation [1]. Also, remember that field syncing is often case-sensitive. Mismatched capitalization between systems can result in sync failures or trigger incorrect workflows, so double-check for consistency.
Conclusion
Successfully mapping customer portal fields to internal ticket fields requires thoughtful planning and regular updates. Start by revisiting your initial field audit to verify dependencies and automation rules. When mapping, ensure data types are compatible – for instance, aligning a portal "Dropdown" field with an internal "Single Select" field – and set clear synchronization rules to avoid conflicts [16]. These steps create a solid foundation for efficient and sustainable workflows.
Once your mapping is in place, post-deployment validation becomes essential. As Richie Aharonian, Head of Customer Experience & Revenue Operations at Unito, explains:
"Handoffs fail when workflow design treats them as clean boundaries instead of translation points that compress information" [3].
Perform monthly validations to confirm that field statistics, mandatory field usage, and mapping accuracy remain consistent [15].
When fields are no longer needed, archive them instead of deleting. Deleting dropdown choices can result in null values for mapped data, which may corrupt historical records and disrupt automations [14]. Archiving fields preserves historical data, which is valuable for analytics and ensures smoother transitions as your operations grow.
FAQs
What’s the minimum set of fields I should map first?
Begin by aligning key ticket attributes to maintain seamless workflows and operational stability. Focus on essentials like ticket ID, status, and priority to track the ticket lifecycle and manage urgency effectively. Incorporating categorization fields – such as type or category – can further enhance routing and reporting capabilities. This foundational setup ensures workflows, SLAs, and reporting processes remain intact during migration, helping to minimize any potential disruptions.
How do I handle dropdown values that don’t match between systems?
To address mismatched dropdown values, start by auditing and documenting the options available in both systems. Once you’ve got a clear picture, create a mapping plan to align these values. If some options don’t have a direct match, consider standardizing or consolidating them to maintain consistency across the systems.
Use tools like spreadsheets to track your mappings, which makes it easier to organize and review. Before rolling out any changes, test your plan with a small data set to catch potential issues early. If the target system lacks fields to accommodate unmatched values, create or update custom fields as needed to ensure everything fits seamlessly.
How can I detect and fix silent sync failures after launch?
To spot and address silent sync failures, keep an eye on field mappings for potential issues such as mismatched data types, inconsistent naming conventions, or constraints that could lead to data corruption or omissions. Regularly run validation checks, test migrations, and conduct data audits to catch problems before they escalate. Standardizing field names and data types can help reduce errors, while AI-powered tools can automate the process of detecting and fixing issues, ensuring your workflows stay smooth and dependable.
Related Blog Posts
- How do you map Zendesk fields, tags, and statuses to a new help desk correctly?
- How do you map Salesforce Case fields, Record Types, and Statuses to a new helpdesk?
- How do you map Kayako statuses, priorities, and custom fields to a new helpdesk?
- How do you map Help Scout mailboxes, workflows, and statuses to a full helpdesk?