Switching from Kayako to a new helpdesk can be challenging, especially when mapping ticket statuses, priorities, and custom fields. These elements are critical for maintaining workflows, SLA commitments, and data integrity. Missteps during migration can disrupt operations, cause data mismatches, or lead to incomplete records.
To ensure a smooth transition:
- Document Your Current Setup: Review Kayako configurations, custom fields, and agent roles. Identify active vs. inactive elements.
- Define New Platform Requirements: Understand your new helpdesk’s field types, required fields, and limitations.
- Clean Up Data: Remove duplicates, spam, and outdated records. Standardize agent emails and decide how to handle inactive accounts.
- Map Key Elements:
- Statuses: Align Kayako’s statuses (e.g., "Open", "Resolved") with the new system. Create custom statuses if needed.
- Priorities: Ensure priority levels (e.g., "Low", "Urgent") match their intended functions in the new platform.
- Custom Fields: Match field types (e.g., String, Boolean) and values carefully to avoid errors.
Test all mappings through a demo migration with a small ticket batch. Address issues like data mismatches or missing fields before proceeding with the full migration. Validate the results by checking ticket accuracy, workflows, and SLAs in the new platform. Pausing automations during migration helps avoid interruptions.
Done right, this process ensures your team retains the context and workflows needed to provide effective support.

Complete Kayako Migration Mapping Process: 4 Essential Phases
How Help Desk Migration Wizard Works | Step-by-Step Migration Guide
sbb-itb-e60d259
Preparing for the Mapping Process
Before transitioning from email to a helpdesk or starting a data migration, it’s essential to have a clear understanding of what you’re working with. Missing or incomplete documentation can lead to workflow disruptions and a lot of cleanup. How well you prepare will determine whether your migration is quick and efficient or drags on for weeks. These steps will help you set the foundation for a smooth, migration-ready process.
Review Your Kayako Configuration
Start by thoroughly documenting your Kayako setup. Take note of all custom fields and their types – such as String, Boolean, Date, Number, Select, or Multi-select – and identify which ones are actively used versus those that are inactive. It’s equally important to map out your agent directory. Kayako differentiates between agents (who interact with customers) and collaborators (who focus on internal communication). You’ll want to confirm each person’s role and whether their account is active, inactive, or deleted.
The structure of your knowledge base is another critical piece. Document the hierarchy of categories and sections to ensure you can replicate the same organization in the new system. Don’t overlook technical details like CC users, inline images in articles, or HTML settings, as these may not transfer automatically and could require extra attention.
Determine Your New Helpdesk Requirements
Once you’ve documented your current setup, define the technical and operational needs for your new helpdesk. This is where you identify potential challenges, such as attachment size limits or differences in how custom fields are handled. Pay special attention to required fields in the new platform. If certain fields are mandatory for ticket processing, you’ll need a plan to address any gaps in your data.
Involve your support team in this process by running a demo migration of 20 random tickets. This trial run will show how field mappings, attachments, and agent assignments appear in the new system, giving you a chance to make adjustments before committing to the full migration.
Clean Up Your Data Before Migration
With your documentation and requirements in place, it’s time to streamline your data. Start by filtering out spam and duplicates to reduce the volume. Use criteria like creation dates, tags, or custom fields to decide what’s worth keeping. For inactive or deleted agents in Kayako, determine if their tickets should be reassigned to an active admin or mapped to a default "unassigned" agent.
Attachments can be a major bottleneck during migration. To speed things up, consider skipping files older than 12 or 24 months, especially if they’re unlikely to be needed. Also, ensure that agent emails in Kayako match those in the new system – mismatched emails can disrupt ticket assignments. Taking the time to standardize your data now will minimize errors and make the import process much faster.
"Clean up old data: Review your existing platform and decide what’s worth keeping. Leave behind records you’ll never use."
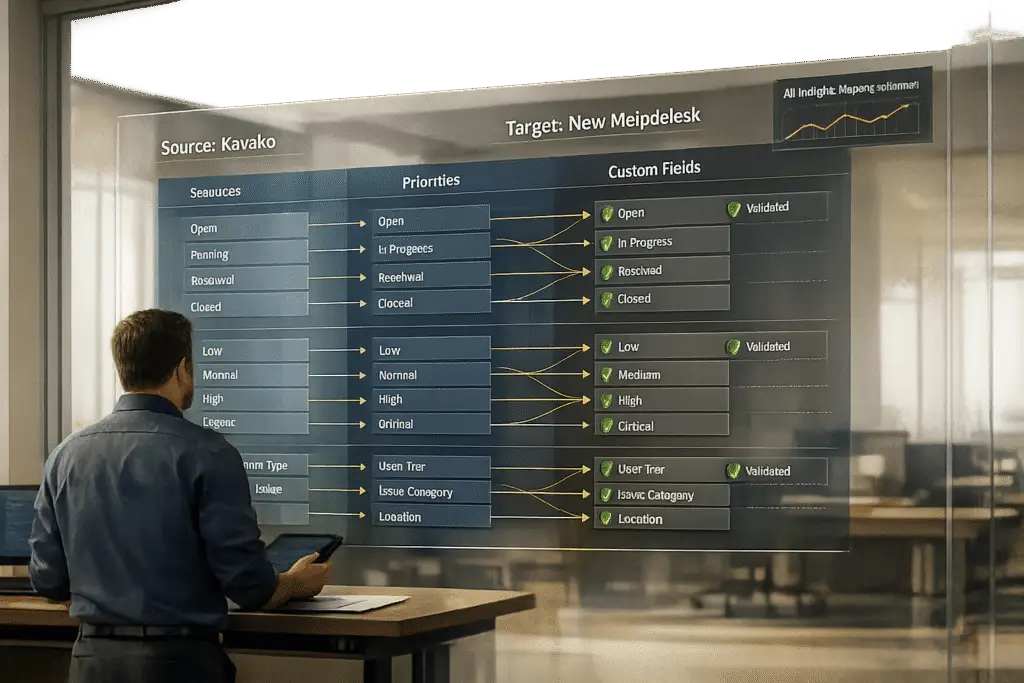
How to Map Statuses, Priorities, and Custom Fields
Once your data is clean and properly documented, it’s time to map Kayako’s configurations to your new helpdesk system. This step ensures that ticket statuses, priority levels, and custom fields transition seamlessly, preserving workflows and critical information without disruption.
Mapping Ticket Statuses
Begin by identifying all the ticket statuses currently in use in Kayako. These typically include common statuses like Open, Resolved, and Closed, along with any custom statuses your team has created. To get a complete list, navigate to the Kayako Agent area and go to Administration > Customization > Custom fields. Compare this list against the status options available in your new helpdesk platform.
If your new system has equivalent statuses, the mapping is straightforward. For statuses without a direct match, assign a default value to avoid leaving any tickets unclassified. For instance, if Kayako has a "Pending Customer" status but your new platform doesn’t, you might map it to "Open" or create a similar custom status before migration.
Modern migration tools often include automation features to simplify this process. These tools can apply your mapping rules during the data transfer, eliminating the need for manual updates. Always run a demo migration to verify that your mappings work as intended.
Once ticket statuses are aligned, move on to synchronizing priority levels to maintain SLA consistency and workflow efficiency.
Mapping Priority Levels
Kayako’s priority levels – Low, Normal, High, and Urgent – must align with the structure in your new helpdesk system. This alignment is essential to ensure SLA timers, escalation rules, and routing logic remain intact. Misaligned priorities could lead to workflow disruptions or missed critical tickets.
If your new platform uses different terminology, match the priorities based on their intended function. For example, a ticket marked as "Urgent" in Kayako should still receive the same level of attention in the new system. Document these mappings in a spreadsheet or table to help your team understand the changes and expectations after migration.
With statuses and priorities mapped, the next step is to tackle custom fields, which often require extra attention.
Mapping Custom Fields
Custom fields can be challenging because they are tailored to your business needs. Kayako supports various field types, including String, Boolean, Date, Number, Select (drop-down), and Multi-select. Each field type must map to a compatible type in your new helpdesk to maintain data accuracy and reporting functionality.
Before migrating, create the corresponding custom fields in your target platform. Some migration tools can auto-create missing fields during the process, but this requires careful review to ensure field names, types, and values are correctly matched.
Pay extra attention to mandatory fields. If a field is required for ticket processing, you must map it to a source field or assign a default value. Failing to do so could result in incomplete records or migration errors.
"Data mapping plays a key role in data migration by placing every piece of information in its correct location. Unless you map your data correctly, you risk creating inaccurate results and damaging valuable information".
| Kayako Field Type | Target Field Type | Action |
|---|---|---|
| String | Text or String | Direct match; verify character limits. |
| Boolean | Checkbox or Toggle | Map True/False values accurately. |
| Date | Date or DateTime | Ensure formats align (e.g., MM/DD/YYYY in the U.S.). |
| Number | Number | Direct match; confirm numeric compatibility. |
| Select | Drop-down or Single-select | Match option values exactly. |
| Multi-select | Multi-select or Tags | Ensure multiple selections are preserved. |
Solving Common Mapping Problems
Even with thorough preparation – like mapping statuses, priorities, and custom fields – migration hiccups can still pop up. The good news? Most of these issues are predictable and manageable with the right approach.
Fixing Data Mismatches
Data mismatches happen when field formats in Kayako don’t align with your new system. To catch these issues early, start with a demo migration of about 20 tickets. This lets you identify potential problems before committing to a full transfer. If your Kayako setup uses custom fields or unique statuses, try a Custom Demo migration where you can handpick specific ticket IDs for testing.
Once the demo (a process that usually takes around five minutes) is complete, download the migration report. This report highlights successful transfers, failures, and skipped entries. Look for patterns in the data – if tickets with a specific custom field fail consistently, that field might need adjustment before the full migration.
For any incompatible or missing data, assign default values to mandatory fields in the new system. For instance, you can map Kayako’s "Product Version" field to a general text field or assign a placeholder value like "N/A" to ensure smooth ticket handling. If tickets are updated during testing, use a Delta Migration to sync those changes. Keep in mind, you have a 10-day window after the full migration to run this delta sync before the data is permanently purged.
Once data mismatches are resolved, the next priority is ensuring your service remains uninterrupted during the migration.
Avoiding Service Interruptions
To avoid downtime, pause all automations in both Kayako and your new helpdesk system. This includes email notifications, ticket triggers, monitors, and observer rules. If pausing automations entirely isn’t feasible, tag all migrated tickets with a specific label, then configure your rules to ignore tickets carrying that tag.
"Your support team keeps working without interruptions. Continue handling tickets in your source or target platform while data is transferred safely in the background." – Help Desk Migration
For larger datasets, consider using Interval Migration to break the process into smaller chunks that can be scheduled during off-peak hours. Another option is to migrate the most recent records first, allowing agents to work on current tickets while older data transfers in the background. If you need to speed things up, ask your new helpdesk provider for a temporary API limit increase.
Once service continuity is secured, take time to validate your mappings in a controlled environment.
Testing Your Mapped Fields
Always test your field mappings in a sandbox environment before going live. Run a demo migration and manually verify that custom fields, priorities, and statuses appear correctly in your target system. Check attachments, confirm that comment authorship is accurate, and ensure agent assignments and historical dates are properly preserved.
If you encounter errors, tweak your field mappings and rerun the demo. Take advantage of unlimited demo tests to fine-tune your setup and gain confidence in the process. For example, Help Desk Migration has completed over 50,000 migrations and boasts a perfect 5.0/5.0 rating for customer support on Capterra.
"The tool itself is very straightforward to use and having unlimited tests made me really confident that it was going to work as I needed it." – Brett C., IT Manager
Verifying the Migration Results
Verification is the final step to ensure your migration was successful and everything works as it should. Once the migration process is complete, download the migration report immediately – it’s only available for five days. The report will categorize records into three groups: migrated, failed, or skipped. Pay special attention to the failed entries. For example, if tickets with a specific custom field repeatedly fail, you may need to adjust the mapping for that field.
Checking Data Accuracy
Take a close look at a sample of migrated tickets in your new helpdesk system. Check that custom field values, priorities, and statuses match the original records. Download a few attachments to ensure they transferred correctly. Also, confirm that tickets remain properly linked to agents, customers, and companies. Historical details like comments and timestamps should be intact as well. If your team continued working during the migration, consider running a Delta Migration to sync any new or updated records. Once you’re confident in the data’s accuracy, move on to testing workflows and SLAs.
Testing Workflows and SLAs
Restart any automations, email notifications, and triggers that were paused during the migration. Test the entire ticket lifecycle – create, update, and close a test ticket to ensure everything operates smoothly. Make sure SLA timers are active so time-sensitive tickets stay with the right owners, reducing the risk of missed deadlines. Redirect all incoming support channels, such as email, live chat, and social media, to the new platform. Double-check that agents only have access to data relevant to their roles. Don’t forget to update internal links in Help Center articles to reflect the new platform’s URL structure.
Using AI to Improve Post-Migration Operations
Advanced AI tools can take your post-migration operations to the next level. Use AI to simulate large samples of past tickets, which can help identify potential mapping issues or automation opportunities before they affect customers. AI platforms can also generate real-time audit trails, making it easier to track changes and spot anomalies. After the migration, AI can analyze resolved tickets to suggest knowledge base articles, categorize and route tickets more effectively, and continuously learn to improve future processes. Some organizations have seen ticket completion times drop by up to 60% and achieved automation rates of 60% for high-volume requests.
Conclusion
Switching from Kayako to a new helpdesk system requires three key steps: preparation, precise field mapping, and thorough testing. Start by reviewing your Kayako setup to eliminate duplicates and outdated records before migration. As Eric Klimuk, Founder and CTO of Supportbench, wisely says:
"A clean dataset saves time, reduces risk, and improves results in the new system. There’s no benefit to moving junk."
Once your data is cleaned and ready, map each field carefully to ensure that tickets, agent assignments, and customer information stay intact. Before committing to a full migration, test the process with a small batch of around 20 tickets. This step helps catch any formatting issues or mapping errors early. After the migration, double-check that workflows, SLA timers, and automations are functioning as expected in the new system.
To make the transition smoother, consider using AI-powered support platforms like Supportbench. These platforms simplify the process with features like built-in audit logs, automated validation, and real-time dashboards. Unlike fragmented tools or costly add-ons, these systems integrate AI directly into case management, knowledge sharing, and daily workflows – minimizing migration challenges while enhancing post-migration operations.
FAQs
How do I handle Kayako statuses that don’t exist in my new helpdesk?
When preparing to migrate from Kayako to a new helpdesk system, it’s important to address any statuses in Kayako that don’t exist in the new platform. Start by identifying these statuses before the migration process begins. Assign them to a default or placeholder status in the new system to avoid issues later.
To make this process smoother, use data mapping tools. These tools help you review and adjust the mappings, ensuring that unsupported statuses are properly reassigned. Once you’ve completed a test migration, use reports to verify that the mappings are accurate. This step is crucial to maintaining workflow continuity and ensuring your support operations remain uninterrupted.
What’s the safest way to map priorities without breaking SLAs?
To ensure a smooth transition, it’s best to start with a demo migration. This lets you test and refine the priority mappings in advance, ensuring your data remains accurate and workflows stay uninterrupted. By taking this precaution, you can avoid SLA violations and keep disruptions to a minimum during the migration process.
How do I prevent custom-field data from being lost or reformatted?
To make sure custom-field data stays intact during migration, implement a detailed data mapping process. Carefully review and fine-tune field mappings before starting the transfer. This ensures the data remains consistent and properly formatted in the new system, reducing the risk of errors or mismatches on the new helpdesk platform.
Related Blog Posts
- How do you map Zendesk fields, tags, and statuses to a new help desk correctly?
- How do you migrate away from Freshdesk without losing tickets, contacts, or history?
- How do you map Freshdesk fields, groups, and statuses to a new helpdesk?
- How do you migrate away from Kayako without losing tickets, users, and attachments?