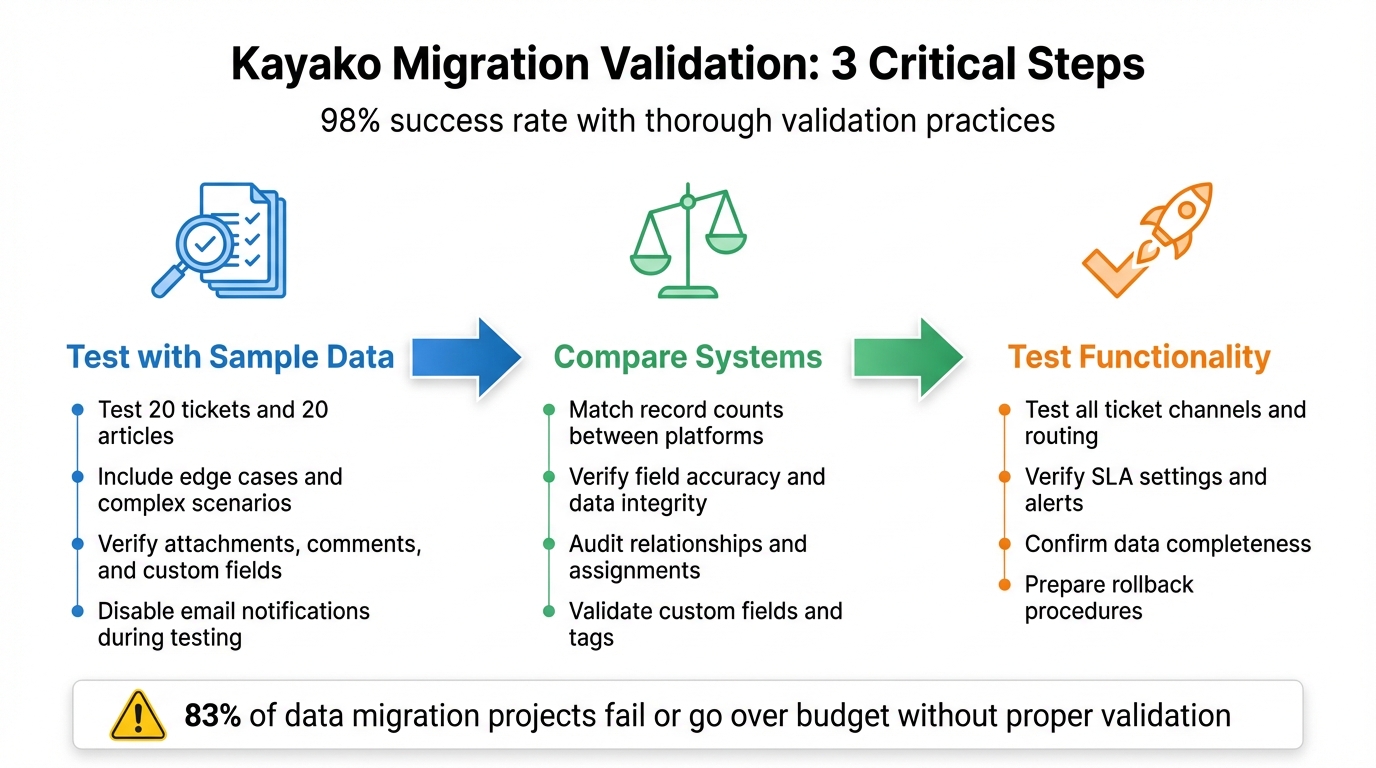
Migrating from Kayako to a new platform can be tricky, but thorough validation ensures a smooth transition. Without it, you risk losing data, breaking workflows, and facing costly downtime. Here’s a quick breakdown of how to validate your migration:
- Data Sampling: Test a small, diverse dataset (20 tickets and articles) to identify mapping or formatting errors early.
- Parity Checks: Compare record counts, field accuracy, and relationships between systems to ensure nothing is lost or misaligned.
- Go-Live Readiness: Test system functionality, SLA settings, and data completeness to ensure everything runs smoothly on launch day.
Skipping these steps can lead to long-term issues. Follow these methods to avoid disruptions, maintain data integrity, and ensure your team is ready to work efficiently from day one.
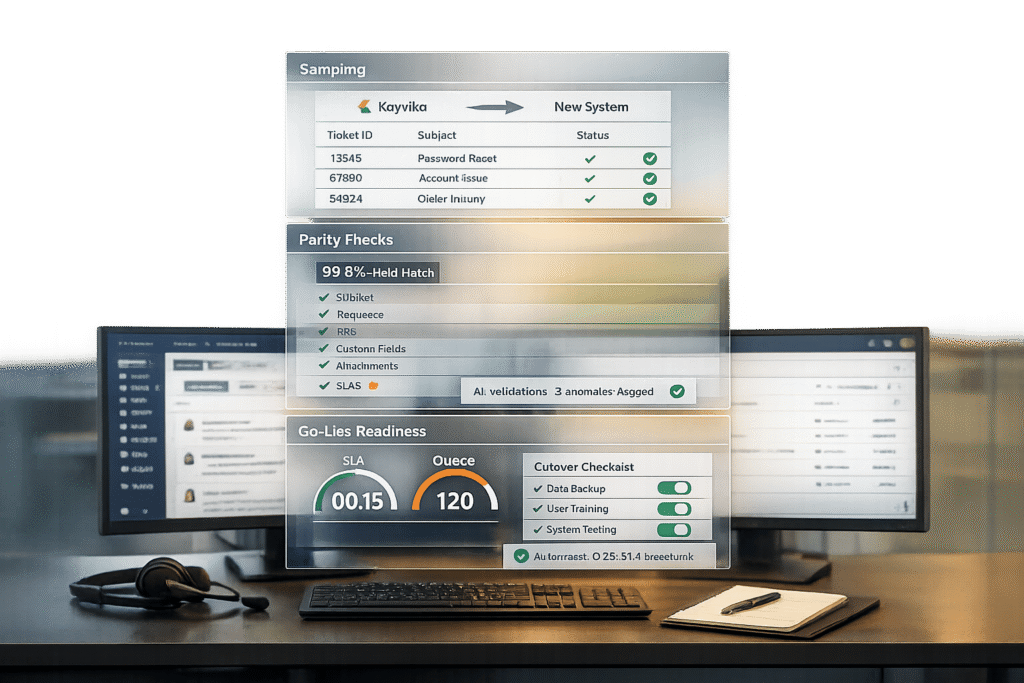
3-Step Kayako Migration Validation Process: Sampling, Parity Checks, and Go-Live Readiness
Pre-Migration Checklist
To pull off a smooth migration that ensures effective data sampling, thorough checks, and a confident go-live, you need to start with a solid pre-migration checklist. This is your chance to create a detailed migration plan that outlines the scope, resolves potential issues, and sets clear metrics for tracking progress. Skipping this step can lead to trouble – 83% of data migration projects either fail or go over budget. Here’s a breakdown of the key pre-migration tasks to help you get it right.
Review Data Structures and Custom Fields
Start by mapping out your Kayako setup. This means auditing everything – agent profiles, ticket fields, custom data, and knowledge base structures. Pay close attention to agent roles and permissions: in Kayako, agents have full access, while collaborators are limited to adding internal notes. If your current platform doesn’t make these distinctions, plan how to handle the role mapping.
Custom fields also deserve careful consideration. Kayako supports specific field types, including String, Boolean, Date, Number, Select, and Multi-select for Users, Organizations, and Conversations. If your source platform uses different types, you’ll need to strategize on converting them. For instance, CC users don’t migrate by default, so you’ll have to create a custom field to store those email addresses. If you’re transferring knowledge base content, enable the "potentially unsafe HTML" option in Kayako’s admin panel first. This preserves embedded links and formatting.
One small but important detail: article dates reset to the migration date when imported into Kayako. If keeping original publish dates is critical – say, for compliance reasons – document this limitation and consider storing the original dates in a custom field.
Create Fallback Procedures
Once your data structures are mapped, the next step is to set up fallback plans. Without a safety net, you’re taking on unnecessary risk. Backup all your source data and confirm that it can be restored. Develop rollback scripts and test them in a sandbox environment to ensure they work as expected.
During the migration itself, freeze changes to the source system. This prevents data mismatches and ensures consistency. You might also want to run both systems in parallel for a short time, giving you an immediate fallback option if the new platform doesn’t perform as expected. Use delta migrations to capture any records created or updated during the process, so nothing gets left behind.
Another important step: disable all automations on the target platform before importing data. This includes email notifications, triggers, and workflow rules. Doing this helps you avoid duplicate alerts or unintended ticket status changes while the data is being loaded.
Set Up Logging and Reporting
Detailed logging is your best friend during migration. Set up logs that categorize records as migrated, skipped, or failed. Create ID mapping reports that pair source database record IDs with their new Kayako IDs. This makes it much easier to verify specific records later.
"Maintain detailed audit logs. Track every modification, transfer, and system action to preserve accountability and simplify compliance reviews." – Eric Klimuk, Founder and CTO, Supportbench
Before committing to the full migration, run a demo migration and review the reports. Check that attachments are intact and confirm that comment authors, privacy settings (public vs. private notes), and custom field values are correctly reflected. If any records are skipped or fail, ensure your migration tool explains why – common issues include API limits or data format mismatches.
One last tip: ask Kayako for a temporary increase in API limits before starting. This can speed up the migration process and reduce the risk of records failing due to rate limits.
sbb-itb-e60d259
Data Sampling for Initial Validation
After completing your pre-migration checklist, the next step is to test the migration workflow using a small, representative dataset. This is a critical step in ensuring a smooth transition, especially in AI-driven support operations. By sampling data early, you can catch and fix costly errors like mismatches or formatting issues before committing to a full migration. Testing on a smaller scale builds confidence that the process will work effectively when scaled up. In fact, organizations that implement thorough data validation practices report a 98% success rate in help desk migrations.
Run a Test Migration with Sample Data
Start by transferring a subset of your data – typically 20 tickets and 20 articles – to test how well the migration handles data mapping and compatibility. Many automated migration tools offer free demo migrations, which move this sample to verify system compatibility. However, relying solely on random samples may not uncover all potential issues. Instead, take advantage of "Custom Demo" features, which allow you to select specific ticket and article IDs. Choose records that represent complex cases, such as tickets with large attachments, inline images, multi-level comments, or unusual custom field types like Boolean or Multi-select.
Don’t forget to include edge cases in your sample. These might include inactive users, data in legacy formats, or tickets with atypical attributes – records that are more likely to challenge standard mapping rules. Before running your test migration, disable email notifications, monitors, and triggers in Kayako to avoid unnecessary alerts being sent to customers during the process.
Verify Sample Data Integrity
Once the test migration is complete, carefully review the results. Automated reports will categorize records by their status, but manual inspection is equally important. Check that each ticket’s Type, Status, Priority, Source, and Tags match the original data. Download and open attachments to confirm they transferred without corruption. Also, verify that comment authors are correctly linked to the appropriate agents or customers. This step is vital for maintaining accountability and context within your customer support management system.
"Validation is your safety net – it confirms that everything moved as expected and continues to function correctly in the new system." – Eric Klimuk, Founder and CTO, Supportbench
Pay close attention to customer-company links and foreign keys to ensure they align with the original records. If you’re migrating Knowledge Base articles, check that embedded content appears correctly. To avoid broken links or formatting issues, enable the "Allow potentially unsafe HTML" setting in Kayako’s security policies. Keep in mind that article publish dates will reset to the migration date in Kayako. If preserving original dates is crucial, consider storing them in a custom field. These detailed checks can prevent significant disruptions down the line.
Check Sample Coverage
Your sample data should reflect the full variety of your dataset. Include tickets with varying statuses (open, pending, closed), priority levels (low, medium, high, urgent), and different agent assignments. Make sure to test records with heavy attachments, inline images, or complex custom fields. This ensures that your migration logic can handle all types of data scenarios.
Involve your frontline support agents in reviewing the migrated sample data. Their firsthand experience can reveal usability issues or missing information that automated checks might overlook. Keep in mind that any records that fail to migrate during this test phase will likely fail during the full migration as well. Use this opportunity to identify and resolve problems before scaling up. Once your sample data passes these checks, you’ll be ready to perform detailed parity reviews to ensure complete alignment between systems.
Parity Checks Between Kayako and Target Platform
Once your sample data clears its initial validation, it’s time to dive deeper. Perform a thorough comparison between Kayako and your target platform to ensure every record has been transferred correctly. This step ensures no data is lost, corrupted, or mislinked during the migration process. These checks build on earlier sampling validations to maintain consistency across both systems.
Compare Record Counts and Field Accuracy
Begin by reviewing the summary table that highlights the number of records available, migrated, failed, and skipped. For a more detailed analysis, download the ID mapping report. This report pairs each original ID from Kayako with its corresponding ID in the target platform, providing a clear 1-to-1 match and helping you identify any discrepancies.
Combine automated reports with hands-on checks. For instance, access the Customers section in Kayako to view the total number of customer records displayed above the list. Compare these counts with the corresponding data in the target platform. Use advanced search queries to validate specific subsets, such as running in:conversations (status:closed) in Kayako to confirm closed ticket volumes. Don’t overlook the "skipped records" report, which explains why certain data wasn’t transferred – this could include reasons like API limitations or incompatible formats. Deduct these skipped records from the total to reconcile counts accurately.
Verify Relationships and Assignments
Accuracy isn’t just about numbers – it’s about relationships. Confirm that connections between tickets, users, and organizations remain intact. For example, ensure comments are still linked to the correct tickets, and agent assignments match the original data. Parent-child ticket relationships, such as escalations or linked conversations, should also appear correctly in the target platform. Any mismatched relationships could disrupt workflows and compromise data integrity. Additionally, confirm that agent profiles in the target platform retain the same email addresses as those in Kayako. This step is crucial for maintaining proper assignments and audit trails.
Attachments also deserve attention. Download a sample of attachments and open them to confirm they’re not corrupted. Check that they’re still associated with the appropriate tickets, particularly for those with inline images or large files. Once these relationships are verified, you can move on to validating custom data and tags.
Audit Custom Data and Tags
Custom fields and tags often present challenges during migration, as they don’t always map seamlessly between platforms. If you created corresponding custom fields in the target platform’s Administration > Custom fields section before migration, now is the time to ensure they’ve been populated correctly.
Check custom fields for fill rates, uniqueness, and consistency. Use the target platform’s search functionality to confirm that tags and statuses are applied correctly. If you encounter missing values or formatting issues, custom data validation scripts or profiling reports can help identify the root cause. It’s worth noting that organizations with strong data integrity practices report a 98% success rate in help desk migrations. This underscores the importance of thoroughly auditing custom data to maintain accuracy.
Go-Live Readiness Assessment
Before going live, it’s crucial to ensure the system is fully prepared. This means testing functionality, verifying SLA settings, and confirming data completeness. A thorough assessment can save you from costly errors after migration.
Test System Functionality
Start by generating test tickets from all available channels – email, web portal, social media, and API. This helps confirm that the system is receiving and processing tickets as it should. Check that business rules, triggers, and routing logic work seamlessly, ensuring tickets are routed correctly and notifications are triggered without issues.
Log in using different roles – admin, team lead, and agent – to verify that each has the appropriate access. Test integrations with third-party tools like CRM systems and communication platforms to confirm smooth data flow. For those using a Help Center, review all articles to ensure they are present, properly formatted, and include working hyperlinks. If you migrated embedded content from Kayako, double-check that settings for potentially unsafe HTML are configured correctly.
"A thorough QA process is one of the most important Best Practices for a successful migration. It’s your final line of defense against the chaos that a botched migration can cause." – ClonePartner
Once functionality is confirmed, move on to verifying SLA settings and reporting accuracy.
Verify SLAs and Reporting Accuracy
Compare SLA metrics such as first response times, resolution times, and ticket volumes between the new platform and historical data. Test SLA alerts to ensure they trigger at the correct intervals and confirm that escalation rules are enforceable using sample tickets. Reporting dashboards should reflect accurate business metrics, as these are essential for maintaining efficient AI-driven support.
Don’t forget to reactivate triggers, monitors, and notifications that were temporarily disabled during migration to avoid data noise. This step ensures your system is ready to handle live operations without interruptions.
Finally, evaluate the completeness of your data and the overall success of the migration.
Measure Data Completeness and Transition Success
Review a summary table showing available, migrated, failed, and skipped records for key entities like tickets, contacts, organizations, and articles. Pay special attention to skipped records, as these often result from API limits or data format mismatches. Reconcile record counts to ensure nothing critical is missing.
Manually inspect a sample of migrated attachments, checking that they remain intact, inline images are properly linked, and ticket comment threads are in chronological order. Confirm that privacy settings for public and private notes are accurate. Frontline agents can provide valuable insights here – they’re in the best position to spot missing context or usability issues.
Lastly, prepare a rollback plan. This might include reactivating access to the legacy system or using backup email routing in case of any unexpected system failures during go-live. Having this safety net ensures you’re ready for any challenges that might arise.
Wrapping It All Together
The steps outlined earlier – data sampling through demo migrations, thorough parity checks, and detailed go-live readiness testing – are your safety net when migrating Kayako. Validation isn’t just a box to check; it’s what separates a seamless migration from weeks spent untangling broken workflows. By catching mapping errors, addressing data format inconsistencies, and verifying every detail – like record counts, field accuracy, and ticket relationships – you ensure a smooth transition. Plus, testing workflows such as ticket routing and SLA enforcement ensures your support operations remain uninterrupted.
FAQs
What should I sample beyond 20 tickets and 20 articles?
To ensure a smooth go-live process, it’s crucial to prepare sample data that aligns with your validation goals. Alongside the 20 tickets and 20 articles, include data like user attributes, custom fields, and record statuses. This approach helps perform thorough parity checks, ensuring data accuracy and verifying that the system functions as expected in key areas.
How do I prove nothing is missing after the full migration?
When completing a data migration, it’s crucial to double-check that everything has transferred correctly. Start by comparing the record counts between the source and target systems. Next, verify data integrity by ensuring the data remains consistent and unaltered. Finally, review sample records to confirm accuracy and proper formatting.
Don’t skip analyzing migration reports. These reports often include details about migrated, skipped, or failed records, giving you a clear picture of what needs attention. Pay particular attention to sampling and parity checks, as they can help you catch discrepancies early in the process.
What go-live tests prevent workflow and SLA failures?
When preparing for a go-live, it’s crucial to conduct tests that help prevent workflow disruptions and SLA failures. Key steps include:
- Verifying accurate data transfer: Ensure that all data is migrated correctly and without loss, maintaining its integrity throughout the process.
- Testing key workflows and automations: Confirm that essential processes and automated tasks function as expected in the new system.
- Confirming system functionalities: Check that every feature and tool within the system operates smoothly and is ready for use.
These measures are essential for a seamless transition, reducing the risk of interruptions during the migration.
Related Blog Posts
- How do you migrate away from Freshdesk without losing tickets, contacts, or history?
- How do you migrate away from Kayako without losing tickets, users, and attachments?
- How do you map Kayako statuses, priorities, and custom fields to a new helpdesk?
- Kayako migration project plan: scope, timeline, and common pitfalls