Migrating away from Jira Service Management (JSM) while keeping your ticket history intact can be challenging but entirely achievable with the right approach. Here’s the key takeaway: a structured plan, careful data preparation, and the right tools are essential to ensure a smooth transition. Whether you’re moving to another platform or adapting to Atlassian‘s evolving ecosystem, your ticket history is vital for continuity and reporting. Here’s how you can do it:
- Why Migrate? Rising costs, platform changes, and the upcoming end-of-life for Jira Data Center licenses (March 28, 2029) are driving organizations to seek alternatives.
- Data Preparation: Identify and clean up the data you need to migrate, including tickets, comments, attachments, and custom fields. Address any customizations early.
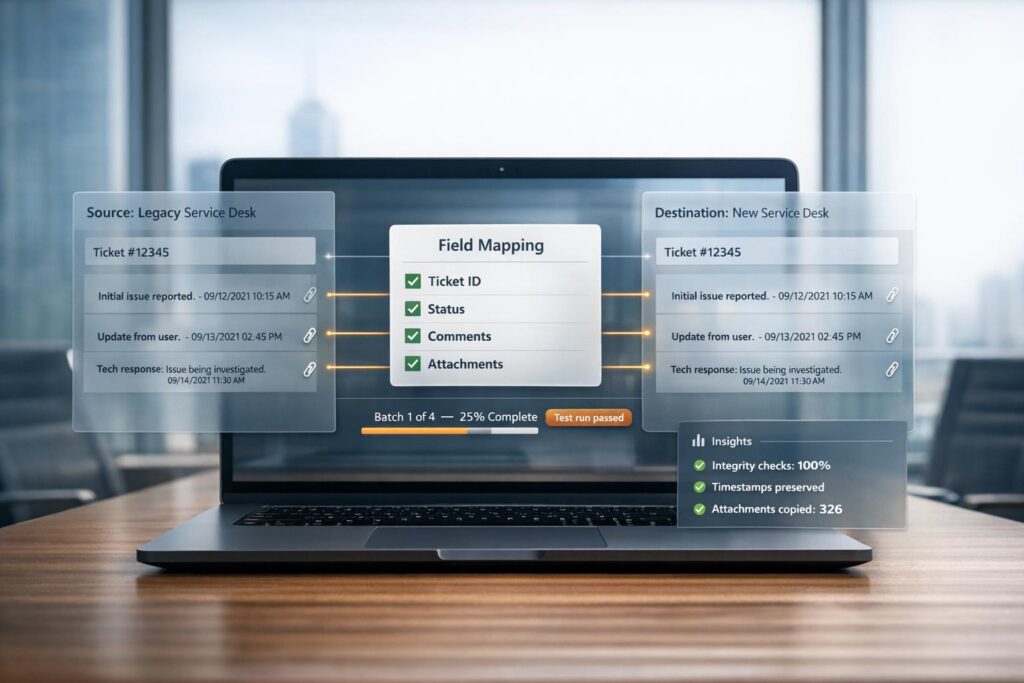
- Mapping and Transformation: Align fields and data structures between systems. Use demo migrations to test and validate mappings.
- Automation and Tools: Export automation rules, assets, and third-party app data separately. Use ETL tools for large datasets and strategies like delta and batch migrations to manage the process efficiently.
- Testing and Verification: Run test migrations and validate data accuracy before proceeding. Post-migration, verify ticket counts, custom fields, and links.
- Post-Migration Setup: Rebuild workflows, automations, and dashboards in the new system. Use historical data to refine operations and improve support.
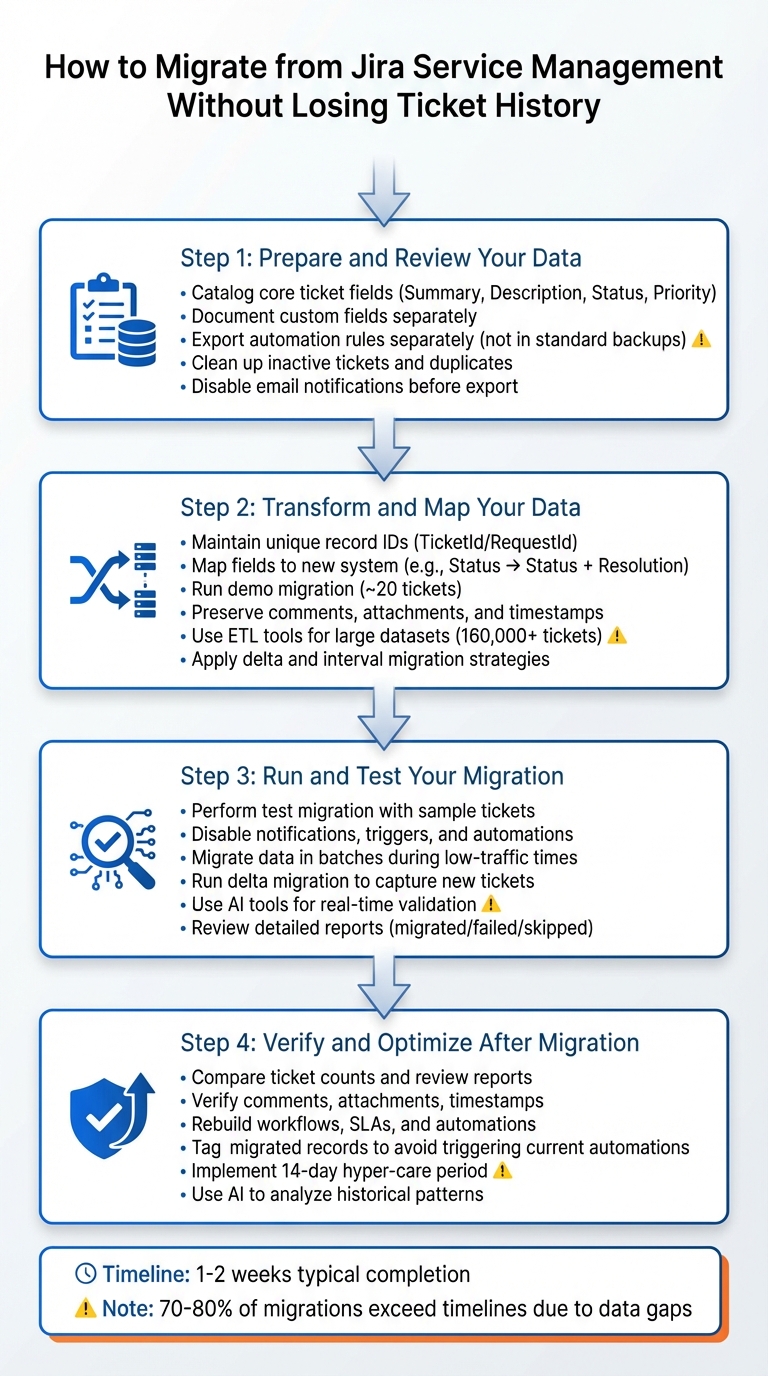
4-Step Process for Migrating Away from Jira Service Management While Preserving Ticket History
Step 1: Prepare and Review Your Data
The first step in a successful migration is to carefully prepare and review your data. If you are moving from email to a helpdesk, start by cataloging the core ticket information you plan to export. This typically includes fields like Summary, Description, Status, Priority, and Work Type, which are essential for most migrations. Don’t forget to review the Reporter and Assignee fields – these often export as email addresses or Atlassian Account IDs. Make sure to include all communication history, as every comment contains body text, author details, and timestamps. Keep in mind that inline images might need to be converted into standard attachments. If your system has customizations, address them early to ensure proper mapping.
Custom fields deserve special attention. Document these fields separately – especially multi-select, cascading, and date fields – since they may not map directly to the new system. When handling work logs, remember that they are stored in seconds (e.g., one hour equals 3,600 seconds), so you’ll need to adjust these values during the transformation process. If your team uses Labels, Components, or Version data to organize tickets, review these fields as well.
Automation rules can be tricky because they aren’t included in standard site backups. You’ll need to export these separately. Similarly, Assets data and Opsgenie-powered features like alerts and on-call schedules require their own export processes. Additionally, keep in mind that data from third-party apps isn’t captured by standard backup tools and will need special handling.
Here’s a quick overview of what can and cannot be exported using JSM backups:
| Data Category | Export via JSM Backup? | Notes |
|---|---|---|
| Work Items/Issues | Yes | Includes system and custom field content |
| Comments | Yes | Includes author and timestamp |
| Attachments | Yes | Includes media files, avatars, and logos |
| Automation Rules | No | Must be exported separately |
| Assets (JSM) | No | Requires separate export/import process |
Before proceeding, clean up your data by closing inactive tickets and removing duplicates. This will reduce the volume of data to transfer and make validation easier later on. If you need to comply with data retention policies, use filters like creation date, tags, or custom fields to decide which records to migrate and which to archive. Lastly, disable email notifications and automation rules before running any test exports to avoid sending unintended alerts to users.
sbb-itb-e60d259
Step 2: Transform and Map Your Data
Now that your data is prepared, the next move is to transform and map it correctly to fit your new system. After exporting, adjust your data to align with the structure of the new platform. It’s crucial to maintain unique record IDs (like TicketId or RequestId) throughout the process. This ensures that comments, attachments, and agent assignments remain properly linked to their respective records.
Map Fields to Your New System
Start by aligning the fields in Jira Service Management with those in your new system. For example, map the Status field to both "Status" and "Resolution" in the new platform. This step ensures that closed cases are accurately reflected and prevents migrated cases from being marked as unresolved.
If your new platform requires custom fields for unique data points – like subscription levels or SLA timers – create those fields before starting the migration. For fields that don’t have a direct match (e.g., CC users), consider mapping them into a custom field to retain communication history. Many migration tools cannot move CC users directly, so this workaround helps preserve that data.
Before committing to the full migration, always run a demo migration to test your field mappings. Patrick A., an IT System Administrator who successfully migrated over 200,000 records and more than a decade of data from ServiceNow to FreshService in 2022, stressed the importance of this step:
Being able to run demos many times iteratively to show business partners exactly what to expect, vet the tool, and catch some gaps along the way was absolutely key.
Most automated migration tools provide a free demo migration for a small sample, typically around 20 tickets. Use this opportunity to confirm that agent assignments, timestamps, and other critical elements transfer correctly.
Keep Comments, Attachments, and Timestamps
Once ticket fields are mapped, focus on preserving the details of your conversations. This means transferring comments, attachments, and timestamps with care. To maintain the full history, ensure both public and private comments are migrated along with their original authors and timestamps. It’s essential to map all agents and users before starting the migration.
For attachments, check your new platform’s file size limits and increase them if necessary to avoid data loss. If your tickets include inline images (within descriptions or comments), enable the option to migrate these as regular attachments. This way, the visual context of your tickets remains intact.
The Salvation Army’s migration project serves as an example of how custom mapping techniques can preserve the full ticket history. While ticket timestamps (like created, updated, and closed dates) usually transfer without issues, be aware that knowledge base article dates may reset to the migration date in some systems.
Use ETL Tools for Large Datasets
For large-scale migrations involving tens of thousands of records, automated ETL (Extract, Transform, Load) tools can save you significant time. These tools use smart mapping engines to maintain relationships between tickets, agents, and companies by linking records through unique IDs. For example, Jason Morehouse, CEO and Co-founder of Checkfront, successfully used an automated migration service to import over 160,000 tickets and six years of support history from Desk.com to Zendesk, while ensuring data integrity.
If you’re dealing with massive datasets, consider using delta migration and interval migration strategies. Delta migration identifies and transfers only new or updated records created during the migration process, ensuring consistency. Interval migration, on the other hand, breaks the process into smaller, scheduled sessions (e.g., hourly or daily) to avoid overloading the system or hitting API limits.
Before starting any large-scale migration, disable outgoing mail and customer notifications in both systems. This step prevents thousands of automated emails from flooding your users during the transfer.
Step 3: Run and Test Your Migration
With your data mapped, it’s time to execute the migration. But before diving into the full transfer, running a test migration is a smart move. This step helps identify potential problems without risking your entire dataset. Start by performing a demo migration with a small, random sample – around 20 tickets and articles – to see how your data behaves in the new system. This trial run ensures that field mappings, attachments, and timestamps transfer as expected.
To dig deeper, select specific tickets by ID to verify unique field mappings and edge cases with a custom demo. After the test, download detailed reports that categorize records as migrated, failed, or skipped. These reports pinpoint what didn’t transfer and why, giving you the chance to resolve issues before moving forward. Once you’re confident the sample migration is successful, proceed with the full migration in smaller, manageable batches.
Run a Test Migration First
Before starting the full migration, disable email notifications, triggers, and automations to avoid unnecessary alerts or disruptions. During the test, confirm that tickets remain connected to the correct agents, customers, and organizations, and that comment authors are preserved. Pay close attention to custom fields – missing mappings, like failing to link the "Status" field to both "Status" and "Resolution", can result in unresolved cases. Additionally, adjust attachment size limits in your new system to prevent large files from being rejected.
Caitlin Steel, VP of Product Management at Leapfin, emphasized the value of testing:
"I did a test run and that proved it was a good method. Keep testing until you are happy with the result."
For large datasets, splitting XML and media files can help avoid timeout errors. This approach keeps the migration process stable and reduces the likelihood of failures.
Migrate Data in Batches
Once testing is complete, migrate your data in smaller groups rather than all at once. Start with the most recent or active tickets to ensure your team can address urgent customer needs while older records are imported in the background. This interval migration strategy divides large datasets into smaller chunks, minimizing performance issues and keeping your service desk operational during critical hours.
Schedule these batch migrations during low-traffic times – like after hours or on weekends – to reduce any disruption to active support operations. For example, if you’re migrating tens of thousands of records, break the process into smaller plans to stay within system "soft limits" and avoid failures. After completing the main migration, run a delta migration to capture any new tickets or updates created during the migration process, ensuring that no data is left behind. Once the batches are done, use AI tools to validate and maintain data accuracy.
Use AI to Validate Your Data
AI-powered migration tools can make the process smoother by providing real-time validation. These tools identify mapping errors before the full migration begins, offering auto-suggestions for field matching to ensure consistency across different help desk systems. Automated systems also generate detailed post-migration reports that categorize records as migrated, failed, or skipped, allowing you to address any anomalies right away. With over 60,000 successful help desk migrations completed and a 4.8/5 ease-of-use rating from more than 100 reviews, these tools save up to 90% of the time compared to manual methods. They’re a reliable way to ensure your migration is accurate and efficient.
Step 4: Verify and Optimize After Migration
Once the migration is complete, the next step is to ensure everything transferred correctly. Start by comparing ticket counts and reviewing automated reports. These reports will categorize records as "migrated", "skipped", or "failed", helping you pinpoint any issues and understand why certain records didn’t transfer successfully.
Check Data Accuracy
Take the time to verify that all essential details – like comments, attachments, and timestamps – have transferred without issues. Randomly inspect tickets to confirm that files remain intact, comment authors are correctly attributed, and privacy settings are preserved. Double-check that custom fields, tags, and ticket statuses (e.g., "Open", "Pending", "Resolved") align with the structure of your new system. Additionally, ensure tickets are assigned to the appropriate agents and that customer profiles are correctly linked to their ticket histories.
If your migration included knowledge base articles, use automated tools to update internal links. This ensures they point to the correct URLs on the new platform, preventing broken links and maintaining usability. Once you’re confident in the data’s accuracy, move on to rebuilding your operational workflows.
Set Up Workflows and Automations
Recreating your workflows is crucial for maintaining service consistency. Manually rebuild SLAs, automation rules, and dashboards, ensuring that original Jira ticket IDs are mapped to enable historical searches. Keep in mind that automation rules from Jira Service Management usually don’t migrate automatically, so you’ll need to recreate or export them separately.
To avoid confusion, tag all migrated records so legacy tickets don’t inadvertently trigger current automations. After configuring workflows, test every function thoroughly. Once you’re confident everything is working as expected, re-enable notifications to restore normal service operations.
Use AI to Improve Operations
With your data verified and workflows in place, you can leverage AI tools to take your support operations to the next level. A complete ticket history allows AI to analyze past patterns, enabling virtual agents to handle common issues, providing real-time suggestions for agents, and even generating knowledge base articles from past resolutions.
Modern platforms can use historical data to speed up self-service by offering automated solutions based on what has worked before. AI can also help with proactive incident tracking, alerting your team about potential service disruptions before they escalate.
Matt Brayley, Field Service Manager at Primetals Technologies, shared his experience on the importance of retaining historical data:
"We are able to retain our data from another help desk solution. We considered starting fresh with a new help desk – and losing years of history. Fantastic support!"
Conclusion: What You Need for a Successful Migration
Migrating from Jira Service Management while keeping your ticket history intact requires careful planning, precise execution, and thorough verification. To start, focus on proper data preparation – ensure that fields, agents, and organizations are mapped correctly to maintain your data structure. Running a demo migration with a small sample is a smart way to confirm that the process works as expected.
Breaking the migration into batches can help contain potential issues and make troubleshooting more manageable. Most help desk migrations typically take one to two weeks to complete. Don’t forget to disable notifications before you begin to avoid overwhelming your team with unnecessary alerts.
Once the migration is complete, verify that all critical elements – such as comments, attachments, timestamps, and custom fields – have transferred correctly and align with the structure of the new system. Implementing a 14-day hyper-care period after migration can provide focused support to address any lingering issues or confusion in workflows. Considering that nearly 70–80% of large migration programs exceed their timelines due to data gaps and rework, taking the time for comprehensive verification is vital.
Your preserved ticket history is more than just a record – it’s a resource. Use it to enhance operations by analyzing past patterns, automating common resolutions, and generating knowledge base articles from previous tickets with the help of AI. This historical data can fuel AI-driven insights, helping your team optimize support operations and deliver proactive service improvements. With careful verification and a well-thought-out strategy, your team can transition smoothly to a more efficient, AI-enhanced support platform.
FAQs
What data from Jira Service Management won’t migrate automatically?
When migrating tickets using CSV export methods, ticket history, such as assignee changes and change logs, won’t transfer automatically. CSV files simply don’t have columns to capture historical data. To retain this information, you’ll need to rely on other tools or methods during the migration process.
How do I preserve ticket IDs, timestamps, and private comments during migration?
To keep ticket IDs, timestamps, and private comments intact during migration, opt for a reliable data export method that supports comments and attachments, like JSON or API exports. Make sure the migration process correctly maps and preserves the original ticket IDs and timestamps. It’s a good idea to run test migrations beforehand to confirm data accuracy and prevent potential errors during the full transfer.
How can I validate migration accuracy before switching teams over?
To ensure your migration goes smoothly, start with a test migration. Carefully review the import logs for any warnings or errors that might pop up. Next, compare data counts between the source and destination systems to confirm everything lines up. Pay close attention to critical elements like ticket statuses and customer details, as these are often the backbone of your operations. Finally, perform sample checks on the migrated data to confirm its integrity. Prioritizing consistency and precision during this phase can help you sidestep potential problems when it’s time for the final migration.
Related Blog Posts
- How do you migrate from Salesforce Service Cloud to a helpdesk without losing case history?
- How do you migrate away from Freshdesk without losing tickets, contacts, or history?
- How do you migrate away from HappyFox without losing ticket history or attachments?
- How do you migrate from Intercom to a true helpdesk without losing conversation history?