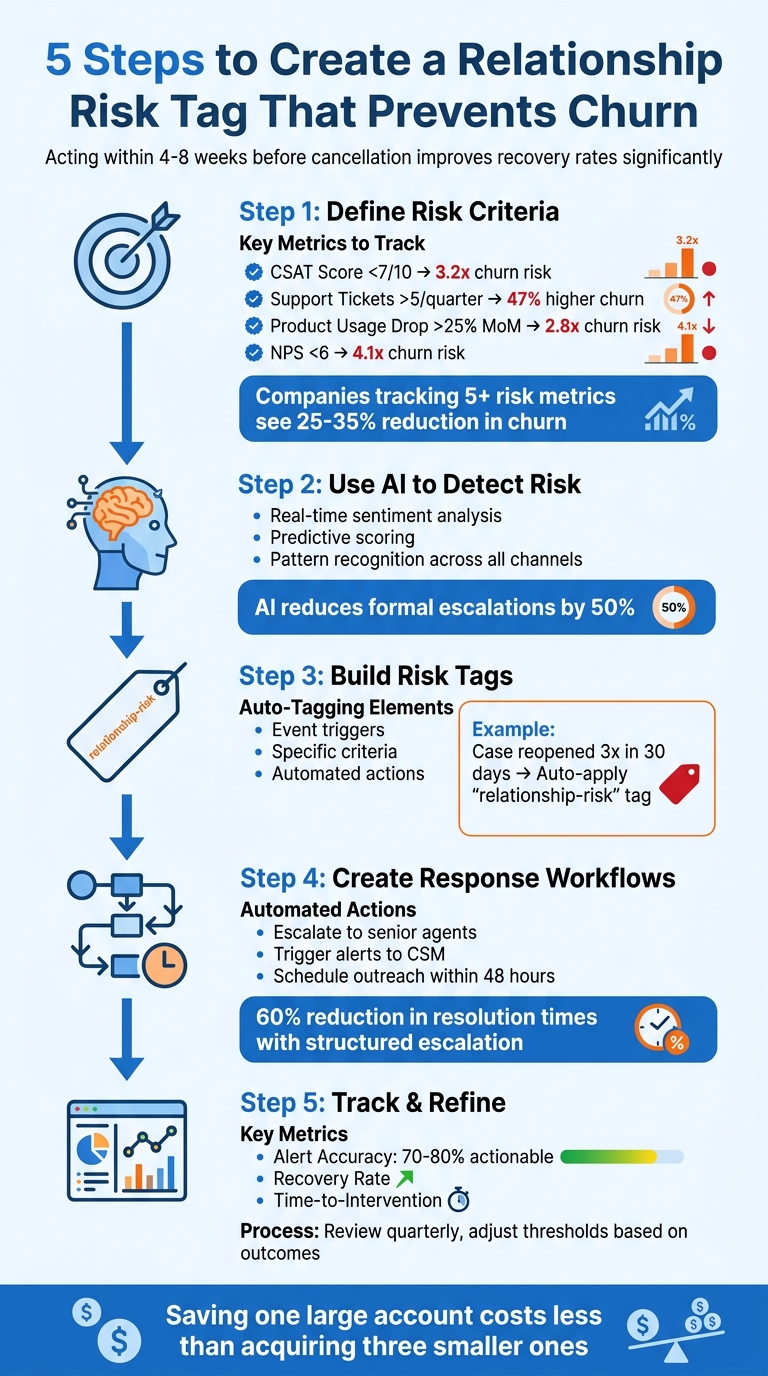
In B2B customer support, identifying “relationship risks” early can save accounts and prevent churn. These risks often arise from operational issues like slow responses, unmet expectations, or unresolved frustrations – not just technical failures. Research shows that acting within a 4–8 week window before a customer decides to cancel improves recovery rates significantly. Here’s how to create a risk tagging system that works:
- Define Risk Metrics: Track key signals like low CSAT scores (<7/10), high ticket volume (>5 tickets/quarter), product usage drops (>25% month-over-month), and NPS below 6.
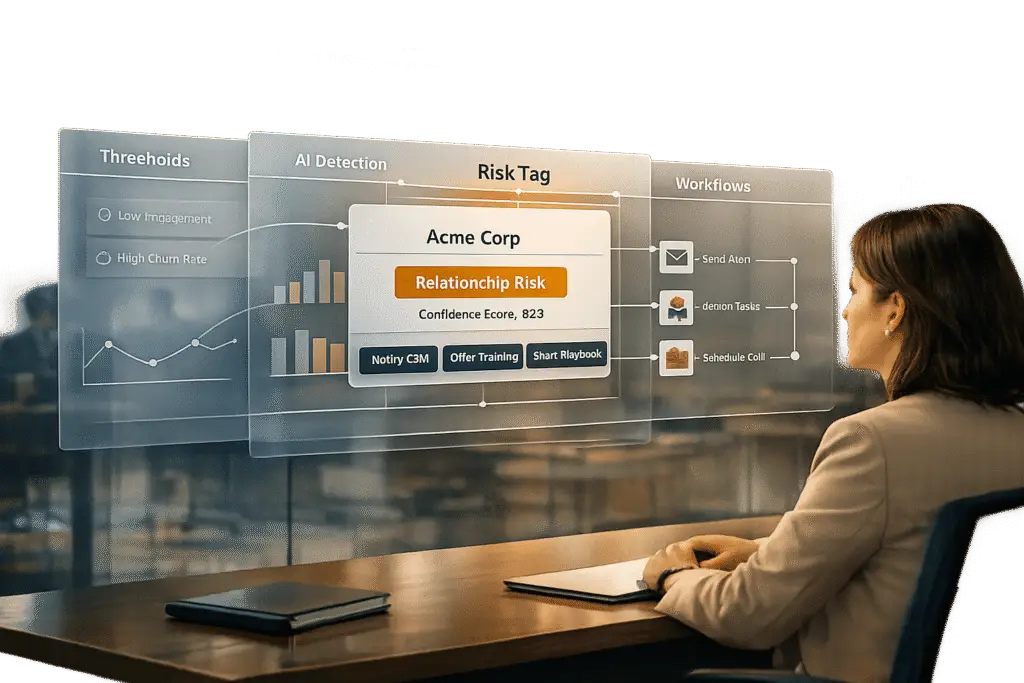
- Set Clear Thresholds: Use data-driven thresholds to flag accounts, ensuring consistent and accurate risk identification.
- Leverage AI: Automate detection with AI tools for real-time sentiment analysis, ticket pattern recognition, and predictive scoring.
- Implement Auto-Tagging: Configure triggers to apply risk tags automatically based on predefined criteria, streamlining workflows.
- Create Actionable Workflows: Use tags to automate escalations, assign cases to senior agents, or schedule outreach for at-risk accounts.
- Measure and Refine: Track performance metrics like alert accuracy and recovery rates, and adjust criteria quarterly based on outcomes.
5-Step Framework for Creating Relationship Risk Tags in B2B Customer Support
The Ultimate Guide to Mitigate Customer Churn
sbb-itb-e60d259
Step 1: Define Your Risk Criteria
Before identifying at-risk accounts, you need a clear understanding of what "risk" means for your business. This involves pinpointing measurable signals that indicate a customer relationship is weakening. The goal is to create consistent criteria your team can apply to every account.
The tricky part? Striking a balance between tracking enough metrics to catch problems early and avoiding an overload of irrelevant data. Research indicates that companies tracking five or more risk metrics typically see a 25–35% reduction in churn rates [4]. The challenge is selecting the most meaningful signals for your specific customer base and business model. Once you’ve defined "risk", you can focus on identifying measurable metrics.
Pick the Right Metrics to Track
Start with metrics that have a proven track record of predicting churn. For example, Customer Satisfaction (CSAT) scores are a must. Accounts with CSAT below 7/10 are 3.2 times more likely to churn [3]. But satisfaction scores alone won’t give you the full picture – you’ll also need behavioral data to understand how customers interact with your product and support team.
Support tickets can reveal a lot. If an account that usually logs two tickets per month suddenly submits eight – especially about issues like billing problems or downtime – it could signal growing dissatisfaction. Accounts filing more than five tickets per quarter tend to experience 47% higher churn rates [5]. You can also track ticket velocity (tickets per week) and recurring issues, as unresolved problems with recurrence rates above 20% often point to deeper frustrations.
Another red flag is a drop in product usage. A 25% month-over-month decrease in logins or feature engagement suggests disengagement and correlates with a 2.8x increase in churn risk [6]. Combine this with SLA breaches – where more than 10% of tickets miss response or resolution deadlines – and you’ll have a stronger basis for identifying at-risk accounts. Additionally, a Net Promoter Score (NPS) below 6 carries a 4.1x churn risk multiplier [2]. Sentiment analysis of ticket text can also help; scores below 0.5 on a negative scale often indicate emotional dissatisfaction.
The metrics you choose should align with your business type. For instance, SaaS companies might focus on usage and feature adoption, while service-based businesses may prioritize SLA performance and response times. Reviewing past churn cases through win/loss analyses can highlight the signals that consistently preceded cancellations. This historical data sharpens your ability to proactively tag at-risk accounts, reducing the need for reactive responses.
Set Clear Thresholds for Each Metric
Once you’ve identified the right metrics, the next step is establishing clear, numerical thresholds to flag risk. Vague criteria won’t work for automation or team consistency. Instead, create binary rules like "CSAT below 7", "more than five tickets in 90 days", or "a usage drop exceeding 25% month-over-month."
These thresholds should be based on historical data, not intuition. Analyze the top 20% of at-risk accounts from the past year to identify patterns. Ask questions like: What were their CSAT scores before they churned? How many tickets did they submit? How often did they miss SLA targets? Use this information to set thresholds, such as flagging accounts performing in the bottom 10% across multiple metrics.
| Risk Metric | Example Threshold | Churn Risk Multiplier |
|---|---|---|
| CSAT Score | <7/10 | 3.2x [3] |
| Support Tickets | >5/quarter | 47% higher [5] |
| Product Usage Drop | >25% month-over-month | 2.8x [6] |
| NPS | <6 | 4.1x [2] |
Test these thresholds against six months of historical data to ensure they predict churn with at least 80% accuracy. Revisit and adjust them quarterly based on real outcomes – evaluating which accounts churned, which were retained, and which metrics were most predictive.
If your customer base includes different tiers, segment your thresholds accordingly. For example, enterprise accounts might warrant a risk tag after just one or two SLA breaches or an executive escalation. Smaller accounts, on the other hand, might only be flagged after a higher volume of issues, like five tickets per quarter. Document everything in a one-page Risk Criteria Playbook and review it monthly to ensure consistent application.
Step 2: Use AI to Detect Risk Automatically
Once you’ve established clear risk metrics, the next move is to let AI handle detection. Relying on manual methods just doesn’t cut it when you’re dealing with hundreds – or even thousands – of B2B accounts. No human team can realistically monitor every ticket, track sentiment changes, or spot unusual behaviors in real time. That’s where AI steps in. It analyzes interactions at scale, identifying risk patterns early enough to address them before they spiral into formal complaints or customer churn.
By catching potential problems early, AI doesn’t just help prevent churn – it enables proactive outreach. Unlike traditional manual methods, AI can identify subtle patterns before they become major issues. For example, predictive AI tools have helped some enterprise teams cut formal escalations by as much as 50% [1]. The key difference? AI doesn’t wait to react; it predicts and flags emerging risks.
Apply Sentiment Analysis and Predictive Scoring
AI can analyze customer messages in real time, picking up on negative sentiment without waiting for feedback from post-interaction surveys. Sentiment analysis looks at tone, word choice, and emotional intensity to detect when interactions are heading south. While one frustrated message might not mean much, a consistent decline in tone over several conversations is a clear red flag.
Natural Language Processing (NLP) takes this a step further by identifying escalation intent. Phrases like “I need to speak to your manager” or “This has been going on for weeks” are clear indicators of dissatisfaction. AI spots these signals early, often before the customer officially escalates the issue.
By combining structured data (like case reopen patterns or response times) with unstructured signals (such as sentiment and intent), AI creates a risk model. For instance, if an account shows declining sentiment, repeated case reopenings, and reduced product usage, AI can label it as high-risk – even if no single factor alone would trigger an alert.
| Feature | Traditional CRM Tracking | AI-Driven Detection |
|---|---|---|
| Detection Method | Manual flagging or keyword rules | Automated sentiment and intent analysis |
| Data Type | Structured fields (checkboxes) | Unstructured text and "silent signals" |
| Timing | Reactive (after the event) | Predictive (before issues fully develop) |
| Scope | Single case status | Time-series patterns across accounts |
Let AI Process Data at Scale
AI excels at processing massive amounts of data. Using scalable Machine Learning-as-a-Service (MLaaS) systems, it can standardize data processing across thousands of interactions while continuously updating its models to reflect changes in industry-specific language and customer behavior.
It doesn’t stop at analyzing emails or support tickets. AI monitors interactions across voice, chat, email, and even social media, creating a unified risk profile for each customer. It also tracks subtle behavioral cues – like hesitation during navigation, slower typing speeds, or unusual shifts in a customer’s journey. For instance, if a customer who usually logs in daily suddenly stops using your product or takes significantly longer to reply, AI flags these deviations automatically.
Advanced Quality Monitoring (AQM) ensures that every interaction – whether with an agent or a bot – is scanned for risk signals. Instead of random sampling, AI evaluates all interactions, ensuring nothing slips through the cracks. Even better, AI can trigger reviews based on behavioral changes, eliminating the need for rigid, calendar-based check-ins. For example, if a customer’s behavior deviates sharply from their usual pattern, AI can prompt an immediate relationship review.
This automation lets your team focus on accounts that genuinely need attention, rather than wasting time on manual reviews or chasing after problems reactively. By turning subtle, often-overlooked signals into actionable insights, AI empowers you to address risks before they escalate. It’s a crucial step in setting up risk tags and ensuring timely interventions in the next phase.
Step 3: Build and Configure Your Risk Tag
Now that AI can detect risk signals in real time, it’s time to set up a system to flag and monitor at-risk accounts. A well-structured tagging system ensures your team and automation workflows are immediately informed about which accounts need attention.
Set Up Auto-Tagging Rules
Auto-tagging relies on three key elements: an event trigger, specific criteria, and an action to apply the tag [7]. For instance, if a customer reopens a case three times within 30 days, the system can automatically apply a relationship-risk tag to their account.
You can keep it simple with labels like at-risk or use key-value pairs such as status=at-risk [7]. Key-value pairs allow you to categorize accounts more effectively, like differentiating between risk-level=high and risk-level=moderate. This makes it easier to create workflows tailored to each risk category. Some platforms even use tag score sequences, where points are assigned based on specific behaviors. For example:
- Reopening a case: +10 points
- Negative sentiment score: +15 points
When the total reaches 50 points, the system applies the risk tag automatically [7].
Before implementing these rules, test them on historical data. Simulating the rules across past interactions helps you ensure accuracy without impacting live accounts [10]. If the tags are too broad or miss key risks, adjust your criteria before going live. Also, establish consistent naming conventions – like using lowercase or CamelCase, singular terms, and standardized separators. This keeps your tagging system clean and avoids confusion as it grows [8].
Once your rules are fine-tuned, deploy them in your support platform for real-time tagging.
Configure Risk Tags in Supportbench
Supportbench makes it simple to create and manage risk tags without needing IT support. You can define conditions like declining sentiment scores, repeated escalations, or reduced product usage, and the platform automatically applies the tag as soon as these conditions are met. Because Supportbench performs real-time lookups against your CRM data the moment a ticket arrives, the risk tag is updated instantly – no waiting for batch syncs [10].
For better organization, you can nest tags to create a visual hierarchy, such as #risk/high-churn or #status/at-risk. This reduces clutter and allows for more precise filtering in dashboards and reports [8]. Supportbench’s workflow engine then uses these tags to automate actions like escalating cases, assigning them to senior agents, or launching outreach campaigns – completely removing the need for manual intervention.
Start with a tag audit to eliminate outdated or conflicting tags. Document your tagging structure in a central governance file so everyone on your team knows what each tag represents and how it’s applied. This keeps your system organized and ensures it remains effective as your customer base expands [9].
Step 4: Create Workflows That Respond to Risk Tags
Risk tags only deliver value when paired with workflows that translate them into timely, effective actions. The aim is to automate responses based on the severity of the risk, allowing your team to address potential issues before they escalate into cancellations.
Set Up Escalation Rules
Escalation rules are essential for directing high-risk accounts to the right team members. For instance, when a relationship-risk tag is applied, your workflow should automatically mark the ticket as Urgent and assign it to a senior agent or support team [12]. These team members should have the authority and context needed to resolve the issue quickly, essentially creating a "fast lane" to reduce customer frustration.
Workflows should also trigger immediate alerts through channels like #risk-alerts or direct emails to Customer Success Managers. For example, if an account’s health score drops below 40, the system can notify the team and schedule a save call within 48 hours [11]. Companies using structured escalation processes have reported up to a 60% reduction in resolution times [13].
"The key to handling escalations is fast response, active listening, and full ownership. Escalations often come from a breakdown in trust, so showing up with transparency and consistency makes all the difference." – Shadman Rahman, Customer Success at Paramify [13]
Supportbench provides real-time updates for escalation rules [10]. You can also establish multi-level escalation paths, escalating from junior support to executive oversight as risks intensify. This ensures that critical issues receive the attention they need at the appropriate level [13].
While escalations are crucial for mitigating significant risks, proactive outreach can address less severe situations.
Trigger Outreach and Retention Actions
Not all risks call for escalation. For medium-risk accounts (with health scores between 41–70), workflows can trigger proactive outreach instead. Actions might include scheduling a Quarterly Business Review or reinforcing the product’s value before the relationship deteriorates further [11].
AI tools can also help by identifying potential escalation signals. For example, natural language processing can detect phrases like "I need to speak to your manager" and prompt immediate alerts [1]. In one case, a B2B SaaS company using a predictive churn system identified at-risk accounts 60 days before cancellations. This approach resulted in a 52% save rate for flagged accounts, cutting monthly churn from 4.2% to 2.1% [11].
Supportbench’s workflow engine automates many of these actions, from updating ticket fields to routing cases based on region or triggering targeted email campaigns. It can also append internal notes with recent order history or sentiment data, giving agents a complete picture when they open a case [10]. This ensures that outreach is timely, well-informed, and tailored to the specific challenges of each account.
Step 5: Track Results and Adjust Your Approach
To effectively prevent churn, it’s essential to measure how well your risk tags are performing. While automated risk detection is a great foundation, tracking results ensures your retention strategies are working. Without consistent evaluation, you can’t confirm if your workflows are targeting the right accounts or delivering the desired outcomes. Start by defining clear metrics to assess tag performance.
Measure Tag Performance
Focus on key metrics to evaluate how well your risk detection system is functioning:
- Alert Accuracy: This measures the percentage of flagged accounts that genuinely required action. Your goal should be for 70–80% of alerts to be actionable by your team [1].
- Recovery Rate: Track the percentage of at-risk accounts that return to a "Healthy" status after your workflows are triggered.
- Time-to-Intervention: Measure how quickly your team responds once a risk tag is applied. Faster responses often lead to better outcomes.
Organizations using predictive AI to spot risk patterns have reported cutting formal escalations by up to 50% [1].
"You cannot predict what you do not structurally capture." – Monika Voorhis, Senior Solutions Architect, SupportLogic [1]
Every escalation should be classified as either "Preventable" (caused by delays or miscommunication) or "Non-Preventable" (due to product or infrastructure issues) [1]. Additionally, monitor escalation density at the account level to determine if problems are isolated or part of a larger trend. Keep an eye on downstream churn – whether accounts that were "saved" eventually leave – to uncover areas for improvement.
Update Criteria and Rules Based on Data
The insights gained from tracking performance should guide adjustments to your approach. Start by running new risk tagging rules for at least 90 days to establish a baseline. During this time, review false positive rates monthly. If your team is bogged down by non-critical alerts, adjust risk thresholds to reduce noise. Plan to refine tagging rules, thresholds, and workflows every quarter based on the data and evolving customer behavior.
For a deeper understanding of customer risk, combine technical metrics with sentiment trajectory analysis. Pay attention to whether a customer’s emotional intensity escalates across multiple interactions, as this is often a better predictor of churn than one isolated complaint. Use natural language processing to spot "Escalation Intent Language" – phrases like "I need to speak to your manager" – so you can address issues before they become formal escalations [1].
Finally, implement closed-loop learning by feeding every risk outcome – whether the account was "Saved", "Churned", or flagged as a "False Alarm" – back into your scoring model. This continuous feedback helps improve the accuracy of your system over time. Tools like Supportbench’s workflow engine and reporting features simplify tracking these results and making necessary adjustments.
Conclusion: Prevent Churn with Early Risk Detection
The steps outlined above offer a clear framework for spotting risks early. By using a well-set-up relationship risk tag, your team can catch warning signs before they snowball, giving you the chance to act swiftly. Often, the difference between saving a high-value account and losing it comes down to how fast you respond to that initial signal.
Early detection opens the door for recovery meetings and tailored 30-day recovery plans to address issues before they spiral out of control [14]. Jimit Mehta from Abmatic highlights this perfectly:
"A 10-percent drop in usage by itself is noise; a 10-percent drop in usage combined with other signals is a near-certain churn signal" [14].
By combining multiple signals, you get a much clearer and more reliable picture of potential churn than relying on a single metric.
The return on investment (ROI) for early risk detection is undeniable: saving one large account often costs less than acquiring three smaller ones [14]. Risk-based segmentation allows you to focus on high-value, high-risk accounts, enabling executive-level intervention within 48 hours. Meanwhile, automated win-back strategies can handle lower-value accounts without stretching your team too thin. This method not only prevents revenue loss but also safeguards upsell opportunities, even when customers aren’t fully churning but are scaling back or downgrading services. It shifts your approach from reactive support to proactive management.
To stay effective, keep refining your risk segments. Update them at least weekly – stale segments lead to outdated decisions and missed chances [14]. Use closed-loop learning to feed every outcome back into your model. Tools like Supportbench’s workflow engine and reporting features can help you monitor progress and fine-tune your strategy based on actual results.
This cohesive framework – built on clear criteria, AI-driven detection, automated tagging, and actionable workflows – shifts your support strategy from simply solving problems to actively managing risks, ensuring your customers and revenue are well-protected.
FAQs
How do I choose risk thresholds that fit my customer segments?
To define risk thresholds for your customer segments, consider the unique characteristics and behaviors of each group – like comparing enterprise clients to SMBs. Leverage AI-driven scoring models to evaluate patterns such as product usage, support engagement, and customer sentiment. Then, cross-check these scores against historical data to ensure accuracy. Adjust the thresholds to align with each segment’s risk tolerance, enabling timely and customized actions that align with your operational objectives.
What’s the fastest way to start auto-tagging relationship risk with limited data?
To efficiently flag relationship risks when data is limited, consider using rule-based automation. Start by outlining straightforward criteria such as negative sentiment, declining activity, or existing CRM risk indicators. Configure your support platform to apply tags automatically when these conditions are met. Additionally, integrate AI-driven sentiment analysis tools to identify potential problems and assign the ‘relationship risk’ tag automatically. This approach allows for quick, proactive responses with minimal effort.
How do I reduce false alarms without missing real churn risk?
To cut down on false alarms while still catching real churn risks, it’s important to strike the right balance between sensitivity and specificity. Here’s how you can do it:
- Keep an eye on multiple signals like payment problems, shifts in customer sentiment, or noticeable behavior changes. These can serve as early warning signs.
- Leverage AI-powered sentiment analysis to better understand how customers feel about your product or service.
- Establish clear thresholds for triggering alerts, so your system isn’t flagging every minor deviation.
Make it a habit to regularly review alerts and fine-tune your detection models using feedback. This ensures your system evolves over time, helping you pinpoint genuine risks while cutting down on unnecessary noise.