Switching from Salesforce to a helpdesk portal requires precise planning to ensure your permissions and role-based access remain secure and functional. The process involves transitioning from outdated Profile-based permissions to a modular system using Permission Sets and Permission Set Groups. This approach simplifies management, reduces errors, and aligns with Salesforce‘s latest best practices.
Here’s how to manage the transition effectively:
- Review Current Permissions: Inventory all user permissions, focusing on roles and profiles. Transition to Permission Sets and Groups for a more flexible structure.
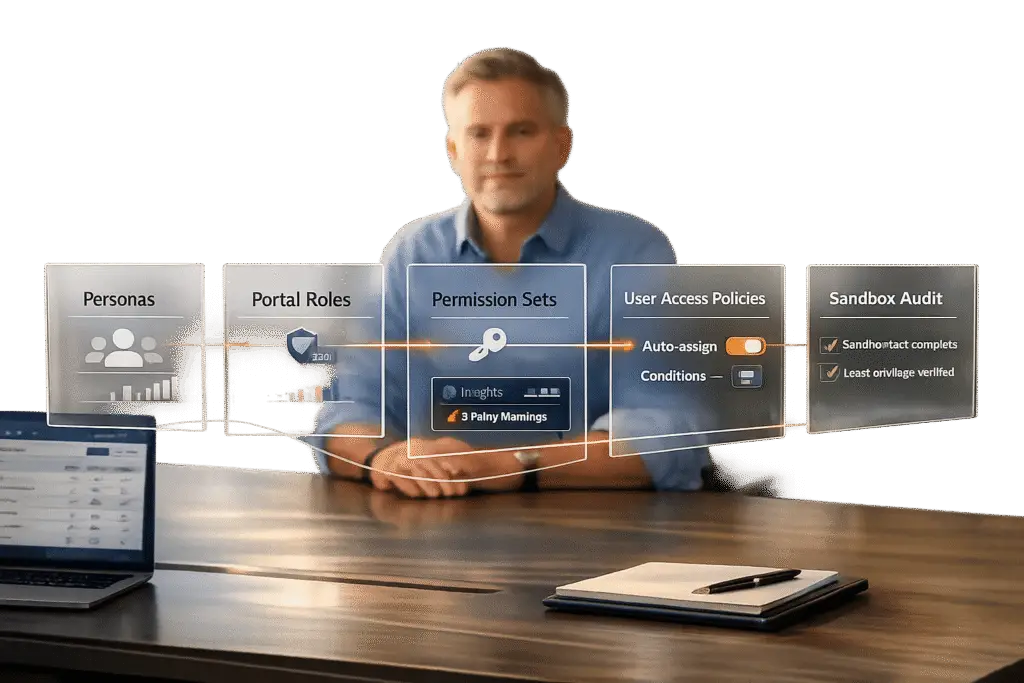
- Map Roles to Portal Access: Define functional personas (e.g., Agent, Manager) and assign appropriate permissions. Use tools like Persona Mapping Tables to stay organized.
- Identify Gaps: Ensure Salesforce permissions align with your portal’s requirements. Address overlapping or missing permissions before migrating.
- Align and Test: Create a Role Alignment Table to map Salesforce roles to helpdesk permissions. Test configurations in a sandbox environment to avoid disruptions.
- Automate and Audit: Leverage User Access Policies and AI workflows to automate role assignments and audits. This minimizes manual errors and ensures proper access control.
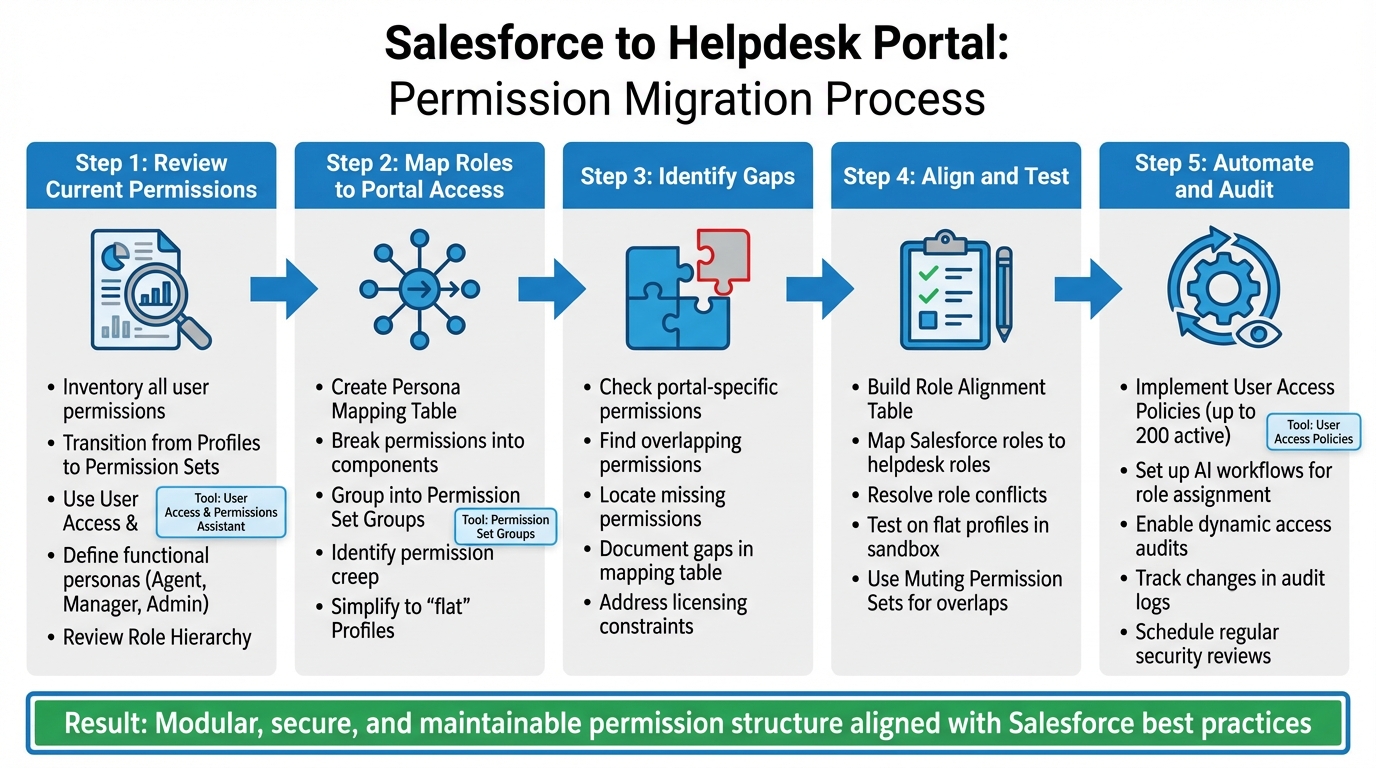
5-Step Process for Migrating Salesforce Permissions to Helpdesk Portal
Webinar: Navigating the shift from Profiles to Permission Sets
Review Your Current Salesforce Permissions and Role Structure
Start by taking a detailed inventory of all permissions in your Salesforce organization. If you’re still relying on older Profile-based structures, it’s time to transition to a more flexible model using Permission Sets and Permission Set Groups. Salesforce is moving away from Profiles as a primary permissions tool, so adopting this modular approach will help you stay aligned with best practices.
A great first step is to install the User Access and Permissions Assistant. This free app allows you to analyze user-level permissions and trace their origin, whether they come from a Profile or a Permission Set. To make this process even smoother, enable Enhanced List Views for Roles, Profiles, and Permission Sets in your User Management Settings. This tool is invaluable for mapping out permissions accurately and documenting them effectively.
Instead of documenting permissions for each individual user, focus on defining key functional personas – like Agent, Manager, and Admin – and outline the specific permissions each role requires. As Caitlin Graaf, a Solutions Architect at Salesforce Ben, explains:
"Shifting permissions from Profiles to Permission Sets allows for a modular permissions model, giving admins more control over who sees what – enabling a simpler, more maintainable Profile structure".
You’ll also need to review your Role Hierarchy to understand how vertical access works. In Salesforce, users higher up in the hierarchy automatically gain access to records owned by those below them. This inherited access must be considered when mapping permissions for your helpdesk portal. If your Salesforce org was created in Spring ’21 or later, it can support up to 5,000 roles. Older orgs are typically capped at 500 roles unless you’ve requested an increase. Streamline your Role Hierarchy by eliminating unnecessary roles – don’t create unique roles for every job title unless they have a distinct purpose related to data visibility.
Once you have a clear picture of your existing permissions and roles, you can move on to assigning access levels for each functional persona.
Map User Roles and Permission Sets to Access Levels
With your current structure documented, organize access levels based on user functions. Break permissions into smaller components, such as "Read Only Cases" or "Create/Update Cases", and group them into Permission Set Groups tailored to each helpdesk persona. To keep this process organized, create a Persona Mapping Table that outlines which Permission Sets are assigned to each role. For instance:
- A Helpdesk Agent might need "Read Only Cases" and "Create/Update Cases."
- A Helpdesk Manager might require those permissions plus "Delete Cases" and "Manage Knowledge."
To uncover hidden issues, use custom report types like "User License Assignments" and "Public Group Members" to see who has access to what features and groups. This will help you identify permission creep, where users retain excess permissions from previous roles. Review this carefully to decide what should be carried forward to the helpdesk portal and what should be retired. If you’re still relying on legacy Profiles, now is the time to simplify them by creating "flat" Profiles – Profiles without embedded permissions – and using Permission Set Groups instead.
Identify Gaps That Impact Portal Transition
Not all Salesforce permissions will carry over seamlessly to your helpdesk portal. Some permissions are specific to portals, while others may not be supported at all, depending on your licensing model. For example, Experience Cloud or portal licenses come with different permission constraints compared to standard internal Salesforce licenses. It’s essential to identify where Salesforce permissions fall short of your portal’s access control needs.
Once you’ve mapped permissions, evaluate them for inconsistencies. Look for overlapping permissions that could create security risks, such as users having both read-only and full edit access to the same object through different Permission Sets. Also, check for missing permissions that your helpdesk agents will need but don’t currently have in Salesforce. Document these gaps in your Persona Mapping Table so you can address them during the alignment phase. As Graaf points out:
"Leveraging this modular design also reduces technical debt and makes the system easier to interpret".
Skipping this step could lead to layering new portal permissions on top of an inconsistent structure, making it difficult to ensure users are seeing only what they’re supposed to. By addressing these gaps now, you’ll set the stage for a smoother portal transition.
Align Salesforce Roles with Helpdesk Portal Permissions
After documenting your Salesforce structure and identifying any gaps, the next step is to align Salesforce roles with helpdesk portal permissions. This ensures that users maintain the right level of access when transitioning to the portal – minimizing security risks and avoiding functionality issues. Instead of relying on job titles, base role mapping on functional personas and follow established mapping practices. A Role Alignment Table will help make this process clear and actionable.
Build a Role Alignment Table
A Role Alignment Table serves as a blueprint for mapping Salesforce personas to their corresponding helpdesk roles. It should detail permissions, data visibility, and restrictions for each role. For example:
- Map an End User to a "ServiceDesk Client" role, granting access to the Self Service portal and Chatter.
- A Support Agent would align with "ServiceDesk Staff", gaining access to the Remedyforce Console, Dashboard, and CMDB.
- A Change Manager would receive the "ServiceDesk Change Manager" permission set, while a System Administrator would be mapped to "Remedyforce Administrator" for full configuration access.
The table should also include the Permission Set Groups tied to each helpdesk role. For instance:
- A Program Officer might receive "Read Only Program" and "Create/Update Program" permission sets.
- A Finance Officer could be assigned "Read Only Budget" and "Create/Update Budget".
By bundling granular permissions into manageable groups, this modular approach simplifies ongoing management and audits.
One key tip: avoid cloning out-of-the-box (OOTB) permission sets provided by your helpdesk integration. Cloned sets won’t automatically update with new fields or features during system upgrades. Instead, create separate permission sets for custom requirements and assign both the OOTB and custom sets to users.
Resolve Role Conflicts and Overlapping Permissions
Once the Role Alignment Table is complete, address any overlaps or conflicts in permissions. It’s important to distinguish between action permissions (profiles/permission sets) and data visibility (roles/hierarchies). Bijay Kumar, Founder of SalesforceFAQs.com, highlights this distinction:
"Roles focus on data access and visibility in the organization hierarchy… Profiles, on the other hand, control what users can do in Salesforce".
To handle overlaps, use flat profiles to eliminate legacy overrides. If a Permission Set Group grants more access than necessary, apply Muting Permission Sets to remove specific permissions without affecting the rest of the group.
When users switch roles or personas, implement User Access Policies to automatically revoke outdated permissions and assign new ones. This prevents "permission creep", where users accumulate unnecessary permissions over time. Adding a custom Persona__c field to the User record can trigger these automated updates, ensuring permissions remain consistent.
Finally, always test new portal permissions on flat profiles to confirm they provide only the intended access levels, free from legacy overrides. These steps ensure your helpdesk portal mirrors the secure and efficient access model of your Salesforce environment.
Set Up Role-Based Access in the Helpdesk Portal
To align your helpdesk portal with Salesforce’s access model, start by configuring roles, groups, and syncing Salesforce data. This ensures a secure, layered structure without unnecessary complexity or security risks. Once roles are established, configure your portal to reflect these access levels.
Configure User Roles, Groups, and Permissions
Design your portal’s access framework using Permission Sets and Permission Set Groups instead of relying solely on profiles. This modular setup simplifies management and avoids unnecessary complications.
For portal users with high-volume access who don’t fit into the standard role hierarchy, set up Sharing Sets and Share Groups. These tools allow you to control record access effectively. The Role Hierarchy provides vertical access, enabling managers to automatically view data owned by their subordinates. Keep this structure lean to minimize administrative burdens.
For broader sharing and task management, leverage Public Groups and Queues. When integrating your helpdesk system, assign one unique user per integration rather than sharing accounts. This approach limits security risks if credentials are compromised. Use the "Minimum Access – API Only Integrations" profile, which restricts access to Salesforce exclusively through APIs like REST, SOAP, or Bulk, preventing login through the user interface.
To further secure integration access, configure Login IP Ranges on the integration profile to match the published IP ranges of your helpdesk portal provider. This adds a layer of protection against unauthorized access, even if OAuth tokens are compromised. Jennifer W. Lee, Salesforce’s Lead Admin Evangelist, highlights this approach:
"As a security-minded admin, you should follow the principle of least privilege… limiting users’ access rights to only what is required to do their jobs."
Start with no permissions and gradually add rights during sandbox testing until the sync process is validated. For Enterprise, Unlimited, and Performance Edition orgs, Salesforce includes five integration user licenses at no additional cost, while Developer Edition orgs receive one.
This setup ensures your helpdesk portal aligns with Salesforce’s security and access controls. Once roles are configured, proceed to sync Salesforce data for real-time updates.
Sync Salesforce Data for Real-Time Updates
To keep your helpdesk portal updated with the latest account and case data, implement User Access Policies. These policies automatically adjust permissions when user records are modified, such as when a user changes departments or roles. This automation can handle updates to permission sets, permission set groups, licenses, and public groups.
Use OAuth scopes – api (for managing data), refresh_token (for maintaining a persistent connection), and offline_access (for background tasks) – to ensure smooth data synchronization. Always test these configurations thoroughly in a sandbox environment before deploying them to production.
For larger organizations, the SOAP API can streamline the assignment of roles and permissions, avoiding the need for manual configuration. Ensure every user is assigned a role, as unassigned users might not appear in critical reports like opportunity forecasts, which your helpdesk portal depends on for visibility.
Avoid making changes to the role hierarchy or complex sharing rules during business hours to prevent service disruptions or locking issues. Additionally, enable delegated administrators to manage users within specific roles and their subordinate groups. This delegation simplifies user management in large-scale helpdesk environments.
sbb-itb-e60d259
Automate Role Assignment and Access Audits with AI
Managing permissions manually can bog down operations and leave room for security vulnerabilities. By automating these processes with AI, you can analyze Salesforce data to assign roles, audit access, and update permissions in real time. This not only saves time but also ensures strong security measures are consistently upheld.
Use AI to Assign Roles Based on Salesforce Data
AI workflows can streamline role assignment by analyzing Salesforce records. For instance, User Access Policies, introduced in Summer ’24, allow organizations to automate the granting and revoking of Permission Sets, Permission Set Groups, and licenses based on specific criteria. These policies are highly scalable, supporting up to 200 active policies at once to handle even the most complex access needs.
Policies can be configured to trigger automatically when user records are created or updated. They rely on filters such as Profile, Role, Department, and up to 10 additional fields. For example, you could create a custom Persona__c field on the User object to serve as the central reference for AI workflows. Whenever an AI agent updates this field – perhaps due to a job change or organizational restructuring – the User Access Policy engine adjusts permissions accordingly.
Take Maria Jimenez, a System Administrator at Ursa Major Solar, as an example. In mid-2024, she used User Access Policies to shift her Support team from a profile-based model to one centered on permission sets. By focusing on the "Custom: Support Profile" and active status, she bulk-assigned the "Support_User" permission set group to her team. This significantly reduced the time spent on manual configurations.
"User Access Policies can be fully automated based on criteria… ensuring there’s less chance of users not having the correct access to perform their tasks as they join the company or change roles." – Andreea Doroftei, Salesforce Technical Instructor
When implementing these policies, assign an "Order" value to each one. This ensures that if a user meets multiple criteria, the most relevant policy is applied first. Before rolling out these policies in production, always test them in a sandbox environment to avoid unintended access changes or mass revocations.
Once roles are assigned, you can rely on AI to continuously audit and refine access as your organization evolves.
Run Dynamic Access Audits and Permission Updates
Assigning roles is just the first step; ongoing audits are essential to ensure permissions remain accurate and secure. The "Recent User Access Changes" log tracks all updates – whether manual or automated by the "Automated Process" user – making security audits much easier. This visibility supports adherence to the principle of least privilege, ensuring users only access the information and resources they truly need.
Policies can also include "Revoke" actions to remove outdated permissions as roles change. For instance, if an employee transitions from Finance to Marketing, the AI workflow updates their Persona__c field. This triggers one policy to revoke their Finance permissions and another to grant Marketing access.
Dynamic auditing is already delivering results in large organizations. In February 2026, Goldman Sachs implemented Anthropic’s Claude AI model to create autonomous agents for tasks like client vetting and onboarding. Under the leadership of Chief Information Officer Marco Argenti, the bank worked with Anthropic engineers for six months to embed these systems. The initiative aims to streamline operations and manage headcount growth by using AI as a "digital co-worker" for complex, process-heavy tasks.
"Think of it as a digital co-worker for many of the professions within the firm that are scaled, are complex and very process intensive." – Marco Argenti, Chief Information Officer, Goldman Sachs
To further enhance security, use the Salesforce Health Check tool to compare your settings against standard baselines. Additionally, monitor administrator audit trails for up to 180 days to track all access changes and maintain a secure environment.
Test, Audit, and Reduce Transition Risks
Once you’ve mapped out and automated role assignments, the next step is thorough testing and auditing. This ensures permissions are secure and minimizes disruptions during the transition. A structured approach to these tasks can help ensure everything runs smoothly.
Test Permissions Across Different User Types
Begin by testing with blank profiles – these are profiles with no pre-existing permissions. By layering your new Permission Sets and Permission Set Groups onto these blank profiles, you can confirm that the correct access is being granted. Testing on profiles that already have legacy permissions may hide gaps in your new setup.
"Test your new permissions on top of ‘flat’ Profiles (that don’t contain permissions); if you layer them on top of your existing Profiles you won’t be able to test effectively." – Caitlin Graaf, Solutions Architect
Perform these tests in a sandbox environment before deploying changes to your live system. Manually review sample user records to confirm permissions are correctly assigned. Check the role hierarchy to ensure it allows proper vertical access – managers should be able to view records owned by their subordinates or shared within their team. Make sure every user is assigned a role, as users without roles may be excluded from reports, dashboards, and forecast roll-ups in the portal.
Avoid making changes to the role hierarchy during business hours. While Salesforce organizations created in Spring ’21 or later can support up to 5,000 roles, modifying the hierarchy during peak usage can lead to system disruptions and access problems for active users.
Once testing confirms that permissions are correctly configured, shift your focus to running detailed security audits.
Run Security Audits
Security audits are essential for identifying vulnerabilities before they become issues. Use the User Access and Permissions Assistant to analyze permissions, generate user-specific reports, and convert existing Profiles into Permission Sets. With the "View User Access Summary" feature, you can see exactly what permissions a user has across objects and fields, making it easier to spot inconsistencies.
Track permission changes using the Setup Audit Trail, which retains records for six months. For sensitive data, such as personally identifiable information (PII) or financial records, the Field Audit Trail stores field history for up to 10 years. Regularly review login history to spot unauthorized access or suspicious activity – pay attention to IP addresses as well as success and failure rates during the transition.
| Audit Tool | Data Tracked | Retention Period |
|---|---|---|
| Setup Audit Trail | Changes to profiles, permission sets, and configurations | 6 Months |
| Field Audit Trail | Modifications to specific fields like PII or financial data | Up to 10 Years |
| Login History | User login attempts, IP addresses, success/failure status | Varies by Org |
| User Access Assistant | Object/user permissions analysis and assignment reporting | Real-time Analysis |
Document your permissions model in a design artifact that includes the profile structure, Permission Set definitions, and Permission Set Group mappings. This documentation serves as a reference, making debugging and audits easier as your organization grows and evolves. Once the transition is validated, deprecate old profiles to reduce technical debt and simplify administration.
Set up automated alerts to notify administrators of unusual events, such as multiple failed login attempts or unauthorized system changes. Also, schedule regular cleanups to remove outdated roles and permissions.
Conclusion
Switching Salesforce permissions to a modular, Permission Set–based structure simplifies maintenance and reduces technical debt. Start by defining functional personas – such as "Tier 1 Support" or "Finance Officer" – and connect them to Permission Set Groups. These groups bundle the exact access needed for each role, ensuring a secure and efficient setup for AI-powered B2B customer support operations.
"Transitioning from a Profile-driven to an automated Permission Set-driven permissions model can help to streamline and simplify permissions management in Salesforce." – Caitlin Graaf, Solutions Architect
Automation plays a key role in this process by reducing manual errors and ensuring users get the right access instantly. With User Access Policies, available since Summer ’24, organizations can automatically assign or revoke Permission Sets, licenses, and groups based on predefined criteria. Up to 200 active policies can run simultaneously, streamlining complex onboarding and role transitions without requiring admin intervention.
Before rolling out changes in production, thorough testing and auditing are critical. Use a sandbox environment to test permissions on "flat" profiles, leverage the User Access and Permissions Assistant to analyze assignments and detect gaps, and document your permissions model in detail. An automated and well-structured permissions model ensures secure and uninterrupted support operations.
"Making sure that your users have the right data access and that your access setup is maintainable is a complex task that requires time and attention… Allocate enough time to plan, test, and implement these important updates." – Salesforce Help
FAQs
What are Permission Set Groups, and how do they simplify access management in Salesforce?
Permission Set Groups in Salesforce let administrators bundle multiple permission sets into a single group. This makes assigning permissions to users based on their roles or responsibilities much easier and more organized. Instead of assigning permissions one by one, admins can simply apply a pre-configured group, streamlining the entire process.
These groups help ensure consistency, speed up onboarding, and reduce the chance of mistakes. For example, when a new team member joins, admins can assign a relevant Permission Set Group rather than manually selecting multiple permissions. This not only saves time but also ensures everything is set up correctly from the start.
Permission Set Groups also support automation, like AI-driven role assignments, which further cuts down on administrative work. They’re especially handy during transitions – such as moving to a helpdesk portal – by keeping access secure and well-structured.
How can I identify and fix permission gaps during the migration to a helpdesk portal?
To tackle permission issues during the switch from Salesforce to a helpdesk portal, the first step is to perform a thorough permissions audit. This means carefully mapping out the roles and permissions in Salesforce and aligning them with the structure of the new helpdesk system. The goal is to ensure every user has access that matches their job responsibilities while spotting problems like overly broad permissions or missing access.
Leveraging automation tools or workflows can make this process faster and more accurate. These tools can flag inconsistencies and help assign roles more efficiently. It’s also crucial to schedule regular access reviews, both during the migration and afterward, to keep the system secure, ensure compliance, and maintain the proper user hierarchy.
By focusing on precise role mapping, using automation, and committing to ongoing reviews, you can transition to the helpdesk portal smoothly while safeguarding operations and protecting sensitive data.
How does AI simplify role assignments and access audits during the move to a helpdesk portal?
When moving from Salesforce to a helpdesk portal, AI makes assigning roles and auditing access much easier. By examining user roles, activity patterns, and organizational data, AI can automatically assign permissions that match each user’s specific needs. This reduces the need for manual work and helps avoid mistakes, ensuring users get the access they need – without granting too much.
AI also boosts security and compliance by constantly monitoring permissions and spotting outdated or suspicious access patterns. Automated workflows can flag or adjust permissions as necessary, keeping your system secure and current. These features not only save time but also lower the chances of security issues during and after the transition.
Related Blog Posts
- Which helpdesk has the best Salesforce integration?
- How do you set up a customer portal that supports role-based access and multiple customer teams?
- How do you design role-based customer portals for B2B (multiple users, permissions, reporting)?
- How do you map Salesforce Case fields, Record Types, and Statuses to a new helpdesk?