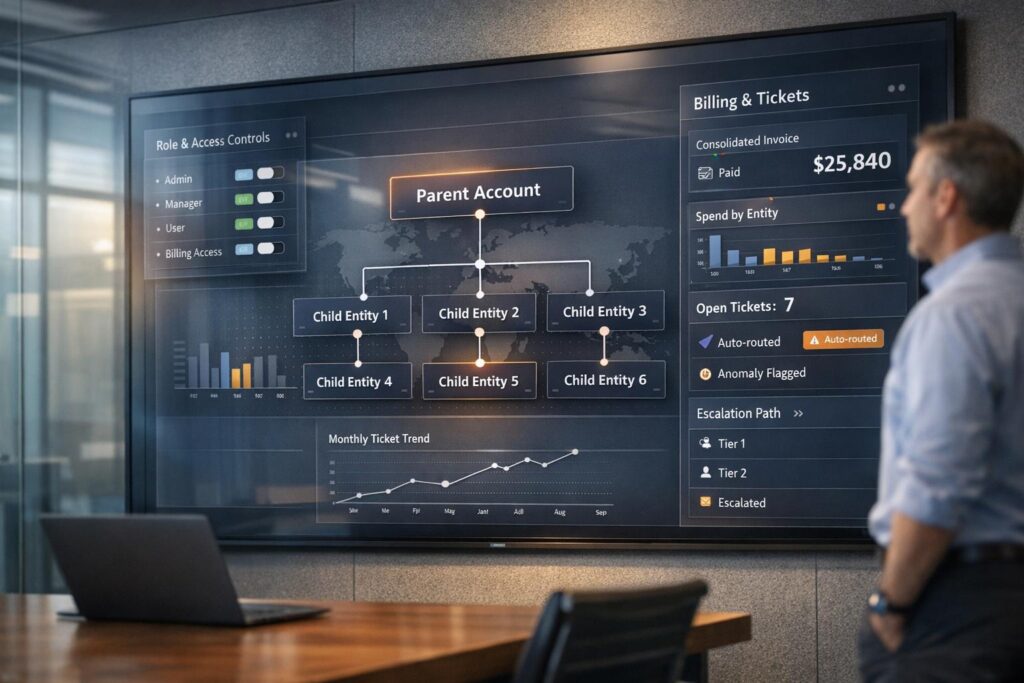
Designing a customer portal that supports parent/child (multi-entity) accounts is essential for businesses managing complex hierarchies. A well-structured portal offers consolidated financial views, granular control for sub-entities, and flexible billing options like consolidated invoicing or split billing. This helps streamline operations, reduce errors, and improve customer experience.
Here’s how to create one:
- Map Account Hierarchies: Identify relationships between parent and child entities, such as legal, financial, or geographical connections. Use a modern support CRM to define these structures clearly.
- Set Role-Based Access Controls (RBAC): Assign permissions based on user roles and hierarchy levels. Parent accounts can view child data, but child accounts are restricted from accessing parent or sibling data.
- Design Intuitive Navigation: Include hierarchy charts, breadcrumb navigation, and dashboards tailored for parent and child entities to improve usability.
- Automate Permissions and Hierarchy Management: Use AI to handle tasks like account segmentation, permissions assignments, and orphaned account detection.
- Enable Custom Reporting: Allow users to toggle between detailed and aggregated views for financials, support tickets, and usage metrics.
- Implement Escalation Rules: Use workflows to manage urgent issues across entities, ensuring timely resolution.
A properly designed portal simplifies complex relationships, improves data visibility, and supports growth by handling up to five hierarchy levels and 250 child accounts per parent. This ensures scalability and efficiency for enterprises managing multi-entity structures.
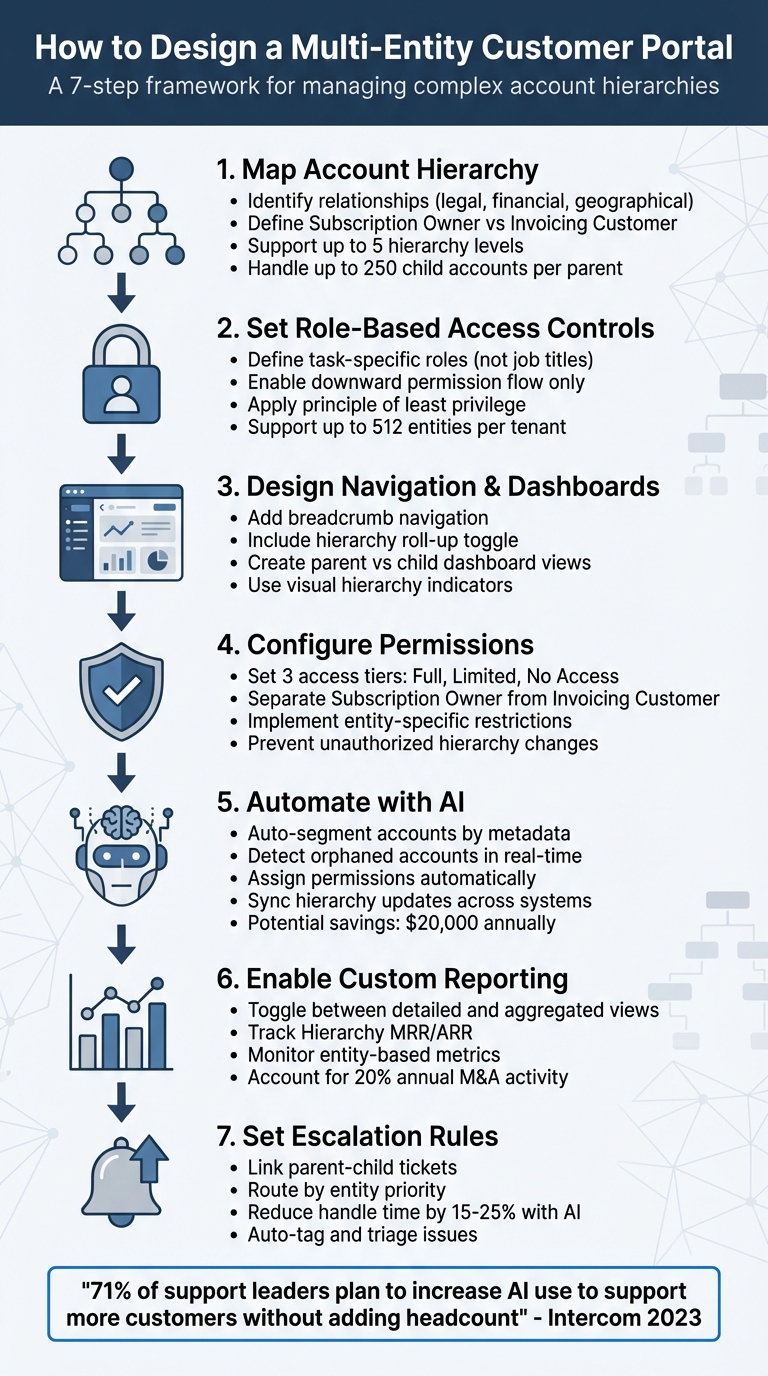
7-Step Process for Designing Multi-Entity Customer Portals
Create Unlimited Client Portals With Deep Personalization Options
sbb-itb-e60d259
Step 1: Map Your Account Hierarchy and Define Entities
Before diving into permissions or dashboard design, take the time to document your customer relationships. This step is essential because it shapes how your portal handles billing, data access, and more. Getting the structure right early on can save you from expensive revisions down the road.
Identify Key Account Relationships
Start by understanding why entities are connected. Is it due to legal ownership (like subsidiaries or holding companies), operational dependencies (such as departments using the service), financial responsibility (who pays the bills), or geographical structure (regional offices or branches)? Each connection type requires specific treatment.
"A properly built Account Hierarchy provides critical visibility across your business… it becomes easy to see who the global parent is, which regional entities roll up to it, and how different divisions or brands fit together." – JP Leggett, CEO and Founder, Squivr [6]
One of the most important distinctions to clarify is between the Subscription Owner (the entity actively using your service) and the Invoicing Customer (the entity responsible for payment) [2][5]. For instance, Acme France might use your platform daily, but Acme Corp headquarters handles the invoices. Your portal must reflect this separation to route invoices correctly while ensuring the right teams access usage data.
To create these connections, use a standardized Parent Account lookup field in your CRM. You can also add an "Ultimate Parent" formula field that automatically identifies the highest-level account in the hierarchy on every child record [3]. This approach makes it easier to trace any account back to its root organization, even in complex setups with up to 5 hierarchy levels and as many as 250 direct child accounts under a single parent [2].
Set Clear Boundaries for Each Entity
Once you’ve mapped the relationships, define clear boundaries for each entity. This includes deciding who can access the portal, what data they can view, and which payment methods they can use. Without clear boundaries, you risk data leaks and confusion over subscriptions.
During this phase, establish access tiers for parent entities. Will they have "Full Access" to view and edit child subscriptions, "Limited Access" for view-only permissions, or "No Access" to maintain complete separation [2]? Document these decisions upfront, as making changes after launch can disrupt customer workflows.
Assign unique identifiers, such as SKUs, subscription numbers, or invoice numbers, to avoid conflicts in the shared portal [7]. Include metadata tags like region, business unit, and contract type for each child account. These tags make filtering and reporting much easier and help your support team quickly understand the context of the account they’re handling.
Finally, ensure that any child account has no outstanding balances before linking it to a parent [2]. This precise mapping and boundary-setting process is the foundation for the streamlined, AI-driven portal design discussed in later sections. This structure allows you to automate and optimize your support workflows as the hierarchy scales.
Step 2: Set Up Role-Based Access Controls for Multi-Entity Visibility
Once you’ve mapped your accounts, the next step is configuring role-based access controls (RBAC). This ensures users only see the data they need for their specific roles. By building on your established account structure, you can fine-tune access controls to match each user’s responsibilities.
Define User Roles and Permissions
In multi-entity setups, roles should align with specific tasks, not just generic job titles. For instance, someone managing billing for a regional office shouldn’t automatically have access to global financial data. Instead, create task-specific roles like Billing Admin or User Manager rather than broad, superuser roles. This helps prevent delegated administrators from unintentionally accessing sensitive, high-level information.
"A role isn’t a job title, it’s a contract that says, ‘These are the actions this user can perform inside this organization.’" – LoginRadius [8]
It’s also important to separate administrative functions from data visibility. For example, a user who can reset passwords or manage team members in a child entity shouldn’t automatically gain access to customer records or financial reports tied to that entity.
Restrict Access Based on Hierarchy Levels
When designing access controls, make sure permissions flow downward – users with parent-level access can view child entities, but the reverse should not happen unless explicitly allowed. This prevents unauthorized access to higher-level or sibling entities. Even if roles share the same name across branches, permissions should be evaluated within the specific context of the entity being accessed.
Take Zuora‘s multi-entity architecture as an example. It supports up to 512 entities within a single tenant, but users created in one entity cannot access another unless an administrator explicitly grants permission [7].
For users who need access to multiple entities, include an entity switcher in your portal interface. This feature lets users toggle between different business units without needing to log in again [7]. Always apply the principle of least privilege – default roles should only grant the minimum access necessary. It’s much easier to add permissions later than to revoke overly broad access that users may have already incorporated into their workflows.
Step 3: Design Navigation and Dashboard Views for Account Hierarchies
Once access roles are defined, the next step is to create navigation and dashboard views that clearly highlight your account hierarchy.
Create Visual Indicators for Account Relationships
After establishing robust role-based access controls, it’s important to design navigation tools and dashboards that reflect your account hierarchy in an intuitive way. A dedicated section on account details pages should visually map the organizational structure. This feature allows users to quickly navigate between related entities without needing to search manually [9].
Breadcrumb navigation is another useful tool. It shows the path from the top-level account to the current entity. For instance, a breadcrumb might display: Global HQ > North America Division > Northeast Region. This approach is particularly helpful for navigating large hierarchies [2].
To further enhance clarity, accounts can be tagged with hierarchy labels like "Root" or "Leaf." When displaying account names in menus or charts, maintain a consistent order – such as starting with the company name, followed by the email address and then the customer ID. This consistency ensures the interface remains clear, even when some data fields are missing [9].
Customize Dashboards for Parent and Child Entities
Dashboards should be tailored to match the specific needs of parent and child accounts. For parent accounts, include a hierarchy roll-up toggle. This feature allows users to switch between viewing data for the parent entity alone or an aggregated view that includes all associated child accounts. The aggregated view can cover key areas like activities, financials, support tickets, and NPS history. This gives executives a comprehensive overview without requiring manual report compilation [9].
For child accounts, dashboards should focus on details specific to that entity. Examples include subscription status, local invoices, and detailed usage metrics. Parent dashboards, on the other hand, should highlight high-level metrics such as total MRR, receivables, and active accounts across the hierarchy [2]. In a multi-tier setup (e.g., A > B > C), data at the top level should encompass all tiers, while intermediate levels display their own data along with that of their direct subordinates [9].
| Feature | Parent Account View | Child Account View |
|---|---|---|
| Data Scope | Aggregated roll-up (parent + all children) [9] | Entity-specific (detailed metrics) [9] |
| Navigation | Can jump down to any child account [9] | Usually restricted to immediate parent or siblings [2] |
| Key Metrics | Hierarchy MRR, total receivables, active accounts [2] | Individual subscription status, specific invoices [2] |
| Access Control | Can often view/edit child subscriptions [2] | Restricted from viewing parent/sibling data [2] |
These customized dashboard views not only improve usability but also set the stage for automated hierarchy management and advanced reporting in future steps. By integrating these visual tools, users can navigate and manage account relationships more efficiently, ensuring smooth escalation management and reporting across the platform.
Step 4: Build Shared and Entity-Specific Permissions
Step 4 takes the role-based controls you’ve already established and fine-tunes them by balancing shared access with restrictions tailored to specific entities. The goal here is to create a system where permissions are both flexible and secure, ensuring that data is accessible to the right people while protecting sensitive information.
Enable Shared Access for Key Stakeholders
Certain roles, like finance directors, account managers, and compliance officers, often require visibility across multiple entities. To accommodate this, implement tiered access levels such as:
- Full Access: Allows editing capabilities and invoice downloads.
- Limited Access: Provides view-only permissions.
- No Access: Blocks access to child data for parent accounts.
For example, parent accounts can be configured to receive payment and invoice notifications, while child entities can receive updates about subscriptions. Parent contacts should also have a unified interface to view all associated child accounts, simplifying oversight [2][10].
It’s also important to separate responsibilities for usage tracking and payments. Designate the "Subscription Owner" as the entity using the service and the "Invoicing Customer" as the one handling payments. This setup ensures that while usage data is tracked at the child level, financial accountability remains centralized with the parent [5].
Once shared access is set up, the next step is to focus on restricting the flow of data to maintain privacy and compliance.
Set Up Entity-Specific Restrictions
Not all data should be accessible across the hierarchy. Child accounts often deal with proprietary data, regional compliance information, or sensitive financial records that shouldn’t be visible to parent entities. To protect this information:
- Prevent child accounts from using parent payment methods directly during checkout, even if the parent handles recurring charges [2].
- Use customer-level overrides for entities that require stricter privacy settings. For instance, if a child entity operates under specific data protection laws, the "Invoice to Self" setting ensures its financial records stay confined to that entity rather than rolling up to the parent [5].
- Restrict the ability to alter hierarchy or relationship settings to administrative or merchant-level users only. End-users should never have the authority to modify account structures, as this could lead to unauthorized access [2].
| Access Type | Parent Capabilities | Child Capabilities |
|---|---|---|
| Full Access | View/Edit child subscriptions, download invoices, receive all emails | View/Edit own subscriptions, download own invoices |
| Limited Access | View-only or restricted edit rights; limited to specific email types | View-only or restricted access to invoices and subscriptions |
| No Access | Cannot access child subscriptions or invoices via the portal | Standard access to own data; no visibility into parent data |
Step 5: Use AI to Automate Hierarchy Management
Once you’ve established permissions and navigation frameworks, the next step is leveraging AI to streamline hierarchy management. As account structures evolve – whether through mergers, acquisitions, or organizational shifts – manual management can quickly become a time drain. AI-driven automation eliminates this bottleneck by taking over repetitive tasks, reducing errors, and saving hours of administrative effort.
Unlike rigid, rule-based systems, AI uses dynamic logic to adapt to real-time inputs. It evaluates data such as user behavior, account metadata, and historical trends to make smarter decisions about account categorization and management [11]. Let’s break down how AI simplifies account segmentation and permissions configuration.
Automate Account Segmentation
AI can automatically group accounts based on metadata like region, business unit, contract type, or revenue tier [1]. This capability is particularly handy for handling orphaned accounts – child entities that lose their connection to a parent entity. These disconnected accounts often lead to audit issues and revenue attribution errors, but AI can detect and resolve them during routine audits [1].
For example, during a merger or acquisition, AI can update account relationships across systems like CRMs, billing platforms, and customer portals in real time. If a parent company acquires a subsidiary, AI can tag the new entity with the correct metadata and place it within the existing hierarchy automatically.
AI also bridges behavioral segmentation with structural organization. By analyzing patterns like support ticket volume or product usage, AI can suggest adjustments to the hierarchy. For instance, if a child entity experiences a sudden surge in activity, AI might recommend elevating it to a parent account or adjusting its placement within the structure [1].
Automate Permissions Configuration
Permissions management in complex hierarchies can be a logistical nightmare. Different users often require distinct roles across entities – for example, someone might be an administrator in one subsidiary but a standard user in another. AI simplifies this by automating permissions assignments based on user attributes, minimizing the risk of errors that could expose sensitive data or block legitimate access [12][13].
A great example of this in action comes from Popl, which used AI via Zapier to manage lead data across platforms like HubSpot and Salesforce. By deploying over 100 automated workflows, the company auto-categorized emails and enriched lead data in real time, saving $20,000 annually by eliminating manual integrations [11]. While this example focuses on leads, the same principles apply to permissions: AI evaluates user attributes and assigns roles automatically, ensuring efficiency and security.
AI can also route sensitive changes – like granting full financial access across all entities – for human approval, ensuring compliance while maintaining speed [11]. To avoid unexpected costs during large-scale updates, you can set token limits and cost-cap alerts within the AI system [11].
"AI orchestration introduces dynamic logic and adaptive behavior. It lets systems decide what to do next based on real-time inputs – like sentiment, context, or historical performance." – Nicole Replogle, Staff Writer, Zapier [11]
Additionally, AI can synchronize General Ledger (GL) journals at the entity level while rolling up Annual Recurring Revenue (ARR) to the parent account. This ensures compliance with revenue recognition standards such as ASC 606, avoiding misattributed revenue and keeping financial reports accurate, even during structural changes [1].
| AI Automation Task | Manual Approach | AI-Driven Approach |
|---|---|---|
| Account Segmentation | Manually tag accounts with metadata | AI auto-tags using metadata and usage patterns |
| Orphaned Account Detection | Quarterly manual audits to find disconnected accounts | AI resolves orphaned accounts in real time |
| Permissions Assignment | Administrators manually assign roles | AI assigns roles based on user attributes |
| Hierarchy Updates (M&A) | Update systems manually during mergers/acquisitions | AI syncs changes across all systems automatically |
Step 6: Enable Custom Reporting and Analytics by Entity
Once hierarchy management is automated, the next step is creating reporting tools that let users break down data by individual entities, parent accounts, or entire corporate families. Without these tools, support and finance teams are forced to manually piece together performance data across complex account structures. By introducing this functionality, you provide actionable insights that simplify both operational and financial management.
Provide Detailed and Aggregated Reports
With automated hierarchy management in place, reporting tools can deliver real-time insights across the entire account structure. Multi-entity portals often include a "Hierarchy roll-up" toggle on parent account pages, allowing users to quickly switch between data for just the parent entity or an aggregated view that includes all associated child entities [9]. For instance, a parent company might want a consolidated view of total support ticket volume across all subsidiaries but also the ability to drill down and identify which specific entity is generating the most cases.
The "Ultimate Parent" field is a key feature here, as it identifies the top-level entity in the hierarchy. This simplifies grouping in reports and enables consolidated metrics like "Total Group Revenue" to be calculated in a single view [14].
"The ‘SMB’ Trap: Your segmentation rules see a subsidiary with $5M revenue and assign it to a junior ‘Mid-Market’ rep, missing the fact that it is owned by a Fortune 500 giant." – Germain Bourgeois, Delpha [14]
It’s worth noting that approximately 20% of companies experience mergers, acquisitions, rebranding, or restructuring annually, which can disrupt account hierarchies if reporting tools aren’t automated [14]. Regular audits are essential to ensure the hierarchy remains accurate and that reports reflect the entire corporate family tree [1].
Include Entity-Based Metrics
Once detailed reports are in place, it’s important to define metrics that are meaningful at both the individual entity level and the overall hierarchy level. Your portal should highlight metrics that matter to both perspectives. Examples include:
- Hierarchy MRR/ARR: The total revenue from the parent entity and its immediate children.
- Hierarchy Last Seen: The most recent activity date across all accounts in the hierarchy.
- Hierarchy Next Renewal: The earliest renewal date among all entities [9].
For support operations, track metrics like SLA adherence, customer satisfaction scores, and case resolution times at both child and parent levels. To enable more advanced filtering in custom reports, tag child accounts with metadata such as region, business unit, and contract type [1]. On the financial side, sync entity-level General Ledger (GL) journals while rolling up ARR to the parent level for both detailed and consolidated reporting accuracy [1].
| Metric Category | Child Entity View | Aggregated View (Parent/Root) |
|---|---|---|
| Financials | Local MRR/ARR, specific deal values | Total Hierarchy MRR/ARR, Global revenue [9][14] |
| Support/Success | Individual support tickets, local NPS | Rolled-up ticket volume, average hierarchy NPS [9] |
| Engagement | Last seen date for specific entity | Hierarchy last seen (latest date across all nodes) [9] |
| Lifecycle | Local renewal date | Hierarchy next renewal (earliest date in the tree) [9] |
To maintain data accuracy, use persistent account IDs across CRM, billing, and portal systems to avoid revenue misattribution [1]. Additionally, AI-driven fuzzy matching can help identify relationships that might otherwise be overlooked – like recognizing "IBM" and "International Business Machines" as the same entity – ensuring the hierarchy stays accurate [14].
Step 7: Set Up Escalation and Workflow Rules Across Entities
Once you’ve established automated reporting and AI-driven insights, it’s time to focus on managing urgent issues across your account hierarchy. Without proper escalation and workflow rules, critical problems from high-value child entities might get stuck in generic queues, while less important tickets receive quicker responses. By implementing dynamic escalation logic, you can ensure the right people address issues promptly, even in complex setups.
Define Escalation Paths for Parent and Child Accounts
A solid strategy involves using parent-child ticket linking. This allows a main request to break into smaller, more manageable tasks assigned to various departments or entities. For instance, imagine a Fortune 500 parent account requests a product rollout across five subsidiaries. The system can automatically create five child tickets – one for each subsidiary’s technical team – while keeping a centralized view on the parent ticket for seamless tracking [15].
Synchronization between parent and child tickets is crucial. Set rules so a parent ticket only closes after all child tickets are resolved [15]. For time-sensitive issues, conditional routing ensures they go directly to on-call engineers or parent account managers, while routine incidents are sent to entity-specific queues [11].
To avoid delays, configure triggers that alert the parent account’s primary stakeholder if a child ticket remains unresolved for more than 48 hours [15]. For escalations involving sensitive matters like legal or financial concerns, incorporate conditional approval steps. This "human-in-the-loop" approach ensures a person reviews and approves actions before the system proceeds, reducing risks in high-stakes situations [11].
Use Automation to Optimize Workflows
Once escalation paths are in place, automation can further streamline workflows, improving response times. AI-powered workflows can adapt escalation paths in real-time, cutting down resolution times significantly. For example, AI triage can automatically tag tickets, suggest root causes, and route issues based on customer sentiment or the specific priorities of an entity [15]. This builds on earlier strategies for managing account segmentation and permissions.
Leverage metadata-driven routing by attaching custom key-value pairs (like subscription_tier or entity_id) to each request. This ensures the workflow rules adjust based on the child entity that triggered the request [4].
"According to Intercom’s 2023 State of AI in Customer Service report, 71% of support leaders plan to increase their use of AI to support more customers without adding headcount, and generative AI agent-assist tools can reduce average handle time by 15% to 25%." [16]
For onboarding, templates can simplify the process by auto-generating child tickets with pre-filled fields [15]. A great example is UltraCamp, a summer camp management company. They implemented AI workflows to automate parent communications and onboarding for new customers, saving roughly one hour of manual work for every new customer onboarded [11].
Common Mistakes in Multi-Entity Portal Design and How to Avoid Them
Creating a seamless and efficient multi-entity portal is no small feat. Even with well-designed escalation workflows, core design flaws can derail the user experience and productivity. Let’s break down some common mistakes and how to tackle them.
One major issue is scattering critical data across multiple tabs, modals, or entity views. This constant context switching eats up as much as 40% of productive time as users reorient themselves with each switch [16]. Instead, aim to consolidate entity-specific data into the primary workspace. Use inline cards or a single, predictable side panel to keep everything accessible without overwhelming users [16].
"Interfaces overloaded with options, alerts, or conflicting calls-to-action increase cognitive load, slow people down, and cause more errors." – Nielsen Norman Group [16]
Another frequent misstep is designing portals with rigid 1-to-1 relationships between contacts and accounts. This setup forces users to log in multiple times to access parent or child entities, which is both frustrating and inefficient [10]. The solution? Implement an entity switcher – a searchable tool, often placed near the username, that allows users to move between all authorized sub-entities without logging out [7]. Zuora’s multi-entity architecture is a great example, supporting up to 512 distinct entities while ensuring isolation by default. Access is granted only through explicit administrator permissions, keeping things secure and organized [7].
Security is another critical area where mistakes often occur. Weak access controls can lead to over-privileged users and compromised task-specific security.
"Access control in SaaS rarely fails because teams don’t understand roles or permissions. It fails because the product grows." – LoginRadius [8]
To mitigate this risk, enforce all permission checks at the API layer, ensuring users can’t bypass restrictions through direct API calls [8]. Stick to a "least privilege" model by default, requiring deliberate actions to grant additional permissions. Tenant-aware role-based access control (RBAC) is also essential, so roles are evaluated strictly within the context of specific entities [8].
Finally, scalability can take a hit if portals lack centralized management for shared objects like product catalogs or accounting periods. Without enforcing unique identifiers (like SKUs or invoice numbers) across the hierarchy, data collisions become inevitable as the system grows [7]. Establishing a global entity to manage security policies, provision new sub-entities, and share core business objects eliminates redundant administration and supports smooth scaling [7].
Here’s a quick recap of key navigation pitfalls and their solutions:
| Navigation Mistake | Impact on User Experience | Practical Solution |
|---|---|---|
| Separate Modals/Tabs | High cognitive load; 40% productivity loss [16] | Inline integration in the primary workspace |
| 1-to-1 Account Mapping | Users cannot see child/parent data [10] | Enable multi-entity visibility for single contacts |
| Manual Data Searching | 19% of workweek wasted [16] | Proactive context injection and "smart" cards |
| Concealed Entity Access | Confusion when managing global units | Global "Entity Switcher" with search functionality [7] |
Conclusion
Creating a customer portal that supports parent/child account structures requires more than just feature development – it’s about finding the right balance between usability, security, and scalability. A misstep in any of these areas can disrupt both the customer experience and your internal workflows.
Start by setting up detailed access controls. Decide early on who gets Full, Limited, or No Access to critical areas like invoices, subscriptions, and support data across accounts [2]. This not only closes security gaps but also ensures users only see what they’re authorized to manage. Once the foundation of account mapping and access controls is in place, you can shift focus to automation for scaling.
Automation is key to handling growth efficiently. AI-powered customer support workflows can streamline tasks like account segmentation, permissions, and entity-specific reporting. In fact, Gartner projects that by 2028, 15% of daily work decisions will be made autonomously by AI [17]. To prepare, ensure your portal integrates APIs for linking and unlinking accounts as organizations expand. Add intuitive features like hierarchy charts to help users clearly understand which entity they’re managing [2].
Operational details also play a big role in improving user experience. Assign roles like "Invoice Owner" and "Payment Owner" during setup to avoid billing errors [2]. Additionally, make sure your reporting system aggregates metrics like MRR and receivables at the highest level, providing an enterprise-wide perspective [2].
For long-term success, design your portal to be flexible. Support up to five hierarchy levels and allow for 250 direct child accounts per parent. Conduct quarterly audits to identify orphaned accounts, use entity tagging for segmentation, and align billing structures with your sales framework [2][1]. A portal that can handle mergers, acquisitions, and organizational shifts without needing a complete overhaul is one that’s truly built to scale.
FAQs
How do I choose the right hierarchy model for my customers?
Start by understanding your customers’ organizational structure – think parent companies, subsidiaries, and divisions. Mapping these relationships helps ensure clear visibility across all entities and minimizes the risk of errors.
Next, pick a hierarchy model that aligns with your support workflows and reporting requirements. For example:
- Parent/Child Hierarchies: Perfect for managing subsidiaries and straightforward relationships.
- Multi-Entity Models: Designed for more complex setups, offering role-based access to keep things organized.
Lastly, take advantage of AI tools to keep your data accurate, especially during times of organizational change. Accurate data ensures smooth operations and better decision-making.
What’s the safest way to let parent users access child accounts without data leaks?
When it comes to managing access securely, role-based access control (RBAC) is your best bet. By implementing strict permissions and hierarchical access policies, you can ensure that parent users have access to relevant child account data – without compromising sensitive information.
To strengthen security even further, consider these strategies:
- Customizable dashboards that provide tailored views based on user roles.
- Granular permissions to define exactly who can access what.
- Regular audits to identify and address potential vulnerabilities.
- Automated permission management to streamline updates and reduce errors.
Additionally, leveraging AI-driven tools to map parent/child hierarchies can help maintain data integrity, especially during complex organizational changes like mergers or restructuring. These tools can adapt to shifting structures while keeping sensitive information secure.
How should billing work when one entity uses the product but another pays?
When one group uses a product while another foots the bill, the billing system needs to accommodate parent/child account structures. This setup lets a parent account oversee payments for multiple child accounts or allows child accounts to handle their own payments independently. These hierarchies simplify billing for large or complex organizations, aligning payment responsibilities with their structure – such as subsidiaries or individual business units.
Related Blog Posts
- How do you set up a customer portal that supports role-based access and multiple customer teams?
- How do you design role-based customer portals for B2B (multiple users, permissions, reporting)?
- Customizing Portals for Strategic Accounts: Why One Size Doesn’t Fit All
- Mapping Complex Organizational Structures (Parent/Child Accounts) in Support