
Access issues like password resets and account lockouts are common, repetitive, and time-consuming for support teams. Automating these tasks through a self-service portal can save time, reduce costs, and improve user satisfaction. Here’s the core idea:
- Why it matters: 81% of users prefer solving issues themselves, and automation can cut support tickets by 40–60%.
- Cost impact: A human-handled ticket costs $15–$25, while self-service costs under $0.10.
- User benefits: Faster resolutions, anytime access, and fewer delays.
- Team benefits: Support teams can focus on more complex problems.
To set this up:
- Identify common issues: Audit tickets to find repetitive tasks (e.g., password resets, permission changes).
- Design a user-friendly portal: Use clear labels, guided workflows, and mobile-friendly design.
- Leverage AI: Automate issue detection, triage, and escalation for faster routing.
- Automate resolutions: Integrate with tools like Okta or Google Workspace for instant changes.
- Monitor and improve: Track metrics like ticket deflection and zero-result searches to refine the system.
This approach ensures users can resolve issues quickly while maintaining security and compliance.
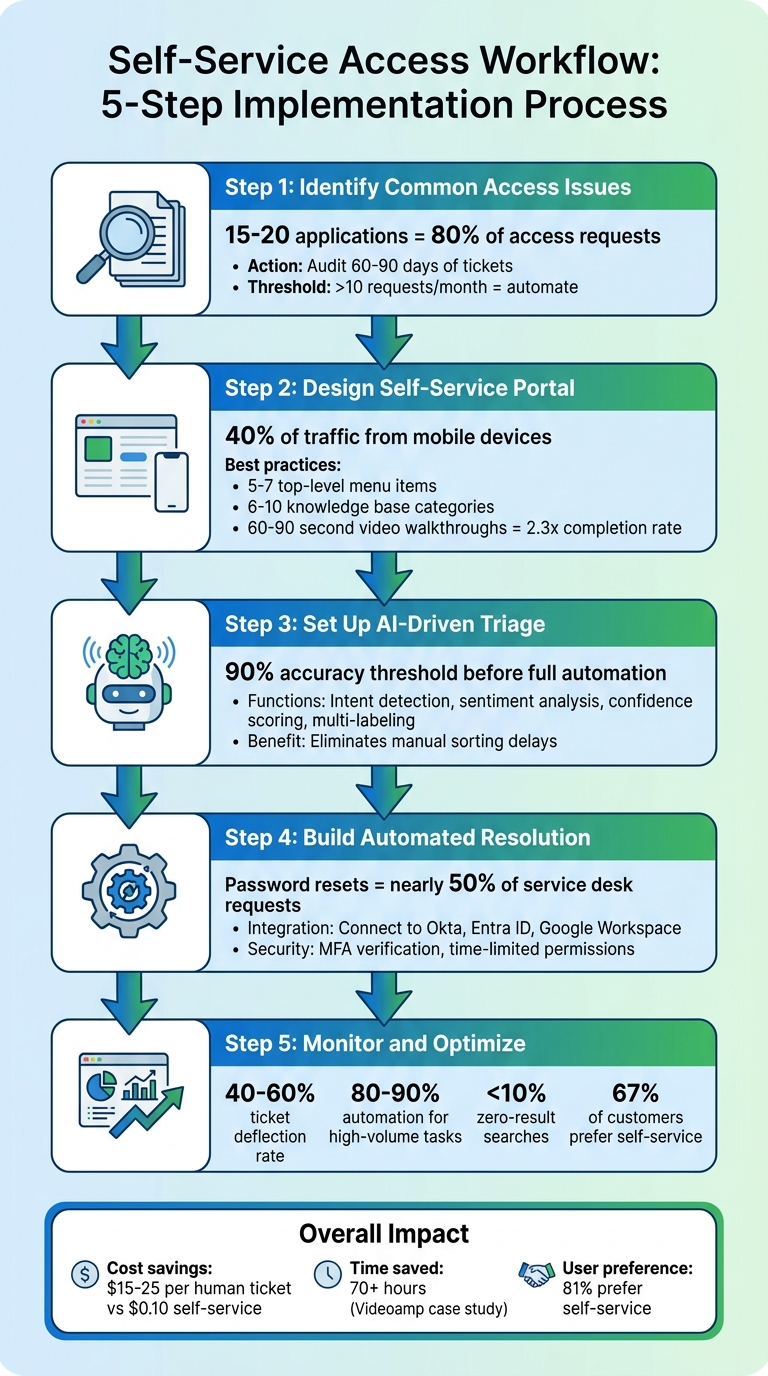
5-Step Self-Service Access Workflow Implementation Guide
How to Build a Customer Self Service Portal Without Code
sbb-itb-e60d259
Step 1: Identify Common Access Issues and User Scenarios
When tackling access issues, it’s essential to rely on real data instead of assumptions.
Audit Your Existing Access Issue Tickets
Start by reviewing support tickets from the last 60–90 days. Categorize these tickets by request type, application, user role, and the amount of manual effort required to resolve them. This process helps you pinpoint recurring issues with predictable resolution paths.
A good rule of thumb: 15 to 20 applications often account for up to 80% of access request volume [1]. Typical requests include:
- Password resets
- Account lockouts ("I’m locked out")
- Access to tools like Figma or GitHub
- Permission changes (e.g., switching from Viewer to Admin)
- Billing updates
Pay close attention to requests that take over 24 hours to resolve. Delays like these often signal unclear approval processes or manual updates to identity providers.
Here’s an example: In May 2026, Videoamp faced a recurring bottleneck on Tuesdays as their team expanded from 100 to 500 employees. New hires submitted incomplete access requests, leading to confusion over approvals. By introducing a Jira-native app catalog that streamlined these workflows, they processed over 500 requests in six months and saved more than 70 hours of IT labor [1].
"You’ll learn more from that spreadsheet than from a portal design workshop." – Multiplier [1]
For any request type that occurs more than 10 times per month, consider mapping the corresponding role to an identity provider group (like Okta, Entra ID, or Google Workspace). Automating these "high-volume, low-complexity" requests makes them ideal candidates for self-service, as they don’t require human intervention.
Use these findings to sketch out the user journey for each major request type.
Map User Journeys for Access Scenarios
Once you’ve identified the most common access issues, take a closer look at how users navigate your system. Combine ticket data analysis with journey mapping to track the steps users take from identifying their problem to resolving it. This approach uncovers "hidden work" that a simple portal interface might miss, like chasing down approvals, manually updating groups, or gathering audit evidence [1].
Mapping user journeys also ensures that the portal’s language aligns with how users describe their problems. For instance, replace technical terms like "LDAP authentication failure" with user-friendly phrases like "I’m locked out." This makes it easier for users to search for solutions and improves resolution rates [2][3].
Focus on identifying bottlenecks, such as:
- Requests taking over 24 hours to complete
- Users defaulting to "Admin" roles due to unclear instructions
- Approval workflows that route every request to a single manager instead of using conditional routing based on risk levels [1]
"The better question isn’t ‘Do we have an access portal?’ The better question is ‘Can a request move from intake to approval to identity provider change to audit record without someone doing copy and paste?’" – Amaresh Ray, Co-founder, Multiplier [1]
These insights will guide you in designing a more efficient workflow in the next steps.
Step 2: Design the Self-Service Portal Experience
Make your portal user-friendly so people can quickly solve common access problems without wading through complicated menus or relying on support tickets.
Create a Dedicated Access Issues Section
Your portal should mirror how users think about their challenges, not how your internal teams are structured. Avoid technical or company-specific jargon. Use straightforward, task-focused labels like "I can’t log in", "Reset my password", or "Request access to a tool" [4].
Keep navigation simple. Limit the top-level menu to 5–7 items to prevent overwhelming users [4]. For your knowledge base, stick to 6–10 categories with no more than two levels of subcategories [3]. The aim? Help users find the right solution in just one or two clicks – no endless dropdown menus required.
"The most common mistake in portal design is organizing content around your internal team structure."
- Vik Chadha, Founder & CEO, AppDeck [4]
With over 40% of portal traffic coming from mobile devices, ensure the access issues section is mobile-friendly and responsive [4]. A well-structured layout sets the stage for seamless, step-by-step workflows.
Use Step-by-Step Workflows
Create guided workflows to address access problems one step at a time. For example, a "locked out" process might ask if the user remembers their password. Based on their response, it could direct them to an automated unlock tool or a password reset form [2].
Smart forms can reduce ticket volume by 10–15% by suggesting relevant articles as users type [4]. If someone starts typing "can’t access", the system should surface helpful resources on login troubleshooting or password resets right away.
Keep instructions simple and actionable – one step, one action. Articles with short video walkthroughs (60–90 seconds) perform much better, with 2.3x higher completion rates and 40% fewer escalations compared to text-only guides [3].
Always include an "escape hatch." Every workflow and article should have a visible "Contact Support" or "Still need help?" option. This prevents frustration when users can’t resolve their issues on their own [4].
"The fastest way to destroy trust in your self-service system is making it hard to reach a human when the AI cannot help."
- Superdots Team [2]
Link to Your Knowledge Base
Integrate relevant help articles directly into your portal workflows so users can easily find additional context when needed. Use AI-powered semantic search to understand intent. For instance, if someone searches for "locked out", the system should pull up "Account Access" articles, even if the exact phrase isn’t in the title [3].
Write article titles in the language your users use in support tickets. For example, "I’m locked out" is much clearer and relatable than "Authentication Failure" [3]. Focus each article on a single issue – don’t combine topics like password resets and MFA setup into one guide [2].
Get to the point quickly. Start articles with the solution, such as: "To reset your password, click the ‘Forgot Password’ link on the login page…" Avoid burying key steps under unnecessary context [2]. This saves users time and helps them resolve their issues faster.
Monitor "zero-result searches" weekly to identify gaps in your knowledge base. This ensures you’re addressing topics users are searching for but can’t find [3][4].
Step 3: Set Up AI-Driven Triage and Classification
Once a user submits an issue, AI steps in to categorize and direct it, cutting out the delays of manual sorting.
Use AI to Detect and Categorize Issues
AI can be configured to interpret user intent, understanding phrases like "I can’t get in" as "locked out" or "access denied" scenarios[2][3]. This nuanced understanding ensures users are directed to the correct account access guides and workflows every time.
It also manages multi-label classification for complex requests. For example, if someone says, "my payment failed and now I’m locked out", the system can tag the issue under both billing and account access categories. This ensures it gets routed to the right teams without bouncing between departments[6].
Prioritization is another area where AI shines. Critical issues like security breaches or total lockouts can be flagged as urgent (1–2 hour SLA), while general inquiries might be marked as medium (12–24 hours). These assignments happen almost instantly[6].
To avoid errors, AI can use confidence scoring. If the confidence level in its classification dips below 0.70, the ticket is flagged for human review. This safeguard helps prevent misrouting, which could add an average of 4.2 hours to resolution times[6].
Sentiment analysis adds even more depth. If the AI detects frustration or anger in a user’s tone, it can bypass self-service options entirely and escalate the issue directly to a human agent[2].
| Feature | Role in Access Workflows |
|---|---|
| Intent Detection | Distinguishes between "locked out" and "requesting new access" scenarios |
| Sentiment Analysis | Identifies frustration to escalate directly to a human |
| Confidence Scoring | Flags uncertain classifications for human review |
| Multi-labeling | Handles tickets involving multiple categories, like "billing" and "technical" |
Before launching, test the AI classifier in shadow mode for two weeks. Compare its routing decisions to those made by human agents, and aim for at least 90% accuracy before fully automating the process[6].
With this setup, issue detection becomes seamless. The next focus is ensuring unresolved problems are escalated effectively.
Automate Escalation Rules
Even with accurate AI classification, some issues will need human involvement to resolve. Define clear escalation triggers, such as two failed AI attempts, explicit user requests for human help, or high-risk topics like fraud or security concerns[2].
When escalating, the AI should provide a detailed handoff, including a summary of the issue, its category, priority level, and a transcript of the user’s previous actions[2][7]. This ensures agents have all the context they need, and users won’t have to repeat themselves.
Routing should also account for factors like urgency, category, customer tier, and sentiment[7]. For example, an enterprise customer with a locked account might be routed to a dedicated queue, while a free-tier user with the same issue could follow standard routing.
Regularly review escalation trends. If certain issues frequently require human intervention, it may signal a need to refine self-service workflows or update your knowledge base content.
Step 4: Build Automated Resolution and Approval Flows
Now that AI is efficiently classifying and routing issues, it’s time to focus on automating resolutions and approvals. Automated workflows can resolve many common access issues in seconds, drastically cutting down resolution times.
The secret lies in directly connecting your portal to the systems that execute changes. By integrating with identity providers like Okta, Entra ID, or Google Workspace and using APIs, you can trigger actions such as password resets, account unlocks, or permission updates seamlessly.
Deploy Automated Account Unlock and Password Reset Tools
Did you know that password resets and account lockouts can make up nearly half of all service desk requests[10]? Automating these processes can eliminate this bottleneck entirely.
Start by incorporating multi-factor authentication (MFA) into your self-service workflows. For example, when users request an account unlock, they can verify their identity using a one-touch approval or a QR code sent to their registered device. This not only strengthens security but also keeps the process quick and user-friendly. The process typically involves:
- User Identification: Collect the username while using email or SMS verification to avoid unauthorized access attempts[8].
- 2FA Approval: Authenticate sensitive actions with smartphone or token-based approval[8].
- Unlock/Reset: Unlock the account and reset failed login counters, while limiting the number of self-unlock attempts to block brute-force attacks[8].
Direct API connections to systems like Active Directory or Azure AD ensure that these actions happen without manual intervention[10].
| Step | Purpose | Security/Comment |
|---|---|---|
| User Identification | Capture the username for the flow. | Use identity verification (Email/SMS) to prevent enumeration[8]. |
| 2FA Approval | Approve the operation via smartphone or token. | Essential for authenticating sensitive actions[8]. |
| Unlock/Reset | Execute the account unlock and reset failed counters. | Limit maximum attempts to deter brute-force attacks[8]. |
Once you’ve set up these workflows, you can extend similar automation to permission adjustments for a more comprehensive solution.
Automate Permission Change Requests
Permission changes can also benefit from automation, using risk-based approval routing. By mapping each application role to identity provider groups, you ensure the IdP remains the authoritative source. Conditional logic, such as JQ expressions, can be used to auto-approve low-risk requests while routing sensitive ones to appropriate reviewers[1][9].
For example, low-risk requests (like ReadOnly access) can be auto-approved, while high-risk changes (such as admin or production access) go through manual reviews. To reduce security risks, elevated permissions should have set expiration times – like 1 hour for production access, 6 hours for admin roles, or 24 hours for business applications[1].
Here’s a real-world example: Between late 2025 and early 2026, Videoamp scaled from 100 to 500 employees. By implementing a Jira-native app catalog tied to automated workflows, they processed over 500 access requests in six months, saving more than 70 hours of IT team follow-up time[1].
"A self-service access portal only works if intake, approval, provisioning, expiry, and audit evidence are tied together." – Amaresh Ray, Co-founder, Multiplier[1]
Every step – request, approval, provisioning, and revocation – should be logged in a unified audit trail. This ensures compliance reviews are straightforward, with clear documentation of who approved what, when, and why[1].
| Access Level | Approval Logic | Recommended Duration |
|---|---|---|
| Low-Risk (e.g., ReadOnly) | Auto-approve based on Dept/Role match | Permanent or Quarterly Review |
| Standard Business Apps | Manager Approval | Permanent or Quarterly Review |
| Elevated/App-Specific | App Owner Approval | 7 to 30 days |
| Privileged/Production | Security Review plus Manual Approval | 1 to 24 hours |
| Contractor Access | Manager Approval | Until Contract End |
By automating these workflows, you not only streamline access management but also maintain a secure and auditable process. To maximize efficiency, review recent tickets and prioritize automating the top 15–20 high-volume apps.
With these resolution and approval flows in place, the next step is to monitor performance and make ongoing improvements to the system.
Step 5: Monitor and Optimize Your Workflow
Once you’ve implemented reliable AI triage and automated resolution, the next critical step is to monitor your system’s performance. This ensures it remains effective and adapts to changing needs. Tracking key metrics and gathering feedback will help you pinpoint what’s working and what needs improvement.
Measure Key Metrics and Gather User Feedback
Start by tracking metrics like ticket deflection rate, portal adoption, and search effectiveness. These numbers reveal how well your automation is performing and where content gaps might exist. A well-designed self-service system can reduce support tickets by 40–60% [2][3][4]. For repetitive, high-volume tasks like password resets or account unlocks, aim for automation rates between 80–90% [2].
Another essential metric is the percentage of zero-result searches. Ideally, this should stay below 10%, as higher rates often signal missing or incomplete knowledge base content [4][11]. Additionally, monitor article helpfulness ratings and escalation rates. If users frequently view certain articles but still escalate their issues, it’s a sign that the guidance provided needs improvement [3].
Feedback from users is just as important. Use tools like "Was this helpful?" ratings and "Is your issue resolved?" confirmations to gather insights. Sentiment analysis can also help detect frustration in real time [2][3][4]. When users submit tickets, ask questions like, "Did you find a helpful article before submitting this?" to determine whether the problem lies in content quality or its discoverability [3][4].
Leverage AI Data to Refine Your Workflow Continuously
AI doesn’t just drive your workflow – it also highlights areas that need refinement. Modern AI systems can analyze escalation reasons to identify gaps in your content or automation processes. Treat these failures as opportunities for improvement.
"Every topic the AI fails on is a gap in your content or a process that needs to be automated. Review escalation reasons weekly and treat them as a backlog." – Superdots Team [2]
Review AI analytics on a weekly basis to spot bottlenecks and track your progress. For example, measure how quickly you can close content gaps by tracking the time it takes to address a user question with a new self-service solution [5]. Pay attention to high-traffic content with low satisfaction ratings – this often points to unclear or incomplete instructions [5]. AI can also escalate issues when it detects repeated failures or negative sentiment, ensuring no problem goes unnoticed [2].
The system architecture you use plays a big role in long-term success. Unified platforms that centralize AI, help centers, and agent tools tend to perform better, achieving resolution rates of 55–75% within 3–6 months. On the other hand, fragmented systems – where chat and documentation tools operate separately – often plateau at 28–35% within 60 days. These setups also require more effort, with teams spending 15–20 hours a month maintaining integrations [5].
Conclusion
A self-service access workflow can reshape support operations by automating repetitive tasks, freeing up your team to tackle more complex challenges. By auditing tickets, creating user-friendly workflows, using AI for triage, and automating resolutions, you establish a support system that scales efficiently. Research highlights that 67% of customers prefer self-service options over speaking with a representative[2], and a thoughtfully designed system can deflect 40–60% of support tickets[2].
This shift requires a clear and methodical approach. Steps like analyzing existing tickets, building an intuitive portal, integrating AI-driven triage, setting up automated resolution processes, and consistently tracking performance are essential to creating a support model that grows without increasing headcount. Traditional support costs often rise alongside customer numbers, but AI-powered self-service enables you to manage higher volumes while keeping expenses in check.
Think of your self-service portal as an evolving tool. Use AI insights to pinpoint content gaps, track searches that yield no results, and refine workflows based on real user interactions. By addressing issues that previously required human assistance with instant solutions, you tackle scalability challenges head-on.
Begin with tasks that generate high ticket volumes, like password resets and account unlocks, which often achieve 80–90% automation rates[2]. The goal isn’t to replace your support team but to empower them to focus on cases that truly need human expertise, while ensuring customers enjoy quick and effective resolutions.
FAQs
Which access issues should we automate first?
When it comes to tackling common IT tickets, start with automating solutions for login problems, account lockouts, and permission issues. These are some of the most frequent and resource-draining issues. By focusing on tasks like verifying entitlement status, resolving account lockouts, and managing role or group assignments, you can save both time and money.
Many of these problems arise from misassigned roles or restrictive policies. To address them effectively, implement tools like guided diagnostics, identity telemetry, and automated routing. These strategies not only cut down on incident volume but also speed up resolution times, making the entire process more efficient.
How do we verify identity safely in self-service resets?
Safe identity verification during self-service password resets often relies on multi-factor authentication (MFA) methods. These might include receiving verification codes via text or email or using authentication apps. When the primary MFA method isn’t accessible, users can turn to alternative options, like switching to a different verification channel.
Some systems also incorporate guided diagnostics. This approach allows users to confirm specific account details or complete certain checks. It adds an extra layer of security while keeping sensitive information protected.
What metrics show the portal is reducing tickets and costs?
Key metrics show a 20-40% drop in support volume, which translates to eliminating 60-120 tickets for every 300 cases. This reduction frees up support engineers to concentrate on more complex, high-priority issues, resulting in noticeable savings in operational costs.