Maintaining customer trust during bug resolutions requires clear communication, realistic timelines, and structured workflows. Here’s the essential guide:
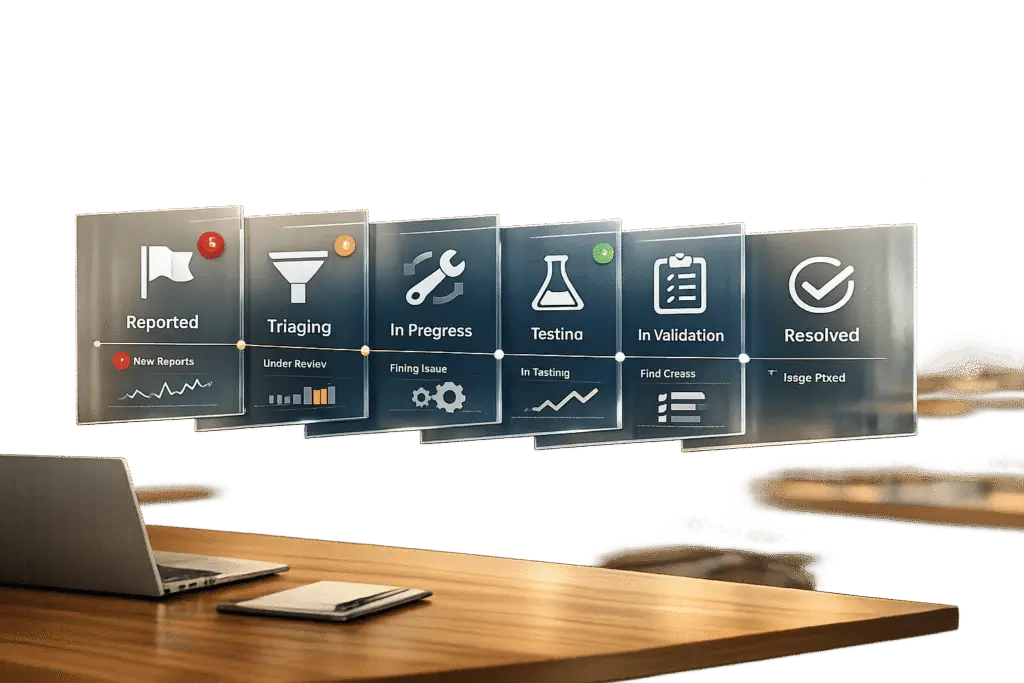
- Define clear bug stages: Use stages like Reported, Triaged, Scheduled, In Progress, Resolved, and Closed. Each stage should have specific criteria and ownership to avoid confusion.
- Standardize bug reporting: Use templates with mandatory fields like reproduction steps, environment info, and screenshots to reduce back-and-forth.
- Prioritize effectively: Separate severity (technical impact) from priority (business urgency). Use a matrix to balance factors like customer impact and SLA requirements.
- Automate updates: Provide timely notifications, focusing on critical changes. Use AI tools for summaries and sentiment analysis to keep updates professional and customer-focused.
- Leverage AI for monitoring: Predict resolution times, track SLA risks, and adjust workflows dynamically to prevent delays.
Key takeaway: Transparency and consistency in bug management build trust, reduce support tickets by up to 50%, and free teams to focus on solutions. Avoid overpromising by setting clear expectations and using AI for smarter workflows.
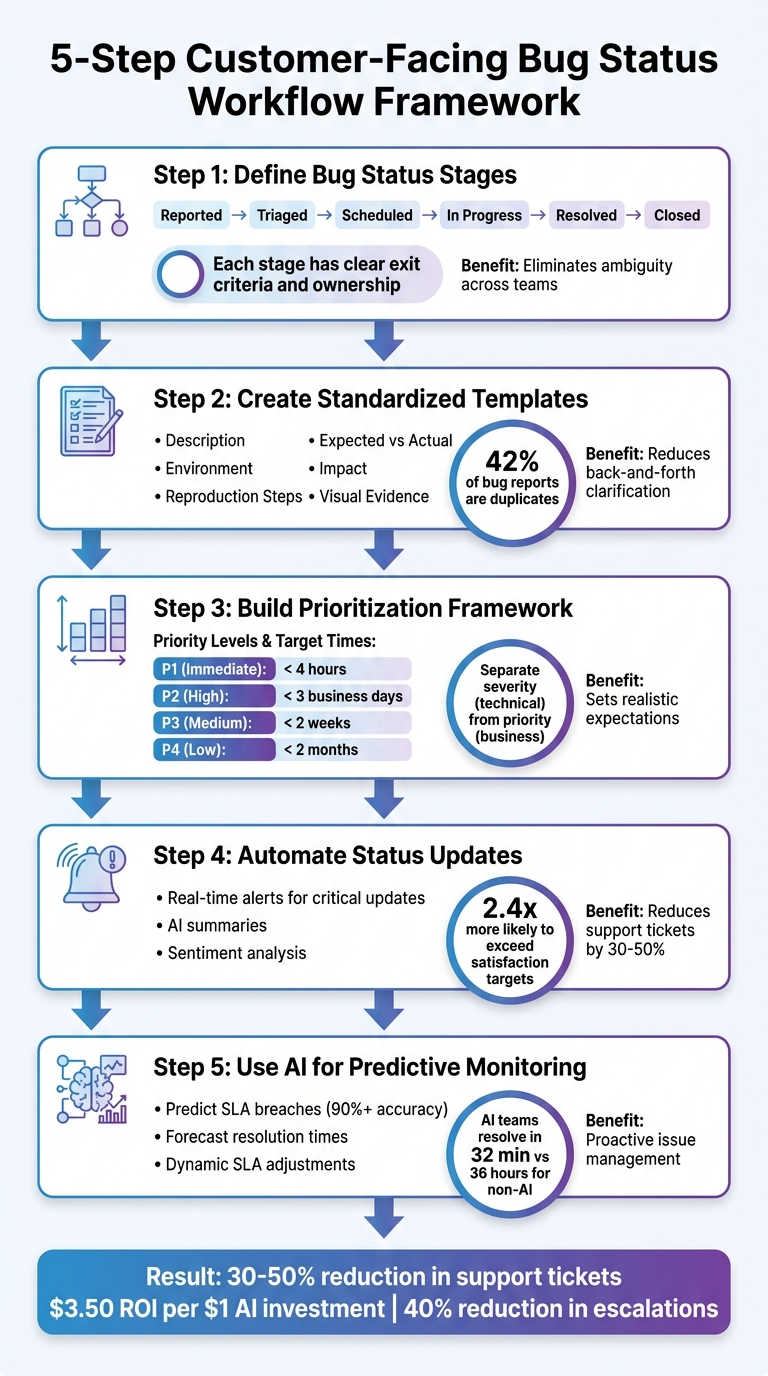
5-Step Customer-Facing Bug Status Workflow Framework
Step 1: Define Bug Status Stages and Criteria
Without clear bug status stages, teams often end up prioritizing the loudest complaints rather than tackling the most critical issues [4]. This lack of structure leads to confusion for both team members and customers, who might not understand what "In Progress" means or why a bug remains stuck in the same stage for weeks.
A well-structured workflow eliminates this ambiguity by creating a shared understanding across Engineering, QA, Product, and customers [1][3]. When everyone knows exactly what terms like "Triaged" or "Resolved" entail, you avoid wasting time on endless status updates via emails or Slack messages. Instead, you gain real-time visibility into bug progress – without the need for manual tracking [1].
Establish Stages Like Open, Triaged, In Progress, Resolved, and Closed
A linear workflow with five or six key stages helps streamline progress. Suggested stages include: Reported, Triaged, Scheduled, In Progress, Fixed, and Closed [4]. Each stage represents a distinct milestone in the bug’s lifecycle, with a clearly assigned owner responsible for advancing it.
Here’s how these stages could look:
| Status | What it means | Who acts |
|---|---|---|
| Reported / Open | Bug has been filed but not yet reviewed or validated | Reporter / Triage Lead |
| Triaged | Bug is reviewed, reproducible, and assigned severity | Triage Lead |
| Scheduled | Bug is approved for a specific sprint or work cycle | Team Lead / Product Owner |
| In Progress | Developer is actively working on the fix | Developer |
| Resolved / Fixed | Fix has been implemented and is ready for verification | Developer / QA |
| Closed | Bug is verified as fixed or marked as "won’t fix" | QA / Reporter |
The "Scheduled" stage is particularly important. It bridges the gap between "we’re aware of the issue" and "we’re working on it." This step reassures customers that their concerns have been acknowledged and prioritized, even if an immediate fix isn’t possible [4].
Define Exit Criteria for Each Stage
Clear rules for moving bugs between stages prevent misunderstandings. For instance, a bug should only transition from "Reported" to "Triaged" after confirming it’s reproducible, assigning its severity, and checking for duplicates [4][5]. Similarly, a bug leaves "In Progress" only after the developer has implemented the fix, updated unit tests, and linked relevant commits or documentation [1][6].
As Ardura Consulting aptly states:
A bug report without steps to reproduce is not a bug report – it is a complaint [5].
To ensure quality reporting, require mandatory fields like screenshots, environment details, and reproduction steps before a bug even enters the "Reported" stage [5][3].
Additionally, it’s essential to separate severity (technical impact) from priority (business urgency) [5][6]. For example, a typo on your homepage may have low severity but high priority due to its branding implications. QA teams should assign severity during triage, while Product Owners determine priority based on business goals and team capacity. This distinction prevents your backlog from becoming a "status bankruptcy" – a graveyard of outdated bug reports that will never be addressed [5].
sbb-itb-e60d259
Step 2: Create Standardized Bug Reporting Templates
A well-structured bug report can be the difference between a quick fix and hours of back-and-forth. As ReviseFlow explains: "A bug report is only useful if a developer can reproduce the issue without asking follow-up questions. Most bug reports fail this test" [9]. When reports are missing key details – like screenshots, steps to reproduce, or environment specifics – teams waste valuable time chasing clarity instead of solving the problem.
Standardized templates act as a framework, ensuring every bug report includes the necessary details. By incorporating objective data – such as "Expected vs. Actual" behavior – these templates minimize the need for follow-up. Combined with clearly defined bug stages (as outlined in Step 1), these templates streamline the process of collecting actionable information.
Include Fields Like Description, Impact, and Priority
A good bug report template should cover these essential fields:
- Identification: Include a Bug ID and a brief, descriptive title for easy tracking.
- Environment Context: Specify details like the operating system, browser version, and software build.
- Reproduction Steps: Provide a numbered list of steps starting from a known state to replicate the issue.
- Behavioral Analysis: Clearly outline the difference between what was expected and what actually occurred.
- Impact Assessment: Highlight the severity and priority to assist with triage.
- Visual Evidence: Add screenshots, videos, or console logs to provide context.
- Metadata: Include the reporter’s name, date, and the URL or screen where the issue was encountered.
Dragana Tadic emphasizes: "Every great bug report should be clear, concise, intelligible, and informative so that the developers can easily reproduce the bug and fix it as soon as possible" [10]. To ensure this, enforce mandatory fields and reject reports missing key details like reproduction steps or visual evidence. Use a severity scale – ranging from Critical (e.g., system crashes affecting all users) to Low (e.g., minor cosmetic issues) – to remove ambiguity during triage.
Where possible, automate metadata collection. Tools that capture details like browser version, screen resolution, and operating system can reduce manual effort and help avoid the classic "it works on my machine" debates.
Make Templates Easy to Use for Teams and Customers
Once the essential fields are defined, focus on usability to encourage adoption. Overly complex templates can discourage use, so aim for a design that fits on a single screen to avoid scroll fatigue. While some sections can be optional, fields like "Expected vs. Actual" behavior should always be required. As novaelvaris points out: "Good bug reports are precise. They can be short if they include the right variables" [12].
To make the process even smoother, provide a sample filled-in template in your documentation. If you handle multiple issue types – such as UI bugs, API errors, or performance problems – create tailored templates for each. This ensures reporters aren’t overwhelmed with irrelevant fields. Additionally, include instructions on redacting sensitive information like tokens, cookies, or personally identifiable information (PII) to maintain data security.
Measuring the effectiveness of your templates is also key. Track metrics like the percentage of issues resolved without further clarification or the rate of reopened defects. If clarification requests or reopenings are frequent, it’s a signal that your template might need adjustments. Also, consider leveraging AI tools for deduplication since about 42% of bug reports are duplicates [11].
Step 3: Build a Prioritization Framework That Sets Realistic Expectations
Once you’ve outlined bug stages and created templates, the next step is figuring out which bugs to address first. Without a clear prioritization system, teams risk treating every issue as urgent, leading to overcommitments and unmet expectations. A structured approach ensures you balance technical needs with business goals while keeping customer expectations realistic.
It’s important to separate severity (technical impact) from priority (business urgency). As the Milestone Team puts it:
Severity is a technical assessment, while priority is a business decision [16].
For example, a high-severity bug in an outdated feature might be less urgent than a minor typo in a headline right before a major product launch.
Weigh Factors Like Severity, Customer Impact, and Business Needs
Using your framework, assign weights to various factors like severity, customer reach, and SLA (Service Level Agreement) obligations. Evaluate bugs based on:
- User reach: How many customers are affected?
- Frequency: How often does the issue occur?
- Revenue impact: Does it block purchases or subscriptions?
- SLA obligations: Are you contractually required to fix it?
A weighted scoring model can help standardize these inputs. For instance, you might assign weights like Impact (35%), Urgency (25%), Customer Value (20%), SLA Risk (10%), and Sentiment (10%) [15].
To ensure a balanced approach, involve key team members in triage discussions. A QA Lead can provide technical insights, a Product Owner can highlight business priorities, and a Tech Lead can estimate the effort required [5][14]. This prevents low-impact bugs from taking precedence over critical issues. Document these decisions with a severity-priority matrix to keep technical and business considerations aligned [14].
Here’s an example framework for prioritization:
| Priority Level | Definition | Target Fix Time |
|---|---|---|
| P1 – Immediate | Requires immediate attention; drop all other tasks | < 4 hours |
| P2 – High | Address within the current sprint | < 3 business days |
| P3 – Medium | Schedule for the next sprint | < 2 weeks |
| P4 – Low | Fix when resources allow | < 2 months |
To avoid "priority inflation", stick to strict definitions for P1 (Critical) issues. If every bug is labeled urgent, your backlog will quickly become unmanageable, filled with unresolved “critical” problems [5][14]. Regularly cleaning up the backlog helps too – close out bugs older than six months with no activity, as they’re likely no longer relevant [5].
Modern AI tools can also assist in refining priorities in real time, offering a smarter way to balance technical evaluations with customer-focused decisions.
Communicate Realistic Timelines Without Fixed Deadlines
Once priorities are set, it’s crucial to communicate timelines clearly – but avoid committing to specific dates. Fixed deadlines can backfire and erode trust if missed. Instead, focus on relative timeframes tied to priority levels. Use terms like "Immediate", "Current Sprint", "Next Sprint", or "Backlog" instead of calendar dates [5][14]. This approach accounts for variables like team capacity, technical debt, or cross-team dependencies while keeping customers informed.
ProjektID highlights the importance of clear service promises:
A service promise is not marketing garnish; it’s part of the product [13].
Avoid vague statements like "we’ll fix it soon." Instead, set clear expectations based on priority levels. For instance, let customers know P2 bugs will be resolved within the current sprint, while P4 issues will be addressed as resources become available. This level of transparency builds trust without overcommitting to deadlines you might not meet.
For an added layer of reliability, aim to meet the 80th percentile of performance – a "safe floor" that ensures consistent delivery even during busy periods [13]. Automating status updates can also help. Let customers know when bugs progress through stages or approach SLA deadlines [5]. This proactive communication reduces uncertainty and spares customers from having to follow up for updates.
Step 4: Automate Status Updates and Notifications
After setting up a clear prioritization framework, the next step is automating status updates. This ensures customers receive timely and consistent communication, especially when managing multiple bugs. Relying on manual updates just isn’t practical at scale. Automation saves your team time while keeping customers informed. The challenge is striking the right balance – keeping customers updated without overwhelming them with notifications.
Set Up Real-Time Notifications for Critical Updates
Not every status change needs an immediate alert. Reserve real-time notifications for high-priority events like P1 incidents, production failures, or when a bug moves from "In Progress" to "Resolved." For less pressing updates, consider scheduled digests that consolidate changes into a single message. For example, daily summaries work well for lower-priority issues.
A hybrid system works best: use event-based alerts for critical updates and scheduled digests for routine changes. This approach prevents customers from being bombarded with fragmented notifications. Additionally, set your system to notify specific stakeholders only when their input is required – like when a ticket is blocked or needs customer feedback.
Automating notifications also helps your team avoid over-promising while keeping customers informed of real progress. AI tools can play a big role here. They can pull live data from platforms like GitHub, Jira, Linear, or Notion and compile it into a single, clear update. These tools filter out unnecessary details, highlight major issues, and even allow customers to request on-demand updates – reducing the need for constant push notifications.
Use AI for Summaries and Sentiment Analysis
AI can take your internal notes and transform them into polished, customer-facing updates. As Ronan, a QA and AI enthusiast, puts it:
"The magic of Large Language Models (LLMs) is that they are excellent summaries. They can take unstructured data (your angry notes) and structure it (Jira format)" [17].
This ensures that updates remain professional and objective, removing any emotional or accusatory tone from internal communications. AI can also analyze stack traces or error logs to suggest potential root causes, enhancing the depth of your updates without making premature commitments about fixes [17].
Sentiment analysis adds another layer of customer insight. AI can classify feedback as positive, neutral, or negative, and even detect emotions like frustration or anger. Companies using sentiment analysis report being 2.4 times more likely to exceed customer satisfaction targets. Real-time monitoring can also reduce support escalations by 40% [18][19]. When negative sentiment spikes, the system can trigger immediate updates or escalate the issue to a human agent for personalized attention [19]. You can even set thresholds to include empathetic language in notifications when frustration is detected [18][19].
Tools like Supportbench integrate AI-driven sentiment analysis, predictive CSAT scoring, and automated summaries into their workflows. These features help you address customer concerns proactively while managing expectations for bug resolution timelines. By combining automation and AI, you can deliver consistent, clear updates that build trust and keep customers in the loop.
Step 5: Use AI for Predictive Monitoring and Escalations
AI takes support operations to the next level by shifting from reactive to proactive workflows. Instead of waiting for customers to report issues or SLA breaches to occur, AI can predict potential problems, forecast resolution times, and adjust communication strategies as they unfold. This builds on the automation framework from Step 4, creating a seamless, AI-powered system that anticipates issues and manages customer expectations without locking in fixed timelines.
Use AI to Predict Resolution Timelines and Customer Satisfaction
AI can analyze everything from ticket queues and agent availability to the complexity of issues to predict SLA breaches well in advance. For example, AI tools can forecast SLA breaches with over 90% accuracy, often providing a 60 to 90-minute buffer for manual intervention before a breach happens [20]. This early warning system gives your team the chance to reassign tickets, notify customers, or escalate problems internally before they spiral out of control.
Setting realistic expectations is another benefit of predictive monitoring. Instead of committing to a rigid deadline, AI uses historical data from similar cases to suggest a range of probable resolution times. This approach helps you communicate timelines transparently, avoiding the risk of overpromising.
AI also excels at gauging customer sentiment. It can scan incoming messages for tone shifts and flag high-stakes keywords like "compliance audit", "critical", or "CEO" to prioritize cases that need immediate attention [20]. For instance, if a high-value account shows signs of frustration, AI can trigger updates or escalate the issue automatically.
Supportbench offers built-in tools like AI Predictive CSAT and First Contact Resolution (FCR) detection to identify cases likely to cause dissatisfaction or those resolved on the first interaction – tasks that are tough to track manually. By combining predictive analytics with sentiment analysis, you can address customer concerns before they escalate. This matters because 72% of enterprise clients cite repeated SLA breaches as a key reason for churn [20].
Implement Dynamic SLAs to Adjust Communication
Dynamic SLAs take predictive insights further by tailoring communication based on urgency and customer value. Not every issue requires the same response time, and dynamic SLAs allow you to adjust timelines and communication strategies without manual intervention.
AI can cross-reference tickets with CRM data to prioritize high-value customers, applying faster escalation timelines and enhanced communication strategies like "white-glove" service [20]. It can also set alerts at 50% (warning), 75% (critical), and 90% (imminent breach) of SLA time, ensuring no escalation is overlooked [20]. Alerts can be sent across multiple platforms – Slack, SMS, on-call systems – so nothing falls through the cracks [20]. Managers also have the option to manually de-escalate tickets with a single click, which helps train the AI and reduces unnecessary alerts [20].
AI can monitor ticket "touch time" and reassign stagnant cases to agents with specialized skills, such as "billing_api" or "database_migration", to keep things moving [20]. This intelligent routing prevents delays and ensures customers aren’t left waiting indefinitely. As Lucas Correia, CEO of BizAI, aptly puts it:
Relying on native ticketing system alerts for SLA management is like using a smoke detector that only goes off after the house has burned down [20].
For delays that can’t be avoided, AI can draft status updates or templated emails to stakeholders, turning potential SLA breaches into manageable incidents [20]. This kind of proactive communication helps maintain trust, even when timelines slip. By combining predictive monitoring with dynamic SLAs, you create a responsive workflow that adapts in real time, keeping customers informed and engaged without making promises you can’t keep.
Common Pitfalls in Bug Status Workflows and How to Avoid Them
Even with well-designed workflows, teams can stumble into familiar traps that disrupt effective bug management. Missteps like unclear communication and overpromising can erode trust and transparency – two cornerstones of successful customer-facing workflows. Let’s take a closer look at these pitfalls and how to steer clear of them.
Pitfall: Vague Statuses vs. Solution: Defined Stages
Using overly simplistic statuses like "Open" or "Closed" can leave customers in the dark about what’s happening behind the scenes. They might wonder: Is the bug still being investigated? Has a fix been identified? Or is the team simply monitoring it? This ambiguity not only frustrates customers but also increases the number of incoming support tickets. In fact, proactive updates can reduce incoming tickets by 30% to 50% during incidents [2].
To address this, implement a workflow with clearly defined stages. Labels like Investigating, Identified, In Progress, Monitoring, and Resolved offer a transparent view of the bug’s lifecycle. Each stage should have clear exit criteria. For example, the "Monitoring" phase might require 15 minutes of stable metrics before moving to "Resolved." This approach prevents premature closures and helps maintain credibility.
| Pitfall | Impact | Solution | Benefit |
|---|---|---|---|
| Binary Status | Hides whether a fix is identified or being tested [7] | Nuanced Stages | Tracks progress through investigation and fixes [7] |
| Jargon | Confuses non-technical customers [2] | Plain Language | Makes updates easy to understand [2] |
| Chat-Based Tracking | Causes duplicate issues and missing context [8] | Centralized Tracking | Creates a single source of truth for updates [1] |
Jordan, an Enterprise Architect, highlights this issue well:
Most companies still treat workflow like a checklist, not a conversation [21].
The takeaway? Think of status updates as clear agreements between your team and the customer – not just internal labels. This same principle applies to managing expectations about timelines.
Pitfall: Overpromising vs. Solution: Realistic Timelines
Even with clear status updates, overpromising can lead to unnecessary friction. Ambiguous promises like "soon" or "as quickly as possible" can set customers up for disappointment when expectations aren’t met. This often results in refunds, appeasements, or even customer churn [13].
Instead, focus on setting realistic timelines based on historical data. Avoid committing to resolution times you may not meet. Instead, promise specific updates, such as: "We’ll provide another update by 2:30 PM EST" [2]. Using the 80th percentile of past performance as a baseline for commitments is a practical way to keep expectations realistic and achievable [13]. As ProjektID aptly puts it:
If a customer can’t tell whether you kept the promise, you didn’t make one – you wrote a slogan [13].
Conclusion
Creating a customer-facing bug status workflow revolves around three key pillars: transparency, automation, and setting realistic expectations. By combining clearly defined status stages with open and honest communication, you can ensure customers always feel informed. As highlighted in the Statuspage Best Practices guide:
Users forgive outages. What they do not forgive is the feeling of being left in the dark [2].
Teams that embrace transparent and frequently updated workflows have seen a 30% to 50% drop in incoming support tickets during incidents. Moreover, AI-enabled support teams significantly outperform their counterparts, resolving tickets in a median of 32 minutes compared to 36 hours for non-AI teams [2][22]. With AI investments returning an average of $3.50 for every $1 spent [22], it’s clear that prioritizing AI-driven solutions makes sense both financially and operationally.
Striking the right balance between automation and human oversight is crucial. While AI can handle up to 90% of routine bug workflow tasks – like triage, diagnosis, and generating fixes – the final approval should always involve your team. As Ben Connor from Forge & Lever aptly puts it:
The AI isn’t the system – the AI plus the human approval process is the system [22].
This ensures fast action without risking overpromising or compromising quality.
To build a workflow that fosters both efficiency and trust, focus on these five steps: define clear status stages, standardize reporting templates, create a prioritization framework, automate notifications, and leverage AI for predictive monitoring. And always keep in mind:
Transparency is not a sign of weakness. It is a sign of professional maturity [2].
FAQs
Which bug statuses should customers see?
Customers appreciate transparency and realistic expectations when it comes to bug statuses. Using clear and straightforward labels like:
- Investigating
- Identified
- Monitoring
- Resolved
helps to communicate the current state of an issue effectively. Providing real-time updates not only keeps customers informed but also builds trust by avoiding overpromising. This method aligns with best practices for managing customer expectations.
How do we share timelines without giving dates?
When sharing timelines without locking in specific dates, it’s helpful to emphasize stages of the process, approximate timeframes, or upcoming steps. For instance, you might say, "We expect to provide an update within the next few hours" or "Our team is actively working and will update you as soon as we have more information." Providing regular updates – such as every 30 to 60 minutes during urgent situations – helps keep customers informed and reassured without making promises you can’t keep.
What should trigger a customer notification?
Customer notifications should be sent at critical moments to keep communication clear and build trust:
- 10–15 minutes after identifying an issue: Send an acknowledgment to inform customers and outline what to expect.
- Right after confirming customer impact: Explain what’s happening and detail which components are affected.
- Regularly during the incident (every 20–60 minutes): Provide updates to keep customers informed as the situation evolves.
- Once the issue is resolved: Confirm the resolution and share any relevant follow-up information.
Related Blog Posts
- How do you create an “Engineering handoff” template that speeds up bug fixes?
- Why Engineering Hates Your Slack Support Channel: Structuring Bug Reports
- How to triage bug reports via portal forms (steps, logs, environment capture)
- Bug report intake checklist: what to require from customers to speed resolution