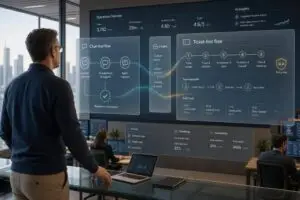

When your support team can’t resolve a customer issue, what’s next? Without a clear escalation process, tickets bounce between teams, frustrating customers and pulling engineers away from critical work. The solution? A structured internal escalation agreement that defines roles, triggers, and timelines for handling issues.
Here’s what it includes:
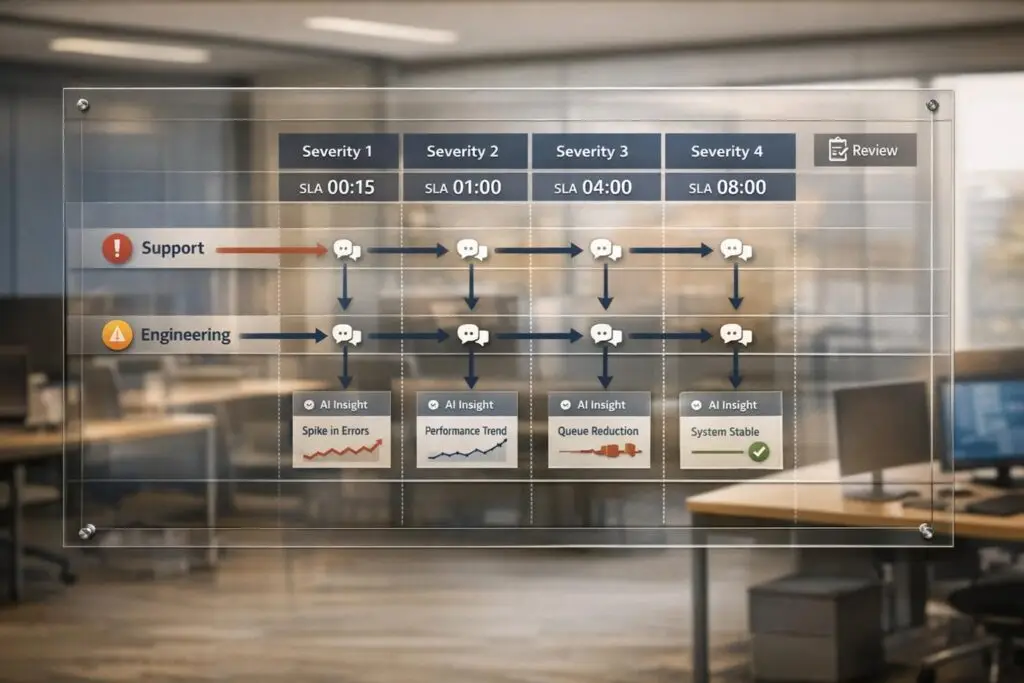
- Escalation Triggers: Define when and why issues move from Support to Engineering (e.g., unresolved bugs, SLA breaches, or high-priority customer concerns).
- Severity Levels: Classify issues (e.g., Critical, High, Medium, Low) with clear response and resolution timelines.
- Service Level Agreements (SLAs): Set internal deadlines faster than customer-facing SLAs to ensure timely resolutions.
- Escalation Matrix: Map out who handles what, when, and how, ensuring smooth handoffs.
- Communication Protocols: Standardize how teams share context, from ticket details to updates during critical incidents.
- Review Process: Regularly analyze escalations to improve workflows and prevent recurring issues.
Organizations with defined escalation policies resolve incidents 40% faster and reduce downtime costs, which can range from $5,600 to $540,000 per hour. Ready to streamline your process? Read on for actionable steps, templates, and SLA examples.
Incident Escalation Procedures: Functional and Hierarchical Explained
sbb-itb-e60d259
Step 1: Define Escalation Triggers and Levels
Before diving into the details of escalation, it’s crucial to outline when and how to move an issue from Support to Engineering, along with assigning clear responsibilities. Without these defined triggers, teams can get bogged down in back-and-forth discussions, delaying resolutions. This step creates the groundwork for a smoother escalation process.
Identify Common Escalation Scenarios
Start by documenting scenarios that require Engineering’s involvement. These situations often fall into three categories:
- Technical triggers: Issues like unresolved software bugs, system outages, product defects, security breaches, or problems that exceed the expertise of the support team.
- Business triggers: High-priority customers, potential contract cancellations, legal threats, or incidents with serious financial consequences, such as failed payment processing.
- Operational triggers: tickets nearing SLA deadlines, complex system failures, or performance dips beyond 20%.
Additionally, keep an eye on functional gaps, like missing features or incomplete documentation. In B2B settings, customers may explicitly request escalation out of frustration or urgency, even if SLA thresholds haven’t been breached. Interestingly, support managers who monitor customer behavior for just 20 minutes twice daily can reduce escalation rates by 30–40%.
Establish Escalation Levels
Using a four-tier model can help clarify roles and responsibilities across the escalation process:
- Level 1 (Front-line Support): Handles initial contact, basic troubleshooting, and applies documented fixes. They can restart services and follow runbooks.
- Level 2 (Technical Specialists): Deals with more complex issues that require advanced product knowledge. They can adjust configurations or reach out to vendors if needed.
- Level 3 (Engineering Specialists): Tackles bugs, architectural challenges, and code-level fixes. They also handle emergency changes and collaborate closely with development teams.
- Level 4 (Management/External): Makes critical decisions during high-stakes incidents, such as approving extra resources or overriding policies.
Pair these levels with severity classifications to streamline response times. For example:
- SEV1 (Critical): Total system outages or security breaches affecting over 50% of users. Requires immediate escalation.
- SEV2 (High): Major issues like login failures or severe performance drops (e.g., a 50% slowdown). Escalation within 15 minutes.
- SEV3 (Medium): Minor bugs or localized issues. Escalation within 2 hours.
- SEV4 (Low): Cosmetic problems or feature requests that can wait until the next business day.
This structured system ensures accountability, prevents unnecessary delays, and helps teams resolve incidents up to 40% faster.
Step 2: Create and Align Service Level Agreements (SLAs)
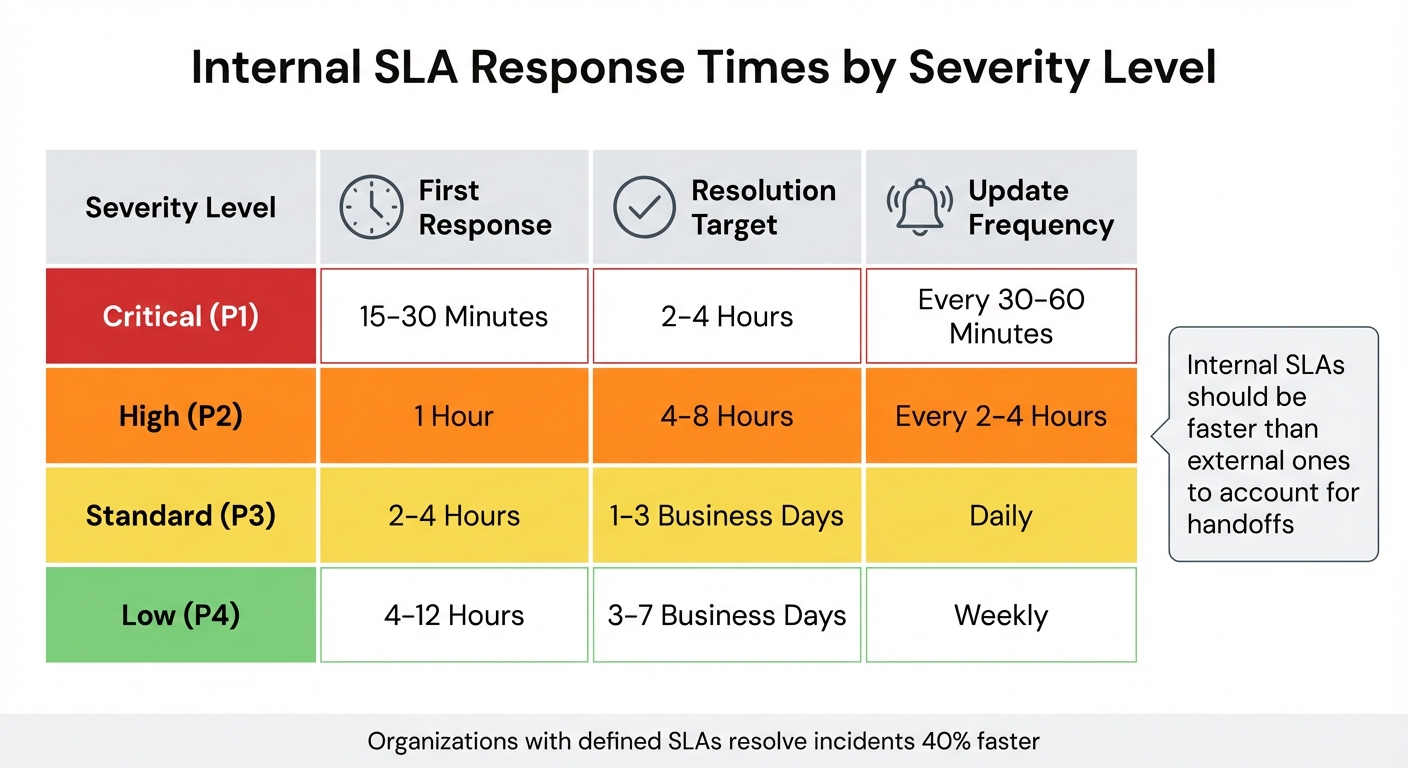
Internal SLA Response Times by Severity Level
Once you’ve established escalation triggers and levels, the next step is to define clear SLA management policies. Without specific timeframes, tickets can get stuck between teams, causing unnecessary delays. The goal is to set expectations before problems arise, creating a smoother escalation process and avoiding last-minute chaos.
Set SLA Timeframes Based on Severity
Your SLA timeframes should directly reflect the impact of each issue. For instance, critical outages need immediate attention, while minor bugs can wait. A great example comes from the University of Saskatchewan IT department, which set aggressive SLAs for classroom incidents: a 1-minute triage and a 15-minute resolution for urgent cases where instructors couldn’t teach. For major incidents, they aimed for a 90-minute response and a 4-hour resolution window.
When designing your SLA framework, focus on three key metrics for each severity level: First Response Time (acknowledging the issue), Update Frequency (keeping stakeholders informed), and Resolution Time (delivering the fix).
| Severity | First Response | Resolution Target | Update Frequency |
|---|---|---|---|
| Critical (P1) | 15–30 Minutes | 2–4 Hours | Every 30–60 Minutes |
| High (P2) | 1 Hour | 4–8 Hours | Every 2–4 Hours |
| Standard (P3) | 2–4 Hours | 1–3 Business Days | Daily |
| Low (P4) | 4–12 Hours | 3–7 Business Days | Weekly |
Internal SLAs should always be faster than external ones. For example, if a customer SLA promises a 4-hour resolution, your internal teams should aim for 3 hours. This buffer accounts for handoffs and communication delays, ensuring deadlines are met even when unexpected issues arise.
A practical example of this principle is a service provider that implemented two internal SLAs: one requiring all new tickets to move from "Open" to "Pending" within 15 minutes, and another mandating tickets be assigned to an engineer within 30 minutes.
Plan for SLA Breach Notifications
Even with well-defined SLAs, breaches are inevitable. What separates top-performing teams is their ability to anticipate and manage them proactively. Set up automated alerts that trigger 30–60 minutes before an SLA deadline. This gives managers time to reallocate resources or escalate the issue.
When breaches occur, your system should take immediate action: reassign the ticket to a senior engineer or manager, elevate its priority (e.g., from High to Critical), and update its status to "Escalation". These automated processes ensure no ticket is overlooked, even during busy periods.
Tracking breach trends over time helps pinpoint recurring issues. Are certain teams consistently overwhelmed? Do specific times – like Friday afternoons – see more violations? High-performing teams aim for 90% or more tickets handled within SLA timeframes and strive to keep reopened tickets below 3%. If you’re falling short, it might be time to reassess team capacity or adjust your targets during quarterly reviews.
"Internal SLAs only work if everyone understands them. Hold brief onboarding sessions for new team members, and make SLA terms visible inside the tools your teams use." – Nooshin Alibhai, Founder and CEO, Supportbench
Finally, involve engineers in the SLA drafting process to ensure the goals are realistic. Unrealistic targets lead to burnout and decreased morale. Start small by focusing on one or two high-impact metrics, such as First Response Time, and expand as your process evolves. Use AI-driven tools to monitor and automate these workflows for smoother operations.
Step 3: Build an Escalation Matrix for Support-to-Engineering Handoffs
Once you’ve nailed down your SLAs, the next step is creating a straightforward escalation matrix. Think of it as a roadmap that links issue severity to the right teams and timelines. This matrix cuts through the chaos during critical moments, making it clear who’s responsible, when a handoff needs to happen, and what steps follow. By 2023, about 85% of mid-to-large companies had adopted a formal escalation matrix for incident management. On the other hand, 40% of small businesses use simpler setups where frontline agents escalate issues directly to department heads for quicker decisions.
Structure the Escalation Matrix
Start by using an editable tool like Excel or Google Sheets. These tools are perfect for quick adjustments without needing help from your engineering team. Your matrix should cover six essential columns: Issue Type, Severity (P1-P4), Current Owner, Escalation Time (when it moves up the chain), Next Engineering Contact, and Actions/Next Steps.
Here’s a sample layout to guide you:
| Issue Type | Severity | Current Owner | Escalation Time (SLA) | Next Engineering Contact | Actions/Next Steps |
|---|---|---|---|---|---|
| System Outage | Critical (P1) | Support L1 | 30 Minutes | On-Call DevOps Lead | Start a bridge call; notify CTO |
| Feature Defect | High (P2) | Support L2 | 4 Hours | Senior Backend Engineer | Log bug in Jira; add repro steps |
| Billing Error | Medium (P3) | Support L1 | 1 Business Day | Finance/Billing Engineer | Check transaction logs; update customer |
| UI/UX Glitch | Low (P4) | Support L1 | 3–5 Business Days | Frontend Developer | Add to backlog |
Over time, you’ll want to tweak this setup to match changing needs and incident types.
One key feature to add is an "In Transfer" status. This tracks the gap between when Support escalates an issue and when Engineering officially takes it over. To avoid delays, set a rule requiring Engineering to acknowledge tickets within a specific window (like 2–4 hours). If they don’t, trigger an automatic escalation to management. Also, make sure to include backup contacts for every role, so you’re covered during vacations or sick days.
Make the matrix easy to find. Pin it in Slack, upload it to your company wiki, or integrate it into your helpdesk software. The goal? Teams should be able to access it instantly when time is critical.
Adapt the Matrix for Dynamic SLAs
While a static matrix works for basic scenarios, today’s B2B support often demands more flexibility. Beyond traditional escalation levels, consider adding customer impact metrics to fine-tune urgency. For example, include a "Segment Weight" column to adjust response times based on customer importance. A P2 issue for a high-value client might automatically get bumped to a P1 timeline. This way, you’re not just reacting to technical severity – you’re prioritizing based on customer impact.
You can even create a scoring system in Google Sheets to calculate an Impact Score (0–100). This score could factor in details like ARR tier, the number of users affected, whether there’s a workaround, and the business outcomes being blocked. For instance, a billing API failure affecting a $500,000/year account with no workaround would score much higher than a minor UI issue affecting a single user. Protect your formulas in the spreadsheet while letting teams update specific variables.
Treat your escalation matrix as a living document. Version it (e.g., v1.1, v1.2) and review it every quarter. Use these updates to adjust scoring weights based on past incidents – whether they were false alarms or overlooked high-impact issues. Keep evolving the matrix, and don’t hesitate to incorporate real-time AI insights to make it even sharper.
Step 4: Document Communication Protocols and Team Responsibilities
Once you’ve set up your escalation matrix and SLAs, the next step is to create detailed communication protocols and clearly define team responsibilities. Without proper documentation, even the most carefully planned escalation paths can break down. In fact, organizations with well-documented escalation policies resolve incidents 40% faster because everyone knows exactly when and how to escalate issues. The difference between a smooth handoff and a ticket languishing in limbo often comes down to having clear, accessible guidelines.
Establish Handoff Procedures
When escalating an issue, it’s crucial to include all relevant details: the original incident description, a timeline of actions taken, attempted solutions, reasons for escalation, current status, and an assessment of the customer impact. This ensures the Engineering team has the necessary context to avoid duplicating efforts.
Communication channels should align with the urgency of the incident. For example:
- Critical (SEV1): Use phone and SMS alongside a dedicated Slack channel.
- High (SEV2): Rely on Slack/Teams and email.
- Medium (SEV3): Stick to ticket updates and emails.
- Low (SEV4): Use email with a next-business-day response.
To keep track of escalations, introduce an "In Transfer" status that monitors the time between escalation and acknowledgment by Engineering. If an incident remains unclaimed within a specific timeframe, it should automatically escalate to management. As one expert aptly put it:
"Your customers don’t distinguish between work time and handoff time. They just know how long they waited." – Unito
For critical incidents, establish clear war-room protocols. Create a single channel for updates (e.g., #warroom-sev1-02-05-2026), pin status updates every 15 minutes, and use emoji shorthand – 👍 for acknowledgment, 🛠️ for investigating, ✅ for resolved – to streamline communication. Assign a rotating "scribe" to document an accurate timeline for post-mortems. Datadog implemented similar practices in October 2025, reducing false-positive alerts by 35% and helping Engineering focus on high-priority tasks.
With these handoff procedures in place, the next focus should be on defining when and how issues can be de-escalated.
Define De-escalation and Review Processes
Not every issue needs to stay escalated indefinitely. Set clear criteria for returning problems to Support. For instance, de-escalate when a technical fix is deployed, when more information is required from the customer (mark it as "blocked"), or when the issue is identified as a "how-to" question rather than a bug. This prevents Engineering teams from becoming overwhelmed with issues that don’t require their expertise.
For SEV1 and SEV2 incidents, conduct blameless retrospectives to refine runbooks and improve escalation triggers. Microsoft’s Xbox Live team adopted this approach in October 2025, using measurable triggers and monitoring to optimize their workflows. The result? A 28% reduction in total escalations and smoother team handoffs. Additionally, establish a protocol to provide customers with status updates every 24 hours during active escalations, even if there’s no immediate resolution. This keeps customers informed and reduces pressure on both teams.
Consistency is key, so regularly validate these de-escalation criteria through simulated scenarios. Organize "chaos days" to inject controlled failures and test your protocols. Ensure triggers activate, auto-escalations function as intended, and communication channels remain effective under stress. The goal isn’t to create unnecessary communication overhead – it’s to make sure the right information gets to the right people at the right time.
Step 5: Develop an Internal Escalation Agreement Template
Once you’ve set up your communication protocols and de-escalation criteria, the next step is to bring everything together in a single, easy-to-access document. This internal escalation agreement acts as a guide for handling unpredictable issues in a structured manner. It builds on previously defined SLA targets and escalation paths, ensuring smooth collaboration across teams. To be effective, the document should be short – no more than one or two pages – so both Support and Engineering teams can quickly refer to it during high-pressure situations. Think of this as a living document that evolves with your team’s needs rather than a rigid policy that gathers dust.
The best escalation agreements are created with input from everyone who will use them. As Stella Inabo wisely points out, "It’s tempting to create an SLA without the input of your agents. But it’s important not to force unrealistic customer expectations on the support team". Involving support agents, engineering leads, and department heads ensures the agreement sets achievable targets that reflect operational realities. Many companies take a collaborative approach to ensure the agreement is grounded in practicality. Once you’ve gathered input, organize the document into clearly defined sections.
Key Sections of the Agreement Template
Use this collaborative groundwork to structure your escalation agreement. Aim to include six essential sections:
- Agreement Summary and Scope: Clearly define the teams involved (e.g., Support Tier 2 and Backend Engineering) and the types of issues covered, such as bugs, outages, or technical queries.
- Escalation Triggers: Specify the conditions that trigger handoffs. These could be time-based (e.g., unresolved after a set number of hours), impact-based (e.g., affecting a large percentage of users), or severity-based (e.g., security breaches).
- Tiered Support Structure: Map out the hierarchy from front-line support (L1) to expert engineers or management (L3/L4). Make sure each level’s responsibilities and authority are clear.
- Internal SLAs: Define response and resolution time targets. For example, a critical issue (SEV1) might require a response within 15 minutes and resolution within 2 hours, while a lower-priority issue (SEV4) could have a longer window.
- Communication Protocols: Outline the primary communication channels (e.g., Jira, Slack war rooms) and detail what information should accompany handoffs, such as troubleshooting steps already taken and customer impact summaries.
- Review Cadence and Success Metrics: Schedule regular reviews (e.g., quarterly) to assess metrics like Mean Time to Resolution (MTTR) and escalation rates. Events like product launches, team restructures, or new tools should trigger immediate updates to the agreement. When breaches occur, conduct root cause analyses to identify issues like staffing shortages, ticket misrouting, or team overload.
Interestingly, about 75% of projects with a clear escalation plan report better adherence to timelines and budgets. Regular reviews and updates ensure the agreement stays relevant and effective.
Use AI to Automate Escalations
Manually tracking escalations can be a headache, creating unnecessary delays and increasing the risk of missed SLAs. AI-powered platforms like Supportbench streamline this process by automating escalations. These tools use workflow engines to trigger alerts when specific time or severity thresholds are reached. For example, AI can analyze incident descriptions with Large Language Models (LLMs) to assign severity levels automatically and identify recurring issues based on historical data.
AI tools can also adjust SLA timers dynamically, accounting for business hours, team availability, or customer tiers. Imagine a ticket escalated at 4:45 p.m. on a Friday – automation can pause the SLA clock until Monday morning, avoiding unfair breach penalties. As Nooshin Alibhai, Founder and CEO of Supportbench, explains: "Automation frees up agents to focus on service – not spreadsheets". Automated tracking of unclaimed tickets also ensures nothing falls through the cracks.
The benefits of automation are clear. Organizations with well-defined escalation policies resolve incidents 40% faster, and structured escalation paths can improve MTTR by 30% to 50%. These tools not only reduce delays but also free up teams to focus on what matters most – delivering excellent service.
Conclusion
Creating an internal escalation agreement goes beyond just putting policies on paper – it turns chaotic, unorganized escalations into a streamlined, efficient process for managing complex issues. By clearly defining triggers, setting achievable SLAs based on severity, structuring escalation matrices, and documenting communication protocols, you ensure that no detail is overlooked and everyone understands their responsibilities.
Clear escalation policies can make a real difference: incidents are resolved 40% faster, and MTTR improves by 30%–50%. Plus, 75% of projects with defined escalation plans stay on track with timelines and budgets, reducing stress for agents and speeding up resolutions.
To take this even further, modern AI-powered tools can simplify the process. For example, Supportbench offers a modern support CRM with automation for severity classification, breach alerts, and visibility across Support and Engineering systems. As Nooshin Alibhai, Founder and CEO of Supportbench, explains:
"A well-defined escalation management system transforms chaotic, ad-hoc issue handling into a structured, efficient process".
Automation can save 5–10 minutes per escalation just on notification routing, freeing up agents to focus on solving problems rather than managing logistics.
To get started, define clear escalation triggers like "unresolved after 2 hours" or "impacting more than 10% of users." Establish a tiered support structure with clear L1, L2, and L3 boundaries. Document handoff protocols to ensure Engineering teams receive all the necessary context upfront. Finally, review and update your agreement quarterly to adapt to your team’s evolving needs.
FAQs
What are the essential elements of a strong internal escalation agreement with Engineering?
To keep collaboration running smoothly and resolve issues quickly, a strong internal escalation agreement should include a few essential components:
- Clear escalation paths: Ensure everyone knows exactly who to contact and when. This eliminates confusion, especially during high-pressure situations.
- Specific triggers for escalation: Define what prompts an escalation, such as the severity of an issue or how long it’s been unresolved.
- Defined roles and responsibilities: Assign clear roles to team members so there’s no overlap or unnecessary delays in addressing the issue.
- Communication protocols: Lay out how updates will be shared between teams, including the frequency and preferred channels.
- Measurable SLAs: Set agreed-upon timelines for responses and resolutions to keep expectations aligned and ensure accountability.
By weaving these elements into your escalation process, you can enhance team coordination, cut down on resolution times, and foster better collaboration between support and Engineering teams.
How can AI improve the escalation process in customer support?
AI has the potential to streamline the escalation process by automating critical steps, cutting down delays, and ensuring issues are addressed more effectively. For instance, AI can identify when a case surpasses set thresholds or service level agreements (SLAs) and instantly notify the appropriate teams. This not only speeds up response times but also reduces the risk of human error.
AI also plays a role in improving resource allocation. It can assign escalations to the most qualified team members by considering factors like their expertise, workload, or past performance. Beyond that, AI can spot trends in recurring problems, enabling teams to refine SLAs or adjust escalation workflows proactively. These improvements result in quicker problem resolution, happier customers, and smoother collaboration among teams.
Why should Engineering be involved in creating SLAs?
Involving the engineering team in drafting SLAs is key to creating agreements that work in the real world. Their expertise ensures that expectations are grounded in reality, with clear escalation paths, practical response times, and shared priorities for resolving issues.
When support and engineering teams collaborate, it minimizes delays, smooths out workflows, and results in SLAs that match how things actually operate. This teamwork leads to quicker issue resolution and happier customers.