
Automating tag suggestions can save time and improve efficiency in managing support tickets, but only if done correctly. Incorrect tags lead to misrouted tickets, poor customer experiences, and unreliable data. Here’s how to ensure accuracy in automated tagging:
- Start with a clear tagging framework: Define categories like Issue Type, Priority, and Sentiment. Use a two-level hierarchy for simplicity and detail, avoiding clutter and redundant tags.
- Clean and prepare data: Remove irrelevant elements (e.g., email signatures) and standardize ticket formats. Use AI to summarize long conversations for better context.
- Design effective AI prompts: Use few-shot examples, structured workflows, and clear definitions to guide the AI in assigning accurate tags.
- Add validation systems: Allow agents to review low-confidence tags and set thresholds for automatic application. Use feedback to refine models.
- Monitor and improve accuracy: Track metrics like precision and recall, test prompt variations, and regularly update models using human-reviewed data.
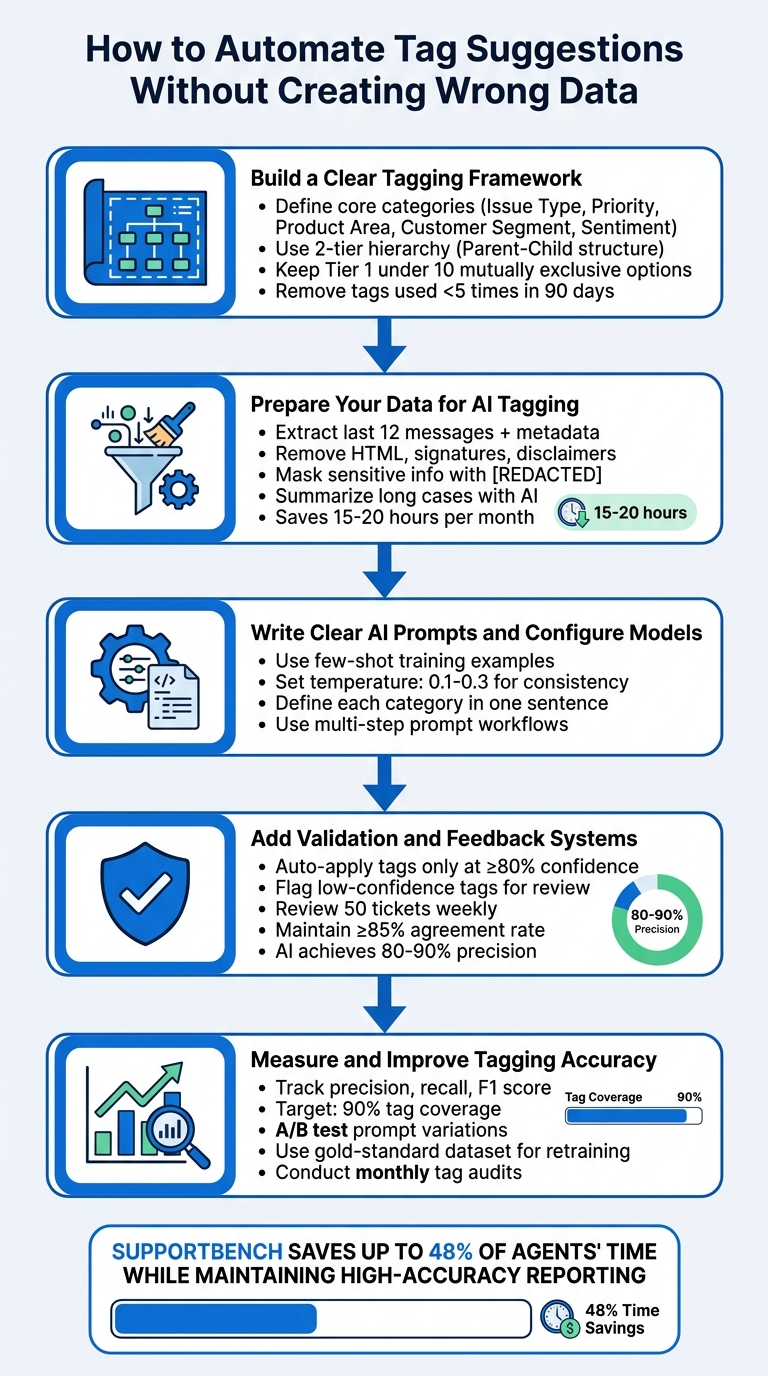
5-Step Process for Automating Tag Suggestions Without Creating Wrong Data
Studio Update #06: Fine Tuning to Tag Support Tickets? Plus Dynamic AI prompting via Spreadsheets
sbb-itb-e60d259
Step 1: Build a Clear Tagging Framework
Before diving into automating tag suggestions, it’s crucial to establish a well-structured tagging framework. Without it, you risk amplifying existing confusion across thousands of tickets, which could make your reports unreliable [2].
"The taxonomy is the strategy. Ticket tagging is just the execution."
– Jake Bartlett, Writer and Customer Support Expert [3]
Your tagging framework needs to answer one key question: What decisions will these tags support? If a tag doesn’t influence how tickets are routed, escalated, or analyzed, it’s just adding unnecessary clutter [3]. Focus on categories that directly impact workflows, like routing tickets to specialized teams, meeting SLAs, or identifying high-risk accounts. Stick to actionable categories such as Issue Type, Priority, Product Area, Customer Segment, and Sentiment. Once you’ve nailed these down, define core categories, set up clear hierarchies, and refine your tag list for simplicity.
Set Up Core Tag Categories
Start with a mandatory Tier 1 set of categories that cover the majority (around 80%) of your tickets. Keep this list short – fewer than 10 mutually exclusive options – to avoid decision fatigue and ensure consistency [3]. For instance, a billing error ticket should not also fall under a feature request category.
A good starting point is the RUF Framework:
- Reliability: Errors or performance issues.
- Usability: How-to or troubleshooting questions.
- Functionality: Requests for new features [3].
For B2B operations, you can expand this with categories like SLA Breach, Renewal Risk, or Customer Segment (e.g., Enterprise vs. SMB) to prioritize high-value accounts. Use consistent naming conventions (e.g., always use "Billing" instead of synonyms like "Invoices" or "Payments") to avoid confusion for both agents and AI models [2].
| Category | Example Tags | Purpose |
|---|---|---|
| Issue Type | bug, feature-request, billing | Classify the nature of the inquiry |
| Priority | p1-urgent, p2-high, SLA-at-risk | Define urgency and business impact |
| Product Area | mobile-app, api, reporting-module | Identify problem areas within products |
| Customer Segment | enterprise, trial-user, renewal-risk | Help route tickets and manage accounts |
| Sentiment | frustrated, positive-feedback | Track customer satisfaction and health |
Organize Tags in Parent-Child Hierarchies
To strike a balance between simplicity and detail, use a two-tier taxonomy. Tier 1 represents broad categories (e.g., "Technical Issue"), while Tier 2 dives into specific subtopics (e.g., "Login Problem" or "API Error"). This structure allows for high-level trend analysis while still providing granular insights, without overwhelming agents or AI systems [3][5].
For example:
- Parent Tag: Bug
Subcategories: UI Crash, Data Sync Error, Performance Lag - Parent Tag: Billing & Payments
Subcategories: Refund Request, Invoice Question, Payment Failed
Configure Tier 2 tags to appear only after a relevant Tier 1 selection is made. This reduces clutter and ensures agents select the most relevant options.
Keep Tag Lists Manageable
A bloated tag list can slow down both agents and AI models. If your list grows too large, similar tags may confuse AI, leading agents to default to generic options like "Other" or skip tagging altogether. To avoid this, export your tag list and deactivate any tag that’s been used fewer than five times in the last 90 days [2].
Steer clear of catch-all categories like "Other" or "General Inquiry", as they often become dumping grounds that compromise data quality. If a tag doesn’t fit into your core categories, it’s a sign to refine your framework rather than create a miscellaneous option.
"If a tag doesn’t change how you handle a ticket or how you understand your support data, it’s adding noise instead of clarity."
– Jake Bartlett, Writer and Customer Support Expert [3]
Regular maintenance is key. Schedule quarterly audits to review tag usage, merge duplicates, and archive rarely used tags. This ongoing upkeep ensures your framework stays clean, minimizes misclassifications, and keeps automated tagging accurate across your support operations.
Step 2: Prepare Your Data for AI Tagging
After setting up your tagging framework, the next step is to prepare your ticket data for AI processing. Ticket data often includes unnecessary elements like HTML, email signatures, and disclaimers, which can confuse AI models. Clean, well-structured data is key to achieving accurate tagging. Here’s how to extract and prepare ticket details effectively for AI.
Pull Relevant Ticket Information
Start by identifying the essential ticket fields to extract: subject lines, ticket descriptions, public and internal comments, priority levels, assigned groups, and metadata such as ticket IDs. AI models typically process the last 12 messages of a conversation alongside current field values and metadata [2]. This helps the model grasp the broader context of the issue instead of relying on isolated snippets.
Pay particular attention to the most recent public comments, as they often contain the most relevant context for the current issue. For voice-based support, create a call summary from the transcript before applying tags. Summaries provide a structured and concise input for classification models [2]. Keep in mind that text should be truncated to 8,000 characters to stay within token limits.
Clean and Standardize Your Data
Once you’ve extracted the necessary fields, clean the data by removing unnecessary elements. Strip out HTML tags, scripts, and links to convert the data into plain text. Use regex patterns or common markers (like "–", "Sent from my iPhone", or "Best regards") to remove email signatures and legal disclaimers, as these inflate token usage without adding value.
To protect customer privacy and comply with data protection regulations, mask sensitive information such as email addresses and phone numbers with [REDACTED]. Standardize ticket fields by converting text to lowercase and ensuring consistency across the dataset.
Introduce formatting delimiters, such as <<<BEGIN_USER_MESSAGE>>>, to clearly separate ticket data from processing instructions. This prevents the AI from misinterpreting customer messages as system prompts, improving the model’s accuracy.
Summarize Long Cases with AI
For lengthy conversation threads, use AI to generate concise summaries. These summaries should highlight the main issue, recent developments, and current status, ensuring that only the most relevant information is used for tag predictions. This eliminates unnecessary noise and allows the model to focus on the customer’s immediate needs.
Summarizing is especially helpful for complex B2B cases, where tickets can span weeks and involve multiple agents. By focusing on the key points, you ensure the tagging model prioritizes the appropriate routing or escalation path. This preprocessing step can significantly reduce manual effort, saving agents 15 to 20 hours per month on ticket organization and classification [1].
Step 3: Write Clear AI Prompts and Configure Models
Once your dataset is prepared and standardized, it’s time to fine-tune your AI’s tagging behavior. The prompts you create play a crucial role in ensuring the AI understands not just the text of a ticket but also its context – things like priority and the assigned group. Well-designed, context-aware prompts guide the AI to analyze entire conversations along with relevant metadata, rather than relying on superficial word matching. To achieve this, using clear and representative examples is key.
Train Models with Few-Shot Examples
AI models excel when you provide labeled examples directly in the prompts. This approach, known as few-shot training, helps the AI quickly learn patterns by showing it what correctly tagged tickets look like in various scenarios. For example, if you’re training the AI to handle billing-related issues, include examples like refund requests, invoice disputes, and subscription cancellations. Be sure to cover a range of styles, such as formal requests, casual messages, and even common mistakes. This method allows the AI to grasp language variations and patterns without needing an extensive dataset [1].
Configure Settings for Consistent Results
To ensure reliable tagging, set the model’s temperature between 0.1 and 0.3. Lower temperature values produce more predictable and consistent outputs, which is ideal for tasks like classification. Additionally, define your tagging taxonomy clearly within the prompt. Use simple, one-sentence definitions for each category, such as: "Technical issue: any ticket reporting errors, performance problems, or system malfunctions" [3]. Clear definitions like these help the AI interpret intent consistently across various tickets. By combining structured prompts with stable output settings, you can refine the tagging process step by step for better accuracy.
Use Multi-Step Prompt Workflows
Instead of asking the AI to handle all tagging tasks in one step, break the process into sequential prompts to improve accuracy. Start with a broad classification, such as: "Is this a Technical, Billing, or General inquiry?" Once the AI identifies the general category, follow up with a more specific prompt. For example, if the ticket falls under "Billing", you might then ask: "Is this a Refund, Invoice, or Subscription issue?" [2].
"Multi-stage prompting represents a fundamental shift in AI architecture: from single-shot interactions to orchestrated sequences." – Glean [6]
This step-by-step approach mimics how humans solve problems systematically. By keeping each prompt focused, the AI avoids being overwhelmed by overly complex tasks. You can even include a final validation step to check for conflicts or inconsistencies. This modular design ensures accurate data tagging, helping your support operations run smoothly and efficiently.
Step 4: Add Validation and Feedback Systems
Even with improved AI prompts and clean data, AI models aren’t perfect. Most AI-powered tagging systems achieve 80% to 90% precision [8], so human oversight remains essential. The goal? Shift your team’s focus from manual tagging to quality assurance – spot-checking AI decisions and fixing errors before they snowball into reporting issues.
Let Agents Review Low-Confidence Suggestions
When the AI generates tagging suggestions with low confidence, route those suggestions to agents for review instead of applying them automatically. This prevents inaccurate data from polluting your system and gives the AI a chance to learn from edge cases. Make this process seamless by integrating it into your agents’ workspace. For instance, add a sidebar button that allows agents to trigger or override AI suggestions without leaving the ticket [2]. This keeps the process efficient and minimally disruptive.
Filter Tags by Confidence Score
Set up a system where tags are automatically applied only if the AI’s confidence score is 80% or higher. For anything below that threshold, flag the tags for manual review [7][8]. This approach minimizes false positives. Additionally, use these flagged cases to spot trends – if certain tags consistently score low, it might indicate that your prompt definitions need tweaking or that more training data is required for those categories.
Track Errors and Retrain Models
Log every correction agents make to build a robust retraining dataset. Aim to review 50 tickets weekly to compare AI-generated tags with human-reviewed data [2][4]. If the agreement rate falls below 85%, use the logged errors to refine prompts or consolidate duplicate tags [4]. Conduct monthly audits of the top 50 newly created tags to merge duplicates, archive irrelevant tags, and prevent "tag sprawl", which can confuse your model [2].
"A model that achieves 99 percent accuracy on its training dataset but only 71 percent accuracy on new real-world data has not been validated. It has been memorized." – Pooja Katkar, QA Test Lead, Testriq [7]
Step 5: Measure and Improve Tagging Accuracy
Automation isn’t a “set it and forget it” process. To keep your AI tagging system performing well, you need to regularly measure its accuracy and fine-tune it. Without consistent monitoring, even a well-built system can start to falter, leading to unreliable results.
Monitor Accuracy Metrics
Once you’ve set up structured data and refined your prompts, it’s time to track how well your system is doing. Keep an eye on key metrics like precision (how often tags are correct) and recall (how often tags are missed). These metrics provide a balanced view of performance [9][10].
- Precision is especially important in situations where mistakes are costly – like misrouting a billing query to the wrong team.
- Recall, on the other hand, is critical when missing a tag could lead to serious consequences, such as overlooking a security issue or an urgent bug [9][10].
Also, calculate the F1 score, which balances precision and recall, to get a clearer picture of overall performance. The goal? Achieve at least 90% tag coverage while keeping misroutes to a minimum [9][2].
Test Different Prompt Versions
Before rolling out changes, test them. A/B testing on live data helps you compare different prompt configurations to see what works best [13]. For example:
- Try a multi-step prompt workflow versus a single-prompt approach.
- Add few-shot examples to prompts to see if they improve accuracy for specific tag categories.
Another key metric to track is time-to-insight – how quickly your system moves from testing a prompt to delivering actionable results. This helps you understand how efficiently your tagging system adapts [11].
Update Models with Corrected Tags
After gathering insights from testing, use them to refine your model. Focus on recent data when retraining, so the model can "forget" outdated patterns as your product and customer needs change [14]. However, avoid retraining the model with unverified AI-generated predictions. Doing so risks creating a "death spiral", where the model learns from its own errors [12].
Instead, rely on a gold-standard dataset – a collection of human-validated labels – for both evaluation and retraining [12][2]. Additionally, keep evolving your tag list to reflect changes in data patterns. These steps help ensure your tagging system stays relevant and reliable as your operations grow.
"If those metrics are not helping anyone make better decisions, they are not really functioning as a measurement. They are just reporting." – Sheree Zhang, Sr. Product Manager, Label Studio [11]
Conclusion: How to Maintain Accurate Tag Automation
automating customer support workflows through tag suggestions doesn’t have to compromise data quality. The secret lies in treating it as an ongoing process, not a one-and-done setup. Let’s recap the core steps: establishing a solid tagging framework, cleaning your data, crafting effective AI prompts, and implementing validation systems.
Keep an eye on performance metrics and perform weekly audits to spot trends or issues. To avoid an overload of unused tags, remove any that have been used fewer than five times in the past 90 days[2][3]. As Sara Feldman from the Consortium for Service Innovation wisely points out, "When it comes to transformation, slow is fast."[40] This mindset aligns with the iterative approach we’ve emphasized throughout this guide.
"For organizations to maximize the potential of AI, they must ensure that the data fueling it has the upmost integrity." – Tendü Yogurtçu, PhD, Precisely CTO[15]
Supportbench offers a great example of how to maintain data integrity with its AI-native solution. By blending Natural Language Processing (NLP) with human-in-the-loop workflows, Supportbench goes beyond simple keyword matching. It analyzes entire conversation histories to grasp intent and context, automatically applying tags and flagging uncertain suggestions for review. This method can save up to 48% of agents’ time while maintaining high-accuracy reporting[2].
The result? Your support team can focus less on organizing tickets and more on resolving customer issues. Plus, the knowledge base you build will accurately reflect your operations, giving you a strong foundation for continuous improvement.
FAQs
How do I choose the “right” tags before automating anything?
When selecting tags, it’s important to design a taxonomy that’s both clear and practical. Aim for a system that strikes a balance between being detailed enough to be useful and simple enough to avoid confusion. Steer clear of creating an overly complicated structure with too many unused tags or categories that are too vague to be helpful.
Focus on tags that represent common issues and workflows your team encounters regularly. To keep the system effective, review and validate your tags consistently. Gather input from support agents who use the tags daily – they’re the best source of insight for refining the system over time. This approach not only ensures consistent use but also lays the groundwork for successful AI-driven automation.
What ticket text should I remove or redact before sending it to an AI model?
Before submitting a ticket to an AI model, it’s crucial to clean up the content to avoid misclassification and protect privacy. Remove unnecessary elements such as signatures, disclaimers, HTML content, and quoted email threads. Be cautious with untrusted user input and redact personal identifiers or sensitive information. This ensures the AI receives clear, accurate, and privacy-compliant data for processing.
How do I roll out auto-tagging safely without polluting reporting data?
To use auto-tagging effectively without messing up your reporting data, you need to take a careful approach. Start by creating a clear and consistent tagging system that everyone understands. Pair this with AI tools, but make sure to include validation loops – basically, checkpoints to catch errors before they affect your data.
Set up feedback processes to keep improving the system over time. It’s also smart to limit auto-tagging to situations where the AI is highly confident in its accuracy. Finally, keep your automated and manual data separate in your reports. This way, you’ll maintain clean, reliable data while also boosting efficiency.