When SSO (Single Sign-On) fails, it can disrupt entire organizations. The key to solving these issues quickly is having the right logs and data. Most failures stem from small errors like mismatched fields, expired timestamps, or incorrect configurations. Without detailed logs, troubleshooting becomes guesswork, wasting time and causing unnecessary delays.
Here’s what you need to know to resolve SSO problems effectively:
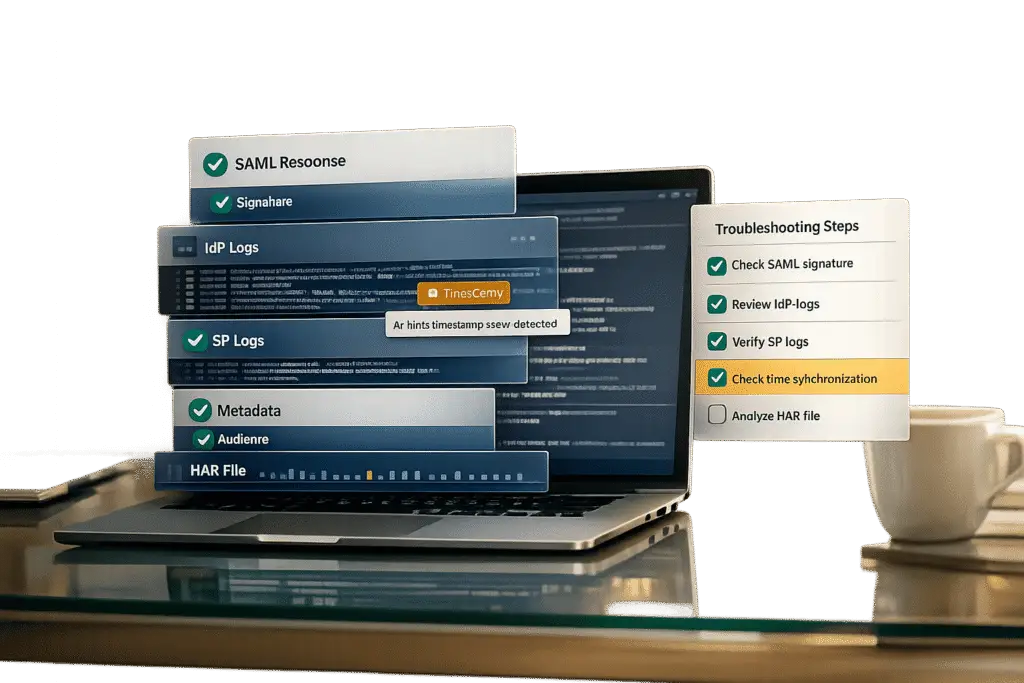
- Critical Logs to Collect:
- SAML Responses (Base64-encoded XML) to identify field mismatches.
- Identity Provider (IdP) Logs to confirm token issuance and attributes.
- Service Provider (SP) Logs to understand why responses are rejected.
- Metadata Files for trust configurations (certificates, URLs).
- HAR Files from browser tools to detect redirect loops or network issues.
- Common Steps to Troubleshoot:
- Generate HAR files to identify network and redirect problems.
- Decode and analyze SAML responses for mismatches.
- Check IdP logs for token and attribute details.
- Review SP logs for validation errors like audience or timestamp mismatches.
- Enable debug logging for deeper insights if needed.
- Avoid These Mistakes:
- Ignoring time zone differences in logs, which can cause timestamp errors.
- Skipping verification of key fields like ACS URLs, certificates, and Issuer values.
- How AI Can Help: AI tools can automate repetitive tasks like decoding SAML responses, analyzing logs, and identifying mismatches, saving hours of manual work.
5-Step SSO Troubleshooting Process with Critical Logs and Data Sources
Troubleshoot SSO Issues with SAML Tracer | Must-Watch Guide – Part III
sbb-itb-e60d259
Why the Right Logs and Data Matter
When it comes to SSO errors, even small issues can bring operations to a halt. That’s why having precise logs and accurate data isn’t just helpful – it’s absolutely necessary. Without proper logs, troubleshooting SSO failures often feels like shooting in the dark. The system might throw out vague error messages like "Authentication Failed" or "Invalid Response", but these alerts don’t tell you what’s actually wrong. Without detailed, protocol-level logs, engineers are left manually decoding Base64 XML and double-checking metadata, all while users are locked out and frustrated.
The numbers back this up. Studies reveal that 40–60% of the time spent resolving incidents is used just identifying the root cause [1]. That’s a huge chunk of downtime that could be avoided. And when SSO failures happen during critical times – like customer onboarding or certificate rotations – every second matters. The difference between a quick 10-minute fix and a drawn-out 2-hour outage often comes down to whether you captured the right data from the start.
How Accurate Data Reduces Resolution Time
When you collect the right information upfront, you eliminate the need for endless back-and-forth that only drags out SSO incidents. For example, having access to decoded SAML responses, IdP logs, and service provider logs allows support teams to pinpoint exactly where the failure occurred. Whether the issue is a signature mismatch, a missing attribute, or a clock skew problem, accurate data takes the guesswork out of the equation.
Imagine this scenario: an engineer sees the error "User Not Authorized" and assumes it’s a permissions issue. They spend hours adjusting role mappings, only to discover that the actual problem was a missing mandatory attribute in the SAML response [3]. With structured logs that show attribute mapping results, the issue could’ve been resolved in minutes. The logs would clearly highlight which field was missing, saving time and effort.
Accurate data also helps catch silent failures – those sneaky issues where everything seems fine on the surface. Redirects work, XML parses correctly, but a subtle mismatch in trust fields like Audience or ACS URL prevents final authorization [3]. These problems don’t trigger obvious errors; instead, they cause login loops that leave users stuck and frustrated. Without visibility into the full authentication sequence, teams often waste time trying to recreate the issue in different environments instead of fixing it.
With these benefits in mind, let’s dive into the specific logs and data you need to troubleshoot SSO problems effectively.
Types of Logs and Data You Need for SSO Issues
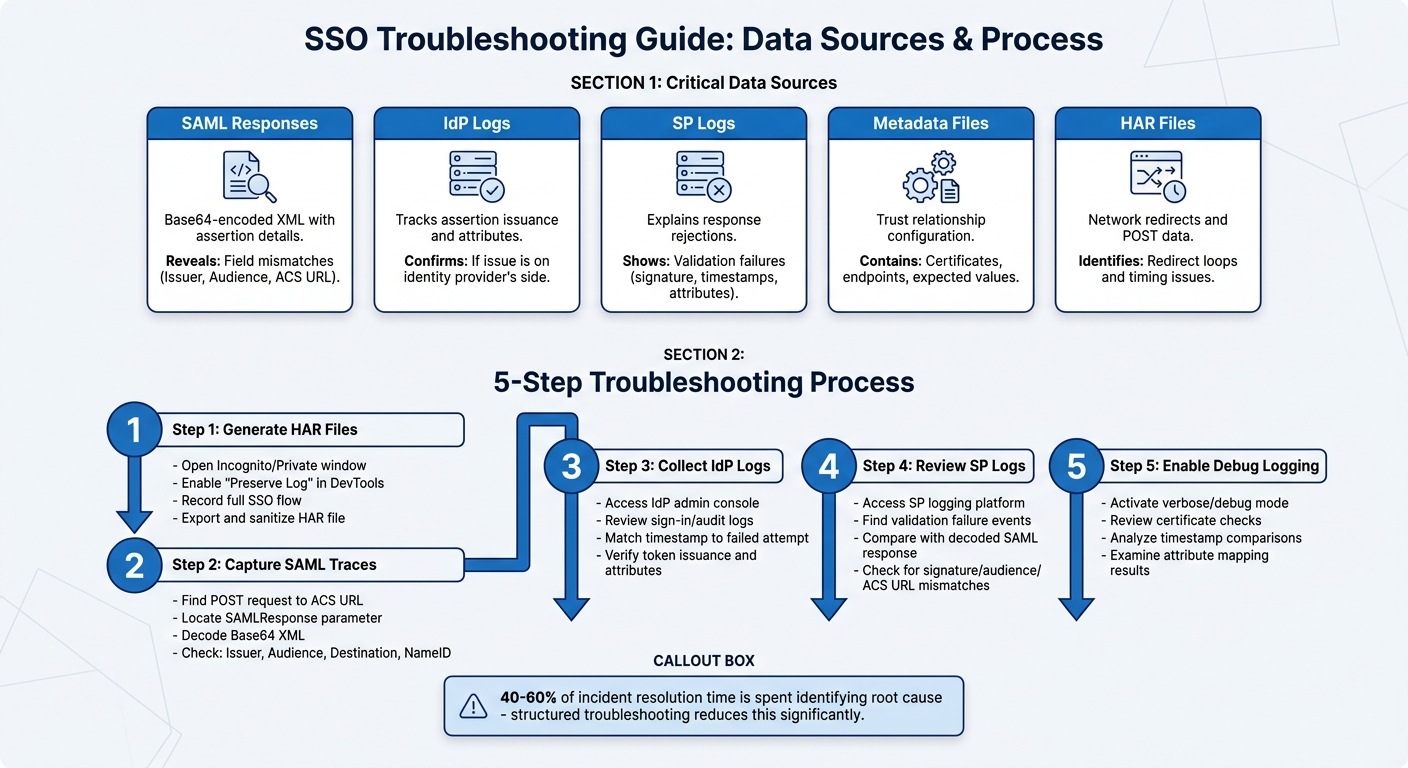
Efficient SSO troubleshooting requires visibility into both sides of the authentication handshake. The key data sources fall into five main categories:
- SAML Responses: These Base64-encoded XML payloads contain the assertion itself. Always keep both the encoded and decoded versions to avoid discrepancies when escalating issues to IdP administrators [4].
- Identity Provider (IdP) Logs: Logs from systems like Okta or Microsoft Entra ID show whether an assertion was issued and what attributes were sent. This confirms if the issue lies on the identity provider’s side.
- Service Provider (SP) Logs: These logs explain why a response was rejected. For instance, AWS CloudTrail’s
ExternalIdPDirectoryLoginevents capture validation failures, such as signature mismatches or timestamp errors [2]. - Metadata Files: These files, from both the IdP and SP, define the trust relationship and include critical details like certificate fingerprints and endpoint URLs [1].
- HAR Files: Captured through browser DevTools, these files reveal network-level issues like redirect loops, POST request parameters, and timing problems that server logs might miss [4].
Here’s a quick breakdown of these data sources and why they matter:
| Data Source | Details | Impact |
|---|---|---|
| SAML Responses | Base64-encoded XML with assertion details | Reveals exact field mismatches (Issuer, Audience, ACS URL) |
| IdP Logs | Tracks assertion issuance and attributes | Confirms if the issue is on the identity provider’s side |
| SP Logs | Explains response rejections | Shows validation failures (e.g., signature, timestamps, attributes) |
| Metadata Files | Trust relationship configuration | Contains certificates, endpoints, and expected values |
| HAR Files | Includes network redirects and POST data | Identifies redirect loops and timing issues |
Having these logs and data at your fingertips can make all the difference in cutting down resolution time and keeping systems running smoothly.
Step-by-Step SSO Troubleshooting Process
This guide simplifies the process of diagnosing SSO failures by focusing on targeted log collection and analysis. Follow these five steps to systematically identify and resolve issues.
Step 1: Generate HAR Files to Check Network and Redirect Problems
Start by creating a HAR (HTTP Archive) file. This file captures every network interaction between the browser and server during the SSO process. It’s particularly useful for identifying redirect loops, timing issues, and network errors that server-side logs might miss.
To ensure accurate results, close all browser windows and open a new Incognito/Private window. This prevents cached data or cookies from interfering. Open Developer Tools (press F12 in most browsers), go to the Network tab, and enable "Preserve Log" (or "Persist Logs" in Firefox). Without this setting, logs will be cleared during redirects.
Start the recording before entering the initial URL, then proceed through the SSO flow until the error occurs or the redirect loop completes. Once done, export the HAR file using the browser’s export function.
| Browser | How to Open Developer Tools | Key Setting to Enable | Export Method |
|---|---|---|---|
| Google Chrome | F12 or View > Developer > Tools | Preserve Log | Export HAR icon |
| Firefox | Ctrl + Shift + E | Persist Logs | Right-click > Save All As HAR |
| Microsoft Edge | F12 | Preserve Log | Export as HAR (Ctrl + S) |
| Safari | Develop > Show Web Inspector | Preserve Log | Export |
Before sharing the HAR file, sanitize it to remove sensitive information like authentication tokens, passwords, or any personally identifiable information (PII). Use redaction tools or manually edit the file to ensure user privacy.
Step 2: Capture SAML Traces with Browser DevTools
Once you have the HAR file, analyze the SAML messages. Open Developer Tools again, go to the Network tab, and ensure Preserve Log is still enabled. Reproduce the SSO attempt.
Find a POST request directed to the Service Provider’s Assertion Consumer Service (ACS) URL, which often looks like /saml2/idpresponse. Select this request and check the Payload or Form Data tab for a parameter called SAMLResponse (or SAMLRequest). This contains a Base64-encoded XML string.
Copy the string and decode it using an online Base64 decoder or browser extension. The resulting XML will include fields like <saml:Issuer>, <saml:Audience>, Destination, and <saml:NameID>. These fields hold clues to common issues such as audience mismatches, incorrect destinations, or missing attributes.
"SAML failures become predictable when troubleshooting starts with a few high-signal checks: clock sync, certificate validity, ACS URL accuracy, issuer/audience matching, and signature-algorithm alignment" [1].
If you’re using a Chromium-based browser, enable sensitive data capture in DevTools settings. Alternatively, browser extensions can help capture and decode SAML assertions.
Step 3: Collect Identity Provider Logs
After capturing the SAML trace, verify if the Identity Provider (IdP) issued the authentication token. Check the IdP’s logs to correlate with the SSO data from earlier steps.
Log in to your IdP’s admin console – such as Microsoft Entra ID, Okta, or Ping Identity – and go to the Sign-in logs or Audit logs section. Look for entries that match the timestamp of the failed login attempt. These logs will show whether the authentication request reached the IdP and if it issued a token.
If the IdP logs show a successful token issuance but the user still can’t log in, the issue likely lies with the Service Provider. If the logs indicate a failure, investigate issues like user assignment to the app or incorrect attribute mappings.
Pay special attention to CorrelationID and Timestamp fields. These help trace specific transactions and link IdP activity to Service Provider errors. For silent login failures or "App not configured" errors, ensure the user is explicitly assigned to the application in the IdP.
Step 4: Review Service Provider Logs
Next, examine the Service Provider (SP) logs to understand why a SAML response was rejected. Common errors include "Signature validation failed", "Audience mismatch", or "ACS URL mismatch."
Access your SP’s logging platform, which could be AWS CloudTrail, custom app logs, or SaaS platform audit logs. Look for events tied to the failed login attempt. For example, AWS CloudTrail logs ExternalIdPDirectoryLogin events that highlight validation failures like signature mismatches or timestamp errors [2].
Compare the SP logs with the decoded SAML response from Step 2. If the logs indicate "Invalid Audience", check the <Audience> field in the SAML assertion against the SP’s configured EntityID. Ensure they match exactly, including protocol (HTTP vs. HTTPS) and trailing slashes.
If the issue remains unresolved, enable debug logging for more detailed insights.
Step 5: Turn On Debug Logging for Detailed Diagnostics
If standard logs don’t reveal the issue, enable debug or verbose logging. This mode provides a deeper look into validation steps and pinpoint failures.
The method to enable debug logging varies by platform. For Microsoft Entra ID, activate detailed sign-in logs through the Azure portal. For custom apps using SAML libraries, check the configuration file for a debug or verbose setting. For WordPress SAML plugins, there’s often a "Debug Mode" checkbox in the plugin settings.
Debug logs reveal critical details such as certificate checks, timestamp comparisons, and attribute mapping results. For example, if logs show "Current time is earlier than NotBefore", adjust the IdP settings to allow a 5–10 second time skew to account for clock drift between servers.
Common Mistakes to Avoid
When troubleshooting SSO issues, it’s easy to fall into predictable traps that waste time and delay resolution. Studies reveal that 40–60% of incident resolution time is spent just identifying the root cause [1]. Steering clear of these common mistakes can significantly speed up the process.
Ignoring Time Zone Differences in Logs
SAML assertions come with strict validity periods, defined by NotBefore and NotOnOrAfter timestamps. If the clocks on your Identity Provider (IdP) and Service Provider (SP) are even slightly out of sync, the SP might reject a valid assertion as "expired" or "not yet valid" [7]. This often results in login loops and misdirected troubleshooting efforts.
The problem becomes worse when logs from different systems use different time zones. For instance, your IdP might log events in UTC, while your SP uses Eastern Time. Without proper time conversion, aligning logs becomes a guessing game. Microsoft Entra ID, for example, records all audit log creation times in UTC to maintain consistency [6].
"If the idp and sp are set to different time zones, the timestamps in the saml assertion will be interpreted incorrectly. It’s like trying to meet someone at 2 pm, but one of you is using eastern time and the other is using pacific time." – Voksha, CIAM Q&A [7]
To avoid this, configure all servers – both IdP and SP – to sync with a reliable Network Time Protocol (NTP) server like time.gov. Regularly automate checks to ensure clocks stay accurate, and set up alerts for any drift. When troubleshooting, use browser developer tools to inspect the raw NotBefore and NotOnOrAfter values in the SAML response and compare them to the current UTC time. This small step can save hours of frustration [7].
Proper timestamp management ties directly into the detailed log analysis discussed earlier. Staying methodical is key to avoiding minor but critical oversights.
Skipping Steps in the Troubleshooting Process
SSO authentication hinges on precise alignment across multiple XML fields. Even a tiny error – like a missing trailing slash in an ACS URL or using "http" instead of "https" – can derail the entire process [1]. When teams rush or skip steps, they risk missing these small but crucial details.
To prevent this, adopt a structured approach, such as a 60-second checklist, before diving into deeper analysis. Start by verifying essential elements in this order: timestamps (to check for clock skew), signing certificates (to ensure they’re valid), the ACS URL (for exact matches), Issuer, Audience, and the signature algorithm [1]. This quick review often catches common issues, like expired certificates or mismatched URLs, without wasting time on unnecessary debugging.
| Troubleshooting Approach | Time Spent on Root Cause | Resolution Speed |
|---|---|---|
| Unstructured (manual guessing) | 40–60% of total incident time [1] | Slow, unpredictable |
| Structured workflow (checklist) | Significantly reduced | Fast, deterministic |
Another often-overlooked safeguard is maintaining a "break-glass" administrator account with a standard username and password. If your SSO setup fails entirely, this backup account ensures you can still access the system, preventing a total lockout for all users – including admins [5]. Without it, you might need to contact your platform’s support team, adding unnecessary delays to your resolution time.
How AI Speeds Up SSO Troubleshooting
AI tools are changing the game for SSO troubleshooting by automating the most tedious parts of the process. Tasks like decoding Base64 XML, formatting raw SAML responses, and comparing fields manually can be incredibly time-consuming. AI steps in to handle these repetitive jobs, analyzing logs and pinpointing failure points in mere seconds. This means less time spent deciphering cryptic error messages and more time focusing on fixes.
AI Log Analysis and Error Detection
AI simplifies SAML payload decoding and runs validation checks on common failure areas like expired certificates, timestamp mismatches, ACS URL errors, and signature algorithm conflicts. Instead of manually poring over raw XML and metadata files, AI provides side-by-side comparisons of expected values (like Issuer, Audience, and Destination) with actual data. This makes it easy to spot even the smallest discrepancies[1].
By mapping vague error messages to specific XML validation failures – such as mismatched signature methods or audience issues – AI removes the guesswork[1][3]. It even goes a step further by suggesting corrective actions, like updating certificate references after a rotation or syncing system clocks to resolve timestamp problems[8].
AI Case Summaries and Knowledge Base Search
Supportbench takes troubleshooting up a notch by integrating AI into case management. Its AI Co-Pilot allows agents to search the knowledge base and review past tickets without leaving their current case screen[9]. For example, when an SSO ticket comes in, agents can ask the AI to look up specific error codes like "Audience Mismatch" or "Issuer Mismatch." The AI then provides configuration checklists and resolution steps based on successful past fixes.
The AI Automation & Summarization feature is another time-saver, condensing long SSO tickets and email threads into clear, actionable summaries. This ensures agents aren’t bogged down by endless logs or multi-day conversations[9]. Once an issue is resolved, agents can use AI Knowledge Integration to create concise knowledge base articles, making future troubleshooting faster and more efficient.
Supportbench also offers Intelligent Suggestions, which provide real-time prompts and next steps tailored to the specific SSO issue. Meanwhile, AI-Powered Ticket Routing ensures that SSO-related tickets are automatically sent to the right technical agents based on the issue type and urgency[10]. On top of that, AI identifies patterns across multiple tickets, which can reveal larger system problems or configuration issues. This proactive approach helps teams address potential systemic failures before they escalate[9][10].
Conclusion
Effective SSO troubleshooting begins with collecting the right logs. Whether it’s HAR files, SAML traces, IdP logs, SP logs, or debug-level diagnostics, having this data at hand is essential for identifying issues quickly. Problems like clock skews of ±2 minutes, expired certificates, or even a single incorrect character in an ACS URL can be pinpointed much faster with proper log collection[1].
A structured approach is key to speeding up resolutions. Research shows that delays often arise when the root cause isn’t identified early on[1]. By sticking to a clear checklist, you can address the most frequent issues before tackling more complex tasks like decoding XML[1].
Avoiding common pitfalls also plays a big role in troubleshooting success. Overlooking time zone discrepancies in logs or skipping steps under pressure can lead to unnecessary delays. As Team Scalekit wisely advises:
"SAML failures become predictable when troubleshooting starts with a few high-signal checks: clock sync, certificate validity, ACS URL accuracy, issuer/audience matching, and signature-algorithm alignment."[1]
Finally, AI tools are reshaping how teams handle SSO troubleshooting. These tools can instantly decode Base64 XML, validate fields automatically, and highlight mismatches. Solutions like Supportbench’s AI customer support tools streamline the process further by pulling relevant knowledge base articles, summarizing ticket threads, and ensuring cases are routed to the right technical agents. This allows you to focus more on solving the issue and less on the tedious details.
FAQs
What should I collect first if SSO fails?
To troubleshoot effectively, begin by collecting essential logs and error messages from both your identity provider and service provider. Pay close attention to logs related to Single Sign-On (SSO), integration processes, and any SAML responses. Tools like browser developer consoles or extensions can be invaluable for capturing SAML assertions and responses. These details are crucial for pinpointing the root cause of the problem. Additionally, clearing your browser’s cache and cookies can sometimes resolve issues early in the process.
How do I confirm whether the IdP or SP is at fault?
When troubleshooting SSO (Single Sign-On) issues, it’s important to figure out whether the problem lies with the Identity Provider (IdP) or the Service Provider (SP). Start by examining key configuration settings like metadata, certificates, and trust relationships.
Next, dive into the logs. Look for specific errors such as signature verification failures or other SAML-related issues. For instance:
- Signature errors or mismatched metadata often suggest a problem on the IdP side.
- Errors related to trust relationships or missing attributes are more likely tied to the SP.
Another helpful step is to review the SAML response XML. It can reveal clues about where the issue originates, making it easier to address the root cause.
What’s the safest way to share HAR or SAML data with support?
To share HAR or SAML data securely, it’s crucial to remove or redact sensitive information beforehand. Modern Chromium-based browsers simplify this by automatically sanitizing HAR files, stripping out headers like Cookie and Authorization. For SAML data, provide decoded XML, metadata files, and redacted logs. This ensures support teams can troubleshoot effectively without compromising security. Always double-check that private details are excluded to protect privacy.