Switching from a shared inbox to helpdesk software can greatly improve your customer support. Shared inboxes often lead to missed emails, duplicate responses, and lack of accountability. A helpdesk system solves these issues by automating ticket assignments, tracking SLAs, and providing detailed analytics.
Here’s how to transition smoothly without disrupting your customers:
- Audit your current setup: Identify inefficiencies like missed emails or overlapping responses.
- Prepare your team: Explain the benefits, assign roles, and provide training.
- Back up your data: Securely store email records and test migrations with a small sample.
- Set up workflows: Automate ticket routing, SLA tracking, and escalation processes.
- Run a phased migration: Start with a pilot program, run old and new systems in parallel, and inform customers about the change.
- Monitor and refine: Track metrics like response time and customer satisfaction, and adjust workflows based on feedback.
This step-by-step approach ensures a smooth transition, improved efficiency, and better customer service.
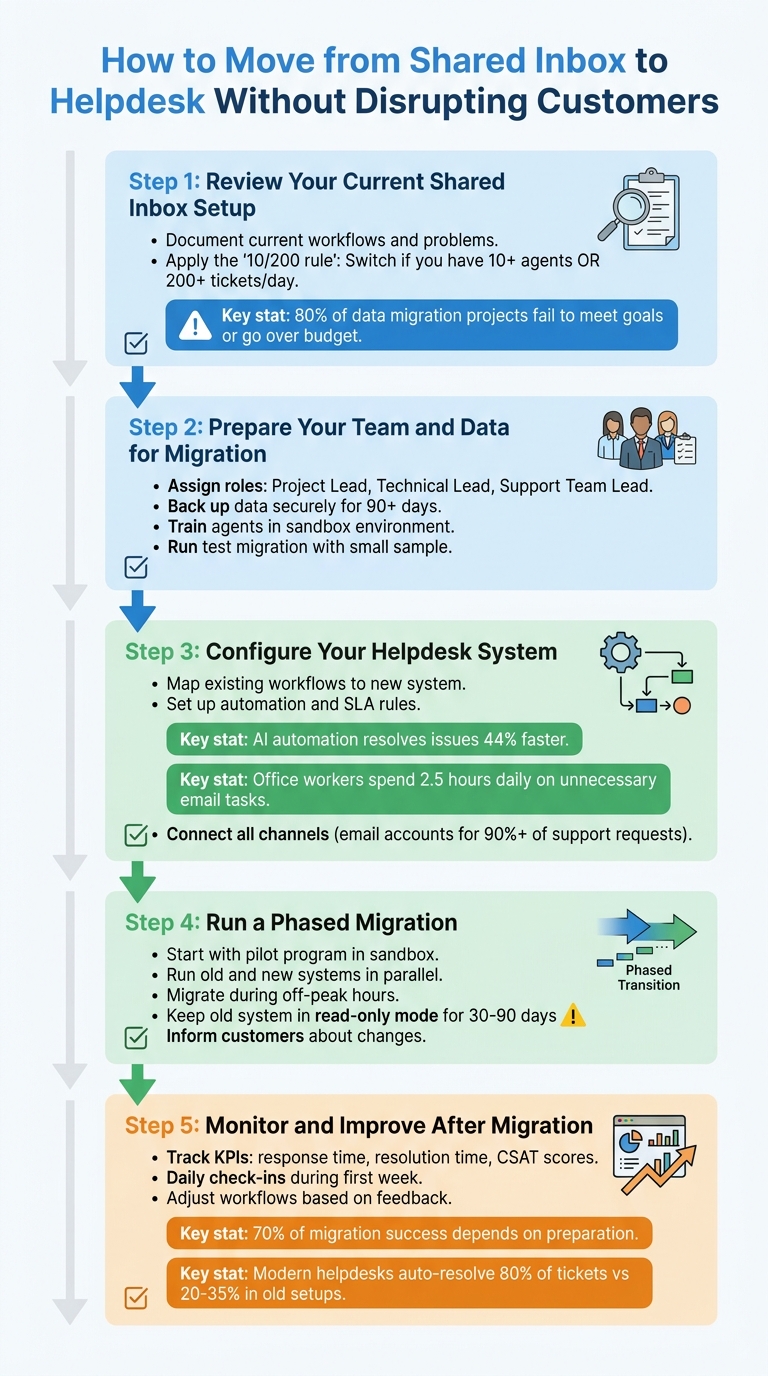
5-Step Process to Migrate from Shared Inbox to Helpdesk System
Moving to Help Desk: Who, When, and Why
sbb-itb-e60d259
Step 1: Review Your Current Shared Inbox Setup
To improve your shared inbox, the first step is to figure out where things are breaking down. This isn’t about venting frustrations – it’s about carefully documenting workflows and pinpointing exactly where they fall apart.
Document Current Workflows and Problems
Start by mapping out your entire email process. Write down how requests come in, how agents pick them up, how progress is tracked, and how issues are marked as resolved. Once you’ve got that mapped out, dive deeper by reviewing 20–30 tickets from different time periods to identify recurring issues [1].
Look for manual processes that slow things down, like tagging emails by hand, repeatedly sending the same responses, or jumping between tools to find customer history. These steps not only waste time but also increase the chance of errors [1].
Talk to your team – especially the frontline agents. They often face challenges that don’t show up in reports. Ask them about problems like duplicate replies, emails being overlooked, or how much time they spend organizing the inbox instead of solving customer issues [3]. If coordination eats up more time than actual problem-solving, that’s a red flag for inefficiency.
These findings will help you decide when it’s the right time to move to a better system.
When to Make the Switch
A good rule of thumb is the "10/200" rule: if your team has more than 10 agents or handles over 200 tickets a day, your shared inbox setup may no longer be enough [2][1]. But there are other signs that it’s time to upgrade.
Workflow issues are often the first sign, but technical limitations and missed SLAs (Service Level Agreements) are just as telling. For example, if agents are stepping on each other’s toes by responding to the same email, or if follow-ups are becoming more frequent, your workflow is likely breaking down [4][1].
You should also keep an eye on your platform’s technical limits. If you’re hitting Microsoft 365’s 50GB storage cap or can’t manage more than 25 users accessing the inbox at once, it’s clear your system isn’t built to scale [4][5].
"Outlook shared mailboxes were designed for team collaboration on email, not customer support operations." – Dinesh Goel, CEO, Robylon [4]
Another critical metric is your SLA breach rate. If you’re consistently missing promised response times because you lack automated tracking or alerts, you’re putting client contracts at risk, especially in B2B environments [4]. And if managers can’t tell who’s working on what without directly asking agents, it’s a sign that your current setup isn’t providing the visibility needed for effective team management [1].
Step 2: Prepare Your Team and Data for Migration
Getting your team and data ready is key to a smooth migration process.
Tell Your Team About the Change
Start by explaining why this change is happening. Use the pain points identified in Step 1 – like manual tagging or the lack of collision detection – to show how the new helpdesk system will solve these problems. It’s important your agents see the benefits, not just management.
Next, assign clear roles early in the process:
- Project Lead: Oversees the migration plan and keeps stakeholders informed.
- Technical Lead: Manages data export and integration setup.
- Support Team Lead: Ensures workflows run smoothly in the new system.
Don’t forget to loop in other departments like engineering, finance, and operations. Share details about the timeline, potential impacts, and any new access instructions. This ensures everyone is prepared, avoiding issues like lost customer history or login troubles.
"Prepare resources early. Provide documentation, training sessions, and FAQs tailored to each user role. Consider live support or chat for the first few weeks to ease the transition." – Eric Klimuk, Founder and CTO of Supportbench [3]
Review and Back Up Your Data
Before moving anything, take a close look at your current channels and records. This includes email aliases, contact forms, widgets, historical tickets, customer contacts, knowledge base articles, and automation rules. This review will help you decide whether to migrate everything or just focus on active, essential data.
Create a full backup of your shared inbox and store it securely – either in cloud storage or on a local drive – for at least 90 days. Why? Because over 80% of data migration projects either fail to meet their goals or go over budget [1]. A backup ensures you have a safety net if something goes wrong.
"Decide if you’ll transfer all historical records or just the essentials. Confirm whether your new system supports bulk import/export via API or internal tools." – Eric Klimuk, Founder and CTO of Supportbench [3]
Run a small test migration using a limited set of historical and active tickets. This allows you to catch formatting issues, data mismatches, or metadata errors before the full migration. Once ready, keep the old inbox in read-only mode for 30–90 days as a reference.
With data backed up and verified, you’re ready to focus on preparing your team.
Train Your Agents
Training is essential to resolving the coordination issues in your current setup. Start with the basics – like ticket assignments, responding to customers, and adding internal notes – before diving into advanced features like automation. A quick-reference guide comparing old and new workflows can help agents adjust more quickly.
Set up a sandbox environment where agents can practice without affecting live customer data. They should feel confident handling tasks like ticket escalations, assignments, and reporting before the system goes live [3]. This hands-on approach is much more effective than relying solely on demo videos or written guides.
During the first week, create a dedicated Slack channel or hold daily check-ins so agents can report any issues. Your frontline team will notice problems like missing features, slow response times, or confusing interfaces before anyone else. Their feedback is critical for making quick adjustments. Finally, plan to provide live support or extra assistance during the initial weeks to help agents adapt and build confidence in the new system.
Step 3: Configure Your Helpdesk System
After training your team and securing your data, the next step is setting up your helpdesk system to mirror your existing workflows while incorporating automation. This stage transforms your manual processes into a more efficient, automated system.
Map Your Existing Workflows
Begin by translating the processes from your shared inbox into structured workflows within the helpdesk. Labels like "urgent" or "billing" can become ticket statuses, while email folders turn into queues. Informal task assignments should be replaced with AI-powered ticket routing, allowing each request to receive a unique ticket ID for easier tracking. This approach shifts the focus from juggling emails to managing workflows, making it clear which requests are being handled. For B2B teams managing multiple issues for a single customer, this clarity is especially important.
Using the workflows documented in Step 1, configure your helpdesk to channel customer queries effectively. Test these workflows in a sandbox environment before going live. Create sample tickets that mimic real-world scenarios – like a customer reporting a technical issue or asking for a refund – and walk through the process from assignment to resolution. This testing phase can highlight gaps, such as missing escalation paths or unclear ownership rules, giving you the chance to refine the system.
Set Up Automation and SLA Rules
Automation is where you’ll see major efficiency improvements. Set up rules to route tickets based on attributes like email subject lines, sender addresses, or specific keywords. For instance, emails mentioning "invoice" can go directly to a billing queue, while messages from key accounts might be routed to senior agents.
Next, establish SLA (Service Level Agreement) policies to monitor response and resolution times. Many modern helpdesk systems can alert managers when a ticket is close to breaching SLA limits, ensuring customer expectations are met without requiring constant manual checks. In fact, AI-driven automation can help teams resolve issues up to 44% faster [6]. Considering office workers spend an average of 2.5 hours daily on unnecessary email tasks [7], these efficiencies free up agents to focus on solving problems for customers.
Once your workflows are automated and SLA tracking is in place, the next step is to integrate all your communication channels into a single system.
Connect Your Email and Support Channels
To maximize the benefits of automation and SLA tracking, integrate all your customer communication channels. Link your existing support email addresses – like support@yourcompany.com or billing@yourcompany.com – into the helpdesk so that every message funnels into one centralized system. Include other channels, such as website contact forms, to ensure comprehensive coverage.
Be prepared for minor disruptions during the first 24–48 hours after routing adjustments, such as temporary delays or duplicate tickets. To mitigate this, have a rollback plan ready, like reactivating legacy systems if needed, to maintain uninterrupted communication [3]. On launch day, double-check that all connected tools – such as your CRM, analytics dashboards, and SLA trackers – are functioning correctly. This ensures tickets sync with customer data and alerts work as intended. Since email accounts for over 90% of support requests for many businesses [6], getting these integrations right is critical.
Step 4: Run a Phased Migration
Switching to a new helpdesk system can feel overwhelming, but breaking it into phases helps reduce risks and ensures customer support remains uninterrupted.
Start with a Pilot Program
Kick things off with a pilot program. Use a sandbox environment to simulate how tickets will be handled, escalated, and reported. Migrate a sample of tickets to uncover any formatting issues, data mismatches, or system hiccups. Encourage frontline agents to test the system by manually submitting tickets, verifying logins, checking routing rules, and working through new processes. Their feedback will be invaluable for fine-tuning permissions and templates before rolling out the system fully.
"A pilot run reveals friction points and ensures team readiness." – Eric Klimuk, Founder and CTO, Supportbench [3]
Move Over Gradually
A sudden switch can lead to chaos, so take your time. Run the old and new systems side by side for a short period. This overlap lets you monitor for stability and catch any workflows you might have missed. During this time, route new tickets to the new helpdesk, while keeping the old system available for ongoing conversations.
"Avoid an abrupt switch. Run both systems in parallel for a short period to monitor stability, identify missing workflows, and prevent service gaps." – Eric Klimuk, Founder and CTO of Supportbench [3]
Plan the final migration during off-peak hours to minimize disruptions. Keep an eye out for duplicate or delayed tickets and adjust routing as needed. To wrap things up, schedule a second small migration about 1–2 weeks later to capture any remaining active threads from the old system.
Once you’re confident everything is running smoothly, shift your focus to keeping customers informed.
Inform Customers About the Change
Let your customers know about the switch ahead of time. Share updates on any changes to ticket submission portals, login processes, or support email addresses. Equip your support agents with clear, standardized response templates to handle customer questions about the transition. Keep a close eye on initial response times and customer satisfaction to quickly address any hiccups.
This proactive communication helps lay the groundwork for tracking your helpdesk’s performance after the migration.
Step 5: Monitor and Improve After Migration
The work doesn’t stop once your migration is complete and ticket flow begins. Now, it’s all about ensuring the new system operates smoothly. Monitoring from the very start allows you to identify and address problems before they snowball.
Track Performance Metrics
Start by keeping a close eye on core KPIs like first-response time, resolution time, ticket volume, and CSAT scores. These metrics provide a clear comparison between your new helpdesk and the old shared inbox. Pay special attention to SLA compliance – make sure alerts for overdue tickets and escalation rules are functioning as they should. Also, check for any message overlap between your old inbox and the new helpdesk, as this could indicate routing issues that need fixing right away [3].
"Don’t wait weeks to gather data. Begin tracking response time, resolution time, and satisfaction scores from day one." – Eric Klimuk, Founder and CTO of Supportbench [3]
Don’t just focus on averages. Look for patterns and outliers – these often reveal inefficiencies that averages can hide. For instance, you might notice certain ticket types taking longer to resolve or specific agents struggling to adapt to the new system [3].
Get Feedback from Agents and Customers
Your agents are on the frontlines, so they’re the first to notice what’s working and what isn’t. During the first week, hold daily check-ins to uncover issues like a confusing interface, slow response times, or missing features. Anonymous pulse surveys can also encourage agents to share honest feedback about the challenges they’re facing [3].
On the customer side, gather feedback while their experience is still fresh. Use in-app or website surveys immediately after ticket resolution to capture accurate insights. Combine numerical ratings with open-ended comments – the former helps you track trends over time, while the latter gives you a deeper understanding of specific issues [8].
By combining feedback from agents and customers, you can refine workflows and address pain points more effectively.
Adjust and Optimize
Take the data and feedback you’ve collected and use it to refine automation, workflows, and settings. Adjust routing rules, prioritization, and SLA triggers based on what you’ve learned from real-world usage. Always test changes in a sandbox environment before rolling them out to avoid disrupting live operations [3].
Keep your knowledge base up to date by adding articles that address recurring issues highlighted in feedback. Set up real-time dashboards and build escalation management systems to make improvement an ongoing part of your operations rather than something you only tackle occasionally [3].
"Ongoing review and iteration ensure your helpdesk remains effective as your business evolves." – Supportbench [3]
Conclusion
Main Points to Remember
The success of a helpdesk migration largely depends on preparation – around 70% of the outcome hinges on it [1]. Start with a detailed audit: document workflows, email aliases, and support channels. Tidy up your data by merging duplicates and archiving outdated tickets. When it’s time to migrate, take a phased approach by testing a small batch of 50–100 tickets to ensure field mapping and attachments work as expected [1].
Keep your old shared inbox in read-only mode for 30–90 days so you can reference past conversations if needed [1]. Plan the go-live during quieter times, like mid-week mornings, to minimize disruption. After the switch, monitor key metrics like first response time and CSAT, CES, and NPS scores. A significant drop in these metrics could indicate deeper migration issues rather than simple adjustment challenges [1].
The long-term advantages are hard to ignore. Modern helpdesks eliminate tedious manual tasks, provide detailed reporting, and enable self-service through knowledge bases. When integrated with your CRM, these systems can auto-resolve up to 80% of email tickets, compared to the 20–35% typical of older setups [4].
By following these steps, you’ll set a solid foundation for future improvements.
Keep Improving Over Time
A helpdesk isn’t a "set it and forget it" tool. As your business evolves, so must your support systems. Regularly review your knowledge base to identify and fill gaps based on recurring customer questions. Revisit workflow triggers to ensure they align with your current goals [4][9].
"A high-performing helpdesk doesn’t stay that way by accident. Ongoing review, iteration, and user collaboration ensure it stays fit for purpose as your business evolves." – Supportbench [3]
Leverage your data to guide decisions. Pay attention to metrics like agent utilization, backlog trends, and ticket categories to catch inefficiencies early [4][9]. Continuously experiment with automation in a sandbox environment, and encourage feedback from both agents and customers to address friction points quickly. By staying proactive, you’ll ensure your helpdesk remains a powerful tool for delivering outstanding support.
FAQs
What data should we migrate vs. leave behind?
When migrating to a new helpdesk system, it’s crucial to transfer essential data like customer conversation history, ticket details, and any related relationships. This ensures your team retains the context needed to provide seamless support. At the same time, leave behind outdated or irrelevant data – such as old unresolved tickets, duplicates, or incomplete records. Removing this clutter not only simplifies the migration process but also helps keep your new system efficient and focused. By cleaning up your data beforehand, you ensure that only accurate and relevant information moves forward, setting the stage for improved support quality and system performance.
How do we prevent missed or duplicate tickets during cutover?
To prevent missed or duplicate tickets during a transition to a helpdesk system, focus on maintaining data accuracy and managing tickets effectively. Here’s how:
- Minimize downtime by using tools like Delta Migration, which help retain updates during the process.
- Run a pilot migration to catch and address potential issues before the full rollout.
- Leverage specialized migration tools built for helpdesk systems to keep ticket relationships intact.
- Validate data accuracy and thoroughly test workflows after migration to confirm everything is functioning as expected.
Which KPIs prove the new helpdesk is working?
When evaluating how well your helpdesk is performing, focus on these critical metrics:
- First Contact Resolution Rate: How often issues are resolved on the first interaction. A high rate means quicker solutions and happier customers.
- Customer Satisfaction Score (CSAT): Captures customer feedback to gauge how satisfied they are with the support experience.
- Average Resolution Time: The average time it takes to resolve a ticket. Shorter times usually indicate efficient processes.
- First Response Time: Measures how quickly your team responds to initial inquiries. Faster responses often lead to better customer experiences.
- SLA Compliance: Tracks how well your team meets service-level agreements. Staying within SLA targets reflects reliability.
- Ticket Volume: Helps monitor workload and identify trends in support demand.
- Escalation Rate: Shows how often tickets need to be escalated to higher levels. A lower rate can indicate better training or processes.
These KPIs give you a clear picture of both team performance and customer satisfaction, making it easier to pinpoint strengths and areas needing improvement.
Related Blog Posts
- Help Desk Migration Checklist: How to Switch Platforms Without Downtime
- How do you move from Freshdesk to a multi-inbox B2B workflow without breaking email?
- How do you migrate away from Pylon without losing shared inbox history and customer context?
- Missive vs. Supportbench: The Limits of Email Clients for Support Operations