Building a status page directly into your portal simplifies incident management, reduces support tickets, and keeps customers informed in real-time. Unlike standalone tools, integrating a status page allows automatic updates tied to your system’s monitoring data, saving time and money while improving communication during outages. Here’s how you can do it:
- Key Features to Check: Ensure your portal supports API access, webhooks, multi-channel notifications, and UI customization (e.g., logos, light/dark mode). Verify admin permissions and the ability to map technical terms into user-friendly language.
- Tools Needed: Basic knowledge of APIs and JSON, monitoring tools, and automation workflows for real-time updates.
- Design Tips: Use clear categories, traffic light indicators (green, yellow, red, blue), and concise updates. Include uptime stats and allow users to subscribe to alerts.
- Automation Setup: Connect monitoring tools to your portal’s API for instant incident reporting and updates. Use AI for drafting customer-friendly messages if available.
- Testing and Maintenance: Test all incident states, notification channels, and mobile responsiveness. Regularly update and archive incidents, and provide clear post-incident summaries.
This approach reduces costs (e.g., standalone tools can cost $348–$948/year) and enhances customer trust through transparency and timely communication.
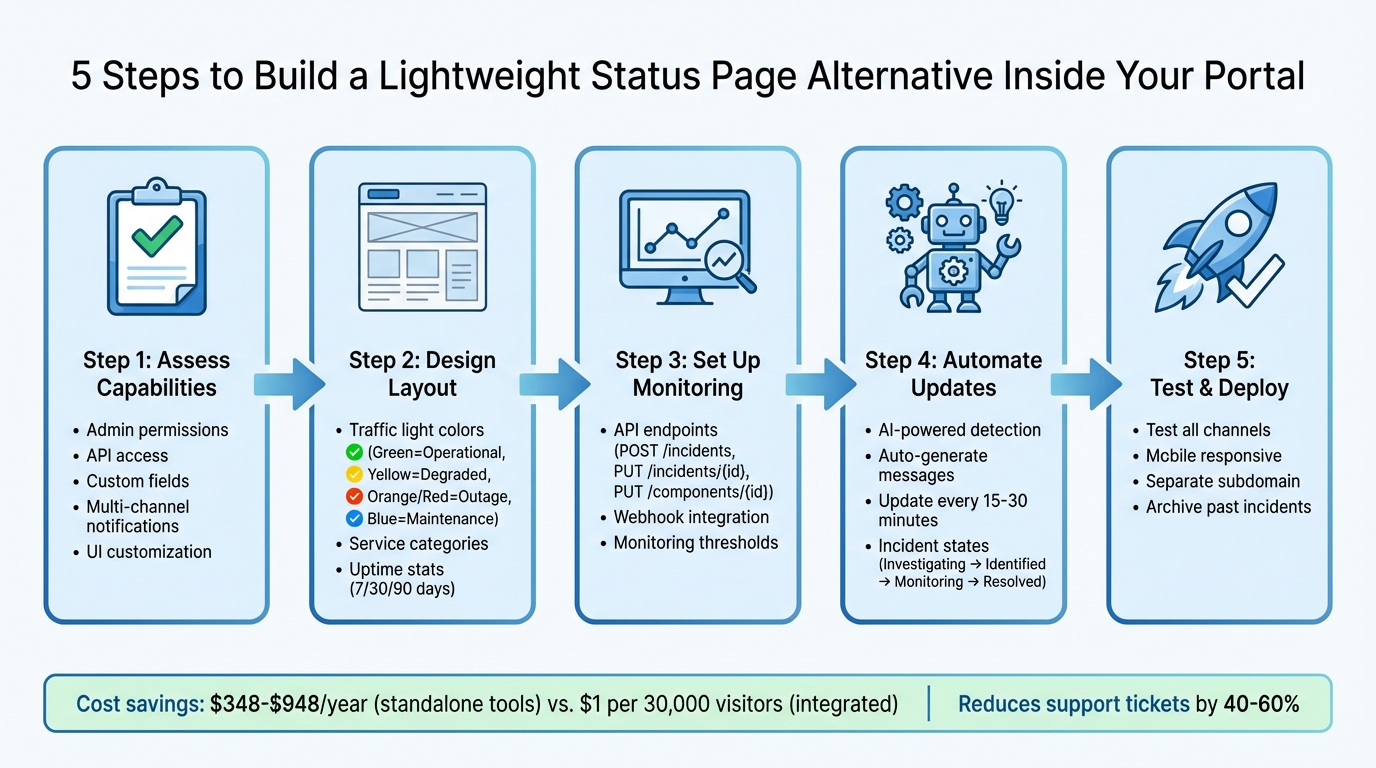
5-Step Process to Build a Status Page Inside Your Portal
Assess Your Portal’s Capabilities and Requirements
Before adding a status page to your portal, it’s crucial to confirm that your portal can handle the necessary features. Most modern B2B portals already come equipped with the essential capabilities you’ll need.
Start by verifying your administrative permissions. To manage integrations, set up workflows, and create API keys for pulling in data, you’ll need Admin-level access [5]. Next, check whether your portal supports custom fields, particularly multi-select fields. These are vital for linking incidents to specific status components, such as "Impacted Products" or "Affected Services" [1].
Ensure your portal includes API access with endpoints for creating incidents, updating component statuses, and receiving webhooks from external monitoring tools. It should also support idempotency keys to avoid duplicate incident reports caused by network retries [6][7]. Lastly, confirm that your portal can handle multi-channel notifications, enabling updates via email, SMS, Slack, and Microsoft Teams [4].
Key Features to Check in Your Portal
Your portal should offer more than just basic text-based updates. Look for UI customization options, such as light/dark mode toggles, logo uploads, and editable headings for your status page [1]. Another important feature is the ability to host the status page on a separate subdomain (e.g., status.yourdomain.com), ensuring accessibility even if your main application goes down [4].
The data structure is just as important. Your portal should be able to map technical backend attributes – like server clusters – to user-friendly terms such as "Dashboard" or "Payments" [1]. Tools like YAML mapping or JQ JSON processors can help transform raw monitoring data into clear, user-readable status updates [5].
Once you’ve confirmed these features, you can shift your focus to the tools and skills required for automating status updates.
Tools and Skills You’ll Need
A basic understanding of APIs and JSON is typically enough to get started. You’ll need access to monitoring data sources, such as uptime checks, application performance metrics, or infrastructure health indicators. If your portal includes built-in AI, you can streamline incident detection and automate status updates, creating real-time communication without needing to write complex code [1].
For portals without native AI, you’ll need to configure webhook receivers and apply basic mapping logic. Start by testing your API setup with a simple GET request to ensure your API key and headers are correctly configured. Then, review your API scopes in the developer dashboard to confirm you have "Create" and "Publish" permissions – not just read-only access [6][7]. Finally, adjust your monitoring tool’s alert thresholds to avoid status flapping, where components frequently switch between operational and degraded states [6].
sbb-itb-e60d259
Design a Clear Status Page Layout
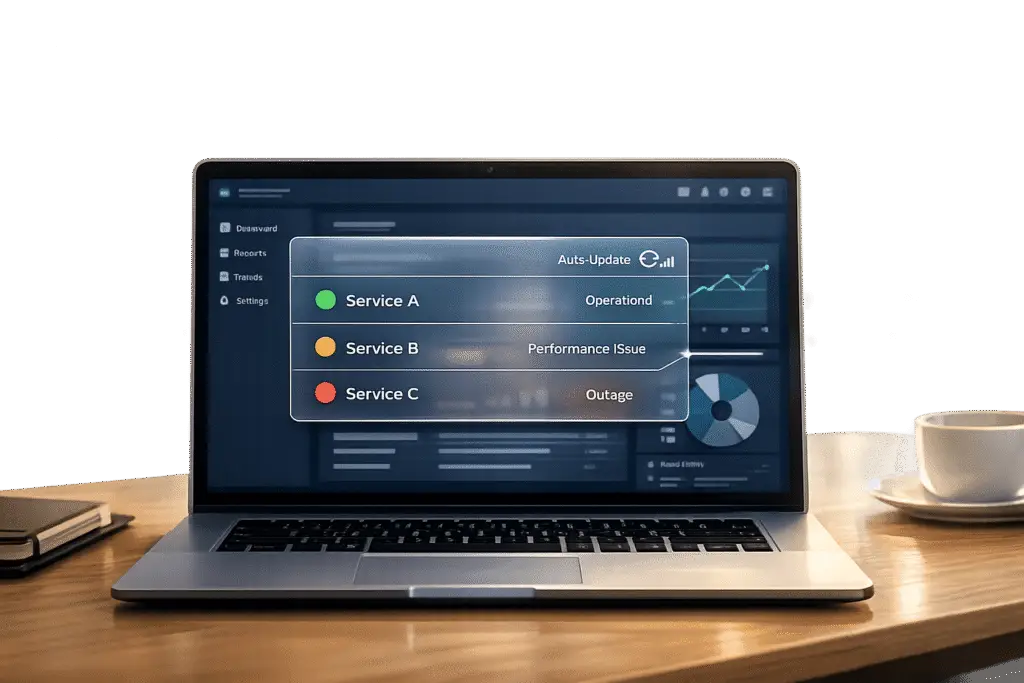
Your status page should immediately convey system health. B2B customers demand detailed transparency, not just a generic "all systems operational" message. Break your service into categories that align with how customers interact with it – think API, Dashboard, Authentication, Webhooks, Email Delivery, and Billing/Payments. Use clear, customer-friendly language for issues (e.g., "Checkout failing" instead of "Cluster A down").
Clarity is key. Customers typically scan status pages, so design for quick understanding. A traffic light color system works well: green for operational, yellow for degraded performance, orange/red for outages, and blue for scheduled maintenance. To build trust, include uptime percentages for the past 7, 30, and 90 days. Interestingly, claiming 99.9% uptime often feels more credible to customers than a flawless 100% [2].
"The companies I trust most aren’t the ones that never have problems. They’re the ones that communicate clearly when problems happen." – Webalert Team [2]
Core Components of Your Status Page
A well-designed status page for B2B services should have these four key sections:
- Overall System Status Indicator: Place this at the top for an immediate overview.
- Service Categories: Break down the status of individual components, mirroring customer usage patterns.
- Incident Timeline: Include timestamped updates with details on impact (who is affected), scope (what’s affected), and actions being taken.
- Subscription-Based Alerts: Allow customers to sign up for updates via email, SMS, Slack, Teams, or webhooks.
When providing incident updates, use standardized lifecycle states: Investigating, Identified, Monitoring, and Resolved. For major issues, update every 15–30 minutes; for minor performance issues, every 30–60 minutes. Always include a "next update" timestamp, even if there’s no new information to share. Keep updates concise (2–5 lines) and use active voice. For instance, instead of "Errors may be encountered by users", write "Users may encounter errors when logging in."
| Incident Update Component | Purpose | Example |
|---|---|---|
| Impact | Who and what is affected | "Users in North America cannot log in" |
| Scope | Affected components/regions | "Authentication service; US-East region" |
| Action | Steps being taken to fix the issue | "We are restarting the auth servers" |
| Next Update | When more information will be shared | "Next update in 20 minutes" |
Once these elements are in place, integrate them into your portal design to maintain brand consistency.
Customize the Design for Your Portal
After establishing the structure, focus on visual design to align with your brand. Incorporate your logo, match brand colors using custom HTML/CSS, and ensure the page is mobile-friendly. Use the MM/DD/YYYY date format and include explicit time zones (e.g., EST) to avoid confusion.
To enhance customer support, consider placing a "Having Trouble?" section at the top. This can include troubleshooting links or contact details for issues not yet reflected on the status page. Hosting the page on a separate subdomain (like status.yourdomain.com) can also improve accessibility and reliability.
Set Up Monitoring and Automated Status Updates
Once your status page layout is ready and tools are in place, the next step is integrating real-time monitoring to keep updates accurate and timely. Relying on manual updates isn’t practical for scaling operations, so automating workflows to detect and report issues is essential. This ensures your status page consistently reflects the current health of your systems, providing transparency to users.
Configure Monitoring and Refresh Intervals
Start by connecting your monitoring tools to your portal’s API. To do this, generate an API key from your portal’s developer settings and include it in the Authorization header for all HTTP requests. These tools will then use designated API endpoints to automatically report incidents and update the status of individual components.
Set clear monitoring thresholds that trigger API actions. For instance, if your monitoring tool detects response times exceeding 500ms, configure it to send a webhook to the POST /incidents endpoint immediately. This creates an incident report in real time. As the issue progresses, use the PUT /incidents/{id} endpoint to update the incident status – such as moving from "investigating" to "monitoring" or "resolved." Similarly, the PUT /components/{id} endpoint can update the status of specific services, like your API Gateway or Database.
Here’s a quick overview of key API endpoints:
| API Endpoint | Action | Purpose |
|---|---|---|
POST /incidents | Create | Generates an incident report when a disruption occurs |
PUT /incidents/{id} | Update | Updates the status of an incident |
PUT /components/{id} | Update | Changes the status of individual services |
GET /status-pages | Retrieve | Fetches current system health data |
Before launching, test the integration by simulating alerts in your monitoring tool. This ensures status updates populate correctly on your portal and verifies that webhooks are functioning as expected. For clearer updates, use tools to transform raw monitoring data into user-friendly status messages.
Automate Incident Detection and Updates with AI
AI can elevate automation by identifying patterns, categorizing issues, and even drafting customer-facing updates. For example, instead of waiting for an engineer to write a message like "We’re investigating login issues in the US-East region", AI can analyze monitoring data, pinpoint affected components, and generate clear, user-friendly updates automatically.
Tools like Supportbench include AI-powered incident management that streamlines the entire process. When an anomaly is detected, AI can classify and prioritize issues (e.g., authentication, API, or billing), estimate customer impact based on historical data, and draft updates in plain language. The AI assistant can also review past cases and knowledge base articles to suggest solutions, while automated workflows prioritize and tag incidents for your team. With these tools in place, your team can focus on resolving core issues while maintaining transparency with users.
Once automation is configured, you’ll be ready to test and deploy your status page effectively.
Test, Deploy, and Maintain Your Status Page
Before launching your status page, it’s crucial to test it thoroughly to ensure it performs reliably during outages. Start by manually triggering a test incident to verify that the user interface updates correctly and transitions smoothly through incident states like Investigating, Identified, Monitoring, and Resolved [4][9]. Test all notification channels – including email, Slack, SMS, and webhooks – to confirm that subscribers receive alerts immediately when the status changes [4].
Test for Reliability and Mobile Responsiveness
Once you’ve confirmed that incident triggers and updates work as expected, shift your focus to the reliability and mobile performance of the page.
Make sure your status page loads quickly and displays correctly on all devices by using lightweight assets [4]. Host the page on infrastructure separate from your main application to ensure it remains accessible even if your primary systems go down [4]. Use clear, customer-friendly terms for components (e.g., API, dashboard, payments) to make the page easy to understand. Additionally, test multi-region monitoring by verifying signals from multiple global locations – typically 3 to 7 regions – to minimize false positives caused by local network issues [9]. A launch checklist can help you confirm important details like custom domain setup, email subscription functionality, and support for updates every 15–30 minutes during incidents [4].
Once you’ve ensured the page is reliable and responsive, ongoing maintenance becomes the next priority to uphold user trust.
Maintain and Update Your Status Page
Regular maintenance is essential to keep your status page accurate and dependable. Close out stale incidents promptly to maintain credibility, and provide a public archive of past incidents and uptime metrics for periods like 7, 30, or 90 days to showcase long-term reliability [4]. For scheduled maintenance, give users ample notice – at least 7 days in advance – and send reminders 24 hours and 1 hour before the maintenance begins [10].
"If your status page is slow, vague, or offline during incidents, it is not a status page. It is a decorative banner." – Nikola Stojković, Founder, StatusPage.me [4]
Monitor analytics for your status page to uncover usage trends and identify areas for improvement. For major outages, publish a post-incident summary detailing the root cause and outlining the steps being taken to prevent similar issues in the future. When properly tested and maintained, your status page can become a powerful tool, reducing support inquiries by 40–60% and keeping customers informed [10].
Conclusion: Benefits of an Integrated Status Page
Creating a status page within your portal isn’t just smart – it can also save you money. Standalone status pages often run between $348 and $948 per year, but integrated solutions can cost as little as $1 for every 30,000 visitors [8].
"A well-maintained status page offers immediate answers to users experiencing service disruptions, cutting down on the volume of direct support requests." – Megha Goel, UptimeRobot Knowledge Hub [3]
Cost savings aside, an integrated status page strengthens customer trust by promoting transparency. Automatic updates let you stay in control during incidents, showing professionalism while keeping users informed. Companies that communicate openly during outages often build stronger relationships with their customers. Sharing historical uptime data and post-incident summaries further boosts credibility, turning challenges into opportunities to reinforce trust.
On top of that, integration simplifies internal workflows. By consolidating tools, you eliminate the hassle of juggling multiple platforms. Engineering teams can focus on fixing problems instead of updating separate systems, and support teams see fewer queries as customers rely on self-service updates. Combining monitoring, incident tracking, and communication into a single system also ensures consistency, avoiding mixed messages.
FAQs
What’s the simplest way to host a status page so it stays up during an outage?
The easiest method is to go with a self-hosted, lightweight setup that doesn’t rely on automated monitoring tools or external services. You can deploy this using Docker Compose with just the basics: a database, a dashboard, and a status page. This way, your status page stays up and running even during outages since it operates directly on your own infrastructure. By configuring environment variables and manually updating the static page, you get a reliable and budget-friendly solution.
How do I prevent duplicate incidents and status flapping with automated alerts?
To keep your incident management process smooth and reliable, it’s crucial to establish clear practices. Start by creating a structured incident playbook that outlines step-by-step procedures for handling issues. This helps your team respond consistently and avoids overlapping incidents.
Integrate your monitoring tools with your status page to ensure updates are accurate and automated. Use clearly defined status categories like Operational and Degraded Performance to make it easier for everyone to understand the current situation. Automation rules should be set to trigger updates only for major changes, preventing unnecessary status toggling.
Regularly testing your processes is equally important. This ensures your system works as expected and helps identify areas for improvement. Additionally, having clear communication templates and assigning specific roles to team members ensures updates are delivered on time and without confusion. This approach reduces conflicting alerts and keeps everyone on the same page.
What should I include in a post-incident summary to maintain customer trust?
When addressing an incident, it’s crucial to provide a clear and honest post-incident summary. Here’s what to include:
- What happened: Offer a straightforward explanation of the issue. Avoid technical jargon that might confuse customers.
- Actions taken: Detail the steps you took to resolve the problem and ensure it’s fully addressed.
- Future prevention: Outline the measures you’re implementing to stop similar issues from happening again.
Be sure to acknowledge the impact the incident had on your customers. Let them know the issue has been resolved and explain how you’re addressing its root cause. This level of transparency shows you’re taking responsibility, which helps rebuild trust and confidence in your service.