


Exporting data from HappyFox is crucial for tasks like system migration, compliance, and analysis. If you are currently transitioning from email to a helpdesk, understanding these export procedures is a vital first step. Here’s how you can efficiently export tickets, contacts, and knowledge base (KB) content:
- Tickets: Use the Reports module, apply filters (e.g., date range, ticket status), and export in CSV or XLSX format. For full ticket history, use the HappyFox API.
- Contacts: Navigate to the Contacts section or Reports module, select fields (e.g., Name, Email), and export as CSV or XLS.
- Knowledge Base (KB): Export published articles (not drafts) by category via the Knowledge Base module. Choose CSV format for the output.
Key Tips:
- Permissions matter: Ensure your role includes export-related permissions.
- Export links expire in 3 days. Download files promptly.
- For large datasets, apply filters and verify exported data for accuracy.
This guide ensures you can manage HappyFox exports effectively. Keep reading for detailed steps, common errors, and solutions.
What You Need Before Exporting HappyFox Data

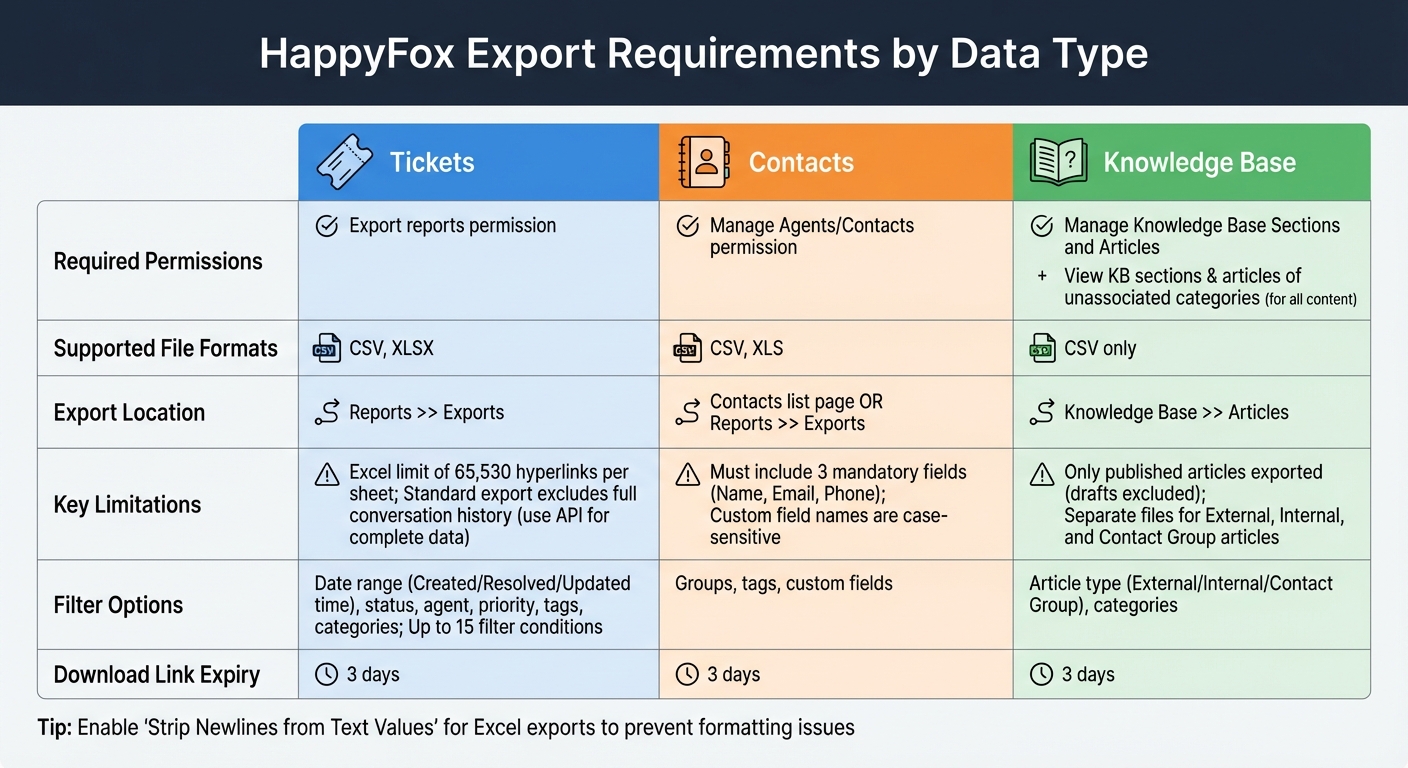
HappyFox Data Export Requirements: Permissions, Formats, and Limitations by Data Type
To ensure a smooth and accurate export process, it’s important to prepare your setup properly. Double-check your settings to avoid issues like incomplete data, failed exports, or permission-related errors.
Check Your User Permissions and Access Level
In HappyFox, permissions are controlled by role-based access control (RBAC). Only users with the right permissions – such as Admins or specific Agent roles – can export data.
- To export tickets using the Reports module, your role must include the Export reports permission.
- For Knowledge Base exports, you need the Manage Knowledge Base Sections and Articles permission. If you want to export all Knowledge Base (KB) articles, including those outside your assigned categories, you’ll also need the View KB sections & articles of unassociated categories permission.
You can verify your permissions by navigating to Main Menu > Manage > Roles & Permissions. If this section is inaccessible, you likely lack the "Manage Agents" permission and should reach out to your Account Admin. When editing a role, check the Managerial tab – export-related settings aren’t listed under Ticket Level permissions.
| Data Type | Required Managerial Permission | Navigation Path |
|---|---|---|
| Tickets | Export reports | Reports, Exports |
| Knowledge Base | Manage Knowledge Base Sections and Articles | Knowledge Base, Articles |
| All KB Content | Manage KB Sections + View KB of unassociated categories | Knowledge Base, Articles |
| Contacts | Manage Agents/Contacts | Manage, Contacts |
Assess Data Volume and Choose File Formats
Knowing the size of your data is critical for selecting the right export format and avoiding technical issues:
- Tickets: CSV/XLSX
- Contacts: CSV/XLS
- Knowledge Base Articles: CSV
Keep in mind that Excel sheets have a limit of 65,530 hyperlinks per sheet. If your export exceeds this limit, some cells may appear empty. To manage large data sets, apply filters such as date ranges, ticket categories, status, or priority. HappyFox supports up to 15 filter conditions at a time.
For exporting full conversation histories, consider using the HappyFox API instead. Additionally, when exporting to Excel, enabling the Strip Newlines from Text Values option can help clean up unwanted tabs or spaces, reducing the risk of import errors.
Create a Backup of Your HappyFox Data
Always back up your data manually by downloading export files as soon as possible. Export links expire after three days, so store them securely in a separate location outside of HappyFox. While HappyFox performs daily backups for system restoration, these aren’t available for standard data exports.
For a complete backup that includes all ticket activities (such as staff replies and private notes), use the HappyFox API (v1.1) instead of the standard export tool. Keep in mind that Knowledge Base exports only include published articles – drafts are not part of the export.
sbb-itb-e60d259
Step-by-Step: Export Tickets from HappyFox
Open the Tickets Module
To get started, head to Reports >> Exports in the module switcher on your HappyFox dashboard. All export-related tools are located here. Make sure your role includes the necessary permission to export reports.
Filter and Select Tickets to Export
Begin by selecting a date range for your export. You can filter tickets based on Created time, Resolved time, or Updated time. For instance, if you want to export tickets resolved in January 2026, choose "Resolved time" and set the range from January 1 to January 31.
For more detailed filtering, use the Additional Filter option. This allows you to refine your export by criteria like ticket status, assigned agent, priority, or tags. You can also specify ticket categories and pick the exact fields – both ticket fields and contact fields – that should be included in your export. Keep in mind that HappyFox doesn’t automatically include all fields, so this step is essential.
If you’re planning to work with the data in Excel, enable the Strip Newlines from Text Values option. This removes tabs and extra spaces that might disrupt formatting. To save time in the future, you can store your filter preferences using the dropdown menu next to the "+" button.
Once your filters and preferences are set, you’re ready to proceed with the export.
Start the Export and Download Your File
After confirming your selections, choose a file format – .xlsx or .csv – and initiate the export. For larger datasets, the export will process in the background. You can track its progress in the My ongoing Exports table or wait for an email notification. Completed files can also be accessed in the All Past Exports table.
Step-by-Step: Export Contacts from HappyFox
Go to the Contacts Section
You can export contacts directly from the Contacts list page or through Reports >> Exports for more tailored options. The Reports method is especially useful if you need to customize your export by selecting specific contact fields or filtering by groups and tags.
Make sure your agent role includes the "Export reports" managerial permission. Without this permission, the export option won’t be available to you.
Once permissions are confirmed, move on to selecting the necessary contact fields.
Choose Contact Types and Fields
If you’re using the Reports module, you’ll need to specify which contact fields to include in your export. At a minimum, select the three mandatory fields: Name, Email, and Phone. Keep in mind that HappyFox treats "Name" as one combined field. If your data separates first and last names, you’ll need to merge them during the export or import process.
To ensure your organizational structure and domain associations are preserved, include the "Contact Group" field. If portal access permissions are important, add the "allow contact portal login" field. This field determines whether a contact has login access to the self-service portal. Don’t forget to include any custom fields you’ve created – whether they’re dropdowns, multi-select options, or dependent fields – to ensure all business-specific data is carried over accurately.
For contacts outside your account’s default country, double-check that phone numbers include the appropriate country code (e.g., +91 for India if your default country is the USA).
By carefully selecting these fields, you can ensure a smooth and accurate data transfer. Once everything is configured, you’re ready to export and verify the data.
Export and Verify Contact Data
After finalizing your selections, choose your preferred file format – either .csv or .xls – and initiate the export. You can monitor the progress in "My ongoing Exports" and will receive an email with a download link, which remains valid for 3 days. The download link is available only to the agent who initiated the export, adding an extra layer of security for sensitive contact data.
After downloading, verify the total number of rows matches the contact count displayed in your HappyFox Contacts module. Ensure that all mandatory fields are filled and that custom field names match exactly, as they are case-sensitive – even minor typos can cause data mapping issues. If you’re transferring data to another platform, it’s a good idea to test the process first with a small batch of 20 records. This allows you to confirm that all fields map correctly before proceeding with a full migration.
Step-by-Step: Export Knowledge Base Content from HappyFox
Exporting Knowledge Base (KB) content is just as important as exporting tickets and contacts, especially for complete data migration and ensuring compliance.
Open the Knowledge Base Module
Start by navigating to the Knowledge Base module and selecting "Articles." Make sure your user role has the necessary permissions, specifically the "Manage Knowledge Base Sections and Articles" permission. You can verify this under Manage → Roles and Permissions → Managerial → Knowledge Base (KB).
If you need to export articles from categories not directly assigned to you, ensure you also have the "View KB sections & articles of unassociated categories" permission. Once your permissions are in place, choose the KB content you want to export.
Select KB Content to Export
HappyFox categorizes articles into three types:
- External Articles: Public-facing content.
- Internal Articles: Accessible only to agents.
- Contact Group Articles: Restricted to specific customer groups.
Decide which type of articles you want to export. Keep in mind that each type will generate its own separate file. Also, note that only published articles can be exported, so any drafts must be published beforehand. The export process runs in the background, making it suitable for handling large datasets. Once you’ve chosen the type of content to export, proceed to download and review the resulting file.
Download and Review Exported KB Files
Click the "Export" icon to create a CSV file. The export happens in the background, and the file will automatically download once ready. The file name will follow a format that includes the article type and date, such as "External_Articles_Feb-09-2026.csv".
The exported CSV contains 13 fields, including:
- Article ID
- Title
- Section Name
- Content
- State
- Tags
- Metadata fields like Created By, Created At, Updated By, Last Updated At, Views, and Language.
After downloading, verify that the number of articles in the CSV matches the total number of published articles in the Knowledge Base module. For migration purposes, it’s a good idea to test the process first with a smaller batch of around 20 articles to ensure the fields map correctly. Additionally, review any common export errors and address them to maintain data accuracy.
Common Export Errors and How to Fix Them
Exporting data can sometimes fail or result in incomplete files. Knowing the typical issues and how to address them can save you time and help avoid losing important data during migrations.
Fix Incomplete or Corrupted Export Files
One common problem with exports is incomplete or corrupted Excel files. These errors often stem from formatting issues, such as newline characters, tabs, or extra spaces in text fields. These can misalign your data or even prevent the file from opening. To avoid this, enable the "Strip Newlines from Text Values" option in Advanced Settings before exporting your data.
Another issue arises when Excel files contain empty cells or misaligned data. This can happen if your export exceeds Excel’s limit of 65,530 hyperlinks. To fix this, try reducing the export size by filtering for smaller date ranges or removing fields with excessive hyperlinks before exporting.
If you’re exporting ticket conversations and notice missing replies or notes, keep in mind that standard tabular exports only include the initial message and subject line. To capture the full ticket history, including all replies and notes, you’ll need to use the HappyFox API instead of the standard export tool.
For Knowledge Base exports, missing articles are often due to their "Draft" status. HappyFox only exports articles that are published.
Other issues like permission errors and size limits can also disrupt the export process, so addressing these is crucial.
Resolve Permission Errors and Data Limit Issues
Sometimes, the export button may be missing entirely. This usually means your user role lacks the required permissions. For ticket exports, ensure that either "Export reports" or "Export Incident Reports" is enabled in your role settings. For Knowledge Base exports, you’ll need the "Manage Knowledge Base Sections and Articles" permission.
If you’re exporting Knowledge Base content and notice missing articles from certain categories, it could be due to a lack of the "View KB sections & articles of unassociated categories" permission. Without this, you’ll only be able to export articles from categories directly assigned to you.
For new HappyFox accounts, API access might be disabled by default. If you need to extract data via the API and can’t enable the option, reach out to HappyFox support to have it activated.
| Issue Type | Specific Problem | Recommended Solution |
|---|---|---|
| Permissions | Export option not visible | Enable "Export reports" or "Export Incident Reports" |
| Permissions | Cannot export all KB articles | Enable "View KB sections & articles of unassociated categories" |
| Data Limit | Empty cells in Excel | Reduce export size to stay within the 65,530 hyperlink limit |
| Data Limit | Missing replies/private notes | Use the HappyFox API instead of standard report export |
| Technical | Excel cannot open file | Enable "Strip Newlines from Text Values" during export setup |
| Technical | Download link not working | Re-run the export if 3 days have passed |
Also, remember that export download links are exclusive to the agent who initiated the export. They cannot be shared or accessed by other team members.
Verify Export Accuracy After Transfer
Once you’ve resolved any errors, it’s essential to confirm the accuracy of your exported data. For ticket exports, compare the number of rows in your CSV file with the total ticket count in your filtered view. For Knowledge Base exports, cross-check fields like Article ID, Title, Section Name, and Content to ensure they match the source data.
Pay attention to file naming conventions as well. Knowledge Base exports use a specific format that includes the article type and generation date, such as "External_Articles_Sep-01-2024.csv". If you’re exporting multiple article types (External, Internal, and Contact Group), each type will generate its own file.
For large exports, keep an eye on the progress in the "My Ongoing Exports" section. If an export takes too long or is set up incorrectly, you can cancel it and start over. To avoid surprises during a full-scale migration, test the process first with a smaller batch of around 20 records. This will help you ensure all fields are mapped correctly and no data is lost in the process.
AI-Powered Methods for Faster, More Accurate Exports
Handling large-scale exports manually can be time-consuming and prone to mistakes, especially when dealing with thousands of tickets, contacts, or knowledge base articles. By using AI-driven workflows, much of this process can be automated, reducing errors and saving valuable time during migrations.
Use AI to Clean Data Before Export
Before exporting, AI can help organize and label your data to ensure it’s ready for use in the new system. For example, AI auto-summarization can condense lengthy ticket threads into clear, concise summaries, highlighting the core problem and resolution for each case. Additionally, AI tools can automatically assign issue types, categories, and priorities to tickets, ensuring everything is properly labeled and structured for the target platform.
AI-native platforms can also analyze sentiment and calculate health scores, making it easier to filter and export only the most relevant or high-value customer information. Once the data is cleaned and structured, it’s important to verify its accuracy using AI-powered checks.
Validate Exported Data with AI
After preparing your data, AI tools can help ensure exports are complete and error-free. For instance, AI quality checks can scan for inconsistencies or missing data within your export. AI Co-Pilots allow you to interact with your dataset using natural language queries, such as asking, “Show me all tickets related to billing from Q3,” to quickly identify any gaps.
To confirm that critical details have been preserved, AI-generated summaries can be compared against the original records. This ensures that the context and key information from each support interaction have transferred accurately. Platforms with auditing features provide a full trail of data changes, offering transparency and accountability throughout the migration process.
Once the data is verified, AI platforms can further simplify the migration itself.
Simplify Migration with AI Platforms Like Supportbench
Switching to an AI-native platform like Supportbench can significantly reduce the manual effort involved in traditional exports. Automated migration tools handle field mapping and alignment, ensuring that custom fields from platforms like HappyFox are correctly matched to the new system, avoiding any data misalignment. These platforms also support Delta Migration, which captures only new or updated records during the export process, preventing data loss during the transition.
Organizations adopting AI-native platforms such as Supportbench report impressive results, including a 40% reduction in operational costs and an average ROI of 250% over two years, thanks to built-in AI and automation. To ensure a smooth migration, it’s recommended to perform a demo migration with at least 20 records to validate the AI’s mapping and data cleaning rules before fully transitioning.
Conclusion
Exporting tickets, contacts, and knowledge base content from HappyFox requires careful planning. Start by ensuring you have the appropriate permissions – such as "Export reports" for tickets or "Manage Knowledge Base Sections and Articles" for knowledge base content. Without these, the export options will remain hidden. To prevent formatting issues, enable the "Strip Newlines from Text Values" setting, and remember to download your files quickly, as the links expire after three days.
Keep in mind that standard exports are limited to ticket subjects and initial messages, leaving out full conversation histories. If you need complete ticket data, you’ll need to use the HappyFox API. For knowledge base content, only published articles can be exported.
Given these constraints, refining your export process becomes essential. For organizations handling large-scale data transfers, leveraging AI-powered tools can simplify tasks like data cleaning, structuring, and validation. Platforms like Supportbench can take this a step further, automating and optimizing exports to boost efficiency in your support operations.
FAQs
How can I export full ticket conversations and notes?
To get a full export of ticket conversations and notes in HappyFox, you can use the tabular report export feature. This export includes details like the initial messages and subject lines.
Here’s how to do it:
- Navigate to Reports & Exports from the left-hand menu.
- Select Tabular view report and create a new export.
- Apply the necessary filters, generate the report, and download it.
If you need the complete ticket history, including all replies, you’ll need to use the HappyFox API.
Why is my export missing fields or showing blank cells?
Missing fields or blank cells in your export can happen for a few reasons: incomplete export settings, limited user permissions, or even data errors. To address this, make sure you’ve selected all the required fields in the export configuration. Check that your user role includes the necessary permissions to access the data. It’s also a good idea to confirm that the data itself is complete and accurate. Lastly, using an updated and compatible browser can help prevent technical glitches. Often, reviewing these settings and permissions will clear up the issue.
How do I export all KB categories, not just mine?
To export all Knowledge Base (KB) categories, start by navigating to the Knowledge Base module and selecting the export option at the category level. Make sure you have the right permissions, as exporting categories outside your ownership might need administrative access. If you’re dealing with a large amount of data, using the API can help streamline the process and provide more detailed data extraction. Keep in mind that your permissions and access level will dictate whether you can export categories that aren’t under your ownership.
Related Blog Posts
- How do you migrate away from Freshdesk without losing tickets, contacts, or history?
- How do you export Freshdesk tickets + attachments (API + CSV) the right way?
- How do you export Kayako ticket history and customer records (API + database options)?
- How do you migrate away from HappyFox without losing ticket history or attachments?