


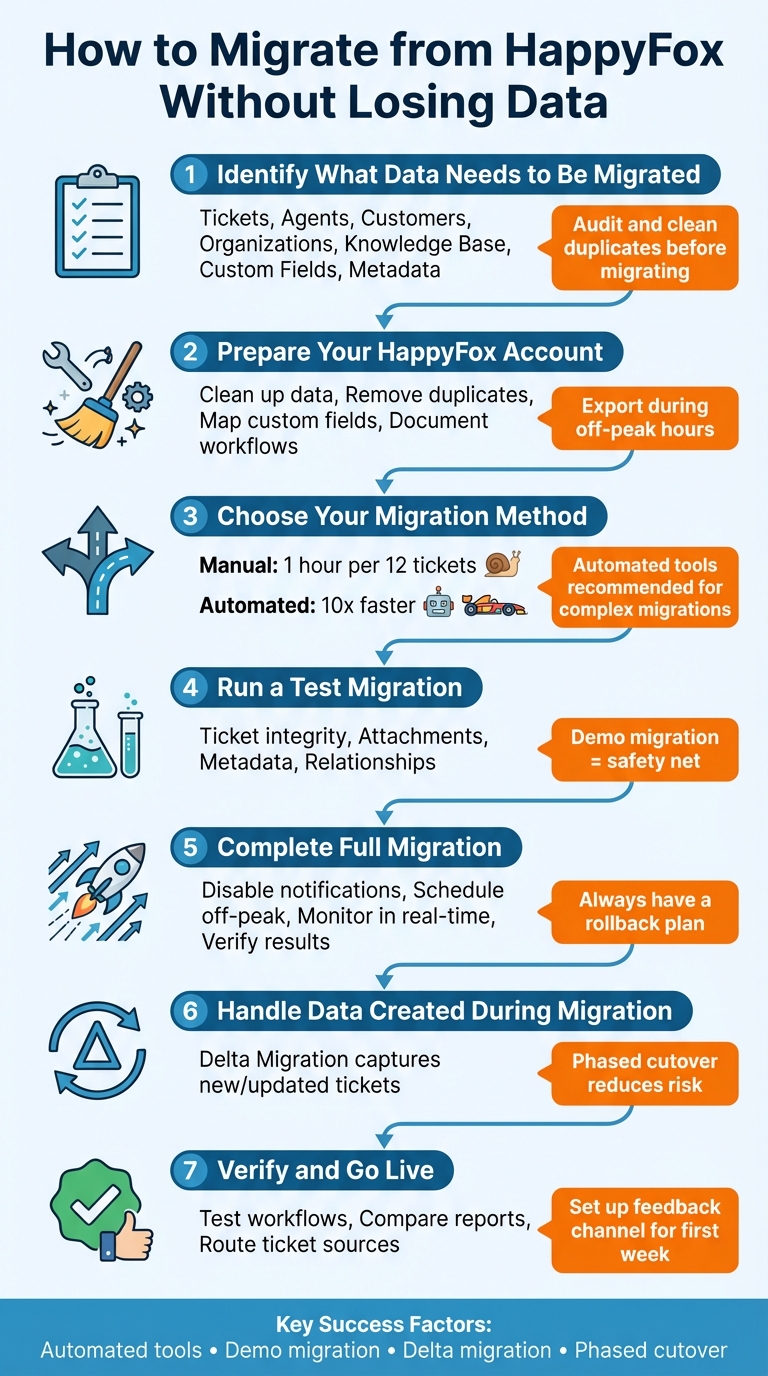
Migrating from HappyFox while keeping ticket history, attachments, and workflows intact requires careful planning. Here’s a quick breakdown of the process:
- Define Data to Migrate: Identify tickets, agents, customers, and custom fields to be transferred.
- Clean and Organize Data: Remove duplicates, outdated records, and ensure formatting consistency.
- Map Data Relationships: Maintain links between tickets, agents, customers, and attachments.
- Choose a Migration Method: Automated tools are faster and more reliable than manual migration.
- Run a Test Migration: Verify data accuracy before full migration.
- Complete Full Migration: Disable notifications, monitor progress, and ensure data is transferred accurately.
- Handle New Data During Migration: Use delta migration to capture updates made during the process.
Automated tools with features like field mapping, demo migration, and delta migration are recommended to minimize errors and downtime. Proper preparation ensures a smooth transition without disrupting support operations.
7-Step HappyFox Migration Process: From Data Audit to Full Cutover
HappyFox help desk tutorial – How to Generate your API Key in HappyFox?

sbb-itb-e60d259
Step 1: Identify What Data Needs to Be Migrated
Start by clearly defining the data you want to move – this might include tickets, agents, customers, organizations, and related knowledge base elements. Getting specific about what needs to be transferred ensures your support ecosystem remains intact during the migration process.
Review Core Data Types
Focus on the essential data types: tickets (including replies, notes, attachments, images, tags, and statuses), agents, customers, organizations, and, if relevant, knowledge base elements like categories, articles, sections, or translations. Each ticket carries important context that supports resolution efforts.
Don’t forget about custom fields (like subscription levels, contract IDs, or SLA timers) and metadata (timestamps, legacy IDs, CC users). These details help maintain operational continuity and accountability. If your HappyFox setup integrates with tools like Jira, make sure to identify and transfer linked task IDs or URLs to preserve cross-platform functionality. Before migrating, audit your data to clean up duplicates, outdated records, or broken files. This step prevents unnecessary clutter and helps keep migration costs in check.
Document Data Relationships
The connections between data are just as important as the data itself. Mapping these relationships is crucial to maintaining system integrity. As Eric Klimuk, Founder and CTO of Supportbench, points out:
"Mismatched relationships are one of the most common sources of integrity issues in poorly executed migrations."
For instance, tickets are not standalone – they’re tied to specific customers, assigned agents, and organizations. To ensure these links remain intact, create a detailed mapping document that outlines how relational data will be structured in the new system.
Only migrate contact records associated with active or historical tickets. For inline images, consider converting them to attachments to retain visual context. Anthony Kendrew, IT Solutions Developer at The Salvation Army, shared how this approach worked for their team:
"The most useful custom feature for us was being able to migrate only associated customers with the tickets we migrated. With this customisation, we could migrate tickets in batches, saving money and ensuring the live destination continues to operate."
Finally, use tools that can automatically update internal links between knowledge base articles. This ensures URLs remain functional after the migration, avoiding broken links and preserving usability.
Step 2: Prepare Your HappyFox Account Before Migration
Getting your HappyFox account ready before migration is key to avoiding errors and saving time on troubleshooting. Start by organizing and cleaning your data to ensure a smooth transition.
Clean Up Your Data
Take stock of everything in your HappyFox account – active tickets, customer details, historical records, knowledge base articles, and support workflows. Look for duplicates, outdated entries, incomplete data, or formatting inconsistencies. As Supportbench puts it:
"There’s no benefit to moving junk."
When exporting data, use the "Strip Newlines from Text Values" option (Reports > Exports) to avoid formatting problems. Keep in mind that HappyFox has a limit of 65,530 hyperlinks per sheet – going over this can leave cells empty. Also, export links expire after 3 days, so save files immediately.
Plan your final data extraction during off-peak hours to minimize disruption to your support operations. Freeze any changes to your HappyFox system during this process to prevent mismatched data caused by last-minute edits. Finally, back up all your source data and store it securely in a cloud-based environment before starting the migration.
Once your data is clean, it’s time to align your custom fields and workflows for migration.
Map Fields and Document Customizations
With your cleaned dataset, make sure all custom fields and automations are accounted for. Document every custom field your team uses and map out workflows that rely on them. The HappyFox export tool can help identify active ticket and contact fields, giving you a clear view of what needs to be migrated. Ensure the person conducting this audit has "Export reports" managerial permissions, as these are required to access the export tool.
Review critical elements like ticket routing rules, SLA management, escalations, and customer notifications. To avoid sending duplicate "ticket updated" emails during migration, pause email alerts, triggers, and automations in HappyFox. If you’re using API-based migration tools, enable API access by going to Apps > Goodies > API in HappyFox to generate an API key and Auth code. Note that API keys might be disabled by default for new accounts, so you may need to contact HappyFox support to activate them.
Before migrating, create matching custom fields in your target platform to ensure data aligns properly during the transfer. Eric Klimuk, Founder and CTO of Supportbench, highlights the importance of this step:
"Consider temporarily freezing changes to the original system during migration. This prevents mismatches caused by last-minute edits or live data updates and ensures a consistent data set is being moved."
Use filters like "Created time" or "Resolved time" during the export process to exclude spam or outdated tickets. This keeps your new system organized and simplifies the mapping of custom fields.
Step 3: Choose Your Migration Method
After mapping and cleaning your data, the next step is selecting the right migration method, which often depends on whether you are choosing between SMB or enterprise helpdesks. This decision is key to maintaining ticket history and ensuring your support operations continue without disruption. You have two primary options: automated migration tools or manual migration. Each has its own pros and cons in terms of speed, accuracy, and effort. The choice you make here will directly impact the smoothness of your data transfer.
Automated Tools vs. Manual Migration
Manual migration might be free, but it’s far from efficient. Testing has shown that manual methods average about one hour to migrate a batch of just 12 tickets. In contrast, automated tools can be up to 10 times faster. Manual processes also struggle with handling inline images, large attachments (over 15MB), and custom field relationships.
Another downside of manual migration is the risk of downtime. It often requires pausing support operations, reformatting CSV files, and dealing with tedious tasks that can delay the process. If something goes wrong, fixing issues is no easy feat – you might have to start over from scratch. Automated tools, on the other hand, offer detailed migration reports and allow you to re-import failed records without redoing the entire process.
Natalia Tomchyshyn from Help Desk Migration sums it up well:
"Built-in import tools are best suited for small-scale migrations with simple data… and when you don’t require custom mapping or attachments."
For most teams transitioning from HappyFox, automated tools are better equipped to handle the complexity. They excel at preserving ticket history, attachments, and custom fields – critical elements for a seamless migration.
Essential Features
Once you’ve decided on automation, it’s time to pick the right tool. Not all migration tools are the same, so it’s important to evaluate their features carefully. Start by ensuring the tool supports all the data types you need to transfer, such as tickets, contacts, knowledge base articles, attachments, custom fields, and tags. Tools with advanced field mapping capabilities are particularly helpful, allowing you to match fields between HappyFox and your new platform using simple dropdown menus instead of manually adjusting CSV files.
A free demo migration is another must-have feature. This allows you to test a small sample (usually about 20 records) to see how your data will look on the new platform before committing to a full migration. This step is especially useful for identifying issues with large attachments or complex formatting.
Additionally, check that the tool complies with GDPR and SOC 2 standards to ensure your customer data is handled securely. Finally, look for tools with Delta Migration support – a feature that captures any new or updated records added after the initial migration. This prevents data gaps and eliminates the need to freeze your HappyFox account during the process. As Eric Klimuk, Founder and CTO of Supportbench, points out:
"Automation can significantly reduce errors, speed up execution, and simplify post-migration verification – but only when used intentionally."
With your method chosen, the next step is running a test migration to confirm everything is set up correctly before moving all your data.
Step 4: Run a Test Migration
Before diving into a full migration, conduct a test migration to simulate the process and uncover any potential issues without disrupting your support operations. As Eric Klimuk, Founder and CTO of Supportbench, puts it:
"A trial run is your safety net. Before fully committing, simulate real workflows to catch friction points and ensure team readiness."
This step is your opportunity to confirm that ticket histories, attachments, and data relationships transfer properly. It also helps identify problems like field mapping errors, broken record links, or formatting glitches – issues that could derail the entire migration if left unchecked. Many migration tools offer a free demo migration, allowing you to test a small sample (usually around 20 records) before committing. As Help Desk Migration explains:
"Tickets and related data migrate the same way during the Demo Migration and Full Data Migration. So, if some records didn’t migrate or/and transfer incorrectly during the Demo Migration, they won’t move during the Full Data Migration."
Once the test migration is complete, it’s time to dig into the details and confirm that your data has transferred accurately.
Check Data Accuracy
After running the test migration, verify that all data has been transferred correctly. Begin by checking ticket integrity. This includes ensuring conversation threads are in chronological order, parent-child relationships are preserved, and both public and private comments are intact. Metadata like timestamps, user IDs, ticket priorities, and original author assignments should also be reviewed for accuracy.
Next, examine attachments and inline images. Confirm they are accessible and properly linked. If the new platform doesn’t support inline images, ensure they’ve been migrated as attachments to maintain visual context.
Additionally, check relational data, such as links between tickets and customer profiles, agent assignments, and organizational associations. Finally, have your support team interact with the migrated test data to ensure everything is functional and meets operational needs.
| Verification Category | What to Check |
|---|---|
| Ticket Content | Comments, HTML formatting, inline images, and attachments |
| Metadata | Timestamps, status, priority, and original ticket IDs |
| Relationships | Agent assignments, customer links, and organization details |
| Knowledge Base | Article hierarchy, tags, and cross-links between articles |
If you spot any discrepancies, it’s important to address them promptly.
Fix Migration Issues
Use migration reports to pinpoint and resolve issues like field mapping errors, missing agents, or broken links. These are some common problems and how to fix them:
- Field Mapping Errors: Update your mapping document to ensure data appears in the correct fields on the new platform.
- Missing Agents: If a user from the original system (e.g., HappyFox) doesn’t exist in the new platform, reassign their tickets to an active agent to maintain SLA compliance.
- Broken Knowledge Base Links: Enable the option to automatically update old URLs with the new ones to fix broken links.
You can rerun the demo migration as many times as necessary until the data behaves as expected. Just remember to disable email notifications and triggers in both systems before running another test to prevent duplicate alerts from being sent to customers.
Step 5: Complete the Full Migration and Verify Results
Now that you’ve completed your test migration and mapped your data, it’s time to tackle the full migration. This step requires careful attention to detail to ensure that all ticket history, attachments, and custom fields make the transition seamlessly. Preserving these elements is critical to maintaining the quality of your support. Eric Klimuk, Founder and CTO of Supportbench, emphasizes the importance of this step:
"Validation confirms that all data transferred correctly and workflows remain intact."
Before beginning, disable all email notifications, ticket triggers, and automations in both HappyFox and your new platform. This prevents duplicate alerts from overwhelming your team. Keep an eye on ticket, contact, and field imports in real time to catch any issues early, avoiding larger problems down the line. With your test migration complete and verified, you can move forward with confidence.
Reduce Downtime During Migration
Timing is everything. Schedule the migration during off-peak hours or weekends when ticket activity is at its lowest. This helps minimize disruptions and keeps your support team running smoothly. If possible, request a temporary API limit increase from both HappyFox and your new platform. Using a "newest records first" migration strategy ensures that your team can address active tickets immediately, while older data transfers in the background.
For added stability, consider running both systems in parallel for a short time. This allows you to monitor performance and resolve any issues before fully deactivating HappyFox. Always have a tested rollback plan or a full backup of your source data ready in case something goes wrong during the migration process.
Verify Data and Workflows After Migration
Once the migration is complete, it’s time to verify that everything transferred correctly. Start by spot-checking ticket threads to ensure that conversation histories are in the right order and that inline images and attachments display as they should. Pay special attention to complex tickets, such as those involving multiple agents, escalations, or custom fields.
Ask your agents to test core functions in the new system: creating, assigning, updating, and closing tickets. This will confirm that SLA triggers, automation rules, and permissions are working as expected. Next, compare reports from both HappyFox and the new platform – like ticket volume by category or average resolution time – to ensure the data aligns. If discrepancies arise, investigate immediately.
| Verification Category | Specific Checkpoint | Goal |
|---|---|---|
| Ticket Data | Thread order and timestamps | Ensure conversation context is preserved |
| Attachments | File accessibility and inline images | Confirm no data loss during file transfer |
| Relationships | Ticket-to-User/Organization links | Maintain historical customer context |
| System Logic | SLA triggers and automation rules | Ensure operational readiness |
| Reporting | Pre- vs. Post-migration metrics | Validate completeness of the dataset |
Finally, double-check that all ticket sources – whether they’re emails, contact forms, or embedded widgets – are correctly routed to your new system. This ensures no communications slip through the cracks. To smooth the transition, set up a feedback channel so agents can report any issues they encounter during the first week of using the new platform.
Step 6: Handle Data Created During Migration
Once you’ve ensured data accuracy and minimized downtime, the next step is to manage updates made during the migration process itself. Migration takes time, and during that period, your support team will continue working. New tickets will be created, customer replies will come in, and agents will update records. Without a plan to handle these changes, you risk losing critical customer data or creating inconsistencies when switching systems.
Use Delta Migration
Delta migration helps solve this issue by transferring only the tickets that are new or updated after the full migration begins. As Help Desk Migration explains:
"Delta migration allows your support team keep working with your current help desk during data migration: your customer service has no hiccups and works as usual while the data on the destination platform will be clean."
To make this work effectively, schedule the migration during off-peak hours to reduce the influx of new data. Then, run the delta migration just before the final cutover to capture any last-minute updates. Some migration tools are designed to prioritize the newest records, allowing agents to access current data immediately while older records are transferred in the background.
This phased approach ensures a seamless transition with minimal disruption.
Plan a Phased Cutover
Building on the delta migration strategy, a phased cutover reduces risk by moving data in smaller, manageable batches. This method allows data to be transferred from both systems in parallel for a short period. It provides time to test workflows, troubleshoot issues, and make adjustments before fully decommissioning HappyFox. This approach helps maintain data integrity and keeps your operations running smoothly. Eric Klimuk, Founder and CTO of Supportbench, explains:
"Phased migration… allows you to test, troubleshoot, and adjust as you go – minimizing disruptions."
While a "big bang" migration is faster, it comes with higher risks and limited fallback options. A phased cutover, on the other hand, offers greater control, especially for customer-facing systems. During the final stages, consider freezing non-essential changes in HappyFox to maintain a consistent dataset. Additionally, request a temporary API limit increase to speed up the final data transfer.
Conclusion
Switching from HappyFox requires careful planning and execution. To ensure success, double-check your data audit, field mapping, demo migration, and delta updates. Running a demo migration and using a phased cutover strategy can help minimize risks and give you time to address any issues that arise.
As Eric Klimuk, Founder and CTO of Supportbench, puts it:
"Done right, migration isn’t just a one-time task. It’s a chance to improve how your data is structured, accessed, and supported for years to come."
Choose a migration tool that aligns with your data requirements. Automated tools can save time and effort, especially those with features like custom field mapping, the ability to preserve inline images as attachments, and delta migration to prevent data loss.
This process also sets the stage for future automation. AI-native platforms can take over tasks like data validation, generating audit trails, and providing real-time dashboards, ensuring your support system grows efficiently. Over time, these platforms reduce costs and enhance productivity by automating ticket routing, SLA management, and agent support, allowing your team to focus on solving complex problems.
Migration isn’t the end – it’s the beginning. By following these strategies, you can enhance data accuracy, streamline processes, and leverage AI-driven tools, putting your team on the path to long-term success without the burden of outdated systems.
FAQs
What data is often missed during a HappyFox migration?
When migrating from HappyFox, it’s easy to overlook key data that plays a vital role in your operations. This often includes:
- Ticket history: Past conversations and resolutions that provide context for ongoing support.
- Attachments: Files exchanged in tickets, like screenshots or documents.
- Custom fields: Unique data points tailored to your business needs.
- Call recordings: Audio files that capture important customer interactions.
- Detailed metadata: Information like timestamps, tags, and other specifics tied to tickets.
Losing any of this data can disrupt workflows and impact customer service. A carefully planned migration process is essential to ensure everything transfers accurately.
How can we keep supporting customers during the migration?
When helping customers through a migration, preparation and clear communication are key. Start by notifying customers about any possible delays or adjustments, and keep them informed with regular updates via emails or a dedicated status page. Leverage automation tools to make the data transfer process as smooth as possible. Additionally, establish temporary support options, like email or chat, to handle urgent questions. Don’t forget to validate the transferred data and test workflows thoroughly to ensure everything runs smoothly. This approach helps maintain reliable service and keeps customer satisfaction high during the transition.
What should we verify to confirm ticket history and attachments migrated correctly?
To make sure ticket history and attachments are migrated properly, double-check that ticket metadata, conversations, timestamps, customer profiles, and related metrics are all preserved. Pay close attention to timestamps, IDs, and attachment links to ensure they remain accurate and unaltered in the new system. Verifying these details is crucial for maintaining data accuracy and ensuring the transition goes smoothly.
Related Blog Posts
- How do you migrate from Salesforce Service Cloud to a helpdesk without losing case history?
- How do you migrate away from Freshdesk without losing tickets, contacts, or history?
- How do you map Freshdesk fields, groups, and statuses to a new helpdesk?
- How do you map Kayako statuses, priorities, and custom fields to a new helpdesk?