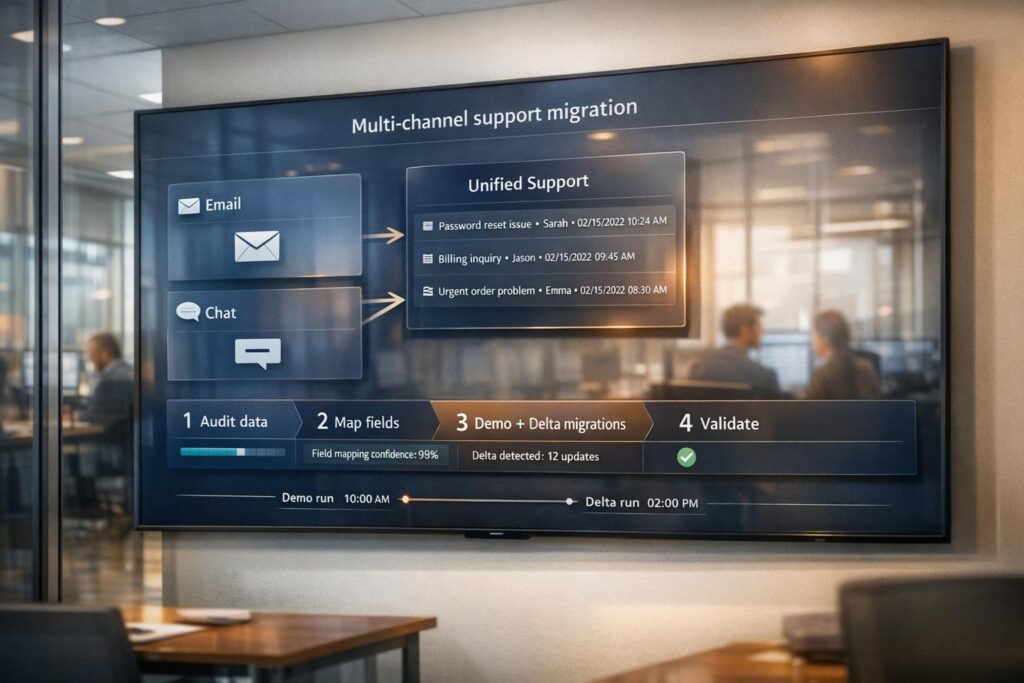
Migrating your Kayako support system – covering email and chat – requires precision to prevent issues like broken ticket links, lost attachments, or missing user details. Here’s how you can ensure a smooth transition:
- Audit Your Data: Identify duplicates, incomplete fields, and inactive agents. Organize and map relational data (tickets, users, organizations) carefully.
- Plan Ahead: Disable automations, request API limit increases, and schedule migrations during off-peak hours to minimize disruptions.
- Test First: Run a demo migration (e.g., 20 tickets) to verify field mappings, attachments, and data relationships.
- Delta Migration: Use this to capture updates made during the migration process, ensuring no data is missed.
- Validate Results: Post-migration, check ticket links, timestamps, and attachments for accuracy. Verify workflows and test system functionality.
A careful approach ensures all historical data, including multi-channel threads, transfers intact, maintaining continuity and customer context.
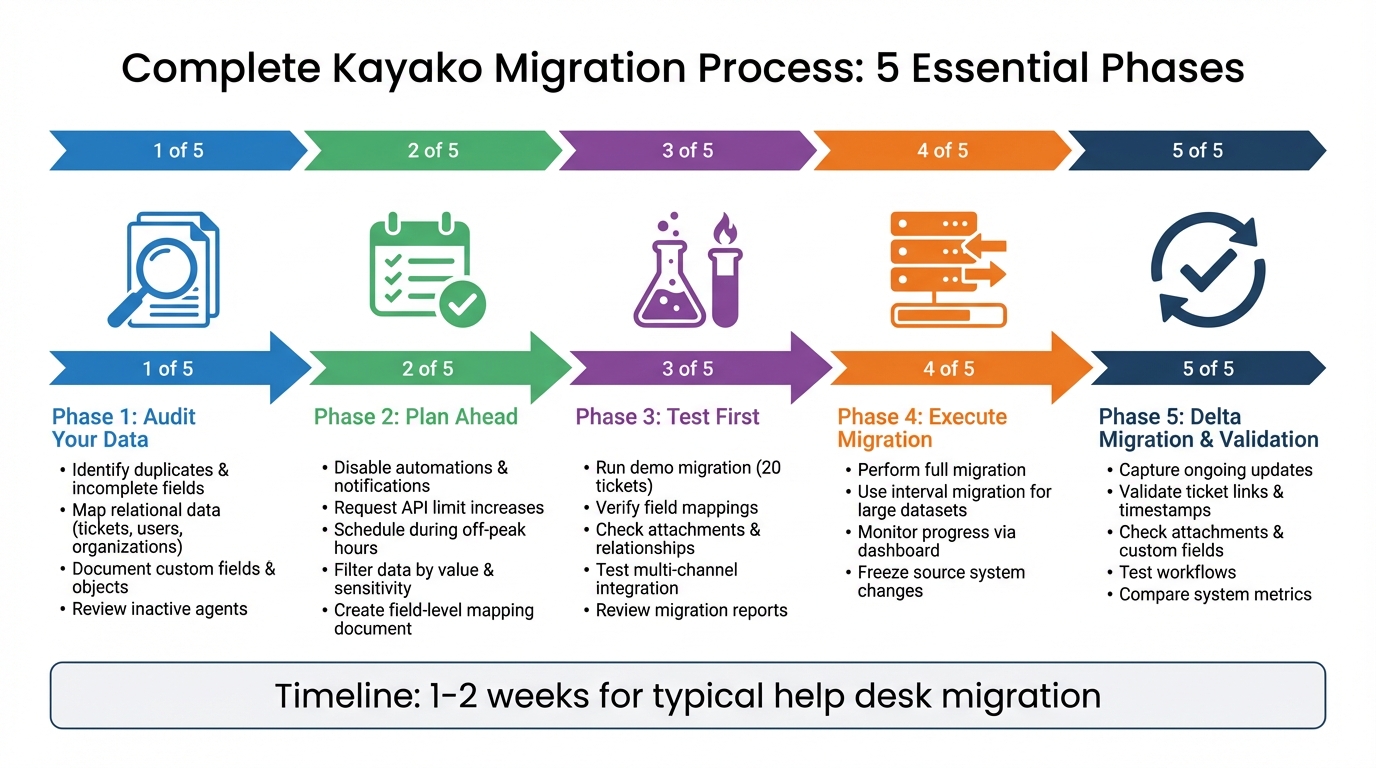
5-Step Kayako Migration Process: From Audit to Validation
How to Export from Kayako Classic? | Kayako Classic Migration Tutorial
sbb-itb-e60d259
Pre-Migration Preparation: Audit and Plan Your Kayako Data
Before transitioning from email to a helpdesk, take time to audit your data. This step helps uncover potential issues like duplicate customer records, incomplete fields, or tickets assigned to inactive agents. Standard migrations might skip crucial elements like inline images or CC users, which often require custom mapping. A thorough audit lays the groundwork for proper categorization and field mapping.
Once the audit is complete, organize your data by its value and sensitivity. The goal is to migrate ONLY the data that’s necessary. As Eric Klimuk, Founder and CTO of Supportbench, explains:
"There’s no benefit to moving irrelevant data. Clean data reduces risk and accelerates migration."
You can filter historical data by creation date, tags, groups, or organizations to focus on essential records. This approach not only reduces the volume of data but also cuts down costs and speeds up the transfer process. Remember, migration costs are typically tied to how much data you’re moving.
Relational data mapping is another critical area. This involves maintaining the connections between tickets, users, and organizations. If these links break during migration, you risk losing the context of your customer interactions. To avoid this, create a detailed field-level mapping document that aligns each source field (like subject, tags, status, or comment author) with its destination in the new system. Keep in mind that Kayako differentiates between agents (full access) and collaborators (notes-only), which impacts how permissions are mapped.
Knowledge Base (KB) content introduces its own set of challenges. For instance, when KB articles are migrated, their original creation dates might change to the migration date. Additionally, Kayako’s default setting blocks "potentially unsafe HTML", which can disrupt embedded content. To avoid these issues, enable unsanitized HTML in Kayako’s admin settings under Security > Security policies before migrating your KB articles. This step preserves formatting and ensures the historical accuracy of your content.
Another key preparation step: disable all automations, email notifications, monitors, and triggers in your target Kayako instance before starting the migration. Skipping this can result in the system sending "ticket created" or "update" emails to customers for every imported record – potentially spamming thousands of users. Additionally, reach out to Kayako support to request a temporary increase in API limits. This can significantly speed up the migration process.
With proper preparation, you can complete a typical help desk data migration in one to two weeks. Taking these steps ensures a smoother process and helps keep your timeline on the shorter end.
Conducting a Full Data Audit
Start by pulling a complete inventory of your Kayako data. This includes conversations (subjects, tags, statuses, groups, types, assignees, and contacts), comment history (authors, body text, privacy settings, and creation dates), and user profiles (names, emails, phone numbers, and company associations). Be sure to include inactive users to maintain the historical context of tickets.
Your audit should also cover agents and staff records. Make sure to account for active, inactive, and even deleted agents. For deactivated agents, reassign their tickets to an active admin or a default agent to ensure continuity. Review all custom fields – whether they’re string, boolean, date, number, select, or multi-select types. Additionally, document custom objects, such as assets or warranties, separately, as these require precise mapping for a smooth transition. Detailed documentation of these mappings is essential to maintain your data structure during migration.
Examine your Knowledge Base setup, including categories, sections, and articles. If you’re using Kayako Classic, keep in mind that its two-level structure (Category; Article) may need adjustments to fit modern platforms, which often use a three-level structure (Category; Folder; Article). Pay close attention to attachments and media – inline images and CC users may not transfer automatically and could require custom solutions.
Identify settings that cannot be transferred. Items like SLAs, triggers, notifications, monitors, and observer rules generally don’t migrate by default. In Administration > Triggers, document your existing workflows, and use Insights to capture your current SLA benchmarks and performance goals. Advanced search strings, such as in:conversations (status:closed), can help you verify the volume of historical data.
Once your data is thoroughly audited and mapped, the next step is to clean and organize your historical records effectively.
Cleaning and Organizing Historical Data
After completing your audit, the next step is to declutter your data. Eric Klimuk, Founder and CTO of Supportbench, emphasizes the importance of this process:
"There’s no benefit to moving junk. A clean dataset saves time, reduces risk, and improves results in the new system."
This approach lays the foundation for effective filtering and organization.
Start by removing outdated or resolved tickets. Tools like Kayako’s advanced search can help you pinpoint records by date and status. For instance, closed tickets from 2019 or earlier might not need to be migrated at all. Similarly, consider skipping attachments older than 12–24 months. Eliminating unnecessary data like this can significantly cut down on migration time and costs, as pricing often depends on the total volume of records being transferred.
Next, organize your data into categories such as channel, customer type, or issue category. Doing so ensures that metadata – like chat transcripts or email threads – maps correctly to the corresponding fields in your new system.
Take steps to manage historical tickets tied to inactive or deleted agents. These can either be reassigned or omitted entirely. Additionally, tag important or sensitive records before cleaning. This precaution safeguards critical data during bulk deletions and makes it easier to locate after the migration is complete.
Once your dataset is clean and systematically organized, you’ll be ready to schedule your migration and choose the right tools for the job.
Creating a Migration Schedule
Timing is everything when it comes to data migration. To minimize disruptions, analyze ticket volume by hour and day to pinpoint off-peak windows. For US-based teams, evenings and weekends typically see the least activity, making them ideal for migration work.
Once you’ve identified the best time slots, align with your team to coordinate efforts. As Eric Klimuk, Founder and CTO of Supportbench, emphasizes:
"A successful data migration isn’t just a technical achievement – it’s also a communication project. People are affected: employees, customers, and stakeholders."
Start communication early – during the planning phase, not at the last minute. Share the rollout schedule, explain the reasoning behind the timing, and outline potential impacts well ahead of the migration. Before the migration window opens, send a targeted reminder to your support team. If service slowdowns or limited functionality are expected, inform customers in advance to set realistic expectations.
Before kicking off the migration, ensure all notifications, monitors, and triggers are disabled. To prevent data mismatches, consider freezing changes to your source system during the migration. For large datasets, breaking the transfer into smaller, manageable chunks (Interval Migration) during off-peak hours can help maintain steady progress while avoiding extended downtime. Also, double-check administrative access and request temporary API limit increases if needed.
With a clear schedule and strong communication plan, you’ll be ready to proceed step by step. A well-organized migration schedule reduces potential issues and helps maintain continuity throughout the process.
Selecting the Right Migration Tool and Strategy
The success of your migration hinges on choosing a tool and approach that ensures your historical data remains accurate and intact. A reliable migration tool should automate field mapping to correctly align agents, groups, and ticket statuses, minimizing the risk of errors.
For businesses handling multiple communication channels, maintaining the integrity of relational data is non-negotiable. Your migration tool must preserve the connections between tickets, users, organizations, and comments, ensuring the entire customer history is accessible. This includes keeping email threads and chat transcripts identical to how they appeared in Kayako, with attachments and inline images properly migrated. Screenshots, diagrams, and other visual elements should remain accessible, maintaining the context across all customer interactions. The right tool ensures that data flows seamlessly between systems, preserving every detail across channels. Once your data is prepared and scheduled, the next step is finding a tool that can bridge the gap between your old and new systems without a hitch.
Delta migration is another crucial feature, as it captures any new data – like incoming emails or chats – that arrives in Kayako during the migration process. This ensures no data is left behind. For larger datasets, consider tools that offer interval migration, which breaks the process into smaller, manageable chunks during off-peak hours. This approach reduces the risk of system timeouts. Once you’ve audited and cleaned your data, running a free demo migration is essential. Typically, this involves transferring 20 random tickets to test how email threads, chat logs, and attachments appear in the new system. This trial run lets you verify data integrity and test multi-channel integrations under realistic conditions before committing to the full migration.
Security is just as important as functionality. The best migration tools provide end-to-end encryption, comply with GDPR, and hold certifications like SOC 2 Type II to safeguard sensitive customer data. These measures protect your data during the transfer and align with the pre-migration preparations you’ve already undertaken. Before starting the migration, audit your Kayako data to identify and remove duplicates or outdated records – transferring unnecessary data increases the risk of errors. Additionally, disable email notifications and automated triggers in your target system to avoid sending unintended notifications to customers during the import process.
Evaluating Migration Tools
When you’re comparing migration tools, one of the first things to focus on is automated field mapping. The tool should seamlessly align both standard fields (like ticket status, priority, and tags) and custom fields (such as "Contract ID" or "Product Category") without requiring manual tweaks. This ensures your data remains organized and retains the context needed to make historical tickets meaningful. Ideally, the tool should also let you create new custom fields directly within the migration wizard, saving time and effort.
Another key feature to consider is agent and group mapping. Based on your data audit, the tool should automatically map agents and groups from Kayako to your new platform. It should also handle tricky situations – like tickets assigned to deleted or inactive agents – by reassigning them to active administrators. This prevents "orphaned" tickets that no one is responsible for. Tools like Help Desk Migration, which boasts a 4.8/5 rating from over 100 reviews, are designed to simplify this process.
For teams offering multi-channel support, the tool must handle varied data types without losing relationships. Whether it’s email threads, chat logs, social media messages, or private notes, everything should transfer seamlessly. Advanced tools often convert inline images into linked attachments, preserving the visual context your team needs.
To maintain data integrity during the transition, consider tools that offer delta migration. This feature captures any new or updated records, ensuring nothing gets lost during the cutover. Some tools even support interval migration, splitting large datasets into smaller chunks for processing during off-peak hours to avoid timeouts. Before fully committing, run a demo migration with a small sample – around 20 random tickets – to check how attachments, agent assignments, and custom fields look in the new system.
Security is non-negotiable. Make sure the tool provides end-to-end encryption, complies with GDPR, and holds SOC 2 Type II certifications to safeguard your data during the transfer. Additionally, confirm that the tool accesses your Kayako data in read-only mode, so your original records remain untouched in case of any issues.
Prioritizing Multi-Channel Integration
Once you’ve completed your audit and chosen a migration tool, the next step is ensuring multi-channel data integrates smoothly. This means migrating email and chat conversations as a single, unified record to retain the complete customer context. Fragmented histories can lead to confusion – your agents lose the background they need to provide quick, personalized support. For instance, if an email from last month isn’t connected to a chat conversation from yesterday, agents may have to ask customers to repeat details, which wastes time and diminishes trust. A unified approach ties directly to the precise data mapping strategies discussed earlier.
It’s also essential to maintain relational data integrity throughout the migration. Every ticket, email thread, and chat transcript must retain its metadata, including sender information, timestamps, and privacy settings. As Eric Klimuk, Founder and CTO at Supportbench, explains:
"Mismatched relationships are one of the most common sources of integrity issues in poorly executed migrations".
These mismatched relationships can lead to significant data issues.
Leverage your migration tool to ensure all data types – from emails to call recordings – transfer without breaking connections. For example, email threads should migrate with all comments and attachments intact, chat transcripts should appear as complete conversations rather than isolated fragments, and internal agent discussions should transfer as private notes to preserve resolution context. If your team relies on call recordings, these can be migrated as MP3 attachments to ensure no details are lost in complex cases.
Before completing the migration, run a demo to validate relational links. Choose a representative sample of tickets that include both email and chat data, and confirm they remain correctly tied to the right customer profiles and organizations in the new system. Proper agent mapping, as outlined earlier, is also critical – assigning agents by email ensures ticket assignments transfer seamlessly.
Finally, use delta migrations to maintain continuity for multi-channel data. This approach prevents any gaps in customer history and allows your team to pick up right where they left off, no matter which channel customers use to connect.
Executing the Migration: Step-by-Step Process
Once you’ve completed the audit and configured your tools, the next step is to run a demo migration. Start by transferring a small sample – 20 tickets and 20 articles – to test field mappings, attachments, agent assignments, and comment threading. Before beginning, make sure to disable all email notifications, monitors, and triggers in Kayako. This prevents automated messages from being sent during the import process.
After the demo migration, carefully review the results. Check that attachments, timestamps, user IDs, and relational links remain intact. As Eric Klimuk, Founder and CTO at Supportbench, advises:
"A trial run is your safety net. Before fully committing, replicate real workflows to catch friction points and ensure team readiness".
If you find issues during the review, update your field mappings or agent assignments and run another test if necessary. Once the demo migration is validated, proceed to the full migration.
The time it takes to complete the migration will depend on the amount of data being transferred. For larger datasets, ask Kayako for a temporary API limit increase to speed things up. If minimizing downtime is crucial, consider breaking the migration into smaller chunks. Schedule these transfers during off-peak hours using an "interval migration" approach, which allows up to five pauses of five days each.
When the full migration is finished, immediately perform a delta migration to capture any new or updated data that was added to Kayako during the main transfer. This ensures your data remains consistent without needing to redo the entire process. If delta migration isn’t an option, freeze changes in the source system during the final cutover to maintain data integrity.
Once you’re confident in the migrated data, redirect all incoming support channels – such as email forwarding and chat widgets – to the new system. To help agents differentiate between legacy tickets and new requests, use automated tagging to label all migrated tickets.
Running a Test Migration
Start by conducting a test migration with a sample of 20 random conversations and 20 knowledge base articles, which should take about 5 minutes. For more intricate cases – like tickets with large attachments or complex custom fields – opt for a Custom Demo to select specific records for testing.
Before beginning, make sure to disable all email notifications, monitors, and triggers in Kayako. This step, though mentioned earlier, is emphasized again here because it prevents automated messages from being sent during the import process. Such messages could disrupt live data. If you’re using a brand-new Kayako account, ensure the support channel is verified through the post-registration email; otherwise, the migration could fail.
After the test migration is complete, download the migration report. Review it carefully to identify which records were successfully migrated, which failed, and which were skipped. Check attachments on the target platform to confirm they open without issues. Additionally, verify that comments are correctly attributed to the appropriate agents or customers, and ensure that timestamps, user IDs, and relational links are accurate.
Confirming the accuracy of the data during this phase is essential to ensure your support operations remain reliable and consistent.
If you encounter problems – like missing custom fields or broken HTML in knowledge base articles – adjust your field mappings or security settings and run the test again. Validating a successful test migration is a key step before proceeding with the full migration process.
Performing the Full Migration
Once your test migration is validated, it’s time to proceed with the full transfer. Before starting, make sure to disable all email notifications, monitors, and triggers in Kayako. This will prevent any automated messages from being sent to customers during the data import process.
With the test migration behind you, focus on efficiency for the full migration. Start with your most recent records first. Automated tools can prioritize importing recent email and chat conversations while older data transfers in the background. This approach allows your team to address urgent customer issues immediately, minimizing disruptions. For teams handling a high volume of daily conversations, this strategy is key to maintaining smooth operations and customer satisfaction.
Request a temporary API limit increase from Kayako before initiating the migration. API rate limits can significantly slow the process, especially for large datasets. A temporary increase can cut migration time from several days to just a few hours. Use your migration dashboard to monitor progress in real time, and keep an eye out for any failed or skipped records so you can address them promptly.
To protect data integrity, freeze all changes to the Kayako source instance during the migration. If agents continue creating or editing tickets during the transfer, it could lead to mismatches or failures. Once changes are frozen, inform your team about the cutover window and plan a Delta Migration afterward to capture any last-minute updates. This two-step process – full migration followed by a delta sync – ensures no data is left behind.
After completing the migration, validate the results. Check a sample of attachments on the new platform to confirm their integrity. Verify that timestamps, user IDs, and links between tickets and contacts are accurate. This final review helps ensure the system is reliable and compliant with necessary standards.
Handling Delta Migrations for Ongoing Updates
After completing the full data migration, Delta Migration steps in to capture any last-minute updates, ensuring your data remains accurate and up-to-date.
Even with your Kayako instance frozen, customer interactions may continue. Delta Migration ensures these new or updated records – created after the full migration begins – are transferred without missing a beat.
"Delta migration allows your support team keep working with your current help desk during data migration: your customer service has no hiccups and works as usual."
– Help Desk Migration
This process serves as the final step in the migration, capturing any lingering updates or new entries effortlessly.
To keep things smooth, schedule the delta sync soon after the full migration – ideally within a 30- to 60-minute off-peak window, like late Monday night or early Tuesday morning. This timing reduces the risk of excessive new data piling up. If you’re dealing with a massive dataset, consider using Interval Migration. This method breaks the transfer into smaller, manageable chunks during off-peak hours.
Before starting the delta migration, make sure to disable all automations (like email notifications, triggers, and monitors) on both platforms. This prevents duplicate alerts from cluttering the system. Adding automated tags to delta-transferred tickets can also help you distinguish them from legacy data.
Keep in mind, Delta Migration is typically offered as part of premium support plans, such as a Signature support tier. Once the sync is complete, take time to verify that timestamps, user IDs, and custom fields align with the source system. Also, review migration reports promptly – these are usually archived after five days, so addressing any gaps quickly is key.
Post-Migration Validation and Optimization
After completing the migration process, the next critical step is post-migration validation. This ensures that everything aligns with your initial planning and preparation. Start by validating your data as soon as the migration is complete. Migration reports come in handy here – they categorize records into statuses like migrated, failed, and skipped, while also mapping source IDs to the new platform IDs. Use these reports to double-check specific tickets by reviewing details such as subjects, tags, statuses, assignees, and custom fields.
It’s essential to confirm that all relationships within the data remain intact. Check that every ticket retains its correct links to users and that threaded conversations maintain their parent–child structure. Additionally, manually verify attachments and internal links to ensure they now align with the new platform’s URL structure.
Once you’ve verified individual data points, take a step back and review the system from a broader perspective. Compare overall system metrics by running reports on both the old and new platforms. Test core workflows – such as creating, updating, assigning, and closing tickets – to identify any inconsistencies. It’s also a good idea to establish a feedback channel for agents to report missing data or broken links during the initial live operations phase.
"Done right, migration isn’t just a one-time task. It’s a chance to improve how your data is structured, accessed, and supported for years to come."
– Eric Klimuk, Founder and CTO of Supportbench
With validation complete, shift your focus to reactivating systems and taking advantage of advanced features. Reactivate automations and redirect all communication channels to the new platform. From there, implement AI-driven tools like auto-assignment for seamless multi-channel ticket routing. You can also use text analytics to review your migrated Knowledge Base content, identifying and addressing duplicate or outdated entries.
Validating Migrated Data
After completing your migration, the next step is to ensure your data integrity remains intact. Start by reviewing your migration tool’s reports. These reports will help you identify records that were successfully migrated, those that failed, and any that were skipped. They’ll also provide an ID mapping between the source and target systems, which you can use to sample individual tickets. Check that key details – such as subject, status, priority, source, tags, and agent assignments – match the original data from Kayako.
Pay close attention to timestamps (created, updated, and closed) and ticket comments (both public and private). Verify that authorship, content, and dates for these comments are accurate. Additionally, download sample attachments from the new platform to confirm they open properly and are linked to the correct tickets.
Custom fields are another critical area to validate. Whether the fields are strings, booleans, dates, numbers, or select lists, ensure they are mapped correctly and retain their original values. Use advanced search queries in your new system – such as filtering for status:closed – to compare ticket counts with those in Kayako. If your source system remained active during the migration, consider running a Delta Migration to capture any new or updated records added after the initial transfer. Then, compare overall ticket counts and custom field values between the two systems for additional verification.
Finally, have your support agents test core workflows, like creating, updating, assigning, and closing tickets. This hands-on testing can uncover discrepancies that automated reports might miss.
Replicating Key Workflows and Automations
Once your data is verified, it’s time to ensure that the automation logic is fully aligned with your operational needs. During this phase, remember to disable all triggers, monitors, and email notifications in both systems. This precaution prevents automated responses from being sent to historical tickets.
Start by auditing the automation rules you’ve set up in Kayako. Don’t just rely on what’s configured in the system – reach out to your frontline agents for insights. They can highlight manual workarounds, important tags, or custom fields that are critical to informal workflows. As Eric Klimuk, Founder and CTO of Supportbench, explains:
"Even if the technical part goes smoothly, unclear goals can still result in failure – like missing fields, broken workflows, or mismatched expectations."
This step is a natural extension of your earlier data validation efforts, ensuring that workflows in the new system match the efficiency of those in Kayako.
When mapping fields, expand your focus to include automation rules, especially SLA timers, ticket routing rules, and custom field dependencies. For instance, if custom fields are used to track subscription levels or contract IDs, these must be recreated in the new system before rebuilding any automations that depend on them. Tag imported tickets with a "migrated_data" label to exclude them from active automations during testing.
A pilot migration is essential. Use a small subset of data and have your support team test key actions – creating, updating, assigning, and closing tickets. This ensures that the automation logic functions as expected. For example, in July 2025, Rossi Residencial completed a seamless migration to Google Cloud, maintaining uninterrupted operations by carefully replicating workflows.
Once the full migration is complete, re-enable automations gradually. Closely monitor their performance to catch any issues early. AI-driven tools like InsightSquared and Kapiche can analyze migrated conversation data, helping you spot workflow gaps and refine your support strategies right after the transition.
After reactivating workflows, ongoing monitoring and AI insights will help you fine-tune your processes for even better results.
Using AI for Post-Migration Optimization
Once your data is successfully migrated and validated, AI tools can help you fine-tune your support operations. These tools can turn your migrated data into actionable insights, setting the foundation for a more efficient system from the very beginning.
Start by automating tagging to categorize legacy data by product line, issue type, or customer segment. This eliminates the need for manual sorting, allowing your team to hit the ground running with the new system. Sentiment analysis can also scan incoming emails and chat messages, flagging frustrated or at-risk customers so agents can prioritize urgent cases. These steps create a solid framework for implementing AI-driven workflows for resolution and case assignment.
Predictive resolution is another game-changer. AI can analyze historical data to suggest standardized responses, saving time and ensuring consistent communication. By reviewing your migrated knowledge base and past ticket resolutions, AI can generate pre-written replies for common inquiries, significantly cutting down response times. For instance, one organization saw a 325% boost in paid customer conversion rates within just a month of rolling out AI-powered chat tools. Additionally, AI-driven auto-assignment ensures cases are routed to the right agents instantly, using historical and contextual data. Once these features are live, track their effectiveness through customizable dashboards that measure key metrics like first-response time and resolution rate.
Beyond routing and resolution, AI can enhance your knowledge base. It can identify recurring ticket topics that lack self-service resources, then use generative AI to draft FAQs addressing those gaps. This reduces ticket volume and frees up your team to focus on refining workflows and improving customer satisfaction.
Conclusion
Migrating multi-channel Kayako support without losing data hinges on three key elements: careful planning, the right tools, and thorough validation. Start by auditing your existing data. This means identifying duplicates, outdated records, and inconsistencies before they carry over into the new system. Map out custom fields, set realistic timelines, and leverage automated delta migration tools to capture any live updates during the process. These steps lay the groundwork for a seamless transition.
Testing plays a critical role in the process. Running a small-scale test ensures your field mappings are correct and helps catch potential errors before the full migration. After completing the migration, validate everything immediately – check ticket assignments, comment authors, attachments, and custom fields to confirm that all data has transferred accurately and remains intact.
The rewards of a well-executed migration are substantial. Organizations that follow a structured approach – Discovery, Mapping, Pilot, Execution, and Validation – have reported zero downtime and reduced infrastructure costs by up to 50%. As Matt Brayley, Field Service Manager at Primetals Technologies, shared:
"We are able to retain our data from another help desk solution. We considered starting fresh with a new help desk – and losing years of history."
FAQs
What data doesn’t migrate automatically from Kayako?
Certain types of data – like organizations, customers, tickets, messages, notes, and attachments – won’t transfer automatically from Kayako. You’ll need to manage these separately during the migration process to ensure no crucial information gets left behind.
How can I migrate without interrupting live email and chat support?
To move your multi-channel Kayako support system without disrupting live email and chat services, here’s what you should do:
- Choose off-peak hours: Schedule the migration during times when customer activity is typically lower to reduce the impact.
- Create a full backup: Secure all your data beforehand to avoid any risk of loss during the process.
- Leverage automated tools: Use reliable tools designed for safe and efficient data transfers.
- Take it step by step: Migrate in smaller phases, checking and confirming each stage before moving on.
- Run thorough tests: After the migration, test everything to confirm that data is intact and operations are running smoothly.
By following these steps, you can transition seamlessly while keeping downtime to a minimum.
What checks prove my migration didn’t lose or corrupt data?
To ensure the migration process went smoothly, start by reviewing the reports for migrated, skipped, and failed records. Carefully check that all ticket details, statuses, custom fields, and knowledge base articles align with the original source data. Perform detailed quality assurance (QA) checks to confirm that everything has been transferred correctly and nothing has been altered or lost.
Related Blog Posts
- How do you migrate from Salesforce Service Cloud to a helpdesk without losing case history?
- How do you migrate away from Freshdesk without losing tickets, contacts, or history?
- How do you migrate away from Kayako without losing tickets, users, and attachments?
- How do you map Kayako statuses, priorities, and custom fields to a new helpdesk?