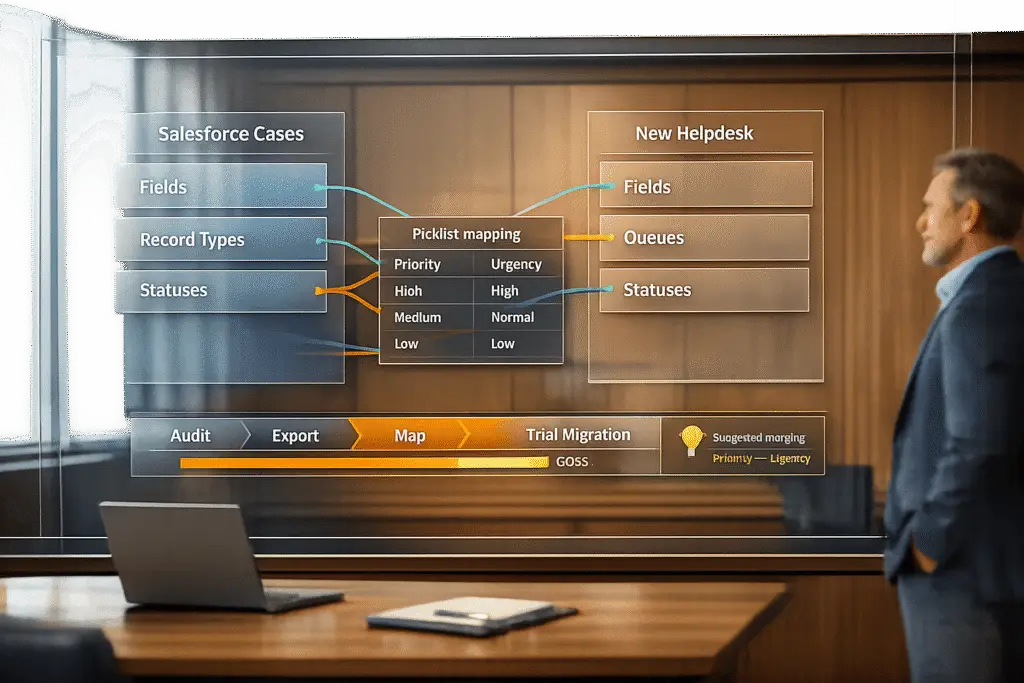
Switching from Salesforce to a new helpdesk requires careful data mapping to avoid errors, broken workflows, and corrupted information. Here’s how to ensure a smooth transition:
- Audit Salesforce Data: Identify critical fields like Case ID, Status, and Priority. Clean up duplicates and incomplete entries.
- Export Data: Use Salesforce tools like Data Loader or Data Export Wizard to extract records, including custom fields and picklist values.
- Map Fields: Match Salesforce fields (e.g., Case Number, Status) to equivalent fields in the new system. Use a spreadsheet to document mappings.
- Handle Record Types: Align Salesforce Record Types with new helpdesk categories like Ticket Type or Case Type.
- Map Status Values: Ensure Salesforce statuses like "New" or "Closed" correspond to valid statuses in the new system.
- Test Migration: Run a trial with 20 records to verify data accuracy, relationships, and workflows before full migration.
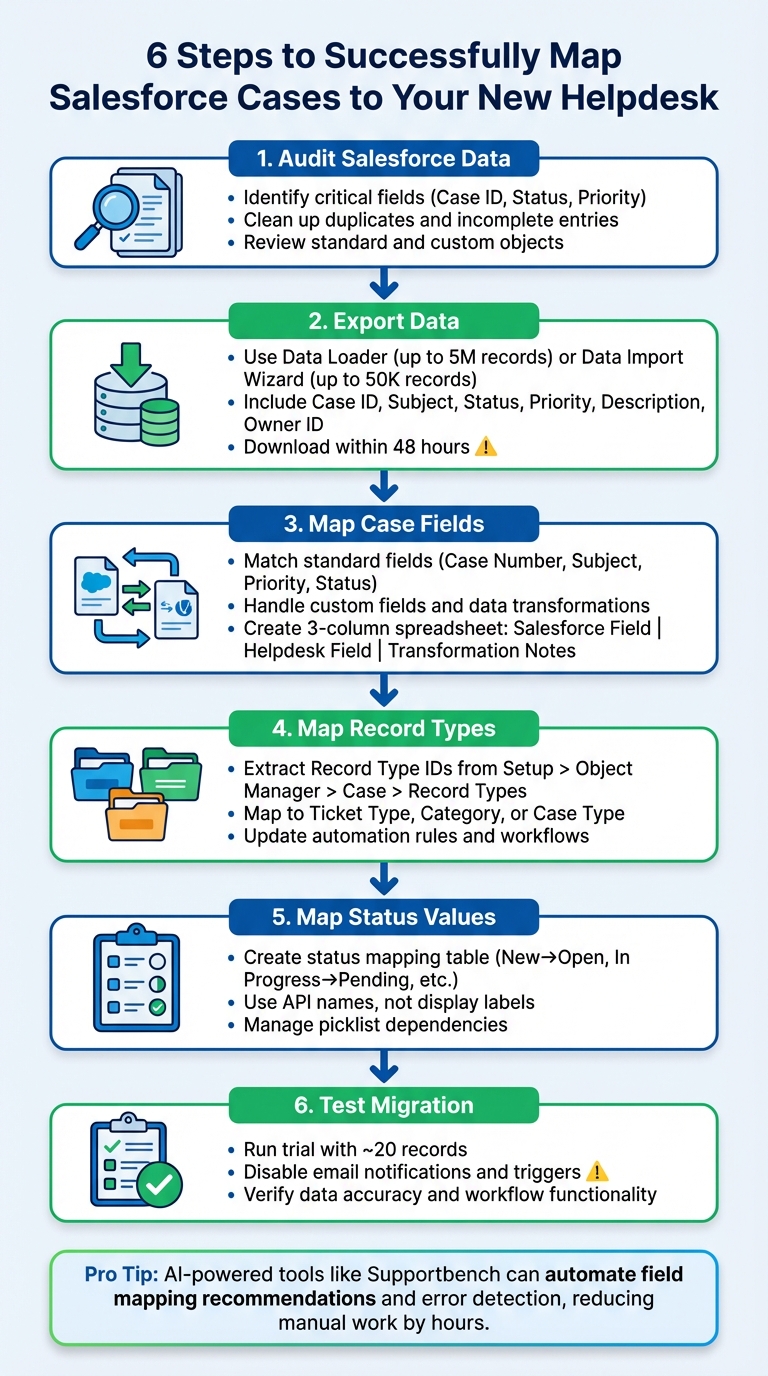
6-Step Process for Mapping Salesforce Cases to New Helpdesk System
How Help Desk Migration Wizard Works | Step-by-Step Migration Guide

sbb-itb-e60d259
Step 1: Review Your Salesforce Data and Plan Your New Helpdesk Setup
Start by getting a clear understanding of your Salesforce data. Use the built-in Data Export Wizard to extract your data into CSV files. Depending on your needs, you can schedule regular exports to keep your data updated.
Once you’ve exported the data, sort it into categories: standard objects like Accounts, Contacts, and Leads, and any custom objects you’ve created. Standard Case fields often include Case ID, Subject, Status, Priority, and Description, while custom fields might track additional details like SLA timers, product categories, or contract IDs. Look for duplicates, inconsistent formatting, or empty cells that could signal missing or incomplete data. With this foundation, dive deeper into the case fields to identify what’s critical for your operations.
Review Your Salesforce Case Fields
Make a complete list of active fields in your Salesforce system. Separate the fields that are vital to your operations – those tied to reports, automation, or daily workflows – from outdated or unused ones. This step ensures consistency and avoids unnecessary clutter when transitioning to the new system.
Pay close attention to required fields – fields that must be filled out for processes to function. These fields can’t be skipped during migration without causing errors. Also, double-check picklist values for Status and Priority; mismatched values are a common reason migrations fail. Tools like Excel’s VLOOKUP can help you match User IDs with record owners and confirm the relationships between parent and child records. This thorough review will help align your data with the goals of your new helpdesk.
Set Clear Objectives for Your New Helpdesk
Your new system shouldn’t just replicate the old one – it should improve on it. Define clear goals, such as better case routing, more organized data, or AI-powered ticket routing and prioritization to automate resolution. These improvements will ensure the migration enhances your support operations and takes full advantage of modern tools.
Document how your Record Types currently separate different business processes. For instance, you might use them to keep synced tickets distinct from native cases. Map these processes to the appropriate categories or workflows in the new helpdesk.
Where source data is missing or inconsistent, set default values for target fields. For example, if some cases don’t have a status, you could default them to "Open" to maintain consistency. This is also the time to decide which fields you no longer need, keeping your new system streamlined and focused on what matters most.
Step 2: Export Your Salesforce Cases, Record Types, and Statuses
After reviewing your data and defining your goals, the next step is exporting your Salesforce data. This ensures you capture a full snapshot of your Cases, including field definitions, Record Types, and Status values. These details are essential for a smooth migration and will play a key role in the field mapping process discussed later.
Prepare Your Data for Export
For exporting, choose the right tool based on the size of your dataset. Salesforce Data Loader handles large exports (up to five million records), while the Data Import Wizard is better suited for smaller datasets (up to 50,000 records). If you need scheduled exports or want to extract related objects at the same time, tools like Dataloader.io can be helpful.
Be sure to include all critical fields, such as:
- Case ID
- Subject
- Status
- Priority
- Description
- Owner ID
- Any custom fields identified earlier
For picklist fields like Status, separate multi-select values with semicolons to ensure proper mapping. Also, include Salesforce’s unique 15- or 18-digit record IDs to maintain parent–child relationships (e.g., linking a Case to a specific Contact). Once exported, download your files promptly, as Salesforce deletes them after 48 hours.
Check Data Quality Before Migration
After exporting, it’s essential to validate your data for accuracy and completeness. Use filters to catch missing values, inconsistent dates, or empty cells that could lead to errors during the import process. If your data includes formulas, convert them to raw values using Paste Special as Values to avoid issues like "#REF!" errors during the migration.
"Salesforce administrators know that their customer relationship management (CRM) is worthless if the data can’t be trusted."
- Diana Ramos, Smartsheet
Taking the time to address these issues now ensures your data aligns with your new helpdesk’s requirements, saving you from unnecessary headaches later on.
Step 3: Map Salesforce Case Fields to Your New Helpdesk Fields
Once your data is exported and validated, the next step is mapping Salesforce fields to their counterparts in your new helpdesk system. This step is critical for maintaining data consistency and avoiding unnecessary complications later. A detailed mapping document can save your team from time-consuming errors and serve as a clear reference throughout the transition process.
"Data mapping is the backbone of any successful data migration, integration, or transformation process. Without it, your data has no direction – it’s just raw information moving without context."
- Taras Velychko
Map Standard Fields
Begin with the standard Salesforce Case fields. These are common across most implementations and include Case Number, Subject, Priority, Status, Description, Created Date, and Account ID. Modern helpdesk platforms often have direct equivalents for these fields, making this part of the process relatively straightforward.
Pay attention to data type compatibility. For instance, ensure Salesforce checkboxes (1/0), U.S. date formats (MM/DD/YYYY), and picklist values are properly aligned with the new system. Start by mapping required fields first, as missing these can lead to migration errors.
To keep the process organized, use a three-column spreadsheet with the following headers: Salesforce Field, Helpdesk Field, and Transformation Notes. This document ensures everyone is on the same page and provides a quick reference if any issues arise during testing.
Once standard fields are mapped, shift your focus to custom fields that reflect your organization’s specific needs.
Handle Custom Fields and Data Transformations
Custom fields often require extra attention. Review each one carefully to decide whether it needs renaming, merging, or converting to a different data type. If your new helpdesk uses different terminology, update field names accordingly.
Certain field types may need special handling. For example, formula fields, encrypted strings, and some multi-line text areas might need to be converted into static text. Similarly, multi-select picklist fields should have their values separated by semicolons, as not all systems natively support multi-select formats.
Use these mapping strategies for a smoother process:
- Static Mapping: Assign fixed values, such as a specific Record Type.
- Dynamic Mapping: Automatically match values from the source ticket object.
- Auto-Match: Link reference objects, like connecting a User Email to an Agent ID.
By following these methods, you can ensure accurate transfers for all fields, whether they relate to cases, contacts, or accounts.
This mapping document will serve as your go-to resource for both standard and custom fields, helping you navigate the migration process with confidence and precision.
Step 4: Map Salesforce Record Types to New Helpdesk Case Categories
Once you’ve handled field mapping, the next step is aligning Salesforce Record Types with the categories in your helpdesk system. This ensures your support workflows stay organized and effective after the migration. Record Types in Salesforce are used to define specific business processes and categorize cases. If these aren’t mapped correctly, you risk disrupting the categorization logic that supports your workflows.
Connect Record Types to Helpdesk Categories
Start by identifying all active Salesforce Record Types. To find them, go to Setup > Object Manager > Case > Record Types in Salesforce. From there, extract the unique 15- or 18-digit ID for each Record Type from the browser URL – this ID is essential for accurate mapping.
Create a mapping table to link each Salesforce Record Type to its equivalent field in the helpdesk system. Most modern helpdesk platforms use fields like Ticket Type, Category, or Case Type. If your helpdesk lacks a native Record Type field, you can map it to a custom picklist instead.
| Salesforce Record Type (Source) | Target Helpdesk Field | Target Value (Example) |
|---|---|---|
| Support Inquiry | Ticket Type | Question / Inquiry |
| Bug Report | Ticket Type | Incident / Problem |
| Feature Request | Category (Custom Field) | Product Feedback |
| Billing Issue | Ticket Type | Task |
Before proceeding, ensure all Record Type values from Salesforce are already set up as dropdown options in the new helpdesk system. Missing values could lead to migration errors or data loss.
Once the mapping is complete, focus on updating your automation rules to reflect these changes.
Update Workflows and Automation Rules
Mapping Record Types correctly is more than just a data migration step – it also lays the groundwork for automation in your new helpdesk. Update the automation logic to recognize the new categories. Review your existing Salesforce workflows, Apex triggers, and assignment rules to identify any dependencies on specific Record Types.
"Consider if you want automation and apex to run during the migration. If you have an email triggered on a new record, you’d probably want to turn this off during the migration."
- Tom Bassett, Senior Solution Architect, Vera Solutions
To avoid disruptions, disable automations during the migration process. This helps prevent unnecessary notifications and performance issues. Once the migration is complete, manually update triggers, webhooks, and assignment rules to reference the newly mapped categories. For example, if the Salesforce "Bug Report" Record Type previously routed cases to the engineering team, configure your new system to use the "Incident / Problem" category for the same purpose.
When mapping to picklist fields that drive automation, always use API Names instead of labels. This reduces the risk of errors caused by label changes or duplicates. Before fully committing to the migration, run a small test with around 20 tickets to ensure Record Types are correctly categorized and automation rules function as expected.
Step 5: Map Salesforce Status Values and Picklist Dependencies
The next step is to align Salesforce Status values with their equivalents in the new helpdesk system. Status fields are crucial for managing case workflows, and incorrect mapping can lead to broken automation, missed SLAs, or unnecessary notifications. Every status value in Salesforce – like New, In Progress, On Hold, Resolved, or Closed – must have a corresponding value in the new system. Without this, the migration process won’t work as intended. Proper mapping ensures workflows and automation remain consistent in the new environment.
Create a Status Mapping Table
Start by listing all active Salesforce status values and pair each one with its equivalent in the new helpdesk system. Use a reference table to document these mappings:
| Salesforce Status (Source) | New Helpdesk Status (Target) | Workflow Implication |
|---|---|---|
| New | Open | Triggers "First Response" SLA |
| In Progress | Pending | Pauses "Agent Wait Time" |
| On Hold | Waiting for Customer | Pauses SLA timers |
| Resolved | Solved | Requires "Resolution Code" |
| Closed | Closed | Record becomes read-only |
Make sure all target status values are already available as dropdown options in the new helpdesk system. If a required field or picklist value is missing, the synchronization will fail. For status fields, always use API names rather than display labels to avoid recognition errors, especially for restricted picklists.
Manage Picklist Dependencies
Recreating picklist dependencies is essential to maintain the operational logic from Salesforce. Some fields in Salesforce rely on specific status changes to function correctly. For instance, a "Resolution Code" might only be mandatory when the status is set to Closed. Similarly, a "Sub-type" field might depend on the selected value in a "Type" field. These relationships, known as picklist dependencies, need to be rebuilt in the new helpdesk system to ensure automation rules work seamlessly.
Additionally, review validation rules or lookup filters in Salesforce that restrict certain status values unless specific conditions are met. These dependencies must also be replicated in the target system.
Before proceeding with the full migration, disable approval workflows, email notifications, and other automated processes in the target system. This step prevents unnecessary triggers, like email floods or data conflicts, during the import process. Finally, perform a test migration with a sample set of about 20 records to confirm that statuses are mapped correctly and automation rules function as expected.
Step 6: Test Your Mappings with a Trial Migration
Once you’ve carefully mapped your data, Record Types, and statuses, it’s time to test these mappings with a trial migration. This step is crucial for identifying mismatches, formatting errors, or overlooked fields before committing to the full migration. Don’t skip this step – it’s your chance to fix any issues upfront.
Run a Test Migration
Choose approximately 20 cases by record ID that reflect the full complexity of your data. Include cases with attachments, inline images, internal notes, varied Organizations and Contacts, and edge cases like inactive agents or intricate field mappings. This ensures you can validate relationship integrity and reassignment logic.
Before starting, disable all email notifications, triggers, and automated workflows in the target helpdesk. This avoids sending unintended alerts to customers or agents during the trial run. Always conduct the trial in a non-production environment to prevent disruptions. After completing the trial, export migration reports to pinpoint any data transfer issues.
With the trial migration done, move on to verifying that both the data and workflows are functioning correctly.
Verify Data and Workflow Accuracy
Using your mapping strategy as a guide, review a sample of the migrated cases to ensure that all fields transferred accurately. Confirm that "Status", "Priority", "Source", "Type", and custom fields have been correctly populated. Also, check that tickets are still linked to the appropriate Contact and Account records, as broken relationships can disrupt workflows and automation.
Simulate ticket management operations and generate reports to validate the data further. This hands-on approach can reveal gaps that technical tests might not catch. Check if automated actions, such as case routing, follow-ups, and SLA timers, are triggering as expected based on the migrated data, particularly status and priority fields. Use custom reports to compare the source data with the target data, ensuring there’s no "silent data loss" during the process.
In 2021, Command Alkon successfully migrated Zendesk Knowledge Articles and Jira Cases to Salesforce Service Cloud under tight deadlines. Matthew Fox, Manager of Program Management, led the effort, leveraging a trial migration to handle an array of custom fields. This step ensured accurate mapping and a seamless transition, preserving data integrity across their complex support structures.
If you encounter errors during this phase, use the "Rollback" feature to remove test data before proceeding with the final migration. This prevents duplicates and gives you the opportunity to correct mapping issues without affecting your production environment.
Common Problems with Salesforce Case Mappings and How to Avoid Them
Even with the best preparation, migration can hit snags that require tedious cleanup after going live.
One of the most frequent culprits? Mismatched data types. For example, if a Salesforce dateTime field is mapped to a text field in your new helpdesk, or if field lengths differ, you might encounter truncated data – or worse, failed imports altogether. To avoid this, double-check that source and target field types align (e.g., date fields map to date fields, picklists map to picklists). Be especially cautious with multi-select picklists – if your new system doesn’t support them, those records won’t import at all.
Another issue is restricted picklist values, which can silently cause data loss. Imagine your Salesforce "Priority" field uses values like "P1", "P2", and "P3", but your new system only recognizes "High", "Medium", and "Low." Without proper mapping, records with unsupported values will fail to import. The fix? Create a mapping table to translate each picklist value from the source system to a valid option in the target system. For any unmapped values, assign a default (e.g., "Medium") to ensure no data is left behind.
Automation rules can also cause headaches during migration. Historical ticket imports might unintentionally trigger notifications or workflows.
In 2021, Brett Cahill, IT Manager at Clayton Legal, tackled this issue by disabling all triggers and notifications before migrating critical support data from ManageEngine to Halo Service Solutions. This approach ensured his team maintained 100% accuracy across Incidents, Change Requests, and Projects – all without disrupting customer communications.
To follow suit, disable validation rules, workflow triggers, and Email-to-Case settings before starting your migration.
Finally, broken relationships between Cases, Contacts, and Accounts can wreak havoc if External IDs aren’t configured correctly. These unique identifiers are crucial for maintaining links between records across systems. Without them, you risk losing connections between tickets and their associated customers, which can disrupt reporting, automation, and agent workflows. Additionally, reassign tickets from inactive users to an active placeholder agent to avoid orphaned records.
How Supportbench Uses AI to Automate Field Mapping and Migration Validation
Supportbench takes the hassle out of manual field mapping by using AI to simplify and secure the migration process.
Mapping fields manually can be a tedious task, especially when dealing with hundreds of custom fields, intricate picklists, and diverse record types. Supportbench’s AI-driven migration tools analyze data patterns to recommend accurate mappings, cutting down on hours of manual work.
AI-Powered Field Mapping Recommendations
Supportbench’s AI dives into field names, data types, and usage trends to suggest the best matches between your Salesforce Cases and your new helpdesk configuration. It offers four main mapping approaches:
- Static Mapping: Assigns fixed values to fields.
- Dynamic Mapping: Dynamically pulls values from source ticket objects.
- Auto-Match: Links related objects, like matching a helpdesk agent to a Salesforce User by email.
- AI Extraction: Automatically extracts details (e.g., company names) from ticket content to populate fields.
"The system recommends mappings automatically, saving time while keeping you in control." – Help Desk Migration
Before starting the migration, clean up broken records or duplicates in Salesforce to ensure the AI works with quality data. You can validate these AI-driven recommendations through a trial migration before committing to the full dataset transfer. It’s also a good idea to temporarily disable email notifications and triggers in your source system during the process to avoid duplicate alerts.
This AI-powered mapping lays the groundwork for advanced error detection and validation.
Automated Error Detection and Data Validation
Supportbench doesn’t stop at mapping – it uses AI to ensure your migration is error-free and smooth.
Once mapping is complete, the system scans your data in real time for issues like missing values, duplicates, formatting problems, or inconsistencies that could disrupt your support workflows. It also ensures that relationships between records – such as Salesforce Cases, Contacts, and Account objects – stay intact. Critical metadata, including timestamps and user IDs, is verified for accuracy throughout the migration.
Real-time dashboards provide visibility into the process, flagging anomalies before they create bigger problems. After the migration, AI-powered checks confirm that your team can seamlessly create, update, and close tickets, with permissions properly set. Eric Klimuk, Founder and CTO of Supportbench, emphasizes:
"Automation can significantly reduce errors, speed up execution, and simplify post-migration verification – but only when used intentionally".
Conclusion
Migrating Salesforce Case fields, Record Types, and Statuses to a new helpdesk can be straightforward if approached methodically. Start by auditing your existing data. This step helps you decide what’s worth migrating and what can be left behind, reducing the risk of clutter and unreliable information entering the new system. Next, focus on creating accurate field mappings for both standard and custom fields. Make sure picklist values align properly and that required fields are always populated.
Testing plays a crucial role in this process. Running a demo migration with real data helps uncover issues with relationships, formatting, and attachments before committing to the full migration. As Matthew Fox, Manager of Program Management at Command Alkon, noted:
"Their solution proved especially valuable when working with the many custom fields we needed to import into, and their guidance helped ensure a smooth and accurate migration".
This testing phase lays the groundwork for using AI to refine and validate your mappings.
Once testing is complete, AI-powered automation can take your migration to the next level. Tools like Supportbench’s AI analyze field names, data types, and usage patterns to suggest accurate mappings. Real-time error detection also catches issues like missing values, duplicates, or broken record relationships before they escalate. By automating these tasks, you save time and ensure your team can handle tickets seamlessly from day one. This combination of careful planning, thorough testing, and automation keeps your support operations running smoothly and efficiently.
FAQs
How can I maintain data accuracy when migrating from Salesforce to a new helpdesk?
Switching from Salesforce to a new helpdesk system? Keeping your data accurate during the migration process is crucial. Here’s how to do it right:
Start by cleaning your existing data. This means removing duplicates, outdated records, and irrelevant information. A clean dataset reduces the chance of errors and ensures your new system starts off on the right foot. At the same time, set clear migration goals – know exactly what data you need to move and how it should function in the new system.
Next, prepare the new helpdesk system ahead of time. Make sure it’s compatible with the data you’re migrating to avoid mismatches or inconsistencies. Using specialized migration tools is a smart move here. These tools can help you preserve key elements like relationships, custom fields, and workflows, minimizing the risk of losing important data.
Before going all in, conduct test migrations. This step allows you to catch and fix potential issues before the full migration. It’s like a dress rehearsal for your data, ensuring everything runs smoothly when it’s time for the big move.
Once the migration is complete, validate your data. Double-check ticket relationships, verify that custom fields have transferred correctly, and ensure statuses are mapped properly. For an extra layer of precision, consider AI-driven tools. These tools can assist with field mapping and error detection, making the process more efficient and reducing the risk of mistakes.
By following these steps, you can ensure a smooth transition while keeping your data accurate and intact.
How can I map Salesforce Record Types to categories in a new helpdesk system?
The first step in linking Salesforce Record Types to the categories in your new helpdesk system is understanding how each Record Type corresponds to the helpdesk categories. Take the time to analyze these connections thoroughly. Use any configuration tools provided by your helpdesk system to set up accurate mappings that reflect your operational needs.
Before you finalize the migration, double-check these mappings. This review ensures that your data remains consistent and that the system functions as intended after the transition.
For an easier process, AI-driven tools can be a game-changer. These tools can suggest logical mappings, validate your configurations, and even flag potential issues before they become problems. This approach not only saves time but also minimizes the chances of errors during the migration.
How can I effectively map custom fields during a helpdesk migration?
When migrating to a new helpdesk system, mapping custom fields correctly is crucial. Start by documenting your existing custom fields – note their purpose, how they’re used, and any dependencies. This will help you figure out if each field has a matching equivalent in the new system or if you’ll need to create new ones.
Take advantage of migration tools with smart mapping features. These tools can recommend the best mappings, check for data consistency, and flag potential errors. Running test migrations is also key – it allows you to review results and fix any issues before committing to the full migration.
With careful planning and the right tools, you can protect your data, minimize errors, and make the transition as smooth as possible for your team.
Related Blog Posts
- Help Desk Migration Checklist: How to Switch Platforms Without Downtime
- How do you map Zendesk fields, tags, and statuses to a new help desk correctly?
- How do you migrate from a US helpdesk to a non-US platform without losing history or data?
- How do you migrate from Salesforce Service Cloud to a helpdesk without losing case history?