
Security flaws are inevitable in SaaS platforms. What matters is how you handle them. A responsible disclosure process ensures vulnerabilities are reported privately, fixed promptly, and communicated transparently. Here’s a quick breakdown of what you need to do:
- Create a Vulnerability Disclosure Policy (VDP): Define what researchers can test, provide safe harbor protections, and publish a
security.txtfile with contact info. - Set Up Secure Reporting Channels: Use a dedicated email (e.g.,
security@yourdomain.com), PGP keys, or platforms like Bugcrowd for structured submissions. - Triage Reports Effectively: Use tools like CVSS to prioritize issues by severity and assign ownership for quick resolution.
- Communicate Clearly: Acknowledge reports within 24 hours, provide regular updates, and coordinate disclosure dates with researchers.
- Monitor and Improve: Track metrics like time-to-patch and false positive rates, conduct reviews, and automate repetitive tasks for scalability.
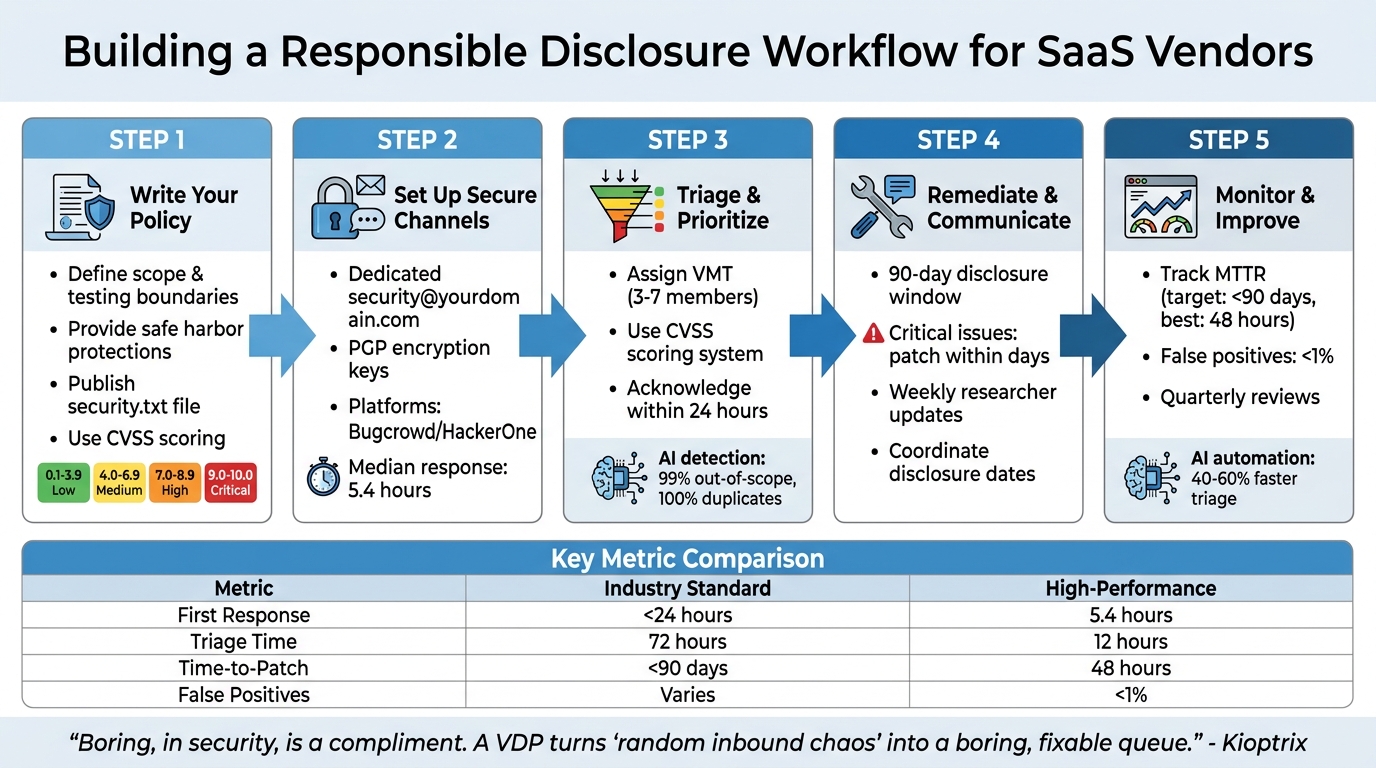
5-Step Responsible Disclosure Workflow for SaaS Vendors
Doing bad things for the right reasons: Vulnerability Disclosure at Amazon and AWS
sbb-itb-e60d259
Step 1: Write Your Responsible Disclosure Policy
Your Vulnerability Disclosure Policy (VDP) is the cornerstone of your security workflow. It outlines expectations for researchers, offers legal protection for your company, and reassures customers that you prioritize security. This policy guides researchers on what they can test, how to report issues, and what protections they’ll receive. A well-crafted policy ensures secure reporting and smooth triage processes.
Set Scope and Testing Boundaries
Start by clearly defining what researchers can and cannot test. List specific domains, APIs, applications, and repositories that are in scope. Also, identify exclusions like third-party services, marketing websites, or physical data centers.
Establish rules of engagement to prevent harmful activities. For instance, prohibit actions such as Denial-of-Service (DoS) attacks, phishing or social engineering attempts targeting employees, automated scanning that disrupts service performance, and unauthorized data access or modifications. Require researchers to create their own test accounts and avoid interacting with data that doesn’t belong to them.
To streamline triage, use the CVSS (Common Vulnerability Scoring System) to classify reports by severity, from Low (0.1–3.9) to Critical (9.0–10.0).
Provide Safe Harbor and Legal Protections
Your policy should include a clear safe harbor statement. For example, you can state that research conducted in line with your VDP is considered "authorized" under laws such as the Computer Fraud and Abuse Act and the Digital Millennium Copyright Act. Define "good faith" behavior, emphasizing that it involves avoiding privacy violations, minimizing service disruptions, and promptly reporting issues without any intent of extortion.
"Legal threats don’t ‘scare off bad actors.’ It mostly scares off the helpful people and leaves you with the worst kind of silence." – Kioptrix
Additionally, include a clause that protects researchers from third-party legal actions. Commit to advocating for their "authorized" status if a vendor or partner raises concerns. This fosters trust and encourages researchers to continue reporting responsibly.
Publish Your Policy
Once your scope and legal protections are set, make the policy public. Host it on a dedicated webpage, written in plain, easy-to-understand language. Avoid heavy legal jargon and use specific timelines, like "acknowledgment within 2 business days", instead of vague phrases like "as soon as possible."
Follow the security.txt standard (RFC 9116) by placing a machine-readable file at:
https://yourdomain.com/.well-known/security.txt This file should include your contact information (e.g., security@company.com), a link to your full VDP, and an expiration date. This helps researchers and automated tools quickly locate your policy and contact details.
A clear, public-facing policy not only streamlines reporting but also supports automated workflows for handling vulnerabilities. If you’re working toward ISO 27001 compliance, consider adding a whistleblowing section for anonymous reporting of internal security violations. This demonstrates strong governance and aligns with regulatory expectations.
Step 2: Set Up Secure Reporting Channels
Creating a secure and straightforward way for researchers to submit their findings is essential. Once your Vulnerability Disclosure Program (VDP) is live, this step ensures that every report is handled efficiently and securely. A good submission process balances ease of use with strong data protection. An effective intake form captures all the necessary details upfront, while automation helps build trust by acknowledging submissions quickly and reducing the risk of premature public disclosures.
Choose the Right Submission Method
Start with a dedicated security@yourdomain.com email address. It’s simple, doesn’t require account setup, and is accessible. To address encryption concerns, include a PGP key in your security.txt file. This allows researchers to encrypt sensitive details before sharing them.
For organizations dealing with a high volume of reports, structured web forms or secure portals can be game-changers. Platforms like Bugcrowd and HackerOne offer managed triage, safe harbor language, and access to experienced researchers. These platforms also boast quick response times, with a median first reply of around 5.4 hours [3]. If your codebase is hosted on GitHub, enabling Private Vulnerability Reporting (PVR) can keep discussions private and streamline patch development within your existing workflow.
"Security issues aren’t just another bug. They can be a blueprint for attackers if exposed too soon." – Nancy Gariché [7]
Make sure your security.txt file is accessible at /.well-known/security.txt. This file should list all active reporting channels, making it easy for researchers and automated scanners to find your contact information [9][1].
Once your secure channel is in place, focus on creating a system to gather detailed and actionable reports.
Design an Effective Intake Form
Your intake form should collect the essentials: vulnerability type (e.g., SQL injection, cross-site scripting), affected URL or software version, clear reproduction steps, and an impact assessment that explains what data or access could be compromised. To speed up the validation process, ask for supporting evidence like HTTP requests, screenshots, or proof-of-concept code [11][3].
Using the OpenSSF vulnerability reporting template is a great way to standardize submissions. This template guides researchers through the required fields, reducing ambiguity and minimizing follow-up questions. Include a checkbox for researchers to confirm they haven’t shared the report with third parties, and remind them to redact any personal or customer information from logs or screenshots before submitting [11][12].
You can also request a preliminary CVSS score (on a 0–10 scale) from researchers. While your security team will ultimately determine the severity, this initial score provides insight into the researcher’s perspective on urgency and helps set expectations for response times [2].
Collecting detailed reports is just the first step – acknowledging submissions promptly is equally important.
Automate Acknowledgment and Notifications
Set up an automated system to send a 24-hour acknowledgment for every report. Include a unique ticket ID and a clear follow-up window (e.g., "We’ll provide an initial assessment within 3 business days"). For context, 95.5% of vulnerabilities reported to Google Project Zero are resolved within the standard 90-day disclosure window [2].
Use professional and neutral language in your responses. Avoid admitting liability or making promises you can’t fulfill. Immediately route reports to a dedicated security team or shared inbox to ensure they’re prioritized appropriately, rather than being grouped with standard bug reports [9][1].
Modern AI-based support tools can help streamline this process. They can classify reports by severity, attach relevant documentation, and notify the right team members. This ensures no report is overlooked, even during high-traffic periods or holidays.
Step 3: Triage and Prioritize Vulnerability Reports
When handling vulnerability reports, having a clear system to prioritize critical threats over lower-risk findings is essential. Without a structured triage process, reports can quickly pile up, critical issues might slip through the cracks, and trust from researchers could erode. A well-organized approach ensures that reports are reviewed by the right people, severity is assessed consistently, and your team focuses on the most pressing issues. This builds on your secure reporting channels and policy framework, creating a smooth process from submission to resolution.
Assign Triage Ownership
Start by assigning a dedicated Vulnerability Management Team (VMT) to handle incoming reports. For larger SaaS vendors, this team often includes 3–7 members with expertise in security, engineering, and program management [10]. Smaller teams can divide these responsibilities among core maintainers, but it’s critical to assign a specific individual to each report. This avoids situations where reports are overlooked or forgotten [1].
Once a report is validated, assign a remediation owner – typically a product or infrastructure lead – and establish clear SLAs based on the severity of the issue.
"By alerting you to an issue, they [reporters] have done your project a massive favor."
– Google Open Source Programs Office [10]
Assigning ownership early ensures that reports are handled efficiently and that the severity of each issue is addressed promptly.
Classify Severity and Prioritize
To assess severity, use the Common Vulnerability Scoring System (CVSS), which provides a numerical score (0 to 10) for each report [6]. Here’s a quick breakdown:
- Critical (9.0–10.0): Issues like unauthenticated remote code execution, large-scale data breaches, or full system takeovers.
- High (7.0–8.9): Problems such as significant unauthorized access or privilege escalation affecting many users.
- Medium (4.0–6.9): Vulnerabilities requiring specific conditions or having moderate impact.
- Low (0.1–3.9): Issues with minimal impact or limited exploitability.
To confirm the validity of technical claims, reproduce the exploit in a sandbox environment. This step helps eliminate false positives and ensures the report is actionable [6][8]. Key factors to consider include whether authentication is required, the scope of exposed data, the number of affected users, and the complexity of exploitation.
Efficient programs aim to acknowledge reports within 24 hours and complete triage for critical issues within 48–72 hours [6][8].
Use AI for Triage Efficiency
AI tools can significantly streamline the triage process. By automating repetitive tasks, AI allows your security team to focus on complex analyses. In October 2026, Yogosha tested an automated "Triage Assistant" using private AI agents. The results were impressive: a 99% detection rate for out-of-scope reports and 100% accuracy in identifying duplicates [13].
"Manual verification of scopes and duplicates took up a significant part of our time. This tool allowed us to automate these basic checks. Now, we can immediately dedicate ourselves to technical expertise, with much more fluid decision-making."
– Mohamed Foudhaili, Yogosha’s Cyber Team [13]
AI systems can compare new reports against historical data to flag duplicates automatically [6]. They also correlate CVSS scores with real-time threat intelligence – like active exploit trends or discussions on the dark web – to prioritize vulnerabilities that require immediate attention [14][15]. Additionally, AI-generated evidence packs help reduce false positives to less than 1%, ensuring your team only reviews actionable reports [3].
For teams juggling vulnerability reports alongside customer cases, AI-native platforms can route submissions to the right team members, attach relevant documentation, and track resolution progress automatically. This ensures no report is missed, even during busy periods. With AI-driven triage, your team is better prepared to move seamlessly into remediation planning.
Step 4: Create a Remediation and Communication Plan
Once you’ve prioritized vulnerabilities, the next step is to set clear timelines for addressing them and establish a communication process that keeps everyone in the loop. This ensures vulnerabilities are resolved efficiently while maintaining trust with researchers. Without a structured approach to fixing issues and sharing updates, researchers might feel ignored and decide to disclose vulnerabilities publicly, which could be damaging.
Set Remediation Timelines
Your remediation efforts need to align with the standard 90-day disclosure window, balancing the urgency of the fix with the time required to develop a reliable patch. The severity of the vulnerability should dictate your response speed:
- Critical issues (CVSS 9.0–10.0): For risks like unauthenticated remote code execution or major data exposure, aim to release an emergency patch within days.
- Other vulnerabilities: Address these during your usual release cycle unless they pose an immediate threat.
If fixing a vulnerability involves complex changes – such as reworking architecture or dealing with third-party dependencies – be upfront with the researcher. Let them know about the challenges and request additional time if necessary. Most researchers are understanding as long as they see progress being made.
Before rolling out a patch, test the fix in a sandbox environment to ensure the vulnerability is completely resolved [3]. Once deployed, ask the researcher to verify the fix in a staging environment before moving forward with public disclosure [9]. Setting realistic remediation schedules is important, but keeping researchers informed is equally critical.
Communicate with Researchers
Clear and regular communication is the backbone of the remediation process. Keeping researchers updated not only builds trust but also ensures smoother collaboration. Use templated responses for different stages of the process – acknowledgment, validation, fix-in-progress, and resolution. For instance, your acknowledgment message might say:
"Thank you for your report. We’ve received your submission and our security team is reviewing it. We’ll provide an update within 48–72 hours."
Even if there’s no major progress, update researchers weekly. A simple message like "We’re still working on the fix and will have an update by [date]" reassures them that the issue is being addressed.
"A quick update keeps researchers engaged and makes collaboration smoother."
– Nancy Gariché, GitHub [7]
Always maintain professional and respectful communication. Avoid any language that could be interpreted as a legal threat, as this can lead to public hostility and damage your reputation.
Coordinate Disclosure Dates
Effective communication lays the groundwork for coordinating disclosure dates. The goal is to synchronize the public announcement of the vulnerability with the release of the patch. Work with the researcher to ensure that public disclosure happens at the right time. Ideally, request a brief delay – usually about a week – after the patch is deployed. This gives users time to apply the update before detailed exploit information becomes available [9].
When drafting the security advisory, collaborate with the researcher and credit their contribution. Public acknowledgment, such as listing them in a Hall of Fame, goes a long way in fostering goodwill. For vulnerabilities with a wide impact, secure a Common Vulnerabilities and Exposures (CVE) identifier for standardized tracking.
If your SaaS product involves a large partner network, consider maintaining a "read-only" embargo list. This allows key partners to prepare for the patch 3–30 days before public disclosure [10]. Use tools like draft advisories or private forks to develop and test fixes discreetly, reducing the risk of alerting threat actors prematurely.
Step 5: Monitor, Improve, and Scale Your Workflow
Once you’ve started addressing vulnerabilities, it’s crucial to keep refining your approach. A disclosure workflow needs to adapt as new threats emerge and your SaaS platform evolves. Without constant monitoring and updates, even a well-structured process can become inefficient. By tracking key metrics, conducting regular reviews, and automating repetitive tasks, you can ensure your workflow remains effective and capable of growing with your organization.
Track Key Metrics
Metrics are the backbone of an efficient workflow. They help you measure performance and identify areas for improvement. Some of the most important ones to track include:
- Time-to-first-acknowledgment: This shows researchers you take their reports seriously. Industry benchmarks suggest this should be under 24 hours, with high-performing teams averaging 5.4 hours [3].
- Time-to-triage: This measures how quickly you categorize and prioritize reports. Critical issues should be triaged within 24 hours, high-priority ones in 72 hours, and medium-priority ones within seven days [4].
- Time-to-patch (MTTR): Ideally, vulnerabilities should be patched within 90 days. Leading teams, however, achieve this in just 48 hours [2][3].
- False positive rates: Keeping this below 1% ensures your team isn’t wasting time on irrelevant issues [3].
Beyond these, monitor the percentage of accepted reports versus false positives and the number of duplicate reports. A high rate of duplicates might indicate unclear policy guidelines [4].
Another often-overlooked metric is researcher satisfaction. If researchers feel undervalued or ignored, they might disclose vulnerabilities publicly or stop reporting to you altogether. For instance, GitGuardian‘s research team disclosed critical secret leaks to over 30 companies in late 2025 and early 2026, but only 50–60% of these disclosures were properly addressed [5].
| Metric | Industry Standard | High-Performance (Automated) |
|---|---|---|
| Time-to-First-Response | < 24 hours [2] | 5.4 hours [3] |
| Time-to-Triage | 72 hours (High) [4] | 12 hours [3] |
| Time-to-Patch (MTTR) | < 90 days [2] | 48 hours [3] |
| False Positive Rate | Varies | < 1% [3] |
Regularly reviewing these metrics will help you identify gaps and refine your process.
Conduct Regular Reviews
While metrics highlight what’s happening, reviews help you understand the why and how behind the numbers. Schedule quarterly reviews of your workflow to ensure it aligns with current regulations like GDPR and notification requirements such as NIS2 [6]. Use these sessions to confirm that your published security.txt has up-to-date contact details.
Tabletop exercises are another valuable tool. They simulate emergency scenarios, helping you uncover communication gaps and test your response plans [5]. After resolving a vulnerability, conduct a postmortem to find root causes, refine test cases, and update your policies [6]. Collaborating with researchers during this process – by providing resolution summaries and coordinating disclosure timing – can strengthen your relationships with them.
For newer programs, consider running a Vulnerability Disclosure Program (VDP) for 6–12 months before transitioning to a paid bug bounty program [2]. For example, Hypixel Studios introduced a high-reward model in late 2025, offering up to $25,000 for critical vulnerabilities. This approach attracted top-tier researchers and revealed deeper systemic issues that lower incentives had failed to surface [6].
Once you’ve established a strong review process, it’s time to automate where possible.
Automate for Scalability
As your program grows, manually handling every report becomes impractical. Automation helps you scale without needing additional staff. Start by automating acknowledgment responses. These can include a ticket ID and an estimated timeline, typically within 24–48 hours [2][16]. This not only maintains researcher trust but also frees up your team to focus on validation and remediation.
AI can be a game-changer for triage. AI-driven tools can cut first-pass triage time by 40–60% for common vulnerabilities [4]. For instance, in May 2026, Bugb introduced its "AI Security Workbench", Bravos. This system achieved a 5.4-hour median first-response time, kept false positives below 1%, and generated artifacts like DisclosureReport.pdf and PoC_Template.yaml to speed up engineering fixes [3].
To streamline operations further, integrate your report intake with tools like Jira or GitHub using webhooks. This ensures vulnerabilities are tracked alongside regular development tasks [16]. Additionally, maintain a rotating triage roster within your Security Operations Center (SOC) to ensure automated alerts are promptly reviewed by a human [16]. Modern AI platforms can also provide ticket summaries, case histories, and workflow automation, blending vulnerability management seamlessly with your existing processes.
"Boring, in security, is a compliment."
– Kioptrix [1]
Conclusion: Building Trust Through Responsible Disclosure
A well-designed responsible disclosure workflow is key to building trust. It creates an environment where security researchers feel safe reporting vulnerabilities, free from legal concerns, while customers appreciate the transparency. This combination lays the groundwork for credibility, setting your SaaS platform apart from competitors.
Key Takeaways
The five steps outlined in this guide form a strong framework for effective disclosure:
- Publish a clear policy that includes safe harbor protections.
- Establish secure reporting channels using tools like
security.txt. - Triage reports efficiently with the help of AI.
- Communicate transparently throughout the remediation process.
- Continuously improve by using metrics and automation.
These steps are interconnected. For example, a well-written policy is meaningless if reports are mishandled, and swift triage efforts lose their impact without clear communication to researchers.
"Boring, in security, is a compliment. A VDP… turns ‘random inbound chaos’ into a boring, fixable queue." – Kioptrix [1]
Data supports this approach: proactive reporting leads to faster fixes, while hiding vulnerabilities only increases reputational risks. Following these practices ensures your SaaS platform remains secure, ethical, and efficient.
How Modern B2B Support Platforms Help
Implementing these best practices is easier with the right tools. Modern B2B support platforms can streamline your disclosure workflow, ensuring security reports are handled with the care they require. For instance, platforms like Supportbench provide specialized triage workflows that include AI-powered routing, automated acknowledgments, and secure evidence handling. These features ensure that security reports are never lost among routine customer inquiries.
Such platforms also offer tools like reproduction steps, MITRE impact mapping, and sanitized artifacts, delivering well-structured reports directly to your engineering team. With AI-driven solutions, platforms can achieve impressive results, such as reducing median first response times to 5.4 hours and lowering false positives to below 1% [3]. Integrations with Slack and Teams further enhance real-time collaboration, enabling your security team to manage vulnerabilities in a structured, scalable, and measurable way.
FAQs
What should my VDP safe harbor statement include?
A VDP safe harbor statement serves as a protective framework for both researchers and your company. It should clearly outline confidentiality for submitted reports, ensuring that any details shared remain secure. Additionally, it’s important to define the scope of testing, so researchers know the boundaries they must respect.
The statement should also guarantee that no legal action will be taken against researchers who adhere to the policy. This helps foster collaboration and trust. To further safeguard systems and individuals, include expectations that researchers must avoid privacy violations and system disruptions during their work.
Lastly, committing to respond to reports within a reasonable timeframe demonstrates accountability and helps maintain a positive relationship with the research community. These guidelines ensure clarity, trust, and mutual respect in vulnerability disclosure programs.
How do I handle vulnerability reports that include customer data?
Handling reports involving customer data demands a careful and secure approach. First, acknowledge the report quickly and evaluate the severity of the vulnerability. Access to such reports should be restricted to authorized personnel only to ensure data remains secure.
Follow your security policies to safeguard customer information and maintain strict confidentiality throughout the process. If there’s any uncertainty, work with the researcher to clarify the scope of the report. Lastly, ensure your Vulnerability Disclosure Policy (VDP) clearly outlines how sensitive data is handled. This helps maintain both compliance and trust.
Which metrics best show if our disclosure workflow is improving?
To gauge how well your responsible disclosure process is working, focus on these key metrics:
- Average response time: Track how quickly you acknowledge and evaluate vulnerability reports. A faster response shows you’re attentive and organized.
- Time to resolution: Measure how long it takes to fix reported vulnerabilities. The quicker, the better for security and trust.
- Vulnerabilities mitigated: Keep an eye on the total number of vulnerabilities resolved over time. This reflects your team’s ability to address issues effectively.
Also, pay attention to:
- Report volume: Monitor how many reports you receive. An increase might indicate better outreach or a growing security focus.
- Fix confirmation rate: Calculate the percentage of reports that lead to confirmed fixes. A high rate suggests efficient handling of valid reports.
- Researcher satisfaction: Gather feedback from security researchers to ensure they’re having a positive experience. Their input can highlight areas for improvement.
By keeping an eye on these metrics, you can spot inefficiencies, track progress, and refine your approach to managing disclosures responsibly.