Portal announcements are vital for keeping customers informed during incidents or maintenance. They appear as banners or messages on your customer portal, ensuring everyone sees critical updates like outages or planned downtimes. This reduces confusion and prevents support teams from being overwhelmed with repetitive inquiries.
Key Takeaways:
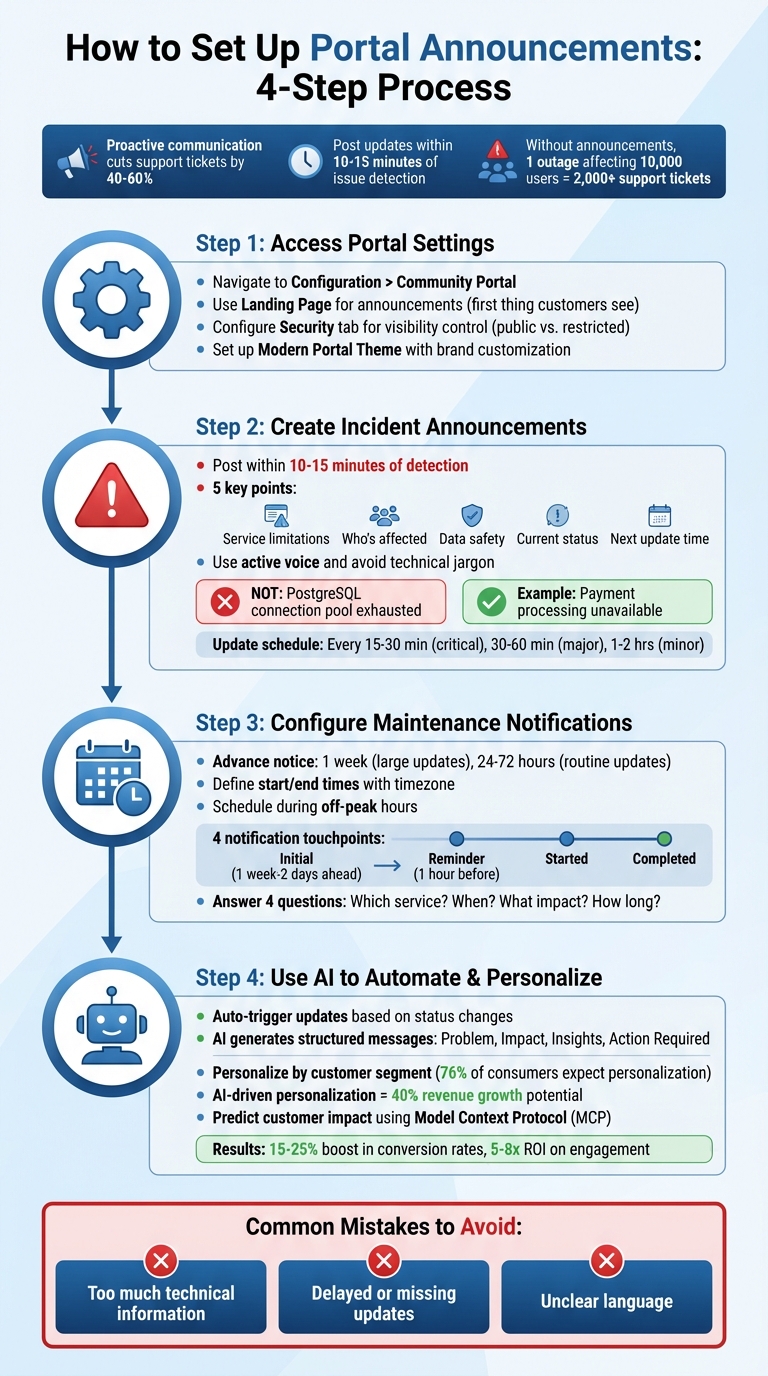
- Why it matters: Timely announcements can cut support tickets by 40-60% and help maintain customer trust during disruptions.
- Where to start: Use your portal’s configuration settings to create banners for incidents or maintenance. Customize visibility, design, and content to match your brand.
- Best practices: Post updates quickly (within 10-15 minutes of issue detection) and keep them clear, concise, and jargon-free.
- AI tools: Automate updates, personalize messages for different user groups, and predict customer impact for faster, more accurate communication.
Clear and proactive communication during disruptions builds trust and keeps customers informed without overloading support teams.
4-Step Process for Setting Up Portal Announcements for Incidents and Maintenance
Step 1: Access Portal Announcement Settings in Supportbench
Where to Find Portal Announcement Settings
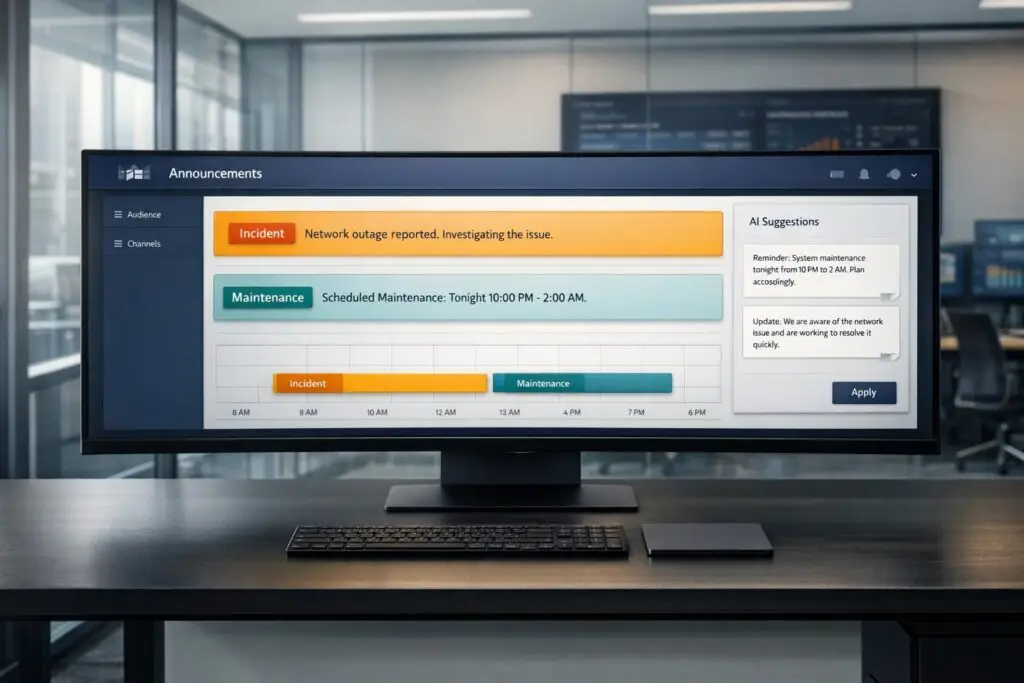
In Supportbench, portal announcements are managed through the Community Portal section of your dashboard. To get started, head to the Configuration menu on your main dashboard. From there, you’ll find the Community Portal settings, which house all the tools you need for managing announcements. No technical skills are required to navigate this.
The Landing Page is your primary spot for incident and maintenance announcements. Since this is the first thing customers see when they log in, it’s the perfect place to make key updates highly visible. You can also use the Security tab to control who can view these announcements – whether it’s specific Divisions or a choice between public and restricted access.
Once you’ve located these settings, you can customize them to align with your brand and tailor them to your audience.
Configuration Options Overview
Supportbench provides various configuration tools to ensure your announcements are both effective and on-brand. Start by selecting the Modern Portal Theme in the portal setup. This theme offers a customizable layout where you can add your company’s logo, brand colors, and contact details via the Customization tab. This helps make your announcements feel like a natural extension of your organization.
The Security tab plays a key role in managing visibility. You can designate containers (which hold your announcement content) as either public or private. For incident reporting, navigate to Configuration > Cases > Policy > New Policy and set the "Type / Location" to "Community / portal open." This ensures the portal is ready to handle new incident submissions seamlessly. To make the process smoother for customers, use the Fields to show and Required Fields options to display only the most essential fields – this minimizes friction, especially during urgent situations.
The Page Header configuration applies across all portal pages, making it a great place to include navigation links or login buttons. Additionally, the Page information section allows you to add meta tags and descriptions, which can improve SEO and help users find relevant information more easily.
sbb-itb-e60d259
Step 2: Create and Manage Incident Announcements
How to Set Up Incident Announcements
When an outage occurs, aim to post an announcement within 10–15 minutes of detection [3][5]. A quick acknowledgment helps prevent an influx of support tickets, as research shows proactive communication can cut support ticket volume by 40% to 60% [3].
On the Community Portal’s Landing Page, craft a message that clearly outlines the customer impact. Be sure to cover these five key points: service limitations, who is affected, data safety, current status, and when the next update will be shared [3][2]. For example, instead of a technical phrase like "PostgreSQL connection pool exhausted", opt for something more customer-focused, such as "Payment processing is currently unavailable" [3][5].
Adjust the visibility of your announcement to target either all users or specific Divisions, depending on the situation. Once the message is live, stick to a consistent update schedule based on the severity of the issue. Even if there’s no new information, posting regular updates reassures customers that the issue is being actively addressed [2].
Finally, review your announcement to ensure it’s clear and offers actionable guidance to your audience.
Writing Clear Incident Messages
When drafting incident messages, keep the language simple and easy for customers to understand. Avoid technical jargon and focus on what matters most to the reader. Use active voice to show accountability (e.g., "We are working to resolve the issue") [3]. Address concerns about data safety upfront, as this is often a top priority for customers during outages [3][2].
"Customers remember how you communicated during outages more than they remember the outages themselves." – Upstat.io [3]
Make your messages concise and easy to skim. If there’s a workaround, include it so customers can remain productive while you work on the fix [4]. Always end your updates with a specific time for the next communication. For instance: "Our next update will be posted by 3:30 PM EST, or sooner if the issue is resolved." This approach helps set clear expectations and reduces the likelihood of customers refreshing your status page or submitting duplicate tickets.
Step 3: Configure Maintenance Window Announcements
How to Set Up Maintenance Notifications
Planning maintenance? It’s your chance to communicate proactively and avoid surprises. For large-scale system updates, give at least a week’s notice. For smaller, routine updates, 24 to 72 hours is usually enough [5][9][10].
In Supportbench, you can easily set up a maintenance window by defining the start and end times, including the timezone [8]. Clearly specify which services or components will be affected so customers understand the scope [7][8]. The system takes care of the rest – automatically marking the window as "In Progress" when it begins and "Completed" when it ends. If maintenance wraps up early, you can manually close it ahead of schedule [7][8].
Timing is everything. Schedule maintenance during off-peak hours to minimize disruption. For global businesses, focus on the time zones with the fewest active users [9][10]. When notifying customers, use multiple touchpoints: an initial announcement (one week to two days ahead), a reminder an hour before, a "started" notification, and a final update when the maintenance is complete [9][10].
"Customers forgive downtime. They do not forgive surprise." – Nikola Stojković, StatusPage.me [5]
What to Include in Maintenance Messages
Your maintenance message should answer four key questions right away: Which service is impacted? When will it happen? What will customers experience? How long will it last? [7][8]. This clarity helps customers understand what’s happening and how it affects them. Avoid vague terms like "our systems" – be specific, such as "Billing Dashboard" or "API v2 endpoints."
Explain the impact in simple terms. Will users lose full access? Will performance be slower? Will the system be read-only? If there are workarounds, mention them so customers can plan ahead. Be realistic with time estimates – it’s better to underpromise and overdeliver than to frustrate users with delays [10].
Keep your messages concise and easy to understand. Supportbench’s rich text formatting lets you include helpful links to knowledge base articles or additional documentation [1]. For major maintenance, consider displaying the announcement as a banner on your customer portal to grab attention [1]. Subscribers will also get an automated email notification when you publish the maintenance window, so choose a clear and descriptive event name – it becomes the email subject line [7][8].
Step 4: Use AI to Automate and Personalize Announcements
Automate Updates for Faster Incident Communication
Relying on manual updates slows down incident communication. With Supportbench’s AI agents, updates are triggered automatically whenever there are changes in status, urgency, or priority [11]. The AI pulls metadata from tools like GitHub to create detailed and consistent updates [11]. Each message follows a structured format: Problem, Impact, Insights, and Action Required [11]. Once generated, the AI updates the internal incident record and shares the content across platforms like your portal homepage or external tools such as Slack [11][6].
You can even set up specific "Slack Output Rules" to customize the format of these updates. For example, you can use emojis to highlight sections or bold text for emphasis, eliminating the need for manual tweaks [11]. This automation not only speeds up communication but also sets the stage for a more tailored customer experience.
Personalize Notifications by Customer Segment
Automation is just the start – personalization takes incident communication to the next level. Research shows that 76% of consumers feel frustrated when interactions aren’t personalized [14]. Companies that embrace hyper-personalization can see up to 40% revenue growth compared to slower competitors [14]. Supportbench allows you to craft announcements specifically for different customer segments, targeting users based on their roles or the services they rely on [6].
Dynamic segmentation makes this even more effective. Instead of relying on static lists, segments can update in real time based on customer behavior or status changes [12][13]. AI can also rank customers by their likelihood to churn or the severity of an incident’s impact on them, enabling you to prioritize messaging accordingly [12][14]. For example, the AI can create tailored announcement versions – technical summaries for developers or broad impact reports for executives – ensuring each audience gets the information they need [13][11]. Companies using AI-driven personalization often see a 15-25% boost in conversion rates and a 5-8x return on engagement investments [14].
Predict Customer Impact with AI
AI doesn’t just streamline communication; it also predicts customer impact, making messages even more precise. Guesswork about how incidents affect customers wastes time and erodes trust. Supportbench’s AI, powered by Model Context Protocol (MCP), analyzes related entities – services, deployments, incidents – across your software catalog to assess the scope of an issue [11]. By linking incident blueprints with repository and service data, the AI uses real-time metadata to forecast how incidents will affect customer-facing services [11].
The AI-generated updates highlight affected services and potential problems like delivery delays or uptime issues [11]. For example, by examining repository metadata, the AI can pinpoint that a recent deployment introduced new filtering logic, offering insights into the root cause [11]. You can also customize AI prompts to prioritize metrics that matter most to your audience, such as SLO breaches or latency increases, ensuring the predictions are both accurate and relevant [11].
Common Mistakes to Avoid with Portal Announcements
When setting up portal announcements, it’s crucial to steer clear of common errors that can undermine customer trust. Poorly handled announcements can lead to frustration and unnecessary work for support teams. On average, companies face 3 to 5 major service disruptions annually [3]. Without a proactive announcement, a single outage affecting 10,000 users can trigger over 2,000 support tickets [3]. Knowing what not to do is just as important as following best practices.
Including Too Much Information
Customers don’t need a deep dive into your system’s inner workings – they care about how the issue affects them. For instance, mentioning "PostgreSQL connection pool exhaustion" will leave most users scratching their heads [3][16]. What they need to know is whether they can log in, process payments, or access their data.
"Database connection pool exhaustion means nothing to customers. Login functionality temporarily unavailable communicates the same information in terms customers understand." – Upstat [16]
The solution? Simplify the language. Translate technical issues into clear, actionable updates. For example, instead of saying "Database replica lag exceeding threshold", say "Some users may see outdated data while we resolve a database issue" [2]. While technical details are essential for your internal team, your customers only need to know what’s working and what’s not.
Failing to Provide Timely Updates
Announcing a problem and then going silent is a quick way to lose customer trust. Without updates, customers might think you’ve stopped working on the issue – or worse, that you’re hiding something [3][2]. Timely communication reduces confusion and prevents a flood of support inquiries.
"A 30-minute outage with no communication can generate more support load than the engineering effort to fix it." – StatusRay [2]
Best practices suggest posting your first update within 10 to 15 minutes of identifying an issue [3][4]. After that, update regularly: every 15–30 minutes for critical incidents, 30–60 minutes for major degradations, and 1–2 hours for minor issues. Always include a time for the next update (e.g., "Next update by 2:30 PM EST") [2][5]. Even if there’s no new information, let customers know you’re still investigating. This keeps them informed and reduces unnecessary portal checks or support tickets.
A real-world example: On April 16, 2025, Zoom’s status page (status.zoom.us) went offline for two hours during a service disruption. The issue stemmed from a communication error between Zoom’s registrar and GoDaddy, which caused the removal of Name Server (NS) records at the Top-Level Domain (TLD) level. Because the status page was hosted as a subdomain of the primary domain, both became inaccessible at the same time [15]. The takeaway? Never host your announcement portal on the same infrastructure as your main application.
Using Technical or Unclear Language
Unclear or overly technical language can erode trust. If your service is completely down but your announcement refers to "intermittent issues" or a "minor disruption", customers may feel you’re downplaying the problem [5][16]. This creates a credibility gap that’s hard to repair.
"If your status page is slow, vague, or offline during incidents, it is not a status page. It is a decorative banner." – Nikola Stojković, StatusPage.me [5]
Use plain, straightforward language that anyone can understand. Stick to active voice to show accountability – for example, "We are implementing a fix" is clearer than "A fix is being implemented" [2]. Be honest about what you don’t know; it’s better to admit uncertainty than to set unrealistic expectations you can’t meet [2][3]. And always reassure customers that their data is secure, as this is often their top concern during outages [3].
| Technical Terms to Avoid | Plain Language (Use Instead) |
|---|---|
| "Database replica lag exceeding threshold" | "Some users may see outdated data while we resolve a database issue" [2] |
| "PostgreSQL connection pool exhaustion" | "Users cannot access their account data" [16] |
| "Deploying hotfix to production cluster" | "We’ve identified the cause and are rolling out a fix now" [2] |
| "Frontend rendering pipeline degraded" | "Some users cannot access their dashboards" [3] |
How to Write Effective Portal Announcements
When incidents occur, announcements need to deliver critical information quickly. Customers want to know what’s happening, how it affects them, and when it will be resolved. These tips build on principles of clear communication, tailored specifically for portal announcements.
Keep Messages Clear and Brief
Short updates are far more effective than long-winded explanations, especially during outages. Stick to 2 to 5 lines of text so the message remains easy to read, even on mobile devices [5]. Each update should cover four key points:
- Impact: What’s broken?
- Scope: Which regions or components are affected?
- Action: What steps are being taken?
- Next Update: When will there be more information?
For example, instead of a detailed technical breakdown, say: "Some requests are failing; we are investigating. Next update by 2:30 PM EST." This version skips unnecessary jargon and gives customers exactly what they need: clarity on the issue and the timeline for updates.
Address Customer Concerns Directly
During outages, customers care about three things: what they can’t do, whether their data is safe, and when service will return. Clearly confirm data safety whenever possible [17], and describe the issue in terms customers can relate to. For instance, instead of saying, "Our authentication server is down," say, "Login is unavailable."
If there’s a workaround, mention it briefly. For example: "Dashboard access is currently down. You can still process orders through the mobile app while we resolve the issue." Use active voice to emphasize action and accountability, such as: "We are implementing a fix."
Use Formatting to Improve Readability
Even with concise language, formatting plays a big role in making announcements easier to digest. Use bold text to highlight key times, dates, or affected features, and break down information with bullet points when listing multiple items. Clear headings and dividers can help customers quickly find what matters most.
Organize updates around customer-facing features like "Billing", "Dashboard", or "API", rather than using internal technical terms. This structure ensures the message resonates with customers, especially those accessing it on mobile devices. Pair these best practices with AI-driven summaries and KB article creation for even faster and more accurate announcements.
Conclusion
By following these steps, you can create effective portal announcements that keep your team aligned during critical situations. With the right settings and clear messaging, you’re able to keep customers informed without adding extra manual effort to your incident response process.
AI-powered tools, like Supportbench’s AI Copilot, take this a step further by turning reactive chaos into proactive, well-contextualized communication. The Copilot drafts announcements using case history, while automated summarization simplifies complex technical details into updates that are easy for customers to understand. This not only speeds up the process but also ensures clarity in every communication.
In addition to saving time, AI tools like sentiment analysis help identify which customer groups need immediate attention, and predictive CSAT scoring evaluates the potential impact of your announcements even before surveys are sent. Quality assurance features also review your messages for tone and empathy, ensuring they meet professional standards.
AI-assisted announcements streamline communication by reducing confusion and boosting productivity [19]. As Vrunda Gadesha points out:
"AI is turning maintenance workers into ‘data-driven strategists’ who can see the future of their equipment" [18].
The same concept applies to customer communication – AI empowers support teams to anticipate customer needs and address concerns before they escalate.
FAQs
What should I include in every incident announcement?
When an incident occurs, keeping customers informed is key to maintaining trust and reducing the strain on support teams. Here’s how to craft a clear and reliable incident announcement:
- Acknowledge the issue quickly: Even if you don’t have all the details yet, let customers know you’re aware of the problem.
- Share the current status: Provide an update on what’s happening, the steps being taken to address it, and, if possible, a timeline for resolution.
- Commit to regular updates: Keep communication flowing with updates every 30–60 minutes or as appropriate to the situation.
- Use clear and empathetic language: Avoid technical jargon and focus on being transparent while showing understanding of the customers’ concerns.
This approach ensures customers feel informed and valued, even during challenging situations.
How often should we post updates during an outage?
During an outage, it’s crucial to share updates within 10–15 minutes of identifying the problem. For major incidents, continue providing updates every 30–60 minutes. A steady rhythm, such as every 20–30 minutes, strikes the right balance – keeping customers informed without flooding your support channels. Regular updates and clear communication go a long way in maintaining trust and reducing the number of support inquiries.
How can AI personalize portal announcements by customer segment?
AI leverages customer data – like behavior, demographics, and past interactions – to divide users into specific segments. This allows support teams to send updates, maintenance notifications, or promotional messages tailored to each group. By ensuring communication is relevant and personalized, this approach boosts engagement and reduces potential misunderstandings, making announcements clearer and more customer-focused.