Migrating from Zendesk to a new help desk can be tricky, especially when it comes to mapping fields, tags, and ticket statuses. If done right, your workflows, reporting, and automations will remain intact. But mistakes – like misaligned statuses or carrying over unnecessary tags – can lead to broken workflows, inaccurate reports, and data cleanup headaches.
Key Takeaways:
- Audit Your Data: Export your Zendesk fields, tags, and statuses to identify outdated, duplicate, or unnecessary entries.
- Clean Before Migrating: Consolidate similar fields, remove redundant tags, and standardize inconsistent data.
- Plan Mapping Carefully: Convert key tags into structured fields for better reporting and workflows. Map statuses to align with your new system’s lifecycle.
- Test Thoroughly: Run a demo migration with sample tickets to catch errors in field mappings, automations, and SLA tracking.
A successful migration is all about preparation – spend 60% of your effort on planning and testing before moving any data. This ensures your team can hit the ground running without disruptions.
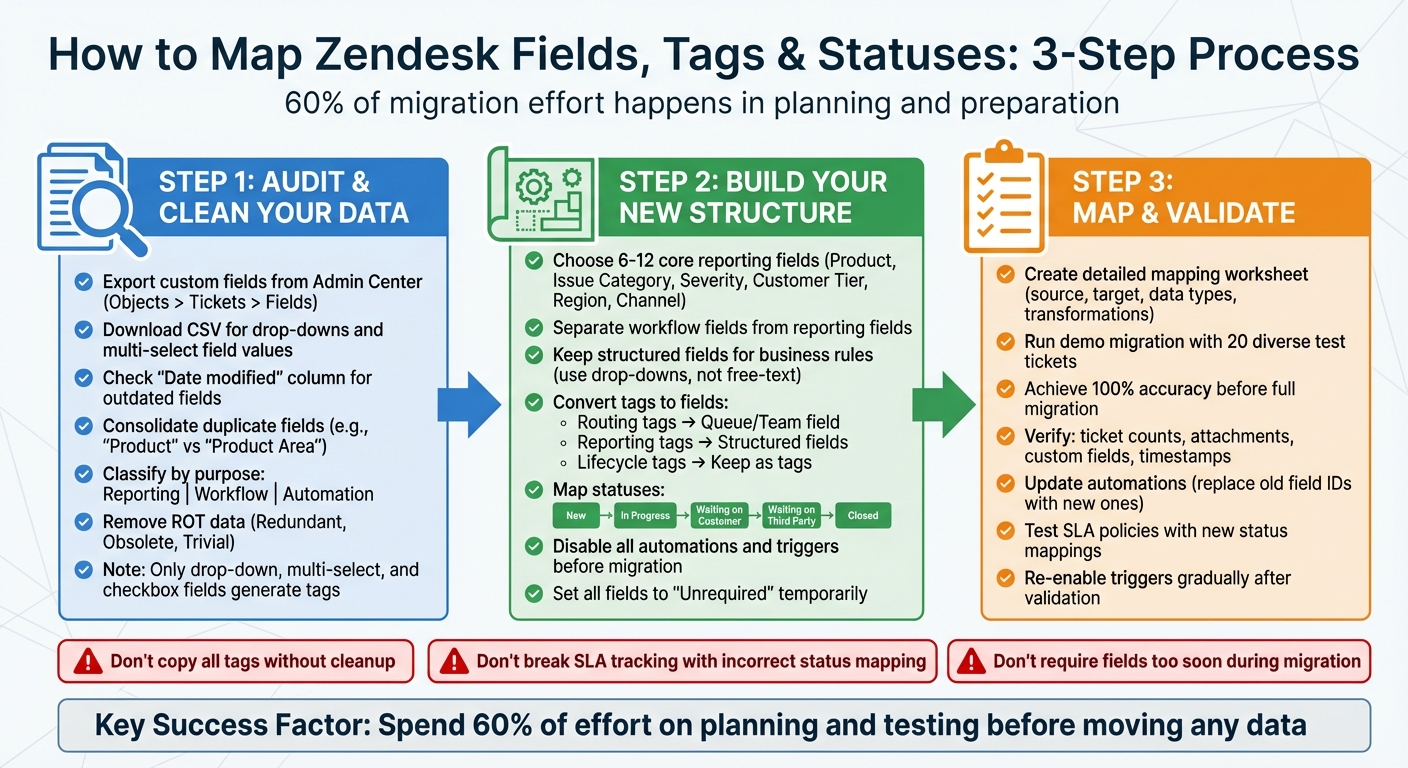
3-Step Zendesk Migration Mapping Process: Audit, Build, and Validate
Zendesk Data Model: What You’re Actually Mapping
Before diving into mapping, it’s essential to understand the structure you’re working with. Zendesk’s data model connects fields, forms, tags, and statuses, all of which play vital roles in ticket routing, automation, and reporting. Each element has a specific function that drives your workflows.
The Main Zendesk Elements You Need to Map
System fields are the default properties present on every ticket, such as Subject, Status, Priority, Assignee, and Requester. On the other hand, custom fields allow you to add specific data points to tickets, users, or organizations. These fields can take various formats, including text, multi-line text, date, integer, decimal, and regex. Keep in mind that each field type has its own capacity limits.
Ticket forms are collections of fields displayed to agents or customers. These forms dictate what information is captured at different stages or for various request types. When migrating data, these forms define the structure of your new system’s data entry interface. Mapping them accurately is critical to maintaining historical context and ensuring automation workflows remain intact.
Tags are the backbone of Zendesk’s functionality. Far from being simple labels, tags are often automatically generated by specific field types like drop-downs, checkboxes, and multi-select fields. These tags are essential for triggers, automations, macros, views, and reporting workflows.
How Tags and Statuses Work in Zendesk
Tags are integral to automation and reporting. For example, when an agent selects "Bug" from a drop-down field labeled "Issue Type", Zendesk automatically creates a tag such as issue_type_bug. Here’s the key takeaway: if you delete a tag-generating field like a drop-down, the tag data remains on the ticket. However, if you delete a text field, that data is permanently lost.
"If you delete a custom field, the data… is not preserved… The data is preserved only if the custom field also adds a tag to a ticket." – Zendesk Help
Statuses define a ticket’s lifecycle stages: New, Open, Pending, On-hold, Solved, and Closed. One crucial aspect to remember is that once a ticket reaches "Closed" or "Archived", it becomes unmodifiable. This limitation has significant implications for handling historical data during migration. Additionally, some system actions, such as triggers or API updates, can bypass "required to solve" field constraints. This means tickets can move to a Closed status without all mandatory fields being completed – a potential issue if your new system enforces stricter validation.
Understanding how these elements interact is crucial. Drop-down fields create tags, tags drive automations, automations update statuses, and statuses determine what actions are possible. If one part of this chain is disrupted during migration, the entire workflow can break down. With this foundation in place, it’s time to audit and clean your current setup before starting the mapping process.
Step 1: Audit and Clean Your Zendesk Data
Before diving into mapping, it’s essential to audit your current setup. Why? Because planning and preparation make up 60% of the total migration effort. Skipping this step could lead to workflow issues after the launch.
Export and Review Your Current Setup
Start by exporting all custom fields from the Admin Center. To do this, go to Objects and rules > Tickets > Fields for ticket fields, or People > Configuration for user and organization fields. Once there, click "Download CSV" to generate a file that includes critical details like display name, field type, field ID, date modified, and associated tags.
For drop-down and multi-select fields, take an extra step: click into each field and select "Download CSV" next to the field values section. This export contains specific options and their related tags. This step matters because only drop-down, multi-select, and checkbox fields generate tags, which are essential for triggers, automations, and views.
Pay close attention to the "Date modified" column in your exported data. Fields that haven’t been updated in a long time might be outdated and could be flagged for removal. Also, keep in mind that drop-down and multi-select fields can handle up to 2,000 values. If you’re nearing that limit, it could mean your data is overly complex or poorly organized.
Once you’ve exported your setup, you’re ready to tackle the next step.
Find and Fix Data Problems
With your CSV files in hand, it’s time to clean up any inconsistencies. Look for duplicate fields with slight variations, like "Product" versus "Product Area." These should be consolidated into a single field. Similarly, check tags for minimal usage and consider archiving ones that don’t add value.
Text and multi-line fields often require extra attention. For example, if a free-text field contains inconsistent entries like "High", "high", "H", and "Urgent", it’s a sign that the data should be converted into a structured format, such as a drop-down menu. Cleaning up these inconsistencies now will save headaches later.
Next, classify all fields and tags by their purpose: reporting, workflow, or automation. Fields used for reporting (e.g., "Product" or "Customer Tier") are crucial for historical analysis and should be retained. Workflow fields (e.g., "Escalation Reason") are vital for ticket routing and agent actions. Automation tags, like those applied by triggers, may not need to be migrated if you’re redesigning your automation logic. This classification helps you focus on what’s truly necessary and avoid cluttering your new system with irrelevant data.
Step 2: Build Your New Data Structure
Once you’ve completed your data audit, it’s time to design a structure that supports accurate reporting, efficient routing, and automation. A crucial step here is to distinguish between mapping and modeling: mapping moves data between systems, while modeling focuses on crafting the structure and relationships within your new environment.
Start by eliminating redundant, outdated, or trivial (ROT) data. This helps keep your new system clean and organized from day one. Identify duplicated data from upstream sources (like external databases) and re-import it directly from the original source instead of migrating outdated records.
Below, we’ll walk through how to set up core fields, reclassify tags, and map statuses effectively.
Choose Your Core Fields
Identify a concise set of core reporting fields that directly inform business decisions. These might include fields like product type, issue category, severity, customer tier, region, and channel. Keep this list tight – typically between 6 and 12 fields – to avoid overwhelming agents and to ensure clear, actionable reporting.
Separate workflow fields from reporting fields. Workflow fields, such as "Escalation Reason" or "Waiting On", help agents manage and route tickets but often change frequently. Reporting fields, like "Product" or "Customer Tier", are more stable and drive analytics. This distinction is critical because mixing the two can lead to confusion and inconsistent data.
Stick with structured fields for anything tied to business rules or reporting. In your old system, drop-downs, multi-selects, and checkboxes likely generated tags automatically. When transitioning to a new platform, keep these fields structured rather than converting them into free-text entries. For instance, if "Product Category" was a drop-down with options like "Mobile App", "Web Platform", and "API", it should remain a drop-down. Free-text entries introduce inconsistencies and disrupt reporting.
Wherever possible, use standard fields like "Name" and "External ID" instead of creating custom ones for basic record identification. Reserve custom fields for attributes that standard fields can’t capture.
Set field requirements thoughtfully. Use "Required to solve a ticket" for internal workflow fields and "Required to submit a request" for customer-facing fields. During migration, temporarily make all fields optional to avoid import errors caused by missing historical data.
| Legacy Data Type | New Field Type | Purpose |
|---|---|---|
| String with Enum / Drop-down | Drop-down | Reporting, routing, triggers |
| Boolean / Checkbox | Checkbox | Binary flags (e.g., "Escalated") |
| Integer | Integer | Numeric counts, IDs |
| Array / List | Multi-select or Text (CSV) | Multiple attributes (e.g., "Affected Services") |
Decide Which Tags Become Fields
Once you’ve defined your core fields, revisit your tags to decide which should remain tags and which should be converted into structured fields. Tags can be classified into three types: routing tags, lifecycle tags, and reporting tags.
- Routing tags: If you’re using tags like "tier2_escalation" or "billing_team" to route tickets, these should become a structured "Queue" or "Team" field. This change simplifies routing rules and makes them easier to maintain.
- Reporting tags: Tags used for tracking feature requests, product feedback, or churn risk should almost always be converted into structured fields for consistent reporting.
- Lifecycle tags: Temporary states or flags, like "waiting_on_customer" or "pending_vendor_response", can remain as tags since they don’t require historical reporting.
Map Statuses to a Standard Ticket Lifecycle
Status mapping is a critical step where many migrations encounter issues. Proper mapping ensures historical context and SLA integrity are preserved. Your old system’s statuses may not align perfectly with the new platform, and mismatches can disrupt SLAs, reporting, and notifications.
Adopt a standard ticket lifecycle that works for most support operations: New → In Progress → Waiting on Customer → Waiting on Third Party → Resolved → Closed. This structure is often clearer than default setups, which may conflate "Open" with both "Assigned" and "In Progress."
Map your old statuses carefully. For instance, "Pending" and "On-hold" often have different meanings across systems. In some platforms, "Pending" pauses SLAs while waiting for a customer response, whereas "On-hold" indicates internal action is required. Clarify these distinctions before proceeding.
Pay close attention to "Solved" versus "Closed." In many systems, tickets marked as "Solved" are automatically transitioned to "Closed" after a set period (e.g., 28 days) and archived later (e.g., 120 days). If your new platform lacks this automation, you’ll need to create it manually to maintain visibility into resolved tickets.
Before migrating, disable all automations and triggers in your new system. If disabling isn’t possible, apply a specific tag (e.g., migrated_data) to incoming tickets and update your business rules to exclude these tickets.
Temporarily remove field requirements by setting all fields to "Unrequired" and disabling regex validations. This ensures tickets can be created in their correct historical statuses without validation errors. Once migration is complete, you can re-enable these requirements.
Assign a "default agent" for tickets originally assigned to inactive or deleted users. This keeps each ticket tied to a valid owner and ensures your audit trail remains intact.
"Around 60% of the migration effort happens before the data transfer begins." – Help Desk Migration
Test your status mapping with a sample of tickets to confirm that SLA timers, status labels, and reporting are functioning as expected. If issues arise, adjust your mappings and test again until everything aligns.
sbb-itb-e60d259
Step 3: Map and Validate Before Go-Live
Carefully document every mapping decision and test with actual data to minimize the risk of migration issues. This step ensures your reports remain accurate and workflows function smoothly after the migration.
Document Your Mappings in a Worksheet
Develop a detailed mapping worksheet to act as your go-to reference during the migration. This should include columns for the source and target entities, data types, transformation rules, and any dependencies.
Pay special attention to fields that generate tags. Dropdowns, multi-selects, and checkboxes in your old system often create tags that need to be mapped to equivalent properties in the new system.
Don’t forget to address agent and user mappings. For inactive or deleted agents, map them to a "default agent" in the new system. This step helps maintain ticket associations and keeps your audit trail intact. For complex migrations, track how legacy record IDs correspond to new system IDs. This is crucial for maintaining relationships between tickets, users, and organizations.
Before you start documenting every field, weed out Redundant, Obsolete, or Trivial (ROT) data. Excluding unnecessary data from your worksheet will streamline the process and keep your focus on critical information.
Once your worksheet is complete, validate your mappings using real-world data.
Run Tests with Real Tickets
Start by performing a demo migration with a small, diverse batch of 20 tickets. Select tickets that include multiple attachments, custom field values, various requester types, and edge cases. This ensures your mappings can handle real-world complexities.
After running the demo, review the dashboard results to see which records migrated successfully, failed, or were skipped. Download these reports to identify and fix any errors. Check that tickets are linked to the correct agents, customers, and organizations. Confirm that custom field values, labels, and comment authors are accurate. Also, ensure attachments are intact and timestamps align with expectations. Continue refining your demo migration until you achieve 100% accuracy.
Keep in mind that roughly 60% of the total migration effort happens during the planning and preparation phase, even before transferring any data.
Update and Test Automations
Once your data mapping is accurate, update your automations to reflect the changes. Business rules often depend on tags generated by custom fields. If these tags or field values are altered during migration, the rules may not work as intended. Review all macros and automated notifications for hardcoded field IDs (e.g., {{ticket.ticket_field_ID}}) and replace them with the new system’s IDs.
Create a cross-reference sheet to match old tags with their equivalents in the new system. This ensures trigger conditions remain functional. Filtering logic for ticket views, which often relies on custom field values, tags, or statuses, should also be re-validated to ensure agents can access the correct ticket queues.
SLA policies, which are usually tied to ticket statuses and priorities, need special attention. If your status mappings change, SLA timers might not trigger or pause correctly. Test the entire lifecycle of a ticket to confirm SLA timers function properly with your new mappings. For example, manually solving a test ticket via a trigger can help ensure the system’s backend rules handle "Required" field logic as expected.
Before testing, disable all triggers, automations, and SLA policies in the target system. Temporarily set mandatory fields to "unrequired" to avoid migration errors caused by missing values in legacy records. Additionally, ask both your source and target help desk providers to temporarily increase API limits. This can help speed up testing and the final migration stages.
Common Migration Mistakes and How to Fix Them
When migrating systems, even the best-laid plans can run into trouble. Mistakes during migration not only disrupt workflows but can also skew reporting. Here’s a look at some common pitfalls and how to sidestep them.
Copying Every Tag Without Cleaning Up First
Carrying over all historical tags into your new system might seem harmless, but it can lead to chaos. Many help desk platforms automatically generate tags for drop-downs, checkboxes, and multi-select fields. Even after these fields are deleted, the tags often stick around. Over the years, this can result in thousands of outdated tags cluttering your system.
The real issue arises when these legacy tags interfere with your new automation setup. Imported tickets with specific tags can accidentally trigger automations, sending customers unintended notifications or misrouting tickets. Instead of copying everything, filter out unnecessary tags. Exclude tags tied to spam tickets, resolved conversations older than a certain timeframe, or fields that no longer exist.
To keep things organized, classify tags by their function – whether they’re used for routing, lifecycle management, reporting, or automation. Archive any tags that don’t serve a clear purpose. This cleanup should happen during the planning phase, long before moving data. Once tags are sorted, it’s time to tackle another common issue: status mismatches that disrupt SLA tracking.
Breaking SLA Tracking with Status Changes
Incorrectly mapping ticket statuses can wreak havoc on your SLA tracking. In most systems, SLA timers are tied to specific statuses, pausing and resuming based on where the ticket is in its lifecycle. For instance, Requester Wait Time pauses when a ticket is marked as "Pending", while Agent Work Time pauses when a ticket is "Pending" or "On-hold". If you mistakenly map a "Pending" status to "Open", the SLA clock keeps running, leading to false breach notifications and unreliable performance data.
"The ‘clock’ on your SLAs… do not run all the time. Instead they’re tied to specific ticket statuses." – Thomas Hils, Swifteq
To avoid this, double-check your status mappings and ensure the default Priority field aligns with your SLA policies. Test the entire ticket lifecycle in the new system, and temporarily disable automations to ensure SLA timers function as expected. Once SLA tracking is sorted, turn your attention to field requirements to prevent data loss during migration.
Requiring Fields Too Soon
Setting custom fields as "required" too early can lead to import failures and data loss. If the target system encounters tickets without values for required fields, it might skip those records or throw errors that halt the migration process. This is especially an issue with older data, where field requirements may have changed or weren’t consistently enforced.
To prevent this, set all custom fields to "Unrequired" during the migration. Once you’ve completed a demo migration and confirmed everything is accurate, you can gradually enable mandatory fields. Start by requiring fields at key workflow points – like before escalation, closing a ticket, or changing its status. This phased approach gives agents time to adjust to the new system without disrupting their work.
Conclusion
Mapping isn’t just about moving data from one place to another – it’s about building a streamlined, functional data model that works better for your team. The key to success lies in the preparation: taking the time to audit your current setup, clean up messy data, and design a target model that aligns with how your team operates. This groundwork can make the difference between a smooth transition and a chaotic, error-filled experience.
Instead of copying everything as-is, focus on organizing and refining your data. For example, convert tags into structured fields, adjust statuses to match your SLA policies, and eliminate duplicate custom fields that could cause confusion later. Run a demo migration to catch potential issues early, and be sure to disable automations and required fields during the transfer to avoid import errors. Take your time with validation – rushing through it could compromise the integrity of your workflows.
Once the demo migration is complete, verify every detail to ensure accuracy. Double-check ticket counts, attachments, custom fields, and automation settings. Update any internal links in your knowledge base, re-enable business rules gradually, and test workflows with sample tickets before fully transitioning. The real success of your migration isn’t about speed – it’s about ensuring your agents can hit the ground running and your reports remain reliable from day one.
FAQs
How can I ensure tags and fields are accurately mapped during a help desk migration?
To make sure your tags and fields are correctly mapped during migration, start by creating a detailed inventory of all your current custom fields, tags, and statuses. Take note of their purpose, how often they’re used, and how they fit into your workflows and reporting. This step helps identify duplicates, unused elements, or anything that might need restructuring or removal.
The next step is designing a clear and scalable data model for your target system. Use structured fields for key data points that require consistent reporting, and establish straightforward naming conventions. Clean up any messy data, merge duplicate tags or fields, and decide which tags should be converted into fields, kept as is, or archived. The goal is to retain only what enhances workflows and reporting efficiency.
Before going live, validate your mapping thoroughly. Test with actual tickets to ensure key data points align correctly, confirm tag distributions, and verify that statuses and workflows operate as expected. This approach reduces errors, keeps reporting accurate, and ensures smooth operations for your team.
How can I avoid SLA disruptions when mapping ticket statuses during migration?
To prevent SLA disruptions, begin by setting well-defined status transition rules that match your ticket lifecycle. Carefully review and adjust all automations, triggers, and SLA policies to align with the updated status definitions. Make sure SLA timers pause and resume correctly during status changes, considering any custom workflows you have in place.
Before rolling out the changes, test your updated statuses using real tickets, including edge cases. This helps identify potential issues early and ensures smooth SLA functionality once the migration is live.
How should I handle custom fields that were inconsistently used in my old help desk system?
To tackle inconsistently used custom fields, start by conducting a thorough review of all existing fields. Look for issues like duplicate entries, fields that are rarely used, or data that’s poorly organized. This initial cleanup step is crucial to prevent unnecessary clutter from being transferred into your new system.
Once you’ve cleaned up, focus on standardizing the data. For example, if a field like "Product" contains inconsistent free-text entries, group similar values together and convert them into a structured format, such as dropdown menus. For fields with unreliable or minimal data, it might be better to archive them and introduce new, well-organized fields that better suit your workflows and reporting requirements.
Lastly, test your mapping decisions with sample tickets to ensure everything works smoothly. This step ensures that critical data remains intact and workflows continue to function properly, helping you avoid broken automations or gaps in reporting after the migration.