


Support teams often struggle with overlooked troubleshooting steps, delaying resolutions and frustrating customers. AI can help by analyzing case data, identifying gaps based on workflows, and ensuring no critical steps are skipped. Here’s the process in four steps:
- Create a structured troubleshooting blueprint: Update workflows, use templates, and organize by product or issue type.
- Train AI to detect gaps: Connect AI to case data, write precise prompts, and automate flagging of missing steps.
- Automate workflows: Use triggers to flag and route cases, ensuring flagged issues get appropriate attention.
- Monitor and improve: Pilot the system, gather feedback, and refine blueprints and prompts for accuracy.
This approach reduces delays, improves resolution quality, and enhances customer satisfaction. AI doesn’t just speed up workflows – it ensures problems are addressed thoroughly and efficiently.
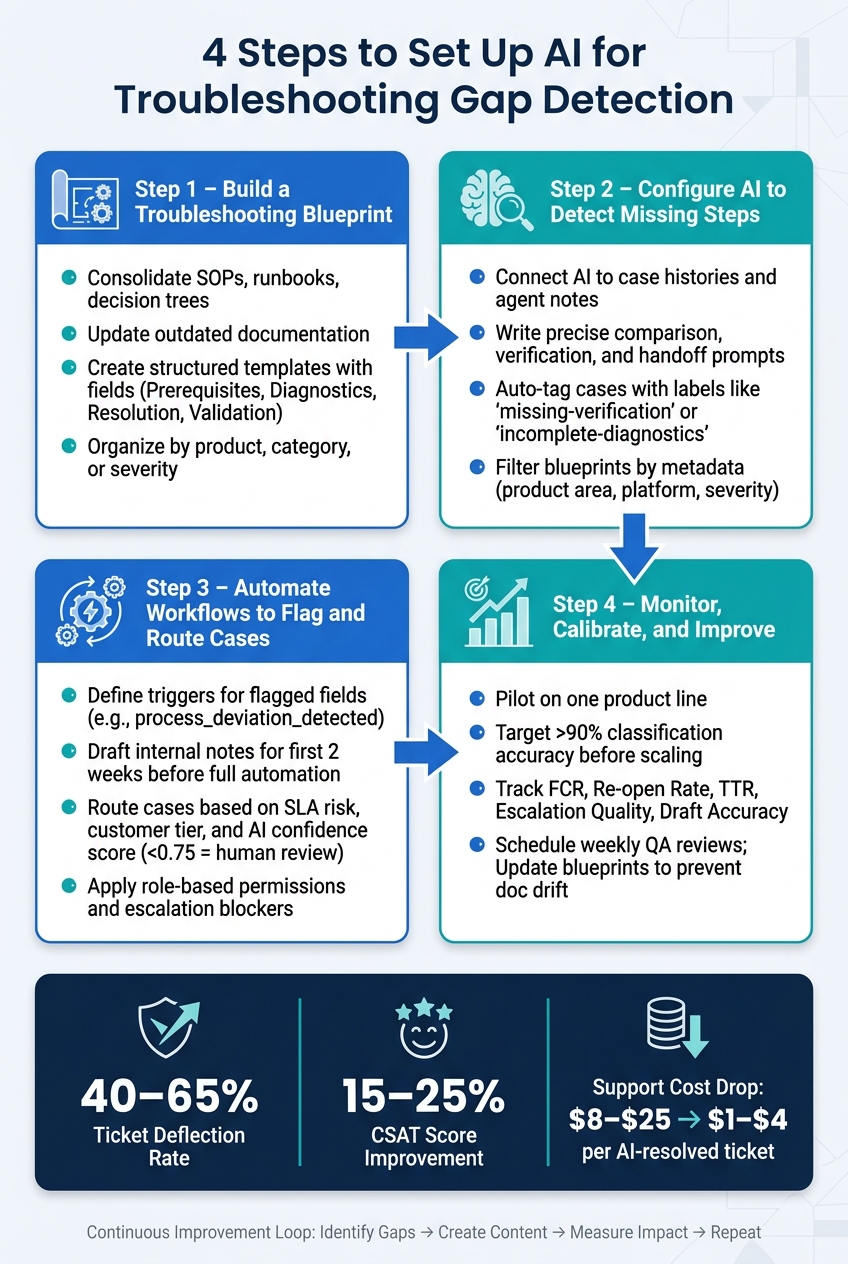
4-Step AI Troubleshooting Gap Detection Setup
Step 1: Build a Troubleshooting Blueprint for AI to Reference
For AI to function effectively in troubleshooting, it needs a structured and clear blueprint that outlines the correct steps for handling different types of issues. Without this foundation, the AI lacks a reliable baseline for comparison.
Gather and Review Your Existing Workflows and Documentation
Start by consolidating all the resources your team relies on – this includes SOPs, runbooks, decision trees, and knowledge base articles. Don’t stop there. Gather informal insights like engineering notes, Slack discussions, and Notion pages to ensure you capture the real-world practices agents use daily. [1]
Once you’ve gathered everything, review and update it. As Thomas Hils points out:
"AI tools don’t know what’s dead code unless you tell them, and mature codebases have piles of it lying around." [1]
This same principle applies to your knowledge base. Outdated references don’t just confuse human agents – they can mislead AI during gap detection. Make sure every resource reflects the current product behavior to avoid introducing errors.
Create Checklists and Templates for Each Issue Type
AI struggles with unstructured data like free-text notes. To make information AI-friendly, create templates with clearly defined fields that leave no room for ambiguity. [2]
| Checklist Component | Purpose for AI Reference | Example Fields |
|---|---|---|
| Prerequisites | Ensures the environment is prepared for testing | software_version, user_permissions |
| Diagnostics | Provides data for identifying gaps | steps_to_reproduce, error_logs_attached |
| Resolution | Confirms the fix aligns with known solutions | resolution_code, kb_article_linked |
| Validation | Verifies the issue is resolved | customer_confirmation, expected_vs_actual |
Mark Sherwood, a CX Strategist, explains it well: "QA becomes a dataset, not just a checklist." [2] This mindset shift is critical. You’re building a structured dataset for AI to analyze, not just a task list for agents. To maintain accuracy, configure AI to pre-fill these templates using case history, but require agents to confirm the data before submission. [2]
Organize Blueprints by Product, Category, or Severity
Once your blueprints are ready, their organization becomes just as important as their content. AI is most effective when dealing with specific problems enriched with detailed context. [1] Group your blueprints by product line, issue category, or severity level to ensure the AI focuses on the most relevant logic. This also helps prevent the AI from referencing outdated or irrelevant paths.
Each blueprint should include a brief context file highlighting known challenges, such as ambiguous service names, legacy database structures, or variations in conditional logic. [1] Clearly define the expected happy path for each scenario so the AI has a solid baseline when comparing agent notes and case logs. Platforms like Supportbench allow you to store and tag these blueprints by product, tier, or customer segment, making it easy to route the right reference to the right case type automatically.
With this robust foundation in place, you can move on to configuring AI to identify missing steps based on these blueprints.
sbb-itb-e60d259
Step 2: Configure AI to Detect Missing Steps
To ensure your AI can spot gaps in troubleshooting processes, it needs access to case data and clear instructions. Here’s how to set it up for success.
Enable AI to Read Case Histories and Agent Notes
Start by connecting the AI to all relevant case data: conversations, agent notes, activity logs, and knowledge base (KB) articles. For example, in Supportbench, the AI Agent Copilot can review past interactions and internal KB content. This allows the AI to understand the steps already taken and compare them against your troubleshooting blueprint to identify any missing actions.
Blueprints should follow a consistent structure with headings like Symptoms, Steps, Verification, and Escalation Criteria to help the AI map case details accurately. If headings are inconsistent, the AI may struggle to align case data with blueprint sections, reducing its effectiveness [3].
Once the AI has access to the data, the next step is to craft prompts that guide it in identifying discrepancies.
Write AI Prompts That Spot Gaps in Case Data
The accuracy of gap detection depends on how well you design your prompts. Vague instructions will yield vague results, so it’s critical to be precise. Direct the AI to compare case details with specific blueprint sections and flag any missing elements.
Here are some effective prompt patterns:
- Comparison prompts: Instruct the AI to check if agent notes align with the steps outlined in the runbook. For example: "Review the agent notes and identify any steps from the [Issue Type] runbook that are missing or undocumented."
- Verification prompts: Ask the AI to confirm whether validation steps – like customer confirmations or expected vs. actual outcome checks – have been completed. Flag cases where these are missing.
- Handoff prompts: Ensure escalation details are complete by checking for key elements like a summary of the issue, steps already tried, environment details, evidence (e.g., KB links), and open questions [3]. Missing elements should trigger a flag for review.
"AI agent assist can… flag missing steps, such as an omitted log check." – Droven.io [3]
Tailor prompts based on the issue type. For example, technical cases might require prompts to verify log checks or database state reviews, while billing issues might focus on identity verification and approval steps. This customization ensures the AI remains relevant and reduces false alarms [3].
To further improve accuracy, include a verification habit in your prompts. Direct the AI to reference specific blueprint sections or KB articles when flagging gaps [1]. This minimizes the risk of outdated or irrelevant flags.
Connect AI Prompts to Supportbench Features
Once you’ve written your prompts, integrate them into your platform for automated execution. Supportbench’s AI Automation feature lets you set rules based on case conditions – like issue type, product tag, or severity level. When these conditions are met, the AI analyzes the case, suggests actions, or flags it for QA review.
For example, prompts can compare case actions to blueprint steps and auto-tag cases with labels like missing-verification or incomplete-diagnostics. These tags act as filterable data points, making it easier for QA teams to generate reports and identify recurring issues by agent or case type [4].
If the AI encounters low confidence in its retrieval, it logs the gap instead of issuing a definitive flag [4]. This approach avoids overwhelming agents with unnecessary alerts while maintaining accuracy.
"Every time a customer asks a question that the AI agent can’t find a confident answer for in your documentation, that question gets logged as a gap – a specific, searchable record of missing coverage." – ChatRAG [4]
Finally, refine your blueprints with metadata filters – like product area, platform, and severity – to ensure the AI references only the relevant troubleshooting paths. For instance, billing issues shouldn’t trigger log check prompts, and network connectivity cases shouldn’t surface refund approval steps [3]. This targeted approach keeps the AI focused and efficient.
Step 3: Set Up Automated Workflows to Flag and Route Cases
After AI identifies gaps using your prompts, the next step is to turn those insights into actionable workflows. Without automation, flagged issues can quickly pile up and become overwhelming. This step focuses on converting AI signals into structured, efficient processes.
Define Triggers and Actions for Flagged Cases
Automation starts with defining what happens when a case is flagged. For instance, when AI updates fields like process_deviation_detected or qa_accuracy_score, these changes can trigger specific actions. A flagged case, such as one tagged with process-gap, could automatically generate an internal comment and pre-fill fields like "steps to reproduce" or "expected vs. actual." For urgent cases (e.g., P1 or P2), real-time alerts can be sent directly to communication platforms to ensure immediate attention.
During the first two weeks of implementation, configure workflows to draft internal notes instead of taking automated actions[5]. This allows your team to monitor and verify that triggers are functioning as intended before the system operates independently. These triggers lay the groundwork for routing cases based on their risk level and priority.
Set Up Routing and Notification Rules
With triggers in place, the next step is to establish AI-powered routing and notification rules. Combine AI-generated insights with clear, deterministic rules to ensure consistency. Factors like SLA breach risk, customer tier, and queue load should guide routing decisions[6]. For example, if the AI confidence score drops below 0.75, the system can route the case to a human triager for review[6]. High-risk cases – such as payment disputes, data loss, or security concerns – should be marked as protected to ensure they always receive human oversight[6].
Apply Role-Based Permissions and Escalation Controls
To maintain accountability, implement role-based permissions that clearly define who can act on flagged cases and under what circumstances. This ensures consistency and prevents escalations from bypassing critical checks. One effective measure is an escalation blocker. This requires agents to confirm or edit pre-filled fields before a case is escalated to engineering or higher support tiers. This step helps avoid sending incomplete or unclear cases up the chain[2].
As CX Strategist Mark Sherwood explains:
"The most important detail is enforcement. If you don’t require those fields, agents will skip them even when the AI is helping. Block escalation until they’re filled, let AI pre-fill, have the agent confirm or edit."[2]
To streamline the process further, define clear lifecycle states for cases, such as AI Recommended, Agent Reviewed, Approved, Escalated. This structured approach ensures human oversight is applied where it’s most needed, without slowing down the workflow unnecessarily[6]. By balancing automation with human input, you can create a system that’s both efficient and reliable.
Step 4: Monitor, Calibrate, and Improve AI Gap Detection
Start with a Pilot Before Expanding
Kick things off with a pilot program focused on a single product line or a few high-frequency issue types. Run this in draft mode for at least two weeks or until you’ve reviewed 100 AI-drafted responses that achieve a classification accuracy of over 90% [5]. This approach helps you identify misclassification trends without disrupting your entire workflow. Once the pilot shows consistent results, incorporate agent feedback to fine-tune your system before scaling up.
Refine Your System with Agent and QA Feedback
When agents flag inaccuracies, it’s often a sign that your blueprints or prompts need updating. Schedule weekly review sessions with QA to address these flagged issues, especially false positives, as they can quickly undermine agent trust. As part of this process, maintain a detailed context file that highlights outdated workflows, renamed services, or legacy processes that are no longer relevant. One common pitfall is "doc drift", where your knowledge base lags behind ongoing product updates, leading to AI missteps [1]. Regular updates to blueprints and prompts should directly improve your system’s performance.
Keep an Eye on Key Metrics
Tracking the right metrics is crucial for measuring success. Focus on indicators like FCR (First Contact Resolution), re-open rates, TTR (Time to Resolution), and escalation quality [7]. If your AI is effectively identifying and addressing gaps, you’ll notice FCR increasing and re-open rates dropping within the first 30 to 60 days. Escalation quality is another critical metric – AI handoffs should provide enough context for the next tier to act without needing follow-up questions [1].
Here’s a breakdown of the key metrics to watch:
| Metric | What It Tells You |
|---|---|
| FCR (First Contact Resolution) | Indicates if troubleshooting steps are thorough enough to resolve issues in one interaction |
| Re-open Rate | Shows whether AI-suggested solutions address the root cause rather than just symptoms |
| Time to Resolution (TTR) | Measures whether agents resolve cases faster with AI gap detection in place |
| Escalation Quality | Assesses if AI handoffs provide sufficient context for seamless next-tier resolutions |
| Draft Accuracy | Tracks the percentage of AI flags that don’t require human correction (aim for >90% before full deployment) |
"The goal is a closed loop: identify gaps, create content, measure impact, repeat." – eesel AI [7]
To make monitoring easier, set up automated daily reports that provide a snapshot of AI performance, including auto-resolution rates and SLA compliance [5]. These reports save time and ensure your team stays informed. Regularly update your blueprints and prompts based on these insights to maintain a streamlined, efficient system that continuously improves.
Conclusion: Using AI to Close Troubleshooting Gaps
Refining your support operations with AI isn’t a one-and-done process – it’s an ongoing effort. By following the four steps outlined – building structured blueprints, configuring AI to spot gaps, automating flagging and routing, and refining based on real-world data – you create a system that improves over time.
The real power of this approach lies in its compounding effect. As your AI identifies gaps and your team addresses them, the system becomes sharper and more efficient. As ChatRAG explains:
"Gap detection is what turns [AI] into a living system that gets better the more it’s used." [4]
This continuous improvement drives long-term success. The benefits are clear: faster resolutions today and a system that evolves to handle tomorrow’s challenges more effectively.
The numbers tell the story. Companies using AI-driven support often achieve 40–65% ticket deflection rates and boost CSAT scores by 15–25% [8]. Plus, support costs per ticket can drop from $8–$25 to just $1–$4 for AI-resolved cases [8]. These aren’t small tweaks – they represent structural changes that free up your team to focus on complex, high-priority cases requiring human expertise.
The key to sustaining these gains is consistency. Consistent blueprints, prompts, and review cycles ensure your system stays aligned with your product and customer needs. Assign clear ownership for every playbook, schedule regular reviews, and treat your knowledge base as a dynamic resource, not a static archive. Without this discipline, even the most advanced AI setup can fall out of sync.
Tools like Supportbench’s built-in AI features – case history search, agent copilot, automated QA insights, and knowledge article creation – make it easier to maintain this closed-loop process without needing extra tools or IT support. This keeps your operation efficient and adaptable, ready to meet the demands of a constantly evolving support landscape.
FAQs
What case data does the AI need to reliably spot missing steps?
For the AI to pinpoint gaps in troubleshooting, it requires a well-structured dataset that includes detailed customer interaction records. Start by standardizing historical ticket data – this means normalizing elements like subject lines, body text, and metadata into a consistent format.
Beyond ticket data, provide the AI with access to your knowledge base, internal documentation, and structured fields such as:
- Steps to reproduce the issue
- Expected vs. actual behavior
- Environment details (e.g., software versions, hardware specs)
These inputs allow the AI to analyze and identify where user intents or technical requirements might not have been fully addressed.
How do I reduce false positives when the AI flags “missing” troubleshooting steps?
To reduce false positives, establish a confidence threshold – say, 70% – and direct ambiguous cases to human reviewers. This approach helps refine accuracy as the system evolves. Use precise prompts to ensure the AI sticks strictly to the provided documentation, responding with "I do not know" when uncertain. Additionally, incorporate multiple layers of verification for both factual accuracy and policy compliance. Regularly audit AI-generated flags against human reviews to pinpoint and address any recurring problems.
What metrics should I track to prove AI gap detection is improving support outcomes?
Tracking the impact of AI gap detection on support outcomes means keeping an eye on several crucial metrics. These include ticket deflection rates, which measure how effectively customers find answers without needing agent assistance, and first-contact resolution rates, which show how often issues are resolved in the initial interaction.
Other important metrics are search success rates (indicating how often users find what they’re looking for) and zero-result search volumes (highlighting gaps in available resources). To understand the broader effects on customer experience, it’s also essential to monitor customer satisfaction scores (CSAT) and average resolution time. Together, these metrics paint a clear picture of how well AI is improving support efficiency and quality.