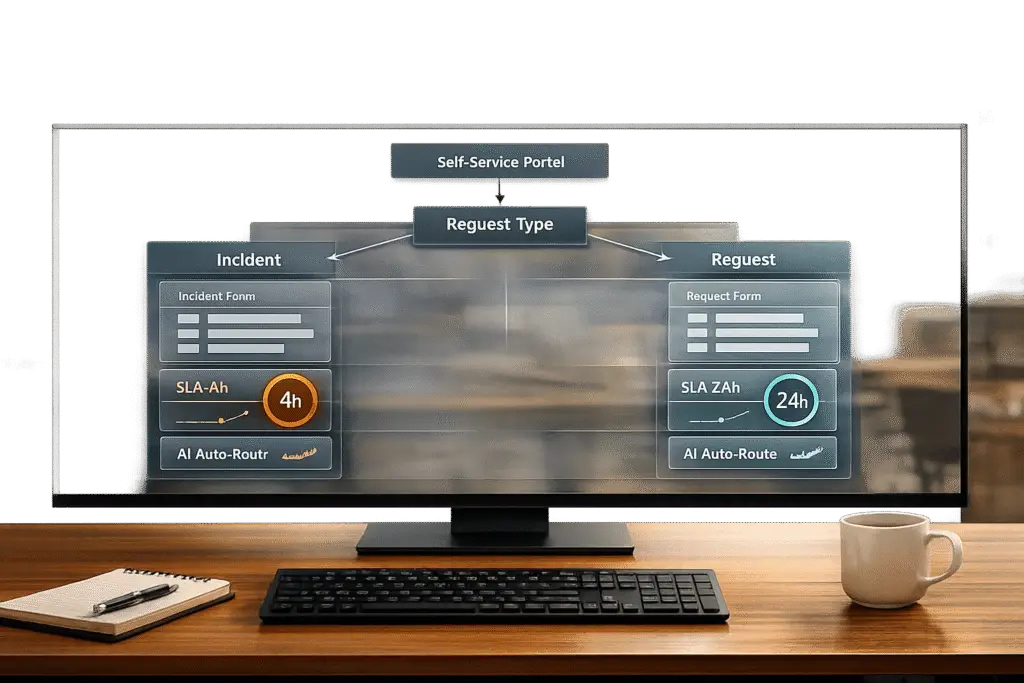
To streamline support operations, a request type model helps classify and route tickets automatically, distinguishing between incidents (unplanned disruptions) and requests (planned needs). This approach saves time, reduces manual effort, and ensures faster resolution by directing tickets to the right team immediately.
Key Takeaways:
- Incidents: Focus on quick fixes for service disruptions (e.g., system outages).
- Requests: Address planned needs like access requests or configuration changes.
- Benefits: Automates ticket routing, improves SLA compliance, and enables AI tools for better classification and prioritization.
- Steps to Implement:
- Define clear ticket categories (e.g., "Report a Problem" vs. "Request Access").
- Use structured forms with conditional logic to collect relevant data.
- Align request types with SLAs and automate escalation workflows.
- Leverage AI for accurate ticket classification and prioritization.
- Create tailored workflows for incidents and requests.
- Enable customer self-service options and real-time updates for customers.
- Measure performance using key metrics like SLA compliance and backlog aging.
By combining automation, AI, and clear workflows, this model ensures efficient operations and better customer experiences.
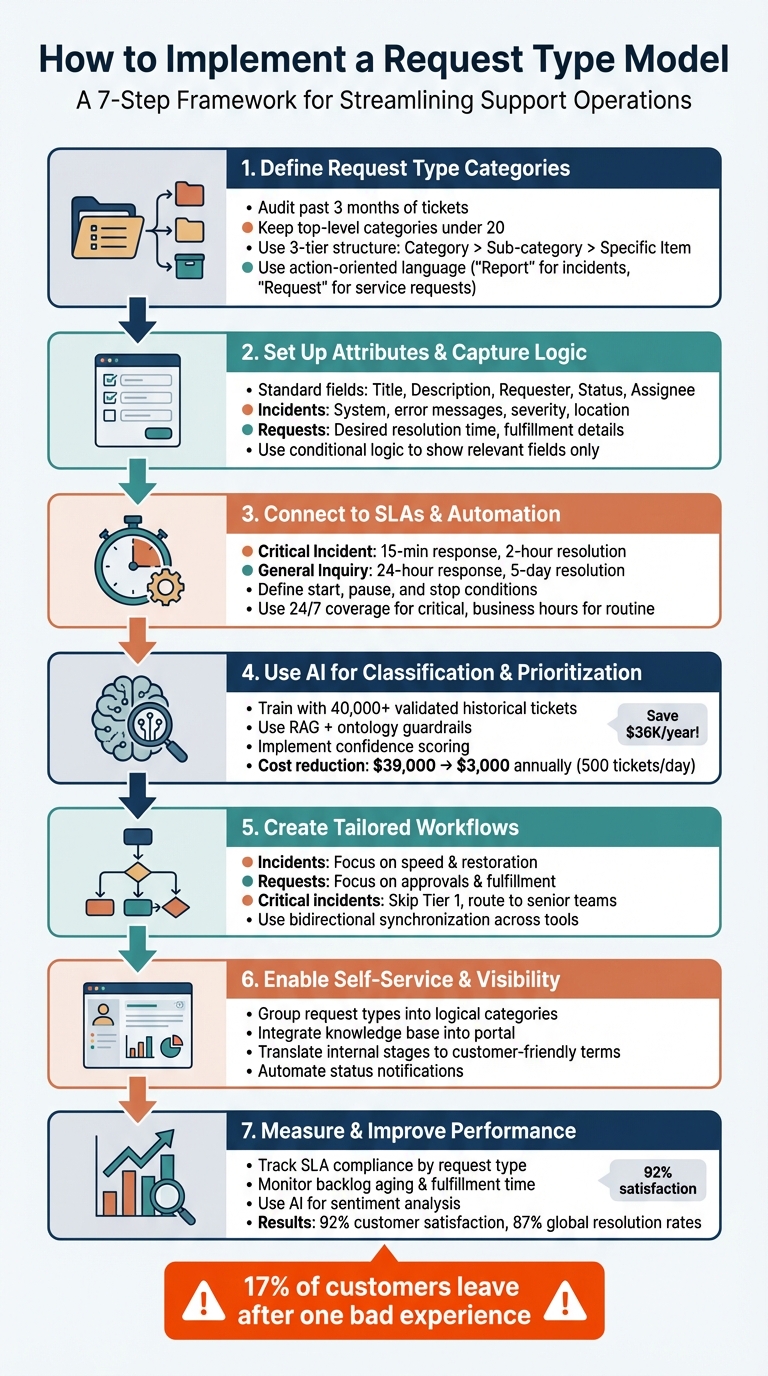
7-Step Process to Implement Request Type Model for Incidents and Requests
Step 1: Define Your Request Type Categories
Start by determining the ticket categories that align with your business needs. The goal is to create a simple, practical system that works.
Begin with an audit of the past three months of tickets – emails, Slack messages, and other support channels. Look for recurring patterns: What are people asking for? How are they phrasing their requests? Taylor Halliday from Ravenna sums it up perfectly:
"The culprit is often hiding in plain sight: your ITIL request types are likely undefined, overly complex, or completely outdated" [1].
Focus on identifying real trends rather than forcing tickets into awkward, mismatched categories. This audit will serve as the foundation for an efficient routing system.
What Makes Incidents and Requests Different
Incidents and requests may seem similar, but they’re handled differently. Incidents require immediate troubleshooting, like fixing a VPN issue. Requests, on the other hand, often involve multiple steps, such as approvals or provisioning. For instance, asking for a new monitor involves budget checks, ordering, and scheduling delivery.
Your customers likely don’t think in these terms, though. Use simple, everyday language for your categories. Instead of technical jargon like "INC-04b-SubCategory-7", opt for something clear and intuitive, such as "Report a Problem" or "Request Access."
How to Build Your Categorization Framework
Keep your top-level categories manageable – fewer than 20 is ideal [3]. Use action-oriented language like "Report" for incidents (e.g., Report a Bug, Report an Outage) and "Request" or "Get" for service requests (e.g., Request New Hardware, Get Access to Software).
Organize your framework into three tiers: Category > Sub-category > Specific Item. For example, under "Hardware", you might have "Laptop", "Monitor", and "Accessories", each with detailed options. This structure keeps things simple for users while still capturing enough detail for effective routing.
Align your categories with your internal team structure. If your engineering team is split into "Mobile" and "Web" groups, reflect this in your support categories. This alignment enables automated routing – a ticket tagged as "Mobile App Bug" can go straight to the mobile team without manual effort [3]. Ensure your knowledge base mirrors these categories so agents can quickly access relevant articles based on ticket type.
Finally, flag "Request for Information" categories for automation. Questions like "Where is the PTO policy?" or "How do I reset my password?" are perfect candidates for AI-driven deflection using knowledge base articles [1]. These types of tickets are usually high in volume but low in complexity, making them ideal for self-service solutions.
Once your categories are set, you’ll be ready to define attributes and capture logic for even smoother operations.
sbb-itb-e60d259
Step 2: Set Up Attributes and Capture Logic
After organizing your categories, the next step is to configure data fields that capture the key details needed for quick triage and resolution.
Required Attributes for Each Request Type
Start by including standard fields that apply to all tickets, such as Title, Description, Requester, Status, and Assignee. These foundational elements ensure consistency across all requests.
For incidents, focus on gathering technical information and understanding severity. Include fields for specifics like the affected system, asset ID, error messages, blockage status, reproduction steps, and location. This helps differentiate between minor glitches and serious outages.
For service requests, prioritize capturing details necessary for fulfillment. For example, include the desired resolution time to align with the delivery windows specified in your service catalog.
Make certain fields mandatory, such as Title and Requester, to ensure that critical metrics – like system-specific reliability – are accurately tracked. For sensitive request types, such as HR or security incidents, configure tickets to be private by default to safeguard confidentiality.
Using Conditional Logic for Data Collection
Conditional logic simplifies forms by showing only the fields relevant to the user’s selection. This reduces confusion and improves the quality of data collected. For instance, if a user selects "Hardware Request", there’s no need to display fields meant for error messages or troubleshooting steps.
Leverage dropdown menus or radio buttons as triggers instead of free-text fields. Orbitforms.ai puts it well:
"Instead of forcing every user through the same rigid questionnaire, your form becomes a dynamic conversation that adapts in real-time."
- Orbitforms.ai
For example, if the priority is marked as high, display an Escalation Reason field. If the request involves hardware, reveal a Device/Asset ID field. Mapping out your decision tree can help you visualize triggers, avoid unnecessary questions, and ensure that all rules work seamlessly.
This structured approach ensures that the data collected flows directly into automated workflows, paving the way for AI-powered ticket routing and prioritization and SLA enforcement. With precise data capture and smart logic, your system is ready for automation and SLA alignment.
Step 3: Connect Request Types to SLAs and Automation
Tie each request type to the correct SLA and enforce it automatically. This removes any guesswork, ensuring that urgent issues get immediate attention while routine requests follow consistent timelines.
Matching Request Types with SLAs
Different request types require specific response and resolution times. For example, a Critical Incident that disrupts production systems might need a 15-minute response and a 2-hour resolution, while a General Inquiry can operate on a 24-hour response and a 5-day resolution. The idea is to align SLA goals with the business impact rather than applying the same rules to all tickets.
Instead of relying on keywords, base SLA assignments on intent. For instance, both a "Production Bug" and a "Checkout Failure" indicate urgent technical problems, even if their descriptions vary. Use structured fields like category, priority, or customer value to automatically assign the right SLA when a ticket is created. For high-value customers – such as those with large contracts or significant gross merchandise volume – set stricter resolution targets to safeguard revenue and reduce churn.
Define start, pause, and stop conditions for your SLA logic, aligning them with workflow statuses. For instance, start the clock when a request is created, pause it while waiting for customer input, and stop it once the ticket reaches "Resolved" or "Closed." Also, connect request types to the appropriate calendars: use 24/7 coverage for critical incidents and business hours for routine service requests. This ensures your team’s availability reflects the urgency of each issue.
Once SLAs are clearly defined, the next step is to use automation to enforce them effectively.
Using Automation to Enforce SLAs
Automation takes SLA enforcement to the next level by ensuring timely escalations and balancing workloads. Manual triage is resource-intensive [2], but automation removes this hurdle by instantly evaluating ticket details and assigning priorities and SLAs.
Leverage AI-powered classification to detect intent and sentiment, automatically boosting priority and reducing response times for frustrated or high-value customers. Set up escalation triggers to monitor SLA deadlines and send alerts – via Slack or Microsoft Teams – if a breach is approaching. You can even reassign tickets to senior agents to prevent delays.
For critical issues like Checkout Failures or Integration Outages, skip Tier 1 support and route tickets directly to senior engineers. This ensures high-impact problems are addressed without delay. Once automation identifies the right team and SLA, use round-robin assignment to distribute workloads evenly and avoid overloading individual agents.
Step 4: Use AI for Classification and Prioritization
AI takes the guesswork out of categorizing and prioritizing requests by analyzing their content and assigning importance based on business impact. This eliminates the inconsistencies that come with manual triage.
AI-Powered Case Classification
AI goes beyond simple keyword matching to classify incoming requests. Instead, it understands intent, which means it can group similar requests even if customers phrase them differently. For example, AI can recognize that "I want my money back" and "reimbursement" mean the same thing [2].
By combining Retrieval Augmented Generation (RAG) and ontology guardrails, AI can perform semantic searches on past cases while keeping its outputs within predefined categories. This approach reduces errors and ensures consistent classifications [5]. RAG pulls relevant historical cases, while ontology guardrails limit the AI’s results to fixed categories like "Product × Issue Type." This setup minimizes the risk of the AI generating irrelevant or incorrect classifications [5].
For teams managing hundreds of tickets daily, manual triage can be a costly bottleneck. AI-driven classification significantly cuts down on these costs [2]. To make the system effective, train the AI with a large dataset – ideally 40,000 validated historical tickets or more – to help it understand context better [5]. Use confidence scoring to flag uncertain cases for human review, and set up threshold filtering to activate AI only when the classification confidence drops below a certain level. This ensures accurate results without wasting resources [5].
Without AI, critical metadata fields in support tickets are often incomplete or incorrect – sometimes accurate less than 50% of the time. A well-trained AI can drastically improve this accuracy [5].
This classification system lays a solid foundation for AI to dynamically prioritize tickets based on business needs.
AI-Based Dynamic Prioritization
AI doesn’t just classify requests – it also prioritizes them by factoring in urgency, business impact, customer history, and even sentiment. This ensures that the most critical cases get attention first [4].
Before deploying AI for prioritization, define clear rules based on business impact. For example, if a high-value customer reports a checkout failure and their message indicates frustration, the AI can automatically assign higher priority to their ticket. It can also detect time-sensitive phrases like "going live tomorrow" to fast-track specific cases [2]. Once priorities are set, they activate corresponding SLA policies, removing delays caused by manual intervention [2].
"Priority quality is queue quality. Teams that use AI to standardize priority levels can reduce confusion, protect SLA performance, and execute support work with far better consistency." – Layer 8 Labs [4]
To keep the system effective, monitor override rates – how often agents manually adjust AI-assigned priorities. High override rates can signal areas where the AI model needs fine-tuning [4]. Regularly review how AI-assigned priorities align with SLA performance to ensure critical cases are being resolved on time [4]. Confidence-based controls can also be applied to automate routing only when the AI is highly confident in its prioritization [4].
Step 5: Create Workflows for Each Request Type
After AI has classified and prioritized your requests, the next step is to establish workflows tailored to each type. Incidents demand speed and investigation, while service requests require structured fulfillment and approvals. By creating distinct workflows, you ensure incidents get immediate attention, while service requests follow the proper approval and delivery processes. Let’s break down how to design workflows for each scenario.
Incident Workflow Design
Incidents are all about restoring services quickly. These are unplanned disruptions that need swift action. Your workflow should prioritize rapid triage, root cause analysis, and restoring functionality as soon as possible [7].
For critical incidents – like system outages or platform failures – skip Tier 1 support entirely. Route these directly to senior technical teams or emergency channels to save time [2]. Seconds matter in these situations, so bypassing manual escalation ensures faster resolutions. Set clear resolution targets based on the severity of the impact:
- Critical incidents: Resolved within minutes
- High-priority incidents: 1–2 hours
- Medium-priority incidents: Same day
- Low-priority incidents: Within 24–48 hours [7]
To handle high-pressure situations effectively, create escalation playbooks. These playbooks should outline step-by-step instructions for handling critical cases, including who is responsible and the required response times. This removes guesswork during chaotic moments [7].
Manual triage takes about 45 seconds per ticket. For a team processing 500 tickets daily, that adds up to over 6 hours of manual work every day [2]. Automating incident routing eliminates this bottleneck, saving time and reducing errors.
Request Workflow Design
Unlike incidents, service requests focus on structured fulfillment. These are planned needs, such as granting access, delivering information, or implementing standard changes. The workflow here should emphasize approvals, clear handoffs, and smooth delivery [7].
Handoffs between teams are a common point of failure. For example, when a ticket moves from your service desk to Jira, critical information can get lost if the systems don’t align [6]. To prevent this, implement a "Handoff Specification" that defines the necessary fields, attachments, and history that must be transferred between teams [6].
If the majority of requests are routinely approved by a manager, consider replacing manual approval gates with automated notifications and audit logs. This reduces unnecessary delays while maintaining accountability [6].
For workflows that span multiple tools, use bidirectional synchronization. This ensures that statuses and comments update automatically across systems, preventing information silos where one team is unaware of another’s progress [6]. If tickets fail due to missing fields, trace the issue back to the handoff and add custom fields in the receiving system to address the gap [6].
"The vulnerability isn’t the boundary itself. It’s what happens to information that doesn’t fit the receiving system’s data model." – Richie Aharonian, Head of Customer Experience & Revenue Operations, Unito [6]
Step 6: Enable Self-Service and Visibility
Once your workflows are running efficiently, the next step is to empower customers with a self-service portal. This not only cuts down on ticket volume but also speeds up resolution times and keeps things transparent. By building on the structured forms and automated workflows you’ve already implemented, your portal can provide seamless self-service and real-time updates.
Setting Up a Self-Service Portal
Make it easy for customers to find what they need by grouping request types into logical categories like "Login Issues", "Hardware Requests", or "Common Requests." This organization helps users navigate quickly without having to scroll endlessly through options.
Take advantage of AI-powered intent detection to categorize requests accurately, even when customers describe their issues in different ways. Use structured submission forms with fields for details like intent, subcategory, and urgency. This ensures requests are routed precisely and assigned to the right team immediately. For example, a team managing 500 tickets daily could see annual routing costs drop from $39,000 (manual triage) to just $3,000 by automating classification [2].
Integrate your knowledge base directly into the portal form. As users type, suggest relevant articles to help them resolve their issues independently. Additionally, use the portal to display alerts for major incidents or scheduled maintenance, keeping customers informed about potential disruptions.
"Ticket classification only matters if it becomes the foundation for routing decisions. If it doesn’t drive assignment, priority, and escalation automatically, it’s just structured reporting." – Mark Sherwood, CX Strategist, SherwoodCX [2]
Once the portal is set up, focus on giving customers visibility into their requests with real-time updates.
Providing Real-Time Updates
Real-time updates enhance trust by keeping customers in the loop without them needing to reach out for status checks. Create a dedicated view in the portal where users can see all their active and past requests, complete with current statuses and assignments.
Translate internal workflow stages into customer-friendly terms. For example, instead of showing backend labels like "Awaiting L2 Review", use clear updates such as "In Progress", "Pending Approval", or "Resolved." Add visual elements like color codes and icons to make it easier for users to scan and understand the status of their requests.
Show workflow transitions alongside the current status to reduce unnecessary follow-ups. For instance, if a request is waiting for approval, display the approver’s details and the approval status so customers know exactly what’s happening.
Automate notifications to alert users when comments are added or statuses change. These updates can be sent via email or displayed as alerts in the portal, ensuring stakeholders stay informed without constant manual effort.
Finally, include a CSAT (Customer Satisfaction) survey in the portal. This allows you to gather immediate feedback and gain insights into how well your request-handling process is working.
Step 7: Measure and Improve Performance
Once your request type model is in action, it’s time to dive into the data. Tracking the right metrics is critical to spotting bottlenecks and fine-tuning workflows. Without clear insights, streamlining your support operations becomes a guessing game.
Key Metrics for Request Types
Breaking down performance data by request type can reveal which areas are running smoothly and which need extra attention. Start by monitoring request fulfillment time and backlog aging – these will help you identify delays and pinpoint requests that are stuck or overlooked. Keep an eye on SLA compliance by request type to ensure your team is meeting service commitments. If you notice high reopen rates, it could mean fulfillment steps are incomplete or communication isn’t clear enough. Use this data to adjust agent training or tweak workflow processes [10].
Tracking request volume by category is another game-changer. It helps you plan capacity better and identify areas where documentation could improve. Although 85% of organizations have adopted Service Request Management, 61% admit there’s still room for improvement [10]. This highlights the ongoing opportunity to refine processes.
Using AI-Powered Analytics
Once you’ve identified the key metrics, AI can take your analysis up a notch. AI-powered tools can proactively flag tickets that might breach SLAs by analyzing past trends [10]. Sentiment analysis is another powerful tool – it picks up on negative emotional tones in messages, helping you spot potential churn risks that simple keyword searches might miss [2]. For example, a global camping company using IBM‘s cognitive AI tools reported a 33% boost in agent efficiency, with average wait times dropping to just 33 seconds. They also achieved a 40% increase in customer engagement across all platforms by using AI to ensure consistent, round-the-clock support [9].
AI doesn’t just stop there. It can highlight knowledge gaps by analyzing recurring customer questions that aren’t covered in your existing documentation. This insight helps you know exactly where to add new articles or create automated runbooks [1]. To measure the effectiveness of your self-service tools, track AI deflection rates – this shows how well your resources are handling common issues. A smart strategy is to start with high-volume, low-complexity tasks like password resets or FAQs. These quick wins can deliver measurable ROI and pave the way for tackling more complex workflows [8].
"AI is reshaping customer service into a strategic advantage… shifting it from a cost center into a proactive customer engagement strategy." – IBM Think [9]
Conclusion: Building Better Support Operations
A unified request model can turn customer support into a strategic advantage by improving both efficiency and cost management. With proper categorization of inquiries, straightforward issues can be automated or handled by frontline agents, while more complex problems are directed to specialists. This approach not only streamlines operations but also helps reduce the cost per interaction.
The benefits of such a system are clear and measurable. Studies show that unified models achieve 92% customer satisfaction and 87% global resolution rates, while also reducing agent headcount by 1% [12]. On the flip side, 17% of customers will leave after a single bad experience [12]. These numbers highlight why relying on outdated, fragmented systems is simply too risky.
A unified model also brings all customer data together across channels, which means no more repeated explanations during escalations. It saves agents from wasting time searching for scattered information and enhances the overall customer experience [11][12]. When paired with AI-powered tools for classification and prioritization, this model supports a proactive approach to customer service. The result? Better performance now and a solid foundation for future growth.
"Underestimate the importance of self service customer support at your peril… Customers want to be able to find the answers for themselves, and if they can’t, they want to speak to agents with real knowledge and expertise." – ModSquad [12]
To maintain momentum, keep refining your system using real-time data. Track key performance indicators weekly, adjust categorization rules based on actual ticket trends, and strike the right balance between AI automation and human oversight for high-value cases [7]. Start with high-volume, simple tasks to quickly demonstrate ROI, then expand as your team becomes more skilled and confident.
FAQs
How do I choose the right request type categories?
To figure out the right request type categories, the first step is separating incidents (unexpected interruptions) from requests (planned service needs). Frameworks like ITIL can help guide this process. You can also use AI tools to automate classification, ensuring consistency across the board. Structuring categories in a logical way not only makes things clearer but also speeds up triage and resolution times. When done right, categorization minimizes confusion and keeps workflows running smoothly for both support teams and customers.
What fields should I require for incidents vs. requests?
When dealing with incidents, it’s essential to gather specific details that aid troubleshooting and help evaluate the impact. These fields should include:
- Issue description: A clear outline of the problem.
- Severity or impact level: How critical the issue is and its effect on operations.
- Affected system/service: Identifying what’s impacted.
- Priority: The urgency of addressing the issue.
- Contact information: Who to reach for more details or updates.
For requests, the focus shifts to service-specific details that streamline the process. Key fields to include are:
- Request description: A concise explanation of what’s needed.
- Desired completion date: When the requester hopes to have it fulfilled.
- Request category: Classifying the type of request for proper routing.
- Approval details: Information on who needs to approve the request.
By customizing the required fields for incidents and requests, teams can handle triage and resolution more effectively.
How can I roll this out without disrupting current workflows?
To introduce a new "request type" model effectively, it’s smart to take things step by step. Begin by tweaking current workflows incrementally. This allows you to test changes in a controlled way without overwhelming the system. Leverage AI tools to handle categorization and routing, which can cut down on manual work significantly.
Start with a pilot program involving a small team. Collect their feedback, refine the process, and make adjustments where necessary. Ensure you have clear communication throughout the rollout, provide thorough training for everyone involved, and have a fallback plan ready to address any hiccups. This approach helps keep disruptions to a minimum and makes the transition much smoother.